
Related Manuals for kruss MSL4000 Series


Summary of Contents for kruss MSL4000 Series
- Page 1 Stereomikroskope MSL4000-Serie Betriebsanleitung KSW4000-Serie Stereo Microscopes MSL4000 Series Operating Manual KSW4000 Series www.kruess.com...
-
Page 2: Table Of Contents
Inhalt Inhalt MSL4000-Serie Einleitung und Geräteübersicht 1. Beschreibung 2. Auspacken und Aufbau 3. Auflagenplatte 4. Fokussiereinrichtung 5. Augenabstands- und Dioptrieneinstellung 6. Beleuchtung 7. Vergrößerungswechsel 8. Technische Daten KSW4000-Serie Einleitung und Geräteübersicht 1. Beschreibung 2. Aufbau senkrecht 3. Bedienung 4. Aufbau waagerecht 5. - Page 3 Index Index MSL4000 Series Introduction and equipment summary 1. Description 2. Unpacking and assembly 3. Supporting plate 4. Focusing 5. Adjustment of eye distance and diopter 6. Illumination 7. Change of magnification 8. Technical data KSW4000 Series Introduction and equipment summary 1.
-
Page 5: Msl4000-Serie
MSL4000-Serie | Einleitung Die MSL4000 Serie Wir beglückwünschen Sie zu dem Kauf Ihres neuen KRÜSS-Mikroskops! Sie haben sich damit für ein Gerät bester optischer und mechanischer Qualität ent- schieden. Der hohe Bedienungskomfort und die lange Lebensdauer unserer Mikroskope garantieren Ihnen ein sicheres und problemloses Mikroskopieren. Bitte beachten Sie die Hinweise auf Seite 19 im Kapitel Wartung. -
Page 6: Beschreibung
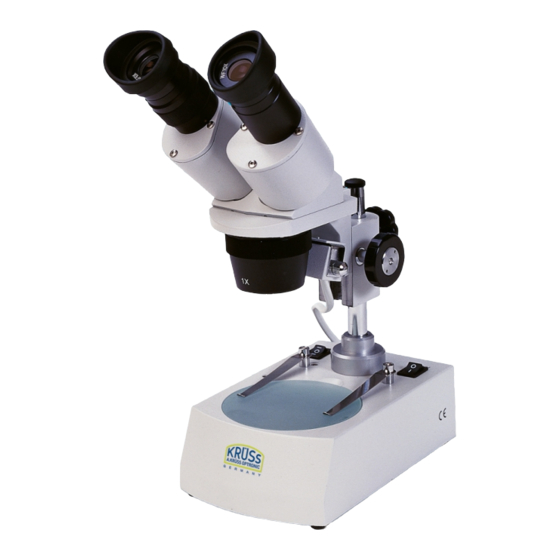
MSL4000-Serie | 1. Beschreibung 1. Beschreibung MSL4000 Okularpaar Dioptrienausgleich Okularkopf Stativstange Feststellschraube Kopf Fokussiereinstellung Revolverobjektiv Auflichtbeleuchtung 3-Stufen-Lichtschalter Hauptschalter Präparatklammern Abdeckscheibe... -
Page 7: Auspacken Und Aufbau
MSL4000-Serie | 2. Auspacken und Aufbau / 3. Auflagenplatte / 4. Fokussiereinrichtung 2. Auspacken und Aufbau Der Styroporbehälter enthält nachstehende Teile: • Mikroskopstativ mit Mikroskopkopf • Okularpaar und am Mikroskopkopf befestigte Objektive • Schwarz/weiße Kontrastplatte als Stativunterlage (nur bei Modellen ohne Schwenkarm) • Klare Glasplatte (nur bei Modellen mit Durchlicht und ohne Schwenkarm) • Vinyl-Abdeckhaube • Bedienungsanleitung Nehmen Sie das Mikroskop aus dem Styroporbehälter. -
Page 8: Augenabstands- Und Dioptrieneinstellung
MSL4000-Serie | 5. Augenabstands- und Dioptrieneinstellung / 6. Beleuchtung 5. Augenabstands- und Dioptrieneinstellung • Fassen Sie beide Okulare an und bewegen Sie sie soweit zusammen oder auseinander, bis sie Ihrem Augenabstand entsprechen, und Sie durch das Mikroskop ein Beobachtungsfeld sehen können. Manchmal gibt es beim Beobachter kleine dioptrische Unterschiede der Augen, die zum ermüdungsfreien Arbeiten ausgeglichen werden müssen. -
Page 9: Vergrößerungswechsel
MSL4000-Serie | 7. Vergrößerungswechsel / 8. Technische Daten 7. Vergrößerungswechsel Die Mikroskope der MSL4000-Serie sind mit einem Revolverobjektiv für zwei Ver- größerungen ausgerüstet. Die Vergrößerung wird durch Drehen des Objektivgehäuses um 180° umgeschaltet, dann wird die jeweilige Vergrößerung angezeigt. Die Scharfein- stellung der Abbildung sollte erst bei einer kleinen Vergrößerung durchgeführt werden, um dann auf die höhere Vergrößerung umzuschalten. -
Page 11: Ksw4000-Serie
KSW4000-Serie | Einleitung Die KSW4000-Serie Wir beglückwünschen Sie zu dem Kauf Ihres neuen KRÜSS-Mikroskops! Sie haben sich damit für ein Gerät bester optischer und mechanischer Qualität ent- schieden. Der hohe Bedienungskomfort und die lange Lebensdauer unserer Mikroskope garantieren Ihnen ein sicheres und problemloses Mikroskopieren. Bitte beachten Sie die Hinweise auf Seite 19 im Kapitel Wartung. -
Page 12: Beschreibung
KSW4000-Serie | 1. Beschreibung 1. Beschreibung KSW4000 Okularpaar mit Augenmuscheln Dioptrienausgleich Stativstange Okularkopf Feststellschraube Kopf Fokussiereinstellung Revolverobjektiv Hauptschalter Präparatklammern Auflageplatte Ventilator 3-Stufen Lichtschalter Netzanschlussbuchse... -
Page 13: Aufbau Senkrecht
KSW4000-Serie | 2. Aufbau senkrecht 2. Aufbau senkrecht • Befestigen Sie die Augenmuscheln auf den Okularen. • Legen Sie die weiße Platte für farbige, die schwarze Platte für weiße Materialien ein. • Legen Sie für die Edelsteinuntersuchung im Dunkelfeld den Dunkelfeldkondesator ein. • Stecken Sie die Steinzange in die Buchse. Die KSW4000-Serie ist mit 2 Buchsen ausgestattet um links- wie rechtshändigen Gebrauch gleichermaßen zu ermöglichen. -
Page 14: Bedienung
KSW4000-Serie | 3. Bedienung • Für Auflicht stecken Sie den Lichtleiter in die Lampen- halterung auf der Rückseite. • Stecken Sie den Stecker in die Netzanschlussbuchse und den Transformator in die 220 V Steckdose. 3. Bedienung • Legen Sie das Untersuchungsmaterial auf die Auf- lageplatte und beleuchten sie es gegebenenfalls. • Schauen Sie durch das Okular. • Lösen Sie die Feststellschraube des Kopfes und bewe- gen Sie den Kopf auf und ab, bis ein klares Bild erscheint. -
Page 15: Aufbau Waagerecht
KSW4000-Serie | 4. Aufbau waagerecht • Die Vergrößerung wird durch Drehen des Objektiv- gehäuses um 180° umgeschaltet. Die jeweilige Ver- größerung wird angezeigt. Die Scharfeinstellung bei der kleinen Vergrößerung vornehmen. Dann auf die höhere Vergrößerung umschalten. 4. Aufbau waagerecht • Stecken Sie die Stativstange in den Klotz waagerecht hinein. Fixieren Sie sie mit der seitlichen Schraube. • Stecken sie den Küvettentisch senkrecht in die hintere Aufnahme des Klotzes. - Page 16 KSW4000-Serie | 4. Aufbau waagerecht • Stecken Sie die Steinzange in die Buchse am Küvettentisch stecken. • Stellen Sie die Küvette auf den Tisch. • Stecken Sie den Stecker in die Netzanschluss- buchse und den Transformator in die 220 V Steck- dose.
-
Page 17: Lampenwechsel
KSW4000-Serie | 5. Lampenwechsel 5. Lampenwechsel wichtiger Hinweis! Vor jedem Lampenwechsel den Netzstecker ziehen. wichtiger Hinweis! Fassen Sie die Lampe mit einem weichen Tuch an. Fingerabdrücke auf dem Glaskolben beeinträchtigen die Lichtleistung und verringern die Lebensdauer. Durchlicht • Entfernen Sie die Auflageplatte • Entfernen Sie die defekte Lampe aus der Fassung • Stecken Sie die neue Lampe in die Fassung • Legen Sie die Auflageplatte ein Auflicht (Kaltlichtquelle) • Lösen Sie die zwei Schrauben. -
Page 18: Technische Daten
KSW4000-Serie | 6. Technische Daten 6. Technische Daten Allgemein • Regulierbarer Augenabstand • 45° Schrägeinblick • Metallstativ Optische Ausstattung • Okulare: 10x Weitfeld 20x Weitfeld (optional erhältlich) • Objektive: 1x und 3x Beleuchtung • KSW4000: 6 V LED Auf- und Durchlicht KSW4000-K und -K-W: 12 V 20 W Durchlicht 12 V 20 W Kaltlichtquelle Stromversorgung • univ. Netztransformator 90 - 240 V, 50 Hz KSW4000 Ausgang: 6 V DC... -
Page 19: Wartung
Wartung | Rückgewinnung und Recycling Wartung Ihr Mikroskop sollte, wie alle Präzisionsgeräte, sorgfältig behandelt werden. Schützen Sie das Mikroskop vor Staub, Niederschlag, Vibration und vor direkter Sonneneinstrahlung. Halten Sie die Optik extrem sauber. Staub kann mit einem weichen Pinsel oder sauberer Luft entfernt werden, Fingerabdrücke mit einem fusselfreiem Tuch, welches in einer Mischung von Äther und Alkohol (80% Äther und 20% Alkohol) getränkt ist. -
Page 20: Garantiebestimmungen
Garantiebestimmungen Garantiebestimmungen A.KRÜSS Optronic übernimmt die Garantie für Material und Herstellung der Mikrosko- pe für einen Zeitraum von 24 Monaten, gerechnet ab Datum des Versands. Während dieser Garantiezeit wird A.KRÜSS Optronic Mängel durch Reparatur oder Austausch beheben, wenn diese unter den Garantieanspruch fallen. Für Garantiereparaturen oder Service muss das Gerät an A.KRÜSS Optronic zurück- gesandt werden. -
Page 21: Garantieverlängerung
Garantieverlängerung Ihre Meinung interessiert uns! Wir gewähren Ihnen 1 Jahr Garantieverlängerung bei Rücksendung des vollständig ausgefüllten Fragebogens! Firma Ansprechpartner Email Anschrift Seriennummer Wurde der Liefertermin eingehalten? nein War die Inbetriebnahme problemlos? nein Sie sind bereits Kunde Neukunde Sie sind Händler Endkunde Universität/Institut Woher kennen Sie uns? Empfehlung... - Page 23 Index Index MSL4000 Series Introduction and equipment summary 1. Description 2. Unpacking and assembly 3. Supporting plate 4. Focusing 5. Adjustment of eye distance and diopter 6. Illumination 7. Change of magnification 8. Technical data KSW4000 Series Introduction and equipment summary 1.
- Page 25 A.KRÜSS does not accept any liability for the improper use of the microscope. The MSL4000 Series includes the following microscopes: MSL4000-10/30-IL-TL Magnification: 10x and 30x Illumination:...
-
Page 26: Msl4000 Series
MSL4000 Series | 1. Description 1. Description MSL4000 Eye pieces Diopter adjustment Ocular head Pillar Locking screw head Focus adjustment Turret lens Incident light illumination 3-levels illuminant switch Main switch Clips for sample Cover plate... -
Page 27: Unpacking And Assembly
MSL4000 Series | 2. Unpacking and assembly / 3. Supporting plate / 4. Focusing 2. Unpacking and assembly The Styrofoam case contains the following parts: • Microscope stand with microscope head • Eye pieces and lenses attached to the microscope head • B/W contrast plate as stand base (only for models without swivel arm) • Transparent glass plate (only for models with transmitted light and without swivelling arm) • Vinyl protecting cap... -
Page 28: Adjustment Of Eye Distance And Diopter
MSL4000 Series | 5. Adjustment of eye distance and diopter / 6. Illumination 5. Adjustment of eye distance and diopter • Move both eyepieces until they match your eye distance and until you can see an observation field through the microscope. The observer might have small diopter differences of the eyes which have to be compensated in order to avoid eye fatigue. -
Page 29: Change Of Magnification
MSL4000 Series | 7. Change of magnification / 8. Technical data 7. Change of magnification The microscopes of the MSL4000 series have been fitted with a turret lens to select two magnifications. The magnification is changed by rotating the lens housing by 180°. The respective magnification is then displayed. -
Page 31: Introduction And Equipment Summary
KSW4000 Series | Introduction The KSW4000 Series Congratulations on your purchase of a new KRÜSS microscope! You now own a device of the highest optical as well as mechanical quality. The excellent operating convenience of our microscopes will guarantee many years of reliable and trouble-free operation. Please follow the instructions on page 19 in chapter Maintenance. -
Page 32: Description
KSW4000 Series | 1. Description 1. Description KSW4000 Eyepieces including cup Diopter adjustment Pillar Ocular head Locking screw head Focus adjustment Turret lens Main switch Clips for sample Supporting plate Ventilator 3 level light switch Power socket... -
Page 33: Assembly Vertical
KSW4000 Series | 2. Assembly vertical 2. Assembly vertical • Attach the cups to the eyepieces. • Insert the white plate for coloured, the black plate for white materials. • Insert the dark field condenser for the examination of precious stones in the dark field. • Insert stone tong into socket. The KSW4000 has been fitted with 2 sockets in order to be used by both right-handed and left- handed people. -
Page 34: Operation
KSW4000 Series | 3. Operation • For incident light, insert the lightguide into the lamp holder on the rear side. • Insert the plug into the mains connection jack and the transformer into the 220 V outlet. 3. Operation • Place the material to be examined on the supporting plate and illuminate, if applicable. • Look through the eyepiece. • Release the locking screw of the head and move the head up and down until there is a clear image. Now fasten the screw again. • Turn the focus adjustment knob slowly, to get a sharp image of the material. -
Page 35: Assembly Horizontal
KSW4000 Series | 4. Assembly horizontal • The magnification is changed by rotating the lens housing by 180°. The respective magnification is then displayed. The image should first be focused with a low magnification and you should then switch to a higher magnification. 4. Assembly horizontal • Insert the pillar into the block horizontally. Fasten by using the screw on the side. • Insert the cell stage vertically into the rear hole of the block . - Page 36 KSW4000 Series | 4. Assembly horizontal • Insert the stone tong into the socket of the cell stage. • Place optical cell on the stage. • Insert the plug into the mains connection jack and the transformer into the 220 V outlet.
-
Page 37: Bulb Replacement
KSW4000-Serie | 5. Bulb replacement 5. Bulb replacement Important note! Always pull the mains plug before replacing the bulb. Important note! When touching the bulb, use a soft cloth. Finger prints on the glass bulb affect the light output and reduce the service life. Transmitted light • Remove the supporting plate • Remove the defective bulb from the socket... -
Page 38: Technical Data
KSW4000 Series | 6. Technical data 6. Technical data General • Adjustable eye distance • 45° inclined eyepiece • Metal stand Optical features • Eyepieces: 10x wide field 20x wide field (optionally) • Object lenses: 1x and 3x • KSW4000: 6 V LED incident and transmitted light Illumination KSW4000-K and -K-W: 12 V 20 W transmitted light 12 V 20 W cold light source Power supply • Universal mains transformer 90–... -
Page 39: Maintenance
Maintenance | Reclamation and recycling Maintenance Just like all precision instruments, your microscope should be handled with care. Protect your microscope from dust, condensation, vibration and direct exposure to sunlight. Keep the optical system very clean. Remove dust with a soft brush or clean air. Remove finger prints with a lint-free cloth soaked in an ether/alcohol mixture (80% ether and 20% alcohol). -
Page 40: Warranty
Warranty Warranty A. KRÜSS Optronic GmbH accepts the guarantee for material and manufacture of the microscope for a period of 24 months from the date of shipment. During this term of warranty A. KRÜSS Optronic GmbH shall remedy any defect by repairing or replacing the device if subject to the warranty claim. -
Page 41: Warranty Extension
Warranty extension We value your opinion! We grant you a 1 year warranty extension period if you return the completely filled out questionnaire to us! Company Contact person Email Address Serial number Was the date of delivery kept? Did any problems occur during start-up? Are you already a customer a new customer... - Page 44 A.KRÜSS Optronic GmbH Alsterdorfer Straße 276–278 22297 Hamburg | Germany +49-(0)40-51 43 1 7- 0 +49-(0)40-51 43 1 7- 60 Email info@kruess.com www.kruess.com...
Need help?
Do you have a question about the MSL4000 Series and is the answer not in the manual?
Questions and answers