Advertisement
Quick Links
W h a t i s i n t h e B ox ?
Radio, quick start guide and safety/warranty leaflet.
Features
•
LW / MW / FM wavebands
•
Angled top panel for ease of use
•
Dial tuning system
•
LED power indicator
•
Carrying strap
•
Headphone socket
•
DC input socket
•
Batteries 4 x LR6 / AA size (not included)
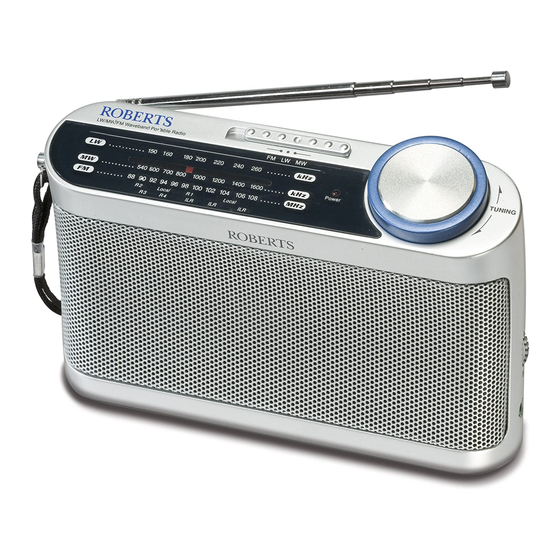
Controls
1
2
5
1 Telescopic aerial
2 Waveband switch
3 On/Off indicator
4 Tuning control
5 Loudspeaker
6 DC input socket
7 Headphone socket
8 Volume control
9 Battery compartment
4
3
8
6
7
Left side
Right side
Battery operation
Please read the safety leaflet provided before using batteries.
1
Remove the Battery cover on the rear
of the unit by pushing the catch in the
direction of the arrow.
2
Insert four LR6 (AA size) batteries into
the spaces in the compartment. Take
care to ensure all batteries are inserted
with the correct polarity as shown inside
the battery compartment. Replace the
battery cover.
3
Reduced power, distortion, and a
'stuttering' sound are all signs that the
batteries may need replacing.
4
If the radio is not to be used for any
extended period of time it is recommended that the batteries are removed from the radio.
Operation via an AC adaptor (not included)
Please read the safety leaflet provided before using an adaptor.
The AC adaptor for use with the R9993 should provide
6 volts DC output at 300mA, centre pin negative.
(Adaptor not included)
1
Place your radio on a flat surface.
2
Plug the adaptor lead into the DC input socket
located on the left hand side end of your radio
ensuring that the plug is pushed fully into the
socket. The batteries will be automatically
disconnected.
3
Plug the adaptor into a wall socket and switch
on.
9
S TE P 1 - P owe r your radi o
continued overleaf...
Advertisement

Subscribe to Our Youtube Channel
Related Manuals for Roberts R9993


Summary of Contents for Roberts R9993
- Page 1 Operation via an AC adaptor (not included) Please read the safety leaflet provided before using an adaptor. The AC adaptor for use with the R9993 should provide 6 volts DC output at 300mA, centre pin negative. (Adaptor not included) 1 Telescopic aerial Place your radio on a flat surface.
- Page 2 We therefore recommend setting the volume to a low 3 band portable radio level before connecting headphones to the radio. ROBERTS RADIO LIMITED www.robertsradio.com Issue 8 Please read this guide and the safety/warranty leaflet before use © 2021 Roberts Radio Limited 2021-02-24...
Need help?
Do you have a question about the R9993 and is the answer not in the manual?
Questions and answers