Advertisement
Quick Links
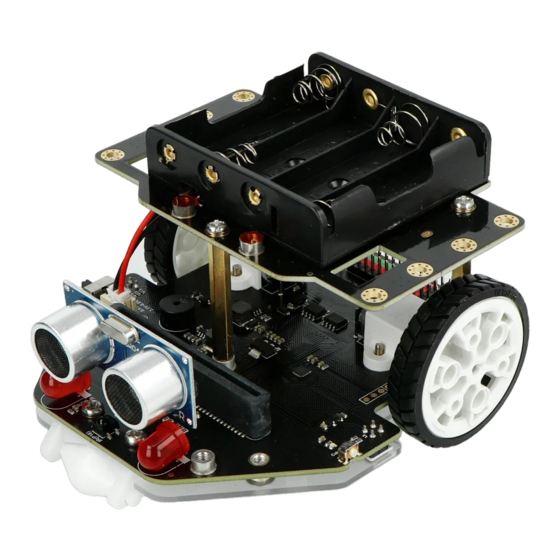
SKU:MBT0021-EN
1. Introduction
This is the latest version of Maqueen Plus, a
programming robot for STEAM education.
Optimized with more expansion ports, larger
capacity power supply and larger body, the Maqueen Plus V2.0 can be perfectly compatible with
more peripheral components like HuskyLens AI camera and Maqueen Mechanic kits, which
makes it an accessible STEAM robot teaching tool for primary and secondary students. Besides,
it can be not only suitable for classroom teaching, but also can be used for after-school extended
exercises and robot competitions. Besides all the functions of Maqueen Lite, it offers richer and
more flexible functions and stronger performance. Whether you have ever used Maqueen series
products or not, you'll find it very easy to get started.
2. Specification
•
Power Supply:
o
MBT0021-EN: 1.5V AA alkaline battery x 4 or 1.2V AA Ni-MH battery x 4
o
MBT0021-EN-18650: 18650 Li-ion battery (3.6V or 3.7V) x 1, onboard charging circuit,
MicroUSB and TYPE-C charging interface, 4 hours to charge fully, last about 15h
•
Support micro:bit V1 and V2
•
N20 All-metal Gear Motor x 2
•
Motor Reduction Ratio: 1:150
•
Motor Rated Rotation Speed: 133 rpm
•
Buzzer x 1
•
5V IO (P0 P1 P2) x 3
•
3.3V IO (P0 P1 P2 P8 P9 P12 P16) x 7
•
3.3V I2C x 2
•
5V I2C x 1
•
Large Size LED Car Lights x 2
•
RGB Ambient Lights x 4
•
Line-tracking Sensor x 5
•
Line-tracking Sensor with One-key Calibration
•
IR Receiver x 1
•
SRO4 Ultrasonic Module x 1
•
Dimension: 136mm×65mm/5.35×2.56"
•
Programming Platform: Mind+, MakeCode
Advertisement

Related Manuals for DFRobot MBT0021-EN


Summary of Contents for DFRobot MBT0021-EN
- Page 1 • Power Supply: MBT0021-EN: 1.5V AA alkaline battery x 4 or 1.2V AA Ni-MH battery x 4 MBT0021-EN-18650: 18650 Li-ion battery (3.6V or 3.7V) x 1, onboard charging circuit, MicroUSB and TYPE-C charging interface, 4 hours to charge fully, last about 15h •...
- Page 2 3. Board Overview MBT0021-EN (AA Battery Version): MBT0021-EN-18650(18650 Version):...
- Page 3 4. Battery Usage and Charging The Maqueen PlusV2 AA battery version supports 1.5V AA batteries and 1.2V Ni-MH rechargeable AA batteries. Please be careful not to use AAA batteries. AA batteries are available in most supermarkets. It should be noted that the 1.5V alkaline battery is disposable and cannot be recharged, otherwise it may explode or catch fire.
- Page 4 Step 2. Plug in the ultrasonic sensor Step 3. Insert the micro:bit board Step 4. Connect the board to a PC via USB cable...
- Page 5 Step 5. Click the sample program link, select "Edit" on the opened webpage, and download program into micro:bit. Sample Program: https://makecode.microbit.org/_dshFJ6f3gfaK Step 6. Unplug the USB cable and turn on the power switch. After the above operations, we downloaded an automatic obstacle avoidance robot program to the board.
- Page 6 6. MakeCode Graphical Programming • How to use MakeCode: https://wiki.dfrobot.com/Makecode%20Get-started%20Tutorial • MakeCode Library Address: https://github.com/DFRobot/pxt-DFRobot_MaqueenPlus_v20 6.1 Light-controlled Maqueen Plus The following program calls the light sensor of the micro:bit motherboard. Normally, the car is in a stopped state, and the RGB light at the bottom lights up in color. When the flashlight illuminates the front side of the micro:bit, the car goes forward, the bottom RGB light goes out, and the front lights turn on.
- Page 7 Program Link: https://makecode.microbit.org/_T89YbzEyeF2m 6-3 obstacle Avoidance Robot The function realized by the following program is: Maqueen Plus detects whether there is an obstacle in front of it during driving. If there is an obstacle about 30cm ahead, turn to avoid the obstacle and continue driving.
- Page 8 After the above procedure is executed, you will find that the car always turns in one direction after encountering an obstacle. Below we will improve the program as follows, let the car encounter obstacles and randomly choose a turning direction to continue driving. In the program, a module that generates integers randomly is used to randomly produce 1 or 2.
- Page 9 Program Link: https://makecode.microbit.org/_TMa48UKa5XAA In the above procedure, we did not use the two probes L2 and R2 on the two sides. If the car is driven out by mistake, it will be difficult to return to find the black line to continue driving. In the following procedure, we will use five probes and add another layer of detection on the left and right sides, so that the car can return in time after it finds that it was on the wrong path.
- Page 10 6-5 IR-controlled Maqueen Plus First, let us get familiar with the infrared remote control and key values. Each button on the infrared remote control corresponds to a unique key value. The key value has two systems of numeration, hexadecimal and decimal. In Maqueen PlusV2, we use decimal. as the picture shows: Example 1: In the following example, we use the four buttons 2, 4, 6, and 8 of the infrared remote control to control the car to go forward, turn left, turn right, and back separately.
- Page 11 Download the program to the micro:bit, press the “2” button of the infrared remote control, and Maqueen PlusV2 will drive forward. Press the “4” button, Maqueen PlusV2 turns to the left, press the “6” button, Maqueen PlusV2 turns to the right, press the “8” button, Maqueen PlusV2 drives backwards.
- Page 12 6-6. Control Maqueen Plus by Remote Controller Here, another way and product to control Maqueen will be used: remote control handle. Program Link: https://www.dfrobot.com.cn/goods-1674.html Wiki Link: https://wiki.dfrobot.com/Micro_bit_Gamepad_Expansion_Board_SKU__DFR0536 Another micro:bit motherboard needs to be installed on the remote control handle, and the two motherboards communicate through the wireless network to realize the remote control function.
- Page 13 Maqueen Plus Car Program Link: https://makecode.microbit.org/_bTPhA5JDs6mA Download the corresponding programs to the microbit motherboard on the handle side and the microbit motherboard on the car side respectively. Turn on the power of the handle and the car. Move the joystick on the left side of the handle to control the forward, backward, left and right turn of the car.
- Page 14 Maqueen Plus Car Program Link: https://makecode.microbit.org/_evzJtbUqoLFt Download the corresponding programs to the micro:bit on the handle side and the microbit motherboard on the car side respectively. Turn on the power of the handle and the car. Gently push the joystick forward, Maqueen Plus will gradually start and speed up. Try turning around and going backward.
- Page 15 The line-tracking sensor has been calibrated before leaving the factory, and you do not need to calibrate it again. Just like the reset button of digital products, you don't need to use it in most cases. Incorrect calibration methods can also cause the line-tracking sensor to fail. If you find that the line-tracking sensor does not recognize the black lines that can be recognized normally, then you can try to calibrate it.
- Page 16 8. Buzzer Switch When you don't need to use the buzzer, but you want to use the P0 port, or use the micro:bit V2 motherboard, you can use this switch to turn off the buzzer. The picture shows the state of turning on the buzzer.
- Page 17 3. Install the other bracket (the bracket and mounting screws are provided with the HuskyLens product) 4. Install HuskyLens AI camera 5. Plug in the AI camera connection...
- Page 18 3. Plug the connecting wire of the servo into any 5V port of P0 or P1 or P2 on the back, and be careful not to plug it in the reverse direction. For any questions, advice or cool ideas to share, please visit the DFRobot Forum. https://wiki.dfrobot.com/SKU_MBT0021-EN_Maqueen_Plus_V2.0_STEAM_Programming_Educational_Robot/7-1-22...
Need help?
Do you have a question about the MBT0021-EN and is the answer not in the manual?
Questions and answers