Advertisement
Quick Links
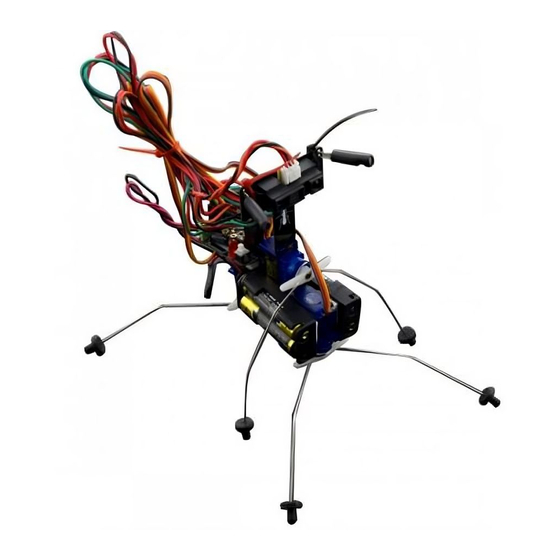
Insectbot Hexa – Fun, technology and education
Welcome to the Insectbot Hexa assembling manual. Here you will learn how to put all the parts
together and how to program the robot.
Note:
If you got the Insectbot kit with already soldered Beetle/Beetle Shield and the light sensors/sensor
holder then you can skip chapter 1 and the soldering parts of chapter 5 and 6
NOTE:
The Insectbot Hexa is not a toy but a way to learn how things work together. By assembling the
Insectbot Hexa you will learn about some mechanical and electronic parts as well the procedures
how to connect all the parts.
IMPORTANT:
Please pay attention to the right polarity when connecting cables and the batteries to the robot.
Wrong connections could lead top permanent damage of parts and may cause a fire.
IMPORTANT:
Work careful when handling the stainless steel wire. Make sure the wire will not bounce to prevent
injuries of you or any bystanders. Wear protective leather gloves to prevent injuries by puncturing
your fingers when bending the wires legs, attaching them to the servo arm and putting the rubber
feet on them.
TIP:
To make the Insectbot Hexa walking properly you need to make sure that the legs are bent in the
right angles and shapes. There is no example which angle and shape will work best since every
robot is build by hand and may have a different center of weight. Try and re-try to bend the legs in
different shapes and angles if the walking pattern does not satisfy you.
TIP:
By changing the code for the light sensors you can make the robot either chasing light or avoiding
light.
DISCLAIMER:
This manual is provided as it is. You may face some difficulties by assembling the robot but that's
part of the plan. That Insectbot Hexa Kit is meant for education, so people learn how to solve minor
problems. However, if you cannot solve your problem then please do not hesitate to contact us for
help.
December 2014
Author: Lutz Michaelis, Robotic Engineer at DFRobot
All content including pictures are copyright by DFRobot.com
Advertisement

Related Manuals for DFRobot Insectbot Hexa


Summary of Contents for DFRobot Insectbot Hexa
- Page 1 1 and the soldering parts of chapter 5 and 6 NOTE: The Insectbot Hexa is not a toy but a way to learn how things work together. By assembling the Insectbot Hexa you will learn about some mechanical and electronic parts as well the procedures how to connect all the parts.
- Page 2 Insect bot Hexa assembling instructions 1. Soldering the Beetle on the Beetle Shield First you need to solder the Beetle controller onto the Beetle shield. You have to put the Beetle on the pins by paying attention to the right direction. The USB socket needs to face to the left side of the shield, the side where these two mounting holes are located.
- Page 3 3. Bending the legs Bending the legs requires some strength or small pliers in order to bend them. The front and the rear legs are bend in a V shape and the middle leg in an U shape. The middle part of the legs needs to be bend again to make sure the legs get not jammed when the servo is moving.
- Page 4 D9, D10 and D11 (see more details below) of the Beetle shield and upload the following program to the Beetle. The file name is insect_bot_servo_center.ino and available on the product/Wiki website at DFRobot.com #include <Servo.h>...
- Page 5 Once the legs are attached to the servo put the supplied rubber caps on the end of the wire legs. These rubber caps will prevent the legs slipping and may also protect your furniture from scratches. You may put the rubber feet in either way on the legs.
- Page 6 After soldering the battery holder wires together cover the wire with a piece of shrink tube to prevent short circuits. To do this, cut 2cm of the provided shrink tube, put it on the wire end and heat it carefully with a lighter or your soldering iron. Heat the tube only for 1 second or less at the time to prevent it from burning.
- Page 7 7. Attaching the Beetle to the robot body Use the supplied 3M double side foam tape to stick the Beetle shield with the Beetle controller on the back of the robot body. 8. Wire-up The final task is to wire up the robot. 8.1.
- Page 8 8.3. Servos: The servo cables also comes with three different wire colors. Brown, red and yellow (or orange). Brown connects with ground and the yellow wire with the signal pin. The order of the servos is the following: Front servo connects to D9, the rear servo to D10 and the middle servo to D11.
- Page 9 The connected Beetle will show up as a Leonardo. Please choose this and select the proper COM port. Open the previous downloaded file insectbot_hexa_en.ino and upload it to the Beetle. Once it's done without errors the InsectBot Hexa is ready to take his first steps. Illustration 2: Choose Leonardo as board...
- Page 10 Illustration 5: Once "Done uploading" is shown, you are finished Congratulation, you just finished your own little robot. You may keep it that way or you may even try to re-program the Insectbot Hexa for your own experience and fun. © by DFRobot.com...
Need help?
Do you have a question about the Insectbot Hexa and is the answer not in the manual?
Questions and answers