Table of Contents
Advertisement
Quick Links
SoundCHEK Connect Sound Level Meter
Cat. No. 702 Series
Operating Instructions
(left/right, up/down)
Power on/off key,
reset, screen grab
Table of Contents
Introduction ................................................................................................................................................ 5
Checking Kit Contents ............................................................................................................................... 5
Models and Features ................................................................................................................................. 6
Microphone and Preamplifier..................................................................................................................... 7
Microphone Types ................................................................................................................................. 7
Microphone Polarization ........................................................................................................................ 7
skcinc.com
Battery
compartment
(on back)
Soft Key 1
Arrow keys
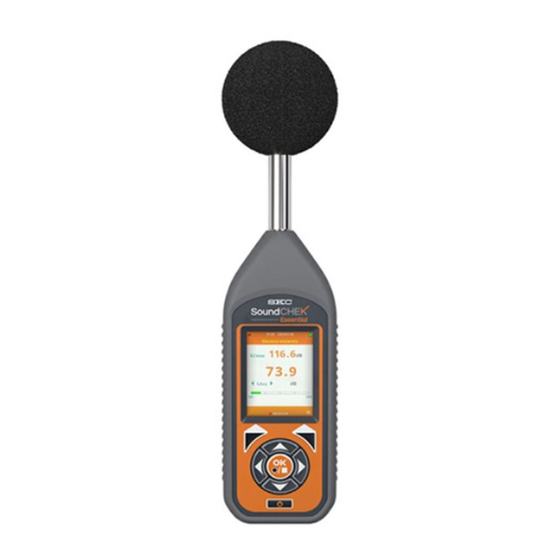
Figure 1. SoundCHEK Connect Overview
Form 37179 Rev 200923
1/2-inch
microphone
with windscreen
Screen
Soft Key 2
OK
Record/Stop
Page 1
Advertisement
Table of Contents

Subscribe to Our Youtube Channel
Related Manuals for SKC SoundCHEK 702 Series


Summary of Contents for SKC SoundCHEK 702 Series
-
Page 1: Table Of Contents
SoundCHEK Connect Sound Level Meter Cat. No. 702 Series Operating Instructions 1/2-inch microphone with windscreen Battery compartment (on back) Screen Soft Key 2 Soft Key 1 Arrow keys (left/right, up/down) Record/Stop Power on/off key, reset, screen grab Figure 1. SoundCHEK Connect Overview Table of Contents Introduction .............................. - Page 2 Microphone Sensitivity ........................... 7 Removing the Microphone ........................8 Attaching/Removing the Preamplifier ....................8 Certifiable Calibration ..........................9 Measuring Sound ............................9 Incidence Angle ............................. 9 Sound Level – General Recommendations ................... 9 Getting Started ............................10 Using the Keypad ............................ 10 Powering the Sound Level Meter ......................
- Page 3 Audio Recording ..........................32 Save As Template ..........................39 File Manager ............................39 Load File ............................40 Send Files To Cloud ......................... 40 Clear Cloud File Queue ........................42 Delete File ............................42 Delete All Files ..........................43 Auto File Naming ..........................43 Auto File Review ..........................
- Page 4 Measurement Screens ..........................64 Measurements ............................. 64 Measurements Table ........................... 65 Exposure .............................. 66 Percentiles (Ln) ............................ 67 ............................... 67 1/1 Octave ............................68 1/3 Octave ............................68 Accessories/Replacement Parts ......................... 69 Appendix A: Performance Profile ........................ 70 skcinc.com Form 37179 Rev 200923 Page 4...
-
Page 5: Introduction
Your data here is secure, always available, and backed up automatically. SoundCHEK Connect can also be connected to SKC CHEKBox through the PC app SKC ChekBox Gateway, which enables you to upload your recordings via your PC using the included Micro USB Cable and your PC’s Internet connection. -
Page 6: Models And Features
Models and Features SoundCHEK Connect models and features are listed below. The SoundCHEK Connect models are presented with all the required features to fulfil specific applications where noise measurement is a requirement, such as for Safety or Construction. Safety SoundCHEK Connect Safety Class 1 Cat. -
Page 7: Microphone And Preamplifier
Microphone and Preamplifier Measurement microphones by the very nature of their manufacture are precision components that are easily damaged through incorrect use. Great care must be taken when using the instrument to ensure the longevity of the microphone. Microphone Types Three different types of microphone are manufactured, and each is designed for measuring noise in different applications outside the scope of this manual. -
Page 8: Removing The Microphone
Great care must be taken to ensure the microphone and sound meter sensitivities match, otherwise incorrect readings will occur. Removing the Microphone The microphone is fitted to the preamplifier by screwing the microphone in a clockwise direction ensuring that the preamplifier spring pin is located centrally in the microphone. To remove the microphone, unscrew in a counterclockwise direction. -
Page 9: Certifiable Calibration
SKC offers a complete calibration service offering a NIST calibration that can be supplied with or without a test report. It is recommended that your sound meter instrumentation is calibrated annually to ensure... -
Page 10: Getting Started
GETTING STARTED Using the Keypad All models of the SoundCHEK Connect sound level meter have the same keypad layout and operation. Soft Key 1 Soft Key 2 Directional arrow keys: up, down, OK, Record/Stop left, right Power, reset, or screen grab Powering the Sound Level Meter The sound level meter can be powered from four 1.5V AA size batteries, four 1.2V rechargeable batteries, or the micro USB connection via a USB port or power supply... -
Page 11: Turning Power On/Off
Turning Power On/Off Turn on: In all power configurations, press the Power Key once. The instrument will take several seconds to boot and load configuration settings. Turn off: Hold the Power Key down for two seconds and follow the on-screen instructions (see below). Note: If no key is pressed within two minutes of turning on the sound level meter, the unit will automatically power down. - Page 12 Low Measuring Range Active High Measuring Range Active User Template Active Voice Memo Recorded (Flashes while recording) Noise Event Recorded (Flashes while recording)* USB Active WiFi – Error with Connection WiFi Connected / Signal Strength Downloading Data via WiFi from CHEKBox Software Uploading Data via WiFi to CHEKBox Software Uploading to &...
- Page 13 The top light blue bar on the screen displays most of the information icons, the current time, date, measurement range and the current screen selected. The bottom lighter blue bar will display the Record, File Review, or Stop symbols in a similar position to the image shown below.
-
Page 14: Operation
OPERATION The SoundCHEK Connect sound level meter has three primary operational modes: • Real Time • Recording • File Review Each mode can be quickly identified by viewing the bottom bar: Real Time has no icon, Record has a standard red record symbol, and File Review shows a standard green play symbol. Record File Review Real Time... -
Page 15: Recording Screen Display
This indicates that a recording is scheduled to start at the specific time or date set. DO NOT switch off the instrument as the recording will not take place while the instrument is off. To stop a pending recording, press the Stop key while in any measurement screen, and press the OK key to stop the recording or Soft Key 1 to cancel the stop request. -
Page 16: Time History Enabled
Time History Enabled When Time History is enabled for the recording, the bottom bar will display the elapsed recording time and the current long interval countdown time. Long interval countdown time Elapsed recording time Time History Disabled, Duration Timer Set When Time History is disabled for the recording but the Duration Timer is enabled, the bottom bar will only display the remaining recording time. -
Page 17: Time History Enabled, Interval Timer Set
Time History Enabled, Interval Timer Set When both Time History and Interval Timer are enabled for the recording, the bottom bar will display the remaining interval timer repeats and the current long interval countdown time: Long Interval Countdown Time Remaining Interval Timer Repeats Stop Active Recording Pressing the Stop key during an active recording will display a Yellow standard stop symbol to indicate the recording has been temporarily halted and will also display the available options shown below. -
Page 18: Time History Disabled
Time History Disabled If Time History was not enabled for the recording, the bottom bar will only indicate the total recording time: Total Record Time Time History Enabled If Time History was enabled for the recording, the bottom bar will display the selected long interval and the time this long interval started recording: Long Interval Record Start Time Selected Long Interval... -
Page 19: Time History Disabled, Duration Timer Set
Time History Disabled, Duration Timer Set If Time History was not enabled for the recording but the Duration Timer has been, the bottom bar will only indicate the total recording time: Total Record Time Time History Enabled, Duration Timer Set When both Time History and Duration Timer were enabled for the recording, the bottom bar will display the remaining recording time and the current long interval countdown time: Long Interval... -
Page 20: Time History Enabled, Interval Timer Set
Time History Enabled, Interval Timer Set When both Time History and Interval Timer were enabled for the recording, the bottom bar will display the selected Long Interval record start time and the selected Interval Timer Repeat: Long Interval Record Start Time Selected Interval Timer Repeat 1. -
Page 21: File Review Options
File Review Options During File Review, press Soft Key 1 to display the available options. Scroll through the options using the Up or Down Arrow keys, and press OK to choose from: • Exit — Quit File Review mode and return to Real Time mode •... -
Page 22: Measurement Setup
Measurement Setup Select Measurement Setup to change how and what your sound level meter records and displays. Scroll through the available options using the Up or Down Arrow keys and press OK to choose the highlighted selection. Function Scroll through the available options using the Up or Down Arrow keys and press OK to choose the highlighted selection. - Page 23 Full Octave When the function Full Octave is selected, full octave band analysis is performed on measurement one and will produce the additional following parameter data for the short and long interval if used at the following frequencies: Frequencies 16 Hz, 31.5 Hz, 63 Hz, 125 Hz, 250 Hz, 500 Hz, 1 kHz, 2 kHz, 4 kHz, 8 kHz, 16 kHz Short Interval Leq, Lmin, Lmax, Lpeak, Le* Long Interval...
-
Page 24: Weightings & Range
Weightings & Range Select Weightings & Range to change the measurement range and the weightings applied to each measurement. Scroll through the available options using the Up or Down Arrow keys and use the Left or Right Arrow keys to change the selection. Range SoundCHEK Connect has two operating ranges, Low and High. -
Page 25: Exposure
Results Selection Under Results Selection you can select which standard results you wish to enable. Those that are enabled are displayed on the instrument and are recorded, and any that are disabled will neither be displayed nor recorded. Scroll through the available options using the directional Arrow keys and press OK to toggle the highlighted selection. - Page 26 UK/EU Select this option for requirements meeting UK or EU legislation. Exchange Rate, Criterion and Threshold are fixed as below: • Exchange Rate = 3 • Criterion = 85 • Threshold = Off When UK/EU is selected, the Exposure measurement screen displays and records the following OSE (Pa OINTS OINTS...
-
Page 27: Data Recording
Data Recording Select Data Recording to determine if the data recording should contain a time history and if used, which time interval periods are to be used. The instrument records over the time periods determined by the Time History settings in conjunction with the settings made within the Timer Selection or by the user manually stopping the recording. - Page 28 Time History On – Enabled When Time History On is enabled the SoundCHEK Connect sound level meter will simultaneously and independently record data at the selected Short and Long Time Interval Settings. Time Start of Recording Where: • = Short Time Interval •...
- Page 29 Short Time Interval. When Time History On is enabled, each recording will calculate data over the Short Time Interval selected. The available options for the Short Time Interval are as follows: • 10ms, 100ms, 200ms, 500ms, 1 to 59s, 1 to 60m If timers are used, then non-cumulative data is reset at the start of each Short Interval period.
-
Page 30: Statistics
Note: The Data Recording screen shows the Total Record Time if Day is not set to Any Timer will not be started until the Record key is pressed while in the measurement screen. THE INSTRUMENT MUST BE ON FOR ANY TIMER TO OPERATE. Duration Timer. - Page 31 Percentiles Choose Percentiles to enable or disable Percentiles, commonly referred to as LNs, by using the OK key or the Left, Right Arrow keys to change Enable LNs between the following options: • Off, Measure 1, Measure 2 or Measure 1 & 2 When LNs are enabled, the selection of individual LNs becomes available using the Up or Down Arrow keys to scroll.
-
Page 32: Audio Recording
Upgrade to Statistics. If your particular SoundCHEK Connect model does not have access to statistical data, the screen below will be displayed. Upgrade your SoundCHEK Connect sound level meter remotely in minutes. Email skcorder@skcinc.com for details. Audio Recording The Audio recording screen is available to all models of SoundCHEK Connect to allow setting Voice Memo audio recording. - Page 33 Start. The user can be prompted automatically to attach a voice memo at the start of a recording. 1. Press the OK key to start a Voice Memo recording or Soft Key 2 labelled Skip to start the data recording without creating a voice memo. 2.
- Page 34 Note: While recording a Voice Memo, the Voice Memo icon will flash. Any data recording with a Voice Memo audio file displays the Voice Memo icon. Note: Multiple Voice Memo audio files can be attached to a data file if required. Off.
- Page 35 3. Press the OK key to start a Voice Memo recording or Soft Key 2 labelled Skip to save the data recording without creating a voice memo. 4. Press the OK key to stop the Voice Memo recording and save the data recording. 5.
- Page 36 • Record Method • Trigger Setup - Becomes available when Record Method set to Trig • Amplify Noise Events Quality. Set the recording quality of the Event Recording. The options are listed below: • Low = 12 kHz, 16 Bit •...
- Page 37 Trigger Edge – Use the Left, Right Arrow keys to select between Rise or Fall. When set to Rise, triggering of the noise event audio file recording will begin when the Trigger Level is reached on the positive rising edge of the input noise, i.e., when the noise increases past the trigger level.
- Page 38 Record Time – Set the Recording Time of the triggered noise event audio file. 1. Use the Left, Right Arrow keys to adjust the Hours, Minutes and Seconds as required. 2. Scroll the available options using the Up, Down Arrow keys or the OK key. The maximum Record Time is 23:59:59 (hh:mm:ss) Noise Event Recordings can create large audio files.
-
Page 39: Save As Template
Save as Template Choose Save as Template to save all current settings to a file known as a Template which can be loaded at any time to your exact requirements, quickly and easily. Templates can be recalled using Template Manager in the Main Menu. 1. -
Page 40: Load File
1. Scroll the available options using the Up or Down Arrow keys, press OK to choose from the following: • Load File • Send Files To Cloud • Clear Cloud File Queue • Delete File • Delete All Files 2. Press OK or the Left, Right Arrow keys to toggle the following: •... - Page 41 Arrow indicates Uploading 4. If the data recording contains any type of audio recording, the message shown on screen at right will be displayed before the file is uploaded. 5. To upload all the associated audio files with the data file, press Soft Key 1 labelled Yes. To upload only the data file, press Soft Key 2 labelled No.
-
Page 42: Clear Cloud File Queue
Clear Cloud File Queue Select Clear Cloud File Queue to cancel all pending file uploads. This option only becomes available if a file exists in the upload queue. Delete File Choose Delete File to delete one individual data recording and any associated audio recordings. 1. -
Page 43: Delete All Files
Delete All Files Choose Delete All Files to delete all data recordings and all associated audio recordings. 1. To cancel, press Soft Key 1 to go back to the previous screen. 2. To delete all files, press Soft Key 2 labelled Confirm. Deleted files are unrecoverable. -
Page 44: Auto File Review
When Auto File Naming Is Disabled The user enters a file name manually. Each data recording and all its associated audio files are structured as below: FILENAME.dat Data File FILENAME.csv Data CSV File FILENAME_V_TIME_DATE.wav Voice Memo Wav File FILENAME_A_TIME_DATE.wav Noise Event Audio Wav File Each audio file is then tagged with one of the following for easy identification: •... -
Page 45: Load Template
Load Template 1. Scroll through the available templates using the Up or Down Arrow keys, press OK to choose and load the highlighted template. 2. If multiple templates exist, use the Left or Right Arrow keys to scroll through the templates by page. -
Page 46: Edit Template
Edit Template Select Edit Template to quickly change the instrument settings held within a saved template. Scroll through the available templates using the Up or Down Arrow keys and press OK to load and edit the highlighted template. If there are multiple templates, use the Left or Right Arrow keys to scroll through the templates by page. -
Page 47: Delete Template
Delete Template Choose Delete Template to delete one individual template file. Note: Factory pre-installed templates are non-removable. Deleted user templates are unrecoverable 1. Scroll the available templates using the Up or Down Arrow keys and press OK to select the template to delete. -
Page 48: Hearing Protection
5. To return to the previous screen without saving the template, select Cancel. 6. To save the template using the file name entered, use Soft Key 1 labelled Done. Hearing Protection Hearing Protection is only available on specific SoundCHEK Connect models and is an internally stored database of leading manufacturers of hearing protectors. -
Page 49: Best Available Method
Best Available Method Select Best Available Method to automatically choose the best method to analyze your data file. The order in which the automatic method selection is made is as follows and does depend on how the data recording was configured: 1. - Page 50 2. Scroll through the available hearing protection models using the Up or Down Arrow keys or by page using the Left or Right Arrow keys. 3. Press the OK key to select the highlighted model and show the frequency data for the open data file.
- Page 51 1. Scroll the available manufacturers using the Up or Down Arrow keys or by page using the Left or Right Arrow keys, press the OK key to select the highlighted option and show the calculated protection level for each model of the manufacturer. Alternatively, select All to show the calculated hearing protection for each model of all the manufacturers.
- Page 52 1. Scroll the available manufacturers using the Up or Down Arrow keys or by page using the Left or Right Arrow keys and press the OK key to select the highlighted option and show the calculated protection level for each model of the manufacturer. Alternatively, select All to show the calculated hearing protection for each model of all the manufacturers.
-
Page 53: Instrument Setup
Instrument Setup Instrument Setup is available to all models of SoundCHEK Connect and is where specific instrument settings are made. Scroll through the available options using the Up or Down Arrow keys, press OK to choose from the following: • Wi-Fi •... - Page 54 1. Press OK or the Left, Right Arrow keys to toggle WiFi On. 2. When WiFi On is enabled and the options for Wi-Fi become available, scroll through them using the Up or Down Arrow keys. 3. Press the OK key to select WiFi Networks or Network Settings. 4.
- Page 55 7. Use Soft Key 1 to exit password entry without saving. 8. When the password is entered correctly select Connect and press the OK key. If the connection is successful, Connected will be shown under the network name and the Wi-Fi icon will be shown in the top light blue bar.
-
Page 56: Screen
Screen Select Screen to adjust screen brightness and color and to access power-saving features. 1. Brightness: Adjust brightness using the Left, Right Arrow keys to the required level. Note: Increased screen brightness reduces battery operating time. 2. Color: Adjust color using the Left, Right Arrow keys to toggle the screen color between White or Black. -
Page 57: Date
Date Enter the current date using the date format specific to your region. 1. Use the Up, Down Arrow keys to adjust the value. 2. Use the Left, Right Arrow keys to move forward or back. 3. Press Soft Key 2 labelled Done to accept the date changes. Time Enter the current time using the time zone specific to your region. -
Page 58: Information
Information Select Information to show instrument-specific details. SPL Bar Levels Select to adjust the levels at which color coding of the SPL bar appears. 1. Scroll through the options using the Up or Down Arrow keys. 2. Use the Left, Right Arrow keys to adjust as follows: Yellow: 40 to 100 dB Red: 80 to 140 dB... -
Page 59: Usb Drive
USB Drive When USB Drive is enabled and the supplied USB cable is connected to the SoundCHEK Connect and a PC, the SD card of the SoundCHEK Connect becomes available. 1. Plug in the USB cable and the USB Drive Active screen will be displayed: USB Drive Active SoundCHEK Locked... -
Page 60: Support
Support 1. Press the OK key on Instrument Upgrades to instantly apply any upgrades purchased. 2. Enter your supplied upgrade code using the Up, Down Arrow keys to adjust the value. 3. Use the OK key or the Left, Right Arrow keys to move forward or back. 4. -
Page 61: Calibration
Select Calibration to acoustically calibrate your SoundCHEK Connect sound level meter. It is recommended that the calibration procedure is performed before and after measurements have been taken using an SKC AcoustiCHEK Calibrator Cat. No. 703-001 or 703-002. To activate an automatic calibration reminder, see Startup Options. -
Page 62: Cal History
Cal History • Calibration History cannot be disabled or deleted. The SoundCHEK Connect sound level meter will store the time and date of the last 1000 successful calibrations. To the right of each calibration are internal scaling factors for the low and high ranges. These figures have only one purpose: to indicate any drift in your calibrations. -
Page 63: Startup Options
Enable to automatically enter the instrument calibration function during start-up. It is recommended that this option is enabled. Updates Your SoundCHEK Connect can update operating software, HPD files, and SKC-certified templates through Wi-Fi. Your instrument will periodically check for updates in the background and download latest software versions when they become available. -
Page 64: Measurement Screens
Measurement Screens The SoundCHEK Connect sound level meter can independently and simultaneously record two measurements. Each measurement can have different time weightings and/or frequency weightings. To clearly identify these, they are named Measurement 1 and Measurement 2 on your instrument where any ambiguity may arise. -
Page 65: Measurements Table
Upgrade your SoundCHEK Connect sound level meter remotely in minutes. Email skcorder@skcinc.com for details. Measurements Table The Measurements Table screen conveniently shows all standard parameter values available on the sound level meter for both Measurement 1 and Measurement 2. This screen is available on all SoundCHEK Connect models. -
Page 66: Exposure
Exposure The Exposure screen can be calculated from Measurement 1 or Measurement 2. See Exposure in Measurement Setup for how to change the calculated Measurements. To comply with legislation for various countries, the instrument can be set to EU settings (below left) or OSHA settings (below right): Custom settings may also be set. -
Page 67: Percentiles (Ln)
Percentiles (LN) This screen is only available on SoundCHEK Connect sound level meters fitted with this option. Percentiles can be turned Off and the percentile level changed. See Percentiles (LN) in Measurement Setup for further details. The Lden screen is only available for SoundCHEK Connect sound level meters fitted with this option and only calculated from Measurement 1. -
Page 68: 1/1 Octave
1/1 Octave The 1/1 Octave screen is only available for SoundCHEK Connect sound level meters fitted with this option and only calculated from Measurement 1. The 1/1 Octave can be turned Off if required. See Function in Measurement Setup for further details. 1. -
Page 69: Accessories/Replacement Parts
SKC Limited Warranty and Return Policy SKC products are subject to the SKC Limited Warranty and Return Policy, which provides SKC’s sole liability and the buyer’s exclusive remedy. To view the complete SKC Limited Warranty and Return Policy, go to http://www.skcinc.com/warranty. -
Page 70: Appendix A: Performance Profile
APPENDIX A: PERFORMANCE PROFILE Class Available in Class 1 or 2 Measurement Range Linear 25 to 140 dB Peak 40 to 143 dB Frequency Range 20 Hz to 20 kHz Frequency Weighting A, C, and Z; peak C or Z weighted Response Time Fast, Slow, and Impulse Measurement Channels...
Need help?
Do you have a question about the SoundCHEK 702 Series and is the answer not in the manual?
Questions and answers