Table of Contents
Advertisement
Quick Links
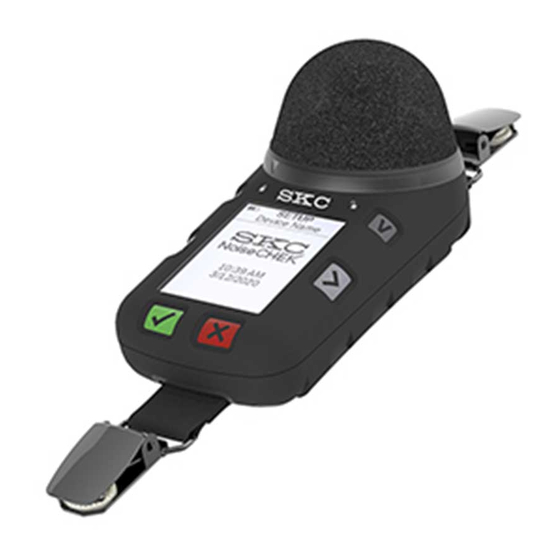
NoiseCHEK Personal Noise Dosimeter
Cat. No. 701-001
Operating Instructions
Clothing clip
Windscreen
lock direction
indicator
History
button
Previous
button
Green button
(Power on/start/select)
Clothing clip
Table of Contents
Introduction.................................................................................................................................................... 3
Checking Dosimeter/Kit Contents ............................................................................................................. 3
Getting Started .............................................................................................................................................. 4
Charging the Battery .................................................................................................................................. 4
Notes and Cautions ................................................................................................................................... 6
Turning Power On/Off ................................................................................................................................ 6
Determining Battery Charge Status ........................................................................................................... 6
skcinc.com
Windscreen
Windscreen LED
collar
Windscreen unlock
direction indicator
Voice Note
button
Next button
Screen/Display
Red button
(Power off/stop/select)
Front view
Figure 1. NoiseCHEK Noise Dosimeter - Overview
Form 37169 Rev 210311
Microphone
(windscreen removed)
Charging/data
transfer contacts
Back view
Page 1
Advertisement
Table of Contents

Subscribe to Our Youtube Channel
Related Manuals for SKC NoiseCHEK


Summary of Contents for SKC NoiseCHEK
-
Page 1: Table Of Contents
Red button (Power on/start/select) (Power off/stop/select) Clothing clip Front view Back view Figure 1. NoiseCHEK Noise Dosimeter — Overview Table of Contents Introduction..............................3 Checking Dosimeter/Kit Contents ......................3 Getting Started .............................. 4 Charging the Battery ..........................4 Notes and Cautions ........................... 6 Turning Power On/Off .......................... - Page 2 Status Icons ............................8 Changing Time/Date ..........................9 Recording/Playing a Voice Note ........................ 9 Voice Note Status ..........................10 Attaching NoiseCHEK on a Worker ......................10 Removing/Reinstalling Windscreen ......................10 Operation..............................11 Performing a Sample Run ........................11 Calibrate ............................... 11 Sample ..............................
-
Page 3: Introduction
NoiseCHEK has a ½-inch Class 2 microphone and is worn on the apex of the shoulder with the microphone close to the ear and away from the neck. Clothing clips on each end of the device attach the dosimeter securely to a worker’s shoulder. -
Page 4: Getting Started
Note: You can also charge NoiseCHEK by connecting the charging dock to your PC or a USB battery bank with a USB cable. Charging time may increase significantly depending on the power available from the USB port used. - Page 5 Charging Train in Carry Case with Charging Cable Installed The carry case for Cat. Nos. 701-001K3, 701-001K3-C, 701-001K5, and 701-001K5-C has a charging cable installed and a power jack for connection to the charging dock and power supply for charging in the case.
-
Page 6: Notes And Cautions
• The battery used in this device may present a risk of fire or explosion when heated above 212 F (100 C) or incinerated. Battery can be replaced only by SKC authorized service center. • When transporting dosimeters, ensure that they are placed in their designated areas inside the case, not on the charging dock. -
Page 7: Determining Dosimeter Status - Leds
White (lower right) flashing intermittently Voice note present. Blue (top), flashing intermittently Communicating via Bluetooth (with SKC SmartWave dB app) Using the Buttons See the table below for how to use the dosimeter buttons (Figure 1) to operate the device, navigate screens, and select screen prompts. -
Page 8: Interpreting And Navigating Screen Displays
Interpreting and Navigating Screen Displays The screen displays are intuitive with messages and selection prompts to guide you through each operation. Icons at the top right and left corners indicate battery and operation status, activated features, and alerts (see Status Icons). Note: After approximately 30 seconds of inactivity, the screen will dim automatically. -
Page 9: Changing Time/Date
You can upload and play a voice note on a PC using DataTrac dB Software. Only one voice note can be held in NoiseCHEK, and it must be deleted or uploaded to a PC before another note can be recorded. -
Page 10: Voice Note Status
Recording deleted Attaching NoiseCHEK on a Worker Attach the NoiseCHEK to the worker’s shoulder after the unit has been turned on and calibrated and before the sample run is started. 1. Choose the shoulder facing the highest level or source of noise. -
Page 11: Operation
Figure 3). After a 5-second countdown shown on the screen, calibration will take place. 5. When calibration is complete/passed, turn off or remove the calibrator from the microphone. 6. Select OK (press green button) on NoiseCHEK (returns you to Home screen). 7. Reinstall the windscreen. See Removing/Reinstalling the Windscreen. -
Page 12: Sample
Sample • To schedule a timed sample run, see DataTrac dB Software for NoiseCHEK User Manual. • For details about Secure Lock and Auto Lock, see Lock Feature. 1. After successful calibration, from the Home screen press the green button. See below. -
Page 13: Post-Calibrate
6. Proceed to Post-calibrate. Post-calibrate • Each time NoiseCHEK is calibrated, it displays the calibration values obtained “Before” and “After” calibration and stores them. For post-calibration, use the “Before” value. 1. See Calibrate, Steps 2 through 6. 2. Review data. See Reviewing Data (History). -
Page 14: Lock Feature
Select list of sample runs Select run from list Review data from the History views on the NoiseCHEK device, on your PC using DataTrac dB software (see Using DataTrac dB Software), or on your mobile device using the SKC SmartWave dB mobile app. -
Page 15: Using Datatrac Db Software
Using DataTrac dB Software NoiseCHEK communicates with a PC via SKC Charging Dock 701-002 or 701-003 and DataTrac dB Software. With DataTrac dB software, you can: • Program and modify presets in your dosimeter setup including virtual dosimeters, octave band display, secure lock and auto lock, and more (Figure 4). -
Page 16: Install Datatrac Db Software
Install DataTrac dB Software The NoiseCHEK noise dosimeter communicates with a PC via USB cable and charging dock (1-unit or 5- unit) and DataTrac dB Software (Figure 5). Connect up to five NoiseCHEK dosimeters in the 5-unit charging dock to upload settings. -
Page 17: Accessories/Replacement Parts
SKC Limited Warranty and Return Policy SKC products are subject to the SKC Limited Warranty and Return Policy, which provides SKC’s sole liability and the buyer’s exclusive remedy. To view the complete SKC Limited Warranty and Return Policy, go to http://www.skcinc.com/warranty. -
Page 18: Appendix: Performance Profile
Up to 95%, non-condensing Dimensions 3.9 x 1.9 x 2 in (99 x 48 x 51 mm) Weight 4.1 oz (117 gm) NoiseCHEK dosimeters are shipped with Li-Ion batteries and are subject to special shipping regulations. skcinc.com Form 37169 Rev 210311 Page 18...
Need help?
Do you have a question about the NoiseCHEK and is the answer not in the manual?
Questions and answers