Table of Contents
Advertisement
Quick Links
Download this manual
See also:
Service Manual
Advertisement
Table of Contents

Related Manuals for Sharp UX-A260


Summary of Contents for Sharp UX-A260
- Page 1 MODEL UX-A260 FACSIMILE OPERATION MANUAL 1. Installation 2. Using the Answering System 3. Sending Faxes 4. Receiving Faxes 5. Making Copies 6. Special Functions 7. Printing Lists 8. Maintenance 9. Troubleshooting...
-
Page 2: Serial Number
Model Number Serial Number Date of Purchase Place of Purchase As an NERGY determined that this product meets the guidelines for energy efficiency. FOR YOUR RECORDS UX-A260 partner, SHARP has NERGY... - Page 3 Recording system Halftone (grayscale) Compression scheme *Based on Sharp Standard No. 1 Chart at standard resolution in Sharp special mode, excluding time for protocol signals (i.e., ITU-T phase C time only). Welcome, and thank you for choosing a Sharp fax...
- Page 4 Display Applicable telephone line Public switched telephone network Paper tray capacity Compatibility Input document size Effective scanning width Effective printing width Contrast control Reception modes Copy function Telephone function Power requirements Operating temperature Humidity Power consumption Dimensions (without attachments) Weight (without attachments) 16-digit LCD display Letter: Approx.
-
Page 5: Important Safety Information
As a part of our policy of continuous improvement, SHARP reserves the right to make design and specification changes for product improvement without prior notice. The performance specification figures indicated are nominal values of production units. There may be some deviations from these values in individual units. -
Page 6: Table Of Contents
Table of Contents A Look at the Operation Panel 1. Installation Unpacking Checklist ........9 Connections . - Page 7 6. Special Functions Caller ID (Requires Subscription to Service) ....67 Distinctive Ring (Requires Subscription to Service) ... . . 72 Blocking Reception of Unwanted Faxes .
-
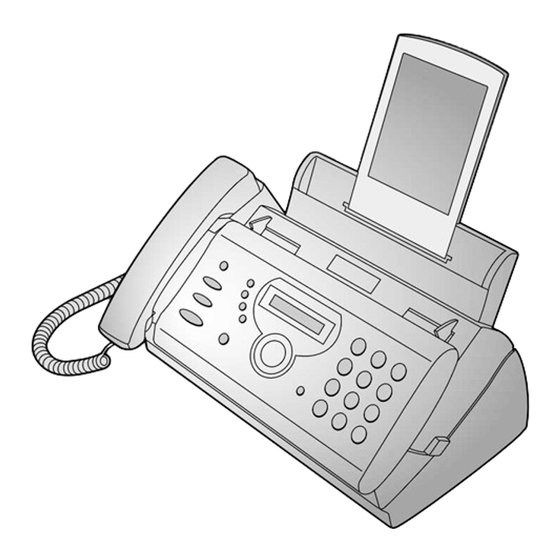
Page 8: A Look At The Operation Panel
A Look at the Operation Panel RESOLUTION/ SPEAKER RECEPTION MODE STOP FLASH REC/ MEMO COPY/HELP/POLL PLAY/ HOLD SPEED START/MEMORY 10 11 SPEAKER key Press this key to listen to the line and fax tones through the speaker when faxing a document (page 47). Note: This is not a speakerphone. - Page 9 UP and DOWN arrow keys Enlarge/reduce setting: When making a copy of a document, press these keys to select an enlarge/reduce setting (page 65). Volume setting: When a document is not in the feeder, press these keys to change the handset volume when the handset is lifted, the speaker volume when the SPEAKER key has been pressed, or the ringer volume at any other time (page 22).
- Page 10 REPEAT key Press this key while listening to a message to play it again (page 27). SKIP key Press this key while listening to a message to skip to the next message (page 27). DELETE key Press this key to erase recorded messages (page 28).
-
Page 11: Installation
1. Installation Unpacking Checklist Before setting up, make sure you have all of the following items. Paper tray Handset Handset cord Points to keep in mind when setting up Do not place the Do not place the machine near machine in direct heaters or air sunlight. -
Page 12: Connections
Connections Connections Connecting the handset Connect the handset as shown and place it on the handset rest. ♦ The ends of the handset cord are identical, so they will go into either jack. Make sure the handset cord goes into the jack marked with a handset symbol on the side of the machine! -
Page 13: Connecting The Telephone Line Cord
Connecting the telephone line cord Insert one end of the line cord into the jack on the back of the machine marked TEL. LINE. Insert the other end into a standard (RJ11C) single-line wall telephone jack. Setting the dial mode: The fax machine is set for tone dialing. - Page 14 Connections Comments: ♦ The fax machine is not designed for use on a line which has call waiting, call forwarding, or certain other special services offered by your telephone company. If you attempt to use the fax machine in conjunction with any of these services, you may experience errors during transmission and reception of facsimile messages.
-
Page 15: Loading The Imaging Film
DO NOT DISCARD THE TWO GREEN GEARS! Loading the Imaging Film When replacing the film, use a roll of Sharp UX- 5CR imaging film. One roll can print about 150 letter-size pages. Use only Sharp Genuine Supplies with this logo:... - Page 16 Loading the Imaging Film Remove the new roll of imaging film from its packaging. • Cut the band that holds the rolls together. Insert the green gears. Make sure the gears fit into the slots in the ends of the rolls. Insert the film into the print compartment.
-
Page 17: Loading Printing Paper
Loading Printing Paper You can load letter or legal size paper in the paper tray. Recommended paper weight is 20-lb. Copy Bond. The maximum number of sheets is as follows: Approx. Letter size: maximum stack height should not be higher than the line on the tray) Legal size: 5 sheets... -
Page 18: Setting The Paper Size
Loading Printing Paper Setting the paper size The fax has been set at the factory to scale received faxes to letter size paper. If you loaded legal paper, you must change the paper size setting to LEGAL. FUNCTION Press once and Press once and Press... -
Page 19: Entering Your Name And Fax Number
Entering Your Name and Fax Number Before you can begin sending faxes, you must enter your name and fax (telephone) number. You also need to set the date and time. Important! FCC regulations require that your name, telephone/fax number, and the date and time appear on each fax message you send. - Page 20 Press Enter your name by pressing number keys for each letter as shown in the chart below. Up to 24 characters can be entered. Example: SHARP = 7777 44 2 777 SPACE = ♦ To enter two letters in succession that require the same key, press after entering the first letter.
-
Page 21: Setting The Date And Time
Setting the Date and Time The date and time appear in the display and are printed at the top of every page you fax. Set the date and time as shown below. STOP START/MEMORY FUNCTION Press once and Press once and Press Enter a two-digit number for the month (“01”... -
Page 22: Daylight Saving Time
Setting the Date and Time Enter the year (four digits). Example: 2003 Enter a two-digit number for the hour (“01” to “12”) and a two-digit number for the minute (“00” to “59”). Example: 9:25 Press to select A.M. or START/MEMORY Press STOP Press... -
Page 23: Setting The Reception Mode
Setting the Reception Mode Your fax has three modes for receiving incoming faxes: FAX mode: Select this mode when you only want to receive faxes on your line. The fax machine will automatically answer all calls on four rings and receive incoming faxes. -
Page 24: Volume Adjustment
Volume Adjustment Volume Adjustment You can adjust the volume of the speaker, handset, and ringer using the up and down arrow keys. SPEAKER Speaker SPEAKER Press Press • SPEAKER Press again to turn off the speaker. until the display shows the desired volume level. - Page 25 Handset When talking through the handset, press until the display shows the desired volume level. • Note: The volume reverts to MIDDLE each time you replace the handset. Ringer Press SPEAKER (Make sure has not been pressed, the handset is not lifted, and a document is not loaded in the feeder.) •...
-
Page 26: Using The Answering System
2. Using the Answering System The built-in answering system allows you to receive both voice messages and faxes while you are out. Recording an Outgoing Message The outgoing message (OGM) is the greeting that the machine plays after answering a call to inform callers that they can leave a message or send a fax. Follow the steps below to record a message. -
Page 27: Operating The Answering System
START/MEMORY Press and speak into the handset to record a message. • The outgoing message can be up to 60 seconds long. While recording, the display will show the time left to record. When finished, replace the handset or press To listen to the outgoing message To listen to the outgoing message, follow Steps 1 and 2 of the above procedure and then press... - Page 28 Operating the Answering System Note: In TAD mode, the machine will automatically switch to fax reception if it detects six seconds of silence after answering a call. For this reason, if a caller pauses for this length of time while leaving a message, they will be cut off.
- Page 29 Listening to received messages When you return, the display will show the number of messages recorded. Follow the steps below to listen to your messages. Press PLAY/ HOLD • If you only want to listen to new messages (messages not previously listened to), continue to hold The messages will play.
- Page 30 Operating the Answering System Erasing received messages It is important to erase received messages after you listen to them to ensure that the memory does not become full. ♦ Erasing all messages: To erase all messages, press START/MEMORY then ♦ Erasing a single message: To erase a single message, press while the message is being played.
-
Page 31: Optional Answering System Settings
Optional Answering System Settings Setting ICM time Incoming messages (ICMs) are the messages which callers leave for you on the built-in answering system. The answering system is set at the factory to allow each caller a maximum of 4 minutes to leave a message. If desired, you can change this setting to 15, 30, or 60 seconds. - Page 32 Optional Answering System Settings ♦ NO (do not switch to FAX mode): The machine will answer after 20 rings, after which it will wait to receive a remote command. Most callers will hang up before it answers; however, when you call the machine from a remote location, you can wait until it answers, listen to your messages, and then erase them (see Remote Operations on page 64).
- Page 33 Press Press to turn on OGM only mode, to turn it off. STOP Press to return to the date and time display. CPC Detection When a caller hangs up, the central telephone exchange issues a CPC (Calling Party Control) signal. When the answering system detects this signal, it stops recording so that periods of silence are not recorded.
-
Page 34: Transfer Function
Transfer Function Transfer Function The Transfer function is used to have the machine automatically call you at a specified number every time it receives an incoming message. This lets you hear your messages immediately after they come in, even when you are at a remote location. - Page 35 Recording the transfer message The transfer message plays when you answer the telephone, and informs you that the call is a transfer call. It can be up to 15 seconds long. To record a transfer message, follow the steps below. The following is an example: “Hello.
- Page 36 Transfer Function Checking or erasing the transfer message To check or erase the transfer message, follow Steps 1 and 2 of the above procedure, and then press the message. Turning the Transfer function on and off When you go out and wish to use the Transfer function, turn it on as follows: FUNCTION Press once and...
-
Page 37: Override Ringing
Each time the machine receives an incoming message, it will call your programmed transfer number. When you answer, you will hear your recorded message telling you that the call is a transfer call. On the dial pad of your phone, enter . - Page 38 Override Ringing Press once and Press Press the number keys to enter a 3-digit override code. START/MEMORY Press to the date and time display. Overriding the answering system Your callers should follow the steps below to override the answering system. The caller calls your machine from a touch-tone telephone.
-
Page 39: Remote Operations
Remote Operations When you are out, you can call the machine from any touch-tone telephone and play back your messages using the remote commands. You can also use these commands to change the reception mode and other settings. Remote code number To access the machine to perform remote operations, you must first enter your remote code number. - Page 40 Remote Operations FUNCTION Press once and Press once. Press once. Press to turn on the Toll Saver function, or STOP Press to return to the date and time display. Retrieving your messages Call the machine from a touch-tone telephone. When your outgoing message begins, press •...
- Page 41 While the messages are playing, you can do any of the following: • Repeat: To listen to a message a second time, press telephone before that message ends. To move back to the previous message, press message. • Skip forward: To skip forward to the next message, press on the telephone.
- Page 42 Remote Operations Note: You can also call the machine and perform remote operations when the reception mode is set to FAX. In this case, when you call the machine, press immediately after it answers (before you hear the fax tone), and then continue from Step 2 above.
- Page 43 Recording a new outgoing message Press When you hear a short beep, speak into the telephone to record the new message. • The message can be up to 15 seconds long. After 15 seconds (or earlier if the machine detects silence after you finish speaking), you will hear a beep, and the new message will be played back.
- Page 44 Remote Operations Recording a new transfer message Press , and When you hear a short beep, speak into the telephone to record the new message. • The time for the transfer message is fixed at 15 seconds. After 15 seconds (or earlier if the machine detects silence after you finish speaking), you will hear a beep, and the new message will be played back automatically.
-
Page 45: Sending Faxes
3. Sending Faxes Transmittable Documents Size and weight The size and weight of documents that you can load in the document feeder depend on whether you load one page at a time or several pages at once. Loading one page at a time: Minimum size Maximum size 8.5"... -
Page 46: Loading The Document
Loading the Document Other restrictions ♦ The scanner cannot recognize yellow, greenish yellow, or light blue ink. ♦ Ink, glue, and correcting fluid on documents must be dry before they pass through the document feeder. ♦ All clips, staples, and pins must be removed from documents before loading in the feeder. -
Page 47: Adjusting The Resolution And Contrast
Adjust the resolution and/or contrast settings as explained in Resolution and Contrast below, then dial the receiving machine as explained on page 46. Adjusting the Resolution and Contrast If desired, you can adjust the resolution and contrast before sending a document. -
Page 48: Contrast Settings
Adjusting the Resolution and Contrast Contrast settings AUTO DARK Load the document(s). • The document must be loaded before the resolution and contrast can be adjusted. RESOLUTION/ Press RECEPTION MODE until the desired resolution and contrast settings appear in the display. •... -
Page 49: Sending A Fax By Normal Dialing
Sending a Fax by Normal Dialing With Normal Dialing, you pick up the handset (or press pressing the number keys. ♦ If a person answers, you can talk with them through the handset before sending the fax. (If you pressed talk.) ♦... -
Page 50: Sending A Fax By Automatic Dialing
Sending a Fax by Automatic Dialing When you hear the fax tone, press • If the transmission is completed successfully, the fax will beep once. • If an error occurs, the fax will beep three times and print a Transaction Report to inform you of the problem (see page 77). - Page 51 Enter a name by pressing number keys for each letter as shown in the chart below. Up to 15 characters can be entered. (If you do not wish to enter a name, go directly to Step 6.) Example: SHARP = 7777 44 2 777 SPACE = ♦...
- Page 52 Sending a Fax by Automatic Dialing ♦ To enter a lower case letter, continue pressing the key for the letter until the lower case letter appears. To enter one of the following symbols, press repeatedly: . / ! " # $ % & ’ ( ) + + , - : ; < = > ? @ [ ¥ ] ^ _ ' { | } START/MEMORY Press If you selected a Speed Dial number in Step 2, the display will briefly...
- Page 53 Select EDIT or CLEAR: EDIT: CLEAR: • If you selected CLEAR, go to Step 8. If you selected EDIT, make the desired changes to the number. • Press to move the cursor to the digit or digits you wish to change, and then enter the new digit.
- Page 54 Sending a Fax by Automatic Dialing Dialing an auto-dial number with the SPEED key If you are sending a fax, load the document(s). • If desired, press resolution and/or contrast. SPEED Press and then enter the 2-digit Speed Dial number (for example, press Check the display.
-
Page 55: Searching For An Auto-Dial Number
Searching for an auto-dial number If you don’t remember the Speed Dial number in which you have stored a full fax or phone number, follow these steps to search for the number. If you are sending a fax, load the document(s). - Page 56 Sending a Fax by Automatic Dialing Sending a fax by Direct Keypad Dialing You can also enter a full number with the number keys and then press the START/MEMORY key to begin dialing. You can use this method to dial a full number when you don't need to speak to the other party before faxing.
-
Page 57: Automatic Redialing
Redial You can automatically redial the last number dialed. This procedure can be used to send a fax or make a phone call. If you are sending a fax, load the document(s). • If desired, press RECEPTION MODE resolution and/or contrast. Press once. -
Page 58: Error Correction Mode
Sending a Fax by Automatic Dialing ♦ To stop automatic redialing, press ♦ Under certain conditions (for example if a person answers the call on a telephone), automatic redialing may stop before three redialing attempts are made. Error Correction Mode The fax machine is set to automatically correct any distortions in a transmission due to noise on the telephone line before printing at the receiving end. -
Page 59: Sending A Fax From Memory
Sending a Fax From Memory You can scan a document into the fax’s memory and send the document from memory. This increases transmission speed and allows you to send a fax to multiple destinations in a single operation. After transmission, the document is automatically cleared from memory. -
Page 60: Memory Transmission
Sending a Fax From Memory When you are ready to begin transmission, press • A Transaction Report is automatically printed out after Broadcasting is completed. Check the "Note" column of the report to see if any of the locations are marked "Busy" or have a communication error code. If so, send the document to those locations again. -
Page 61: Receiving Faxes
4. Receiving Faxes Using FAX Mode To select FAX mode, press RESOLUTION/ RECEPTION MODE in the display points to FAX. RESOLUTION/ RECEPTION MODE When the reception mode is set to FAX, the fax machine will automatically answer all calls on four rings and receive incoming faxes. ♦... -
Page 62: Using Tel Mode
Using TEL Mode Press once. Press once. Enter the desired number of rings (any number from 2 to 5). Example: 3 rings STOP Press to return to the date and time display. Note: If you are using Distinctive Ring, the fax machine will answer calls after two rings regardless of the above setting. - Page 63 Answering with the fax’s handset When the fax machine rings, pick up the handset. If you hear a fax tone, wait until the display shows RECEIVING and then replace the handset. If the other party first speaks with you and then wants to send a fax, press START/MEMORY after speaking.
- Page 64 Using TEL Mode If you hear a soft fax tone, wait until your fax responds (you will hear pronounced, high-pitched tones), then hang up. Beep If the fax doesn't respond, or if the other party first talks to you and then wants to send a fax, set the phone done (do not hang up), walk over to the fax, lift the fax’s handset, and press •...
-
Page 65: Optional Reception Settings
Optional Reception Settings Fax Signal Receive Your fax will automatically begin reception if you hear a soft fax tone after answering a call on your fax or an extension phone. If you use a computer fax modem to send documents on the same line, you must turn this function off in order to prevent your fax from mistakenly attempting to receive documents from the computer fax modem. -
Page 66: Substitute Reception To Memory
Substitute Reception to Memory FUNCTION Press once and Press once and Press once. Press to select AUTO, or select 100%. STOP Press to return to the date and time display. Substitute Reception to Memory In situations where printing is not possible, such as when your fax runs out of paper, the imaging film needs replacement, or the paper jams, incoming faxes will be received to memory. -
Page 67: Making Copies
5. Making Copies Your fax machine can also be used to make copies. Single and multiple copies (up to 99 per original) can be made, enabling your fax to double as a convenience office copier. Load the document(s) face down. (Maximum of 10 pages.) RESOLUTION/ •... - Page 68 Making Copies Copy Cut-off When making a copy of a document that is longer than the printing paper, use the copy cut-off setting to select whether the remaining part of the document will be cut off or printed on a second page. The initial setting is YES (cut off the remainder).
-
Page 69: Special Functions
6. Special Functions Caller ID (Requires Subscription to Service) If you subscribe to a caller identification service from your telephone company, you can set your fax machine to display the name and number of the caller while the fax rings. Important: ♦... -
Page 70: Display Messages
Caller ID (Requires Subscription to Service) Enter the three digits of your area code. START/MEMORY Press STOP Press to return to the date and time display. How Caller ID operates When you receive a call, the name and phone number of the caller will alternately appear in the display, beginning just before the second ring. - Page 71 Viewing the Caller ID list If you subscribe to a Caller ID service and have turned on the Caller ID function, your fax machine will keep information on the most recent 30 calls and faxes you have received. You can view this information, which consists of the name and number of each caller, in the Caller ID List.
-
Page 72: Priority Call
Caller ID (Requires Subscription to Service) To delete calls from the Caller ID list If you want to delete a single call from the caller list, press appears in the display. If you want to delete all calls from the list, hold down for at least 3 seconds while you are viewing any number in the list. - Page 73 Caller ID (Requires Subscription to Service) Blocking voice calls With Caller ID turned on, you can use the Anti Junk Fax function described in Blocking Reception of Unwanted Faxes in this chapter to block voice calls as well as faxes from your specified Anti Junk Number. In this case, when a voice call or a fax transmission comes in from the number you have specified as a "Junk Number", your fax will break the connection as soon as it receives the calling phone number from the caller ID service (before...
-
Page 74: Distinctive Ring (Requires Subscription To Service)
Distinctive Ring (Requires Subscription to Service) Distinctive Ring (Requires Subscription to Service) Important: ♦ To use distinctive ring, you must subscribe to a distinctive ring service from your local phone company. ♦ Your fax machine may not be compatible with some distinctive ring services. -
Page 75: Blocking Reception Of Unwanted Faxes
STOP Press to return to the date and time display. Set the reception mode to FAX. ♦ When using distinctive ring, you must set the reception mode of your fax machine to FAX. When your designated fax number is dialed, your fax will automatically answer and begin reception after two rings. -
Page 76: Polling (Requesting A Fax Transmission)
Polling (Requesting a Fax Transmission) Polling allows you to call another fax machine and have it send a document (previously loaded in its feeder) to your machine without assistance from the operator of the other machine. Hint: Polling is useful when you want the receiving fax machine, not the transmitting fax machine, to bear the cost of the call. -
Page 77: Printing Lists
7. Printing Lists You can print lists showing settings and information entered in the fax machine. The lists are described below. To print a list, follow these steps. FUNCTION Press once and Press once. Press until the desired list appears in the display. Press once. -
Page 78: Telephone Number List
Printing Lists Telephone Number List This list shows the fax and phone numbers that have been stored for automatic dialing. Setup List This list shows your current selections for the FUNCTION key settings. The list also shows your name and fax/telephone number as entered in the machine, and a sample of the header printed at the top of every page you transmit (HEADER PRINT). -
Page 79: Transaction Report
Transaction Report This report is printed out automatically after an operation is completed to allow you to check the result. Your fax machine is set at the factory to print out the report only when an error occurs. ♦ The Transaction report cannot be printed on demand. Headings in Transaction Report SENDER/ The name or fax number of the other machine involved in the... - Page 80 Printing Lists Transaction Report print condition You can change the condition under which a Transaction Report is printed out. Follow the steps below. FUNCTION Press once and Press once and Press once. Press a number from ALWAYS PRINT ERROR/MEMORY SEND ONLY ERROR ONLY NEVER PRINT STOP...
-
Page 81: Maintenance
8. Maintenance Print head Clean the print head frequently to ensure optimum printing performance. Note: Remove the paper from the paper tray before cleaning the print head. Unplug the power cord, and open the operation panel (press Take the imaging film out of the print compartment and place it on a sheet of paper. -
Page 82: Scanning Glass And Rollers
Maintenance Place the imaging film back in the print compartment. Rotate the front gear until the film is taut, and then close the operation panel (press down on both sides to make sure it clicks into place). Scanning glass and rollers Clean the scanning glass and rollers frequently to ensure the quality of transmitted images and copies. -
Page 83: The Housing
Flip up the green levers on each side of the white roller. Wipe the scanning glass (under the white roller) and rollers with a cotton swab. • Make sure that all dirt and stains (such as correcting fluid) are removed. Dirt and stains will cause vertical lines on transmitted images and copies. -
Page 84: Troubleshooting
9. Troubleshooting Problems and Solutions If you have any problems with your fax, first refer to the following troubleshooting guide. If you cannot solve the problem, call Sharp's Customer Assistance Center at 1-800-BE SHARP. Line error Problem LINE ERROR appears in the display. -
Page 85: Dialing And Transmission Problems
Dialing and transmission problems Problem No dial tone when you pick up the handset or press the SPEAKER key. Dialing is not possible. The power is on, but no transmission takes place. Nothing is printed at the receiving end. A distorted image is received at the other end. -
Page 86: Reception And Copying Problems
Problems and Solutions Reception and copying problems Problem The fax machine doesn't receive documents automatically. The printing paper comes out blank when you try to receive a document. General print quality is poor. The received document is faint. Received images are distorted. -
Page 87: General Problems
The quality of copies is poor and/or dark vertical lines appear. Reception/copying is interrupted. Dark vertical lines appear on copies and received faxes. General problems Problem Auto-dial numbers cannot be stored in the fax. Nothing appears in the display. The machine does not respond when you press any of its keys. -
Page 88: Messages And Signals
Messages and Signals Messages and Signals Display messages Note: If you have turned on the Caller ID function, see page 68 for display messages related to Caller ID. ADD PAPER & / PRESS START KEY (alternating messages) CHECK FILM/ CHECK COVER/ CHECK PAPER JAM (alternating messages) CHECK PAPER SIZE... - Page 89 MEMORY IS FULL/ SEE MANUAL (alternating messages) MEMORY PRINTING NO DATA OFF HOOK ON HOOK DIAL OVER HEAT PRINT HEAD FAIL/ YOU NEED SERVICE (alternating messages) READY TO SEND RECALLING The memory is full. You may have too many messages recorded in the answering system. To erase messages, see page 28.
-
Page 90: Audible Signals
Messages and Signals T.A.D. TRANSFER TOTAL MSGS:XX TOTAL PAGE(S) 01 Audible signals Continuous tone 3 seconds Intermittent tone 5 seconds (3 beeps) (1 second on, 1 second off) Rapid intermittent 35 seconds tone (0.7 seconds on, 0.3 seconds off) The answering system's transfer function has been turned on (see page 32). -
Page 91: Clearing Paper Jams
Clearing Paper Jams Clearing a jammed document If the original document doesn’t feed properly during transmission or copying, or DOCUMENT JAMMED appears in the display, first try pressing START/MEMORY . If the document doesn't feed out, remove it as explained below. Important: Do not try to remove a jammed document without releasing it as explained below. -
Page 92: Clearing Jammed Printing Paper
Clearing Paper Jams Flip down the green levers on each side of the white roller. Rotate the front gear until the film is taut, and then close the operation panel (press down on both sides to make sure it clicks into place). Clearing jammed printing paper Open the operation panel (press Gently pull the jammed paper out of... -
Page 93: Ordering Parts
1015 NW 52nd Street Ft. Lauderdale, FL 33309 Fox International, Ltd. 23600 Aurora Road Bedford Heights, OH 44146 Andrews Electronics 25158 Avenue Stanford Santa Clarita, CA 91355 Sharp Accessories and Supply Center 2130 Townline Road Peoria, IL 61615 TINSE4356XHTZ TCADZ3598XHZZ QCNWG209BXHOW QCNWG208BXHZZ... -
Page 94: Fcc Regulatory Information
If trouble is experienced with this equipment, or for repair or warranty information, please contact Sharp’s Customer Assistance Center. The number is 1-877-794-8675. If the equipment is causing harm to the telephone network, the telephone company may request that you disconnect the equipment until the problem is resolved. - Page 95 °...
- Page 96 °...
-
Page 97: Quick Reference Guide
Quick Reference Guide Sending Faxes Place your document (up to 10 pages) face down in the document feeder. Normal Dialing 1. Lift the handset or press 2. Dial the fax number. 3. Wait for the reception tone (if a person answers, ask them to press their Start key). -
Page 98: Guía De Referencia Rápida
Guía de referencia rápida Transmisión de mensajes telefax Coloque el original (hasta 10 páginas) cara abajo en el alimentador de documentos. Marcación normal Levante el auricular u oprima: Marque el número de telefax. Espere hasta escuchar el tono de recepción (si contestara una persona, pídale oprimir su tecla Start). -
Page 99: Index
Index Anti Junk Fax, 73 Audible signals, 88 Auto-dial numbers Storing, 25, 48 Using, 52, 53 Caller ID, 67-71 Caller ID List, 76 Contrast, 46 Copies, 65 Copy cut-off setting, 66 CPC Detection, 31 Date, setting, 19-20 Daylight Saving Time, 20 Dial mode, 11 Dialing Direct Keypad, 54... - Page 100 Index OGM only mode, 30 Ordering parts, 91 Outgoing message, 24 Override Ringing, 35 Paper jams, clearing, 89-90 Paper size setting, 16 Paper tray extension, 12 Paper, loading, 15 Polling, 74 Power cord, 10 Print contrast setting, 16 Print head, cleaning, 79-80 Priority Call, 70 Reception mode FAX mode, 21, 59...
- Page 105 REMOTE OPERATION CARD The card below is provided as a quick guide to remote operation. Cut it out and carry it with you when you go out. Remote Operation Guide 1. Call your fax from a touch-tone telephone, and press # when the outgoing message begins. 2.
-
Page 106: Remote Commands
REMOTE COMMANDS • PLAYBACK Play messages ... 7 # Move backward/repeat... 2 # Skip forward ... 5 # Stop ... 0 # Play new messages only .. 6 # (first stop playback) • ERASING MESSAGES Erase single message ... 3 # Erase all messages ... -
Page 107: Limited Warranty
In no event shall Sharp be liable, or in any way responsible, for any damages or defects in the Product which were caused by repairs or attempted repairs performed by anyone other than an authorized servicer. -
Page 108: Sharp Corporation
SHARP ELECTRONICS CORPORATION Sharp Plaza, Mahwah, New Jersey 07430-2135 SHARP CORPORATION PRINTED IN THAILAND (TINSE4356XHTZ)
Need help?
Do you have a question about the UX-A260 and is the answer not in the manual?
Questions and answers