Advertisement
Available languages
Available languages
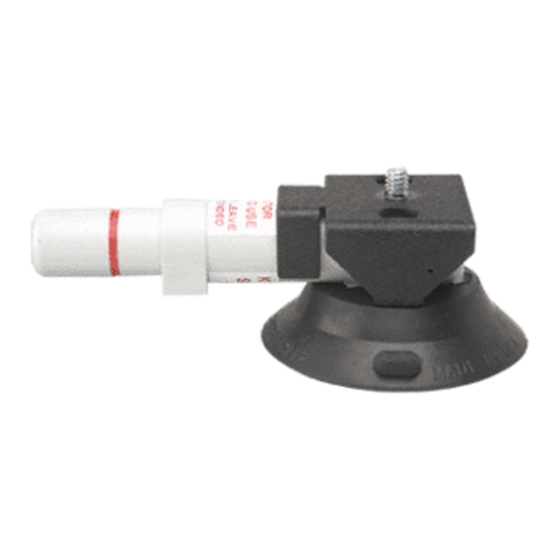
SMALL
VACUUM CUP
INSTRUCTIONS
RELEASE
TABS
OPERATION
To Attach
1) Clean the contact surface and,
if needed, the face of the
rubber pad (see Cleaning).
Caution: Some rubber
compounds may stain light surfaces or deform
soft coatings. When in doubt, test a sample of
such materials for permanent effects.
2) Position the vacuum cup so the red line will be
visible if it should appear while the cup is attached.
3) Press the rubber pad against the contact
surface as needed to form a continuous seal.
Caution: Make sure the surface material is
supported as needed to prevent breakage.
4) Pump the plunger until the cup attaches completely.
The red line serves as a vacuum indicator: When
the red line is hidden, the cup is ready for use.
5) Check the plunger frequently to make sure
the cup remains securely attached. If the red
line appears, pump the plunger until the red line
is hidden again (see WARNINGS).
To Release
1) Secure the load.
2) Pull a release tab until the cup disengages completely.
Caution: Remove the cup when not in use.
LIMITED WARRANTY
Wood's Powr-Grip products are guaranteed to
be free of any defects in manufacturing or
materials for 1 year from the date of purchase.
does NOT cover:
Warranty
Cut or scratched rubber parts.
Parts damaged by customer.
Abnormal wear and tear.
Abuse, misuse or neglect.
Modified products.
TROUBLESHOOTING
Scan or click the following codes for:
Troubleshooting Guide
Ordering Replacement Parts
KEEP FOR YOUR RECORDS
Record this information, in case you need
to claim Warranty service.
Date of Purchase:
Purchased From:
Model Number:
Stock Number:
For additional warranty
information, please scan or click this
code or visit wpg.com/warranty.
P.O. BOX 368 · 908 WEST MAIN | LAUREL, MT 59044 U.S.A. | TOLL FREE: 1-800-548-7341 PHONE: 1-406-628-8231 FAX: 1-406-628-8354
SPECIFICATIONS
Product Description
These tools use vacuum to mount loads temporarily or to support loads for manual handling, as follows:
Environmental Conditions
Temperatures: 0° to 120° F (-17° to 49° C)
•
Elevation: up to 5,000' (1,524 m).
•
RUBBER
Note: Maximum Load Capacity includes a 3:1 design factor and requires:
PAD
Attachment on clean, dry, relatively smooth, flat, nonporous surfaces
•
RED LINE
Minimum vacuum level of 17-1/2" Hg (-59 kPa)
•
Friction coefficient of 1
•
PLUNGER
Model
TL3AM
TL3PB1
TL3PH1304
LJ45HG
LJ45PHC
TL6AM
TL6PB1
TL6TD
TL3TH
RF36HG
LJ45HG
CE5RH
CE5HG
LP6FH
LP6HG
LP6RH
TL6FH
TL6HG
1
TL6RH
If the cup remains attached to a hot surface (eg, in direct sunlight) for an extended time, the rubber pad could bond
1
with the surface, resulting in damage to the surface or to the pad when it is removed.
2
Moisture or contaminants can reduce the slip resistance of the rubber pad.
The Maximum Load Capacity is based on lifting under controlled conditions with new vacuum cups attached to horizontal
3
load surfaces (except RH cups, which are attached to a vertical surface). Many factors can reduce the capacity, such as:
mounting or lifting a load when the cup is attached to a vertical or inclined surface
•
dynamic loading (eg, mounting loads on moving vehicles)
•
mounting or lifting a load that applies leverage to the cup (see www.wpg.com/mccc to calculate capacities for specific
•
loads on Mounting Cups)
Contact an authorized dealer or WPG for more information.
Caution: The user must be able to monitor the red line and repump the plunger whenever these cups are in use. If not, a
4
secondary restraint may be needed to protect mounted equipment.
MAINTENANCE
Service
Inspect the vacuum cup regularly for damage or a
missing air filter. Correct any faults before using the
cup (see TROUBLESHOOTING). Note: Replace the
rubber pad at least once every 2 years or whenever
damage is discovered.
If the hand cup does not function normally, first
clean the rubber pad according to the directions to
follow. If the condition persists,
see TROUBLESHOOTING.
Cleaning
1) Remove the air filter from
the rubber pad.
2) Use a clean sponge or lint-free
cloth to apply soapy water or another mild
cleanser to the pad face (see WARNINGS).
Caution: To prevent liquid from contaminating
the pump, hold the cup face-down or cover the
suction hole in the filter recess.
3) Wipe all residue from the pad face.
4) Allow the pad to dry and reinstall the air filter.
Storage
Store the cup in a clean, dry location out of direct
sunlight. Use the cover (when supplied) or another
appropriate means to protect the pad face from
damage.
1
Rubber Pad
Nominal Diameter
Mounting Cups
TL3
3" (8 cm)
LJ45
4-1/2" (11 cm)
TL6
6" (15 cm)
Lifting Cups
TL3
3" (8 cm)
RF36
3" x 6" (8 cm x 15 cm)
LJ45
4-1/2" (11 cm)
VPCE5
5-1/4" (13 cm)
LP6
6" (15 cm)
TL6
6" (15 cm)
2
Max. Load Capacity
Contact Surface
3
4
15 lbs (7 kg)
flat or curved
5 lbs (2.3 kg)
40 lbs (18 kg)
flat or curved
10 lbs (5 kg)
70 lbs (32 kg)
flat or curved
15 lbs (7 kg)
flat or curved
40 lbs (18 kg)
flat or cylindrical
40 lbs (18 kg)
flat or curved
45 lbs (20 kg)
flat or curved
70 lbs (32 kg)
70 lbs (32 kg)
flat or curved
WARNINGS
Failure to observe WARNINGS could damage the
hand cup or the load, or cause injury to the user.
•
Do not use the cup to support loads that exceed
the Maximum Load Capacity (see SPECIFICATIONS).
•
Do not use the cup to support a person.
•
Do not leave a cup unattended which could
injure people if it disengages unexpectedly.
•
Do not place the rubber pad against surfaces
which could damage a sealing edge.
•
Avoid conditions that could cause the cup to
slip or to disengage prematurely, such as:
contaminants, cuts or scratches in the pad face
or contact surface; attaching the cup to porous
materials; or applying pressure against the pad
edge.
•
Do not use the cup when the red line is visible.
If the red line reappears frequently, discontinue
use and see Service.
•
Do not allow anything to interfere with free
movement of the plunger while the cup is
attached.
•
Do not touch any release tab while using the cup.
•
Do not use harsh chemicals (such as solvents or
gasoline) or rubber cleaners and conditioners to
clean the pad.
Rev. 2.9 / 01-22 Instruction Sheet 32630
flat
SC
Advertisement
Table of Contents

Related Manuals for WPG TL3AM


Summary of Contents for WPG TL3AM
- Page 1 1 year from the date of purchase. dynamic loading (eg, mounting loads on moving vehicles) • mounting or lifting a load that applies leverage to the cup (see www.wpg.com/mccc to calculate capacities for specific • does NOT cover:...
- Page 2 • la carga dinámica (p. ej. el montaje de las cargas en los vehículos en marcha) • montar o levantar una carga que ejerce la fuerza de palanca en la ventosa (véase www.wpg.com/mccc para calcular las NO cubre: La garantía...
- Page 3 Jahr ab dem Kaufdatum. • dynamische Belastung (z.B. die Befestigung von Lasten auf fahrenden Autos) • Befestigen oder Heben einer Last, die eine Hebelwirkung auf den Sauger ausübt (siehe www.wpg.com/mccc zur Berechnung der Folgendes fällt NICHT unter die Garantie: Tragfähigkeit spezifischer Lasten auf Befestigungssaugern)
- Page 4 • un chargement dynamique (par ex. le montage des charges sur des véhicules en marche) date d’achat. • fixer au soulever une charge qui exerce de la force de levier sur la ventouse (voir www.wpg.com/mccc pour calculer des capacités spécifiques avec les ventouses de fixation) La Garantie NE couvre PAS : Mettez-vous en contact avec un distributeur autorisé...
Need help?
Do you have a question about the TL3AM and is the answer not in the manual?
Questions and answers