Table of Contents
Advertisement
Quick Links
Advertisement
Table of Contents

Related Manuals for Hart InterCivic Verity Print

Summary of Contents for Hart InterCivic Verity Print
- Page 1 Verity Print Field Guide VERSION 3.0 Document Number 6651-008 A...
- Page 2 Hart InterCivic, Inc. Any person receiving this document has a duty to take reasonable precautions preventing unauthorized use or disclosure of the contents.
- Page 3 Verity Print Field Guide VERSION 3.0...
-
Page 4: Table Of Contents
Verity Print ............................5 setting up Verity Print ............................6 setting up the ballot printer ......................... 6 setting up the Verity Print ..........................8 Verity Print orientation ............................11 screen orientation ............................11 report printer operation ..........................12 printing ballots ..............................13 other tasks and features ............................ -
Page 5: Verity Print
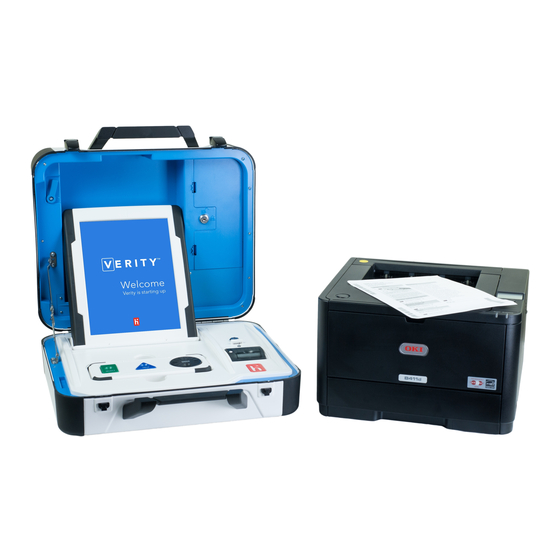
Verity Print Verity Print is an on-demand ballot printing device; using Verity Print, you can print and issue blank paper ballots to voters using an attached ballot printer. The voter then hand-marks their ballot and casts it either using Verity Scan, or into a ballot box to be scanned centrally. -
Page 6: Setting Up Verity Print
Verity Print setting up Verity Print setting up the ballot printer Set up the ballot printer table and set the ballot printer on the table. Plug in the square end of the USB printer cable into the printer. (The flat end will be plugged into the Verity Print.) - Page 7 The main tray extender kit for 17”/20” ballots includes two parts: The front piece installs into the MP Tray door, and is used • to support the ballots as they exit the printer. • The rear piece replaces the stock paper stop and rear tray extension cover.
-
Page 8: Setting Up The Verity Print
Verity Print setting up the Verity Print Position the Verity Print on a table next to the ballot printer. Follow local procedures to the remove tamper seal from the Verity Print handle, if applicable. Unlock the case (if locked). - Page 9 Unlock (A), unlatch (B), and remove the tablet (C). Seat the tablet in the cradle (A), tilt it back (B), and lock it in place (C). Verify the Verity Print device seals, per local procedure.
- Page 10 Print to power it on. During the power on process, a Power-On • Self Test report will print on Verity Print’s built-in printer. This report will indicate any hardware or connection issues; if any issues are noted, check connections and restart the device using the red power button.
-
Page 11: Verity Print Orientation
In addition to the date and time, the following appears at the bottom of the screen: Ballots: The number of ballots printed using the Verity Print for the current • election; at the start of a voting event, this number should be zero. -
Page 12: Report Printer Operation
Verity Print orientation report printer operation The thermal report printer is located on the right- hand side of the Verity Print. To open the paper compartment: While standing in front of the device, pull the lever on the top of the printer cover towards you and lift up to open the paper compartment. -
Page 13: Printing Ballots
Issue a ballot. If your jurisdiction has Verity AutoBallot, you can use the barcode reader attached to the Verity Print to scan barcode labels produced by your electronic pollbook. When using AutoBallot, you will scan the barcode, skipping steps 3-6 of this section. - Page 14 printing ballots Choose the ballot language, and then select OK. Choose the precinct, and then select OK. (Primary Elections only) Choose the party, and then select OK. Verify that the correct precinct and language are displayed on the screen (and party, if this is a primary election), and then select Yes, print the ballot.
- Page 15 Wait while the ballots print on the attached ballot printer. ...
-
Page 16: Other Tasks And Features
spoiling printed paper ballots To spoil a ballot that has already been printed from Verity Print, or to spoil a preprinted paper ballot, follow your local procedures (for example, filling out a spoiled ballot log and envelope). -
Page 17: Printing A Ballot Count Report
Verity Print help Verity Print is equipped with built-in help text that can be accessed from the touchscreen. The content of the Help screen will vary depending on the context. Select Help at the top right of the Verity Print screen to access the Help screen. -
Page 18: Shutting Down Verity Print
Verity Print shutting down Verity Print Prior to shutting down Verity Print. Print the BALLOT COUNT REPORT in accordance with you local jurisdictions guidelines. When you have finished printing ballots and reports, press the red power button on the back of the Verity Print to power it off. - Page 19 notes:...
- Page 20 ©2019 Hart InterCivic All Rights Reserved Hart InterCivic and Verity are registered trademarks of Hart InterCivic, Inc.
Need help?
Do you have a question about the Verity Print and is the answer not in the manual?
Questions and answers