Advertisement
Quick Links
Owner's Manual & Safety Instructions
Save This Manual
operating, inspection, maintenance and cleaning procedures. Write the product's serial number in the back
of the manual near the assembly diagram (or month and year of purchase if product has no number). Keep
this manual and the receipt in a safe and dry place for future reference.
Email our technical support at: productsupport@harborfreight.com
When unpacking, make sure that the product is intact
and undamaged. If any parts are missing or broken,
please call 1-888-866-5797 as soon as possible.
©
Copyright
2021 by Harbor Freight Tools
No portion of this manual or any artwork contained herein may be reproduced in
any shape or form without the express written consent of Harbor Freight Tools.
Diagrams within this manual may not be drawn proportionally. Due to continuing
improvements, actual product may differ slightly from the product described herein.
Tools required for assembly and service may not be included.
Keep this manual for the safety warnings and precautions, assembly,
Visit our website at: http://www.harborfreight.com
®
. All rights reserved.
Read this material before using this product.
Failure to do so can result in serious injury.
SAVE THIS MANUAL.
21l
Advertisement

Related Manuals for Bauer 21681-B


Summary of Contents for Bauer 21681-B
- Page 1 Owner’s Manual & Safety Instructions Save This Manual Keep this manual for the safety warnings and precautions, assembly, operating, inspection, maintenance and cleaning procedures. Write the product’s serial number in the back of the manual near the assembly diagram (or month and year of purchase if product has no number). Keep this manual and the receipt in a safe and dry place for future reference.
-
Page 2: Table Of Contents
Table of contents Safety ............2 Maintenance ..........13 Specifications ..........9 Parts List and Diagram ......... 15 Setup ............. 9 Warranty ............16 Operation ............10 WARNING SyMBOLS AND DEFINITIONS This is the safety alert symbol. It is used to alert you to potential personal injury hazards. -
Page 3: Safety
personal Safety 1. Stay alert, watch what you are doing and 5. Do not overreach. Keep proper use common sense when operating a footing and balance at all times. This power tool. Do not use a power tool while you are tired or under the influence of drugs, alcohol or medication. - Page 4 Service Have your power tool serviced by a qualified repair person using only identical replacement parts. Safety Warnings common for Grinding, Sanding, polishing, or Abrasive cutting-off Operations 1. This power tool is intended to function as a grinder, sander, polisher, or cut-off tool. Read all safety warnings, instructions, instructions listed below may result in electric shock, fire and/or serious injury.
- Page 5 12. Use clamps to support workpiece 20. Avoid unintentional starting. Prepare to begin work before whenever practical. Never hold a small turning on the tool. 21. Do not depress the spindle lock when starting or during operation. to control the tool. Round material such 22.
- Page 6 Kickback and Related Warnings Kickback is a sudden reaction to a pinched or 2. Use special care when working corners, snagged rotating wheel, backing pad, brush sharp edges etc. Avoid bouncing and or any other accessory. Pinching or snagging causes rapid stalling of the rotating accessory edges or bouncing have a tendency which in turn causes the uncontrolled power to snag the rotating accessory and...
- Page 7 Safety Warnings Specific For Wire Brushing Operations 1. Be aware that wire bristles are thrown by 3. Direct the discharge of the spinning wire the brush even during ordinary operation. brush away from you. tiny wire fragments may be discharged at excessive load to the brush.
- Page 8 Grounding TO pREVENT ELEcTRIc SHOcK AND DEATH FROM INcORREcT GROUNDING: check with a qualified electrician if you are in doubt as to whether the outlet is properly grounded. Do not modify the power cord plug provided with the charger. Never remove the grounding prong from the plug. Do not use the charger if the power cord or plug is damaged.
-
Page 9: Specifications
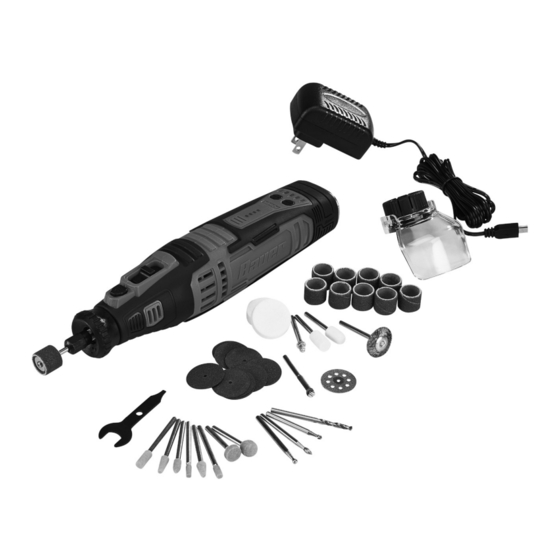
Specifications Battery 8V Li-ion 2000mAh Charging Time 2 to 3 hours Charger Input 120VAC, 0.6A Charger Output 9.0VDC, 1.0A No Load Speed n 0 : 5000 - 30,000/min Collet Size 1/8″ (Ø35mm) Setup - Before Use: Read the ENTIRE IMpORTANT SAFETy INFORMATION section at the beginning of this manual including all text under subheadings therein before set up or use of this product. - Page 10 Operating Instructions Read the ENTIRE IMpORTANT SAFETy INFORMATION section at the beginning of this manual including all text under subheadings therein before set up or use of this product. Tool Set Up TO pREVENT SERIOUS INJURy FROM AccIDENTAL OpERATION: Turn the power Switch of the tool off, wait for the motor to stop, before adjusting tool or installing accessories.
- Page 11 Inserting a Bit 1. Depress the Spindle Lock. Rotate collet until shaft is Spindle Lock engaged by the lock. 2. Loosen the Collet Nut by turning it counterclockwise, using the Wrench provided. 3. To remove a bit: Pull the bit straight out of the Collet once the Collet Nut is loose.
- Page 12 General Operating Instructions TO pREVENT SERIOUS INJURy WHILE IN OpERATION: Use personal protective equipment. Always wear eye protection. Wear ANSI-approved safety goggles with side shields. Speed Buttons 1. Charge the tool before use. 2. Select an appropriate bit or attachment for the job.
-
Page 13: Maintenance
Maintenance and Servicing procedures not specifically explained in this manual must be performed only by a qualified technician. TO pREVENT SERIOUS INJURy FROM AccIDENTAL OpERATION: Turn the power Switch off and wait for tool to completely stop before performing any inspection, maintenance, or cleaning procedures. TO pREVENT SERIOUS INJURy FROM TOOL FAILURE: Do not use damaged equipment. - Page 14 Troubleshooting problem possible causes Likely Solutions Tool will not start. 1. Battery discharged. 1. Charge Battery. 2. Internal damage or wear. 2. Have technician service tool. (Carbon brushes or switch, for example.) Performance 1. Accessory dull 1. Keep cutting accessories decreases or damaged.
-
Page 15: Parts List And Diagram
parts List and Diagram part Description part Description Collet Nut Speed Light Guide Collet PCB Board Screw Housing Cap Battery Components Axle Motor Case Parts Bearing Ring Spindle Lock End Cap Power Switch Motor DC7.2 Panel Electrode Bracket PCB Board Electrode Rubber Pad 2 Battery Indicator Motor Screw... -
Page 16: Warranty
Limited 90 Day Warranty Harbor Freight Tools Co. makes every effort to assure that its products meet high quality and durability standards, and warrants to the original purchaser that this product is free from defects in materials and workmanship for the period of 90 days from the date of purchase. This warranty does not apply to damage due directly or indirectly, to misuse, abuse, negligence or accidents, repairs or alterations outside our facilities, criminal activity, improper installation, normal wear and tear, or to lack of maintenance.
Need help?
Do you have a question about the 21681-B and is the answer not in the manual?
Questions and answers