Table of Contents
Advertisement
Quick Links
Advertisement
Table of Contents

Subscribe to Our Youtube Channel
Related Manuals for minrray UV401


Summary of Contents for minrray UV401
- Page 1 4K Ultra HD PTZ Camera User Manual (V1.0)
- Page 2 Warning Improper operation may cause damage to the structure of product, resulting in malfunction of the camera; please note the following operations. Do not hold the lens barrel by hand when moving the camera; Please move the camera by holding its base with both hands or one hand.
-
Page 3: Notes
Notes This manual describes in detail the features and the principles and methods for installation and operation of this product. Please read this manual carefully before installing and using the product. 1. Precautions for Use * Avoid heavy weight, violent vibration and liquid to prevent damage to the product during transportation, storage, installation and use. -
Page 4: Table Of Contents
Contents NOTES..................................- 2- 1. QUICK INSTALLATION INSTRUCTIONS…………………………………………………………………..- 5 - 1.1. P ..........................- 4 - RODUCT ESCRIPTION 1.2. W ................................- 5 - IRING 1.3.TALLYL ..........................-5 - ONTROL 1.4. B RACKET INSTALLATION................................-6 。 2. PRODUCT OVERVIEW............................- 8 - 2.1 P ............................ -
Page 5: Quick Installation Instructions
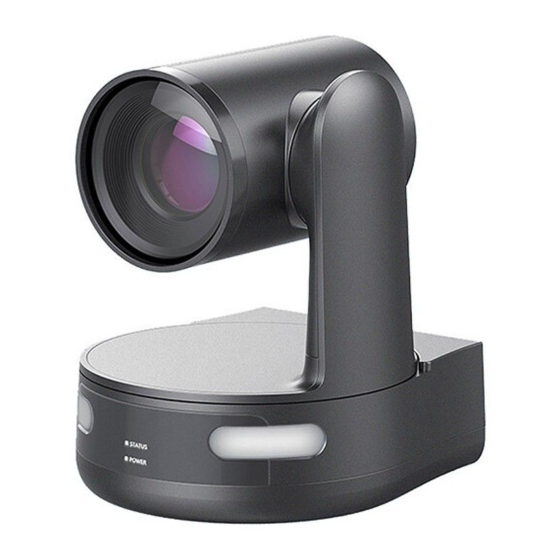
1. Quick Installation Instructions 1.1Product Description Fig. 1.1 Product Connectivity Connector specification: 1. Lens 7. Screw Hole for Installation of Tripod 13、Power Outlet (DC12V) 2. Base 8. Location Hole for Installation of Tripod 14. Power Switch Keys 3. TALLY Lamp 9. -
Page 6: Wiring
1.2Wiring Rotary switch: Video system selection RS232C VISCA cable (supplied) To VISCA IN (VISCA input) To VISCA OUT (VISCA output) To another VISCA IN RS485/RS422 interface To AC (alternate AC power adapter (supplied) current)outlet To DC12V IN 12V (12V DC input) Power cable (supplied) Power switch: Computer, TV set orVCR... -
Page 7: Bracket Installation
1.4Bracket Installation Note: Please install the rubber mat at the installation point of bottom-middle bracket when using the product. Bracket mounted, ceiling mounted, and vertically mounted; the material of wall surface is limited to formwork or concrete; installation on gypsum board is not available. 1) The procedure for wall mounting is show in the figure below. - Page 8 Main machine Wall surface Wall surface Wall mounting bracket 1/4-20UNC screw 2) The hanging procedure is shown in the figure below Ceiling mounted upper cover board PA3X30 tapping screw PM3X6 screw Rubber plug for screw 1/4-20UNC screw Ceiling mounted lower cover board Main machine Ceiling mounted upper cover board Ceiling...
-
Page 9: Product Overview
Ceiling 1/4-20UNC screw Ceiling mounted lower cover board Ceiling mounted upper cover board Ceiling mounted lower cover board Main machine Main machine Ceiling PM3X6 screw Main machine 2、Product Overview 2.1 Product Model This series of products are classified into two models by optical multiple of lens; the specific product models are shown in Fig. -
Page 10: Product Size
Model A----- XX IR------- IR remote control WR------- Wireless remote control A------- 12x optical zoom lens (1/2.5) Fig. 2.1 Product Model Please consult this manual and check the product features corresponding to your own product against product models given above. 2.2 Product Size Fig. -
Page 11: Supplied Accessories
2.3 Supplied accessories Please check and confirm all necessary accessories when opening the package; the supplied accessories for each model are set forth in Table 2.1. Table 2.1 Supplied accessories Configur Standard configuration delivered Options for customer ation 1 power adapter 1 IR remote control 1 USB 3.0 cable 1 wireless remote control... - Page 12 Port Definition Data Terminal Ready Data Set Ready Transmit Data System Ground Receive Data System Ground IR Commander Signal No Connection 3) RS232 (DB9) Port Definition Definition Port Data Carrier Detect Receive Data Transmit Data Data Terminal Ready System Ground Data Set Ready Request to Send Clear to Send...
-
Page 13: Dial Switch
3.TXD 4.GND 5.RXD 6.GND IR OUT 7.OPEN 8.OPEN Note: The product is designed with RS232 input and output ports that can be cascaded in the above-noted way; 2.5. Dial Switch Rotary dial codes 0-F correspond to video system 0: Video format 4K60 8: Video format 1080P30 1: Video format 4K50... -
Page 14: Product Features
2.6 Product Features UHD cameras for information and communication are designed with sophisticated features, excellent performance and abundant connectors; advanced ISP processing technology and algorithm contribute to intensely alive and lifelike image effect, uniform screen brightness, strong sense of light color hierarchy, high resolution, and favorable color recoverability. H.265/H.264 encoding is supported, which offers smoother and clearer screen at low bandwidth. - Page 15 4K UHD: SONY CMOS image sensor is employed to offer a maximum resolution of 4K (3840×2160; 12.4 effective megapixels) and an output frame rate of up to 60 frames per second; presenting clear and realistic UHD video, vividly displaying the expressions and movements of characters, and offering superb sharpness and resolution of image.
-
Page 16: Technical Parameters
A wide range of applications: Conference, education, healthcare, government affairs, cloud video, collaborative office, multimedia fusion, emergency command, broadcast, justice, public security and military, and other system applications. 2.7 Technical Parameters Parameters of Camera and Lens Optical zoom 12x optical zoom Range of focal f=3.85 mm ~ 43.06 mm ±5% length... - Page 17 Parameters of Camera and Lens Focus mode Automatic/manual/one-click focus Exposure mode Automatic, manual, shutter priority, aperture priority, brightness priority Aperture F1.8 ~ F11, CLOSE Parameters Shutter speed 1/25~1/10000 Backlight On/off compensation Dynamic range Off/dynamic level adjustment Brightness, chroma, saturation, contrast, sharpness, black-and-white mode, gamma Video adjustment curve 255dB...
- Page 18 Interface specifications USB communication UVC (video communication protocol) and UAC (audio communication protocol) protocols Power interface HEC3800 power outlet (DC12V) Power adapter Input AC110V-AC220V; output DC12V/2.5A Input voltage DC12V±10% Input current <1A Overall power <12W consumption PTZ Parameters Horizontal Rotation -170°~+170°...
-
Page 19: Use Of Remote Control
3、Use of remote control Operating instructions for remote control: Remote control is classified into IR remote control and wireless remote control; please read the following based on the type of remote control. 3.1 Pairing for Wireless Remote Control Wireless remote control: The procedures for operation, pairing and clearing pairing data are as follows. -
Page 20: Keys Of Remote Control
3.2 Keys of Remote Control After the normal startup of product, it receives and executes IR command; press the key of remote control, and the remote receiving indicator will flash in green; when the key is released, the indicator stops flashing. The setup, selection, horizontal and pitch rotation of preset position are available with IR remote control. - Page 21 5. Set Key and Clear Preset Position Key Set the preset position: Press [Preset] and one of the number keys (0-9) successively, and a preset position corresponding to the number key will be preset. Note: Up to 10 preset positions can be set with the remote control.
-
Page 22: Menu Description
9. Key Combination Function [#] + [#] + [#]: Cancel all preset positions [#] + [#] + [0]: Switch to video format 4KP60 [*] + [#] + [6]: Restore factory defaults [#] + [#] + [1]: Switch to video format 4KP50 [*] + [#] + [3]: Set the menu language to Chinese [#] + [#] + [2]: Switch to video format 4KP30 [*] + [#] + [4]: Set menu language to English... - Page 23 3) English Menu - 22 -...
- Page 24 - 23 -...
-
Page 25: Network Configuration
4. Network Configuration 4.1 Network Connection Network connection: Connect the product via network cable to external Internet access of the PC; or alternatively, connect the product to Internet network via router or switch, in which case, the user is allowed to log into product IP through a browser. -
Page 26: Ie Login
4.2 IE Login 1. Client Login Enter the default IP address 192.168.5.163 into the address bar of browser, and click Enter key to get into the Web client login interface. Login falls into login as administrator and login as common user; operations such as preview, playback, configuration and logout are available for login as administrator (the user name and password are "admin"... -
Page 27: Streaming Media
3. Webpage Login Enter your user name and password after installing the plug-in, and click on "Login" (the initial default user name and password are "admin", and can be changed by yourself after entering the interface) to get into the web client management interface. -
Page 28: Software Upgrading
rtsp://192.168.5.163:554/live/av1 (av1 secondary code stream) Where the default IP address of camera is 192.168.5.163, the rtmp video streaming is obtained in the following way rtmp://192.168.5.163:1935/live/av0 (av0 main code stream) rtmp://192.168.5.163:1935/live/av1 (av1 secondary code stream) Push Video Streaming Enter the following interface by selecting "Configuration" -> "Video Configuration" -> "Stream Release". To push the rtmp audio and video streaming to the server, the camera IP must be mapped to the extranet;... -
Page 29: Serial Port Communication Control
3. Click "Browse" and select the upgrade file ".mrg"; double-click the file and click "Upgrade" button for automatic upgrading. 4. Upon completion of upgrading, restart the product and a message reading "Upgraded successfully" will appear. Log into the network and check whether the software version is consistent with the upgrade file to assure successful upgrading. -
Page 30: Visca Protocol Device Control Command
Command packet Comment Returned when the command format is different or when a command Syntax Error z0 60 02 FF with illegal command parameters is accepted Returned when a command cannot be executed due to current Command Not Executable z0 61 41 FF conditions. - Page 31 Command Function Command packet Comment Down 8x 01 04 03 03 FF Direct 8x 01 04 43 00 00 0p 0q FF pq: R Gain Reset 8x 01 04 04 00 FF 8x 01 04 04 02 FF Manual Control of B Gain CAM_ Bgain Down 8x 01 04 04 03 FF...
- Page 32 Command Function Command packet Comment 50HZ 8x 01 04 23 01 FF 50HZ 60HZ 8x 01 04 23 02 FF 60HZ Reset 8x 01 04 02 00 FF 8x 01 04 02 02 FF Aperture Control CAM_Aperture Down 8x 01 04 02 03 FF Direct 8x 01 04 42 00 00 0p 0q FF pq: Aperture Gain...
-
Page 33: Viscap Rotocol Inquiry Command
Command Function Command packet Comment 8x 01 06 03 VV WW RelativePosition 0Y 0Y 0Y 0Y 0Z 0Z 0Z 0Z FF Home 8x 01 06 04 FF Reset 8x 01 06 05 FF 8x 01 06 07 00 0W W:1 UpRight 0:DownLeft 0Y 0Y 0Y 0Y 0Z 0Z 0Z 0Z FF Pan-tiltLimitSet YYYY: Pan Limit Position(TBD) -
Page 34: Pelco-D Protocol Command List
Command Command packet Return packet Comment y0 50 03 FF y0 50 02 FF CAM_LR_ReverseInq 8x 09 04 61 FF y0 50 03 FF y0 50 02 FF CAM_PictureFlipInq 8x 09 04 66 FF y0 50 03 FF p:Color Gain setting 0h (60%) to Eh CAM_ColorSaturationInq 8x 09 04 49 FF y0 50 00 00 00 0p FF... -
Page 35: Pelco-P Protocol Command List
Function Byte1 Byte2 Byte3 Byte4 Byte5 Byte6 Byte7 Zoom Out 0xFF Address 0x00 0x40 0x00 0x00 Focus Far 0xFF Address 0x00 0x80 0x00 0x00 Focus Near 0xFF Address 0x01 0x00 0x00 0x00 Stop 0xFF Address 0x00 0x00 0x00 0x00 Set Preset 0xFF Address 0x00... -
Page 36: Maintenance And Troubleshooting
6. Maintenance and Troubleshooting 6.1 Product Maintenance 1) If the device is not for long-term service, please turn off its power switch and disconnect the AC power adapter from AC outlet when it's left unused. 2) Please use soft fabric or tissue paper to remove dust from housing of the device to avoid scratch. 3) Wipe the device lens with a dry soft cloth when cleaning the lens;... -
Page 37: Copyright Statement
b. Check whether the network cable is connected properly (flashing yellow indicator of network port indicates correct connection of network cable) c. Check whether the computer is loaded with network segment that matches the IP address of device d. Click "Start" in the computer, select "Run", and enter cmd; click "OK" and open the DOS command window;...
Need help?
Do you have a question about the UV401 and is the answer not in the manual?
Questions and answers