Table of Contents
Advertisement
Quick Links
Advertisement
Table of Contents

Subscribe to Our Youtube Channel
Related Manuals for Docomo DIGNO KY-41B


Summary of Contents for Docomo DIGNO KY-41B
- Page 1 KY-41B INSTRUCTION MANUAL...
- Page 2 The contents of this manual as well as the website URL are subject to change without prior notice. z Reproduction of this manual in part or in whole Quick Start Guide (bundled) (in without prior permission is prohibited. Japanese only) z The screens and illustrations in this manual are This guide describes basic operations. shown as examples. Actual screens and illustrations Instruction Manual (in PDF format) may differ. z Key illustrations in this manual may differ in typeface This manual describes detailed guidance and or shape from actual keys, or may be partially omitted. operations of functions. Download from the NTT DOCOMO website. ( h ttps://www.nttdocomo.co.jp/english/support/ trouble/manual/download/ky-41b/index.html) NOTE z "KY-41B" is referred to as "handset" in this manual. z This manual refers to microSD card or microSDHC card as "microSD card" or "microSD". z The explanations in this manual are based on the handset at time of purchase.
- Page 3 Handset and bundled accessories Back Cover KY01 <K> Battery Pack KY01 Quick Start Guide (in Japanese only) z You can also check and purchase optional accessories (sold separately) compatible with the handset at the NTT DOCOMO Online Shop. ( h ttps://onlineshop.smt.docomo.ne.jp/options/search. html) (in Japanese only) KY-41B Contents/Precautions...
-
Page 4: Table Of Contents
PC mail ..................84 Web browser ................87 Before Using the Handset Tools/Apps Part names and functions ..........31 Basic operation ..............34 Calendar .................. 91 docomo nano UIM card ............41 Alarm ..................92 microSD card................. 46 Countdown timer ..............94 Battery pack ................48 Stopwatch ................94 Charging .................. 50 Notepad................... - Page 5 Lock/Security ..............104 Warranty & after-sales service ........142 Wireless/Network ............. 108 Software updates ............. 144 docomo service ..............114 Main specifications ............146 Battery .................. 115 Specific Absorption Rate (SAR) Information of Mobile Handset Information (About Phone) ......116 Phones ................. 148 More Settings ..............116 Export Control Regulations ........... 150 Intellectual property rights ..........150 Data Management...
-
Page 6: Using The Handset
The handset converts conversations into a digital properly. In this case, delete saved data. signal and sends it to the other party over the radio. If z Ensure the security of your handset by setting a the signal cannot be reconverted properly by such as screen lock password in case you lose it (→P. 1 04). moving to an area with a weak signal, the voice may z If terms of use appear, follow the instructions on the not be heard correctly. screen. z Take notes of data stored on the handset or save the z Apps and their service contents are subject to change data to external memory devices such as microSD without prior notice. cards and PCs periodically. DOCOMO shall not be liable z The handset does not support providers other than whatsoever for any loss of content due to a failure, sp-mode, mopera U and Business mopera Internet. repair, model change or other handling of the handset. z For details on usage fee, refer to the NTT DOCOMO website. Contents/Precautions... -
Page 7: Precautions (Always Follow These Directions)
The handset display is manufactured using high- Precautions (ALWAYS precision technology, but it may contain dots that fail FOLLOW THESE DIRECTIONS) to light or that remain permanently lit on some areas. This is a characteristic of the display and not a malfunction. „ Before use, read these "Precautions" carefully and use z Note that DOCOMO shall not guarantee operation of your handset properly. commercially available optional accessories. „ These precautions contain information intended to prevent bodily injury to the user and to surrounding people, as well as damage to property, and must be observed at all times. „ The following symbols indicate the different degrees of injury or damage that may occur if information provided is not observed and the handset is used improperly. This sign denotes that "death DANGER or serious injury (* ) may directly result from improper use". This sign denotes that "death WARNING or serious injury (* ) may result from improper use". - Page 8 *1 Serious injury: This refers to loss of sight, injury, burns Denotes mandatory instructions (high- and low-temperature), electric shock, broken (matters that must be complied with). bones, poisoning, etc. with remaining aftereffects, and injuries requiring hospital admission or long-term hospital visitation. Denotes that the equipment should be *2 Minor injury: This refers to injuries, burns (high- and unplugged. low-temperature), electric shock, etc. that do not require hospital admission or long-term hospital visitation. *3 Damage to property: This refers to extended damage Handling the handset, battery pack, to buildings, furniture, livestock, pets, etc. adapters, and docomo nano UIM „ The following symbols indicate specific directions. card (common) DANGER Denotes things not to do (prohibition). Do not use, store or leave the equipment in locations subject to high temperatures or Denotes not to disassemble. where heat collects (near a fire or heating unit, in a kotatsu or futon, under direct sunlight, inside a vehicle on a hot day, etc.). Denotes not to use where it could get May cause fire, burns, injury, electric shock, etc. wet. Do not place the equipment inside or near cooking appliances such as microwave ovens, IH cooktops, or pressure cookers. Denotes not to use with wet hands. May cause fire, burns, injury, electric shock, etc.
- Page 9 Do not allow water or other liquid (beverage, May cause fire, burns, injury, electric shock, etc. sweat, seawater, pet urine, etc.) to get inside Refer to the following for details on the external connector terminal. waterproofness. May cause fire, burns, injury, electric shock, etc. →P. 2 4 Refer to the following for details on Do not subject the handset to strong pressure waterproofness. or break the handset. Especially when carrying →P. 2 4 it in your pocket, do not hit it or press it Use only optional accessories specified by between other objects. NTT DOCOMO. May cause fire, burns, or injury due to battery Using products other than those specified may damage. cause fire, burns, injury, electric shock, etc. * Examples to avoid z Sitting or squatting with handset in your pants or WARNING skirt pocket z Handset becoming caught in a sliding door or vehicle door when in a jacket pocket Do not subject the equipment to strong force, z Stepping on the handset when it is on something impact, or vibration by dropping it, stepping on ...
- Page 10 Do not allow conductive materials (such as For use at a gas station or similar location, metal objects or pencil lead) to come into follow the instructions of the facility. contact with the external connector terminal, Do not charge at a gas station or similar location. If using at a gas station or similar location, be or dust to enter them. careful not to drop, and in particular, do not use May cause fire, burns, injury, electric shock, etc. while filling. Do not cover or wrap the equipment with May ignite flammable gases, etc. and cause bedding etc. during use or while charging. explosion, fire, etc. May cause fire, burns, etc. If there is abnormal odor/sound, smoke, When caring for equipment, ensure that no overheating, discoloration, distortion, or other disinfectant or water enters the external abnormalities during use, charging, or storage, connector terminal, earpiece/speaker, or do the following while exercising caution. mouthpiece/microphone. z Unplug the power plug from the outlet or Handset breakage may cause injury, electric shock, accessory socket. etc. z Turn off the handset. z Remove the battery pack from the handset. If charging does not complete after the Continued use may cause fire, burns, injury, electric specified charging time, discontinue charging. shock, etc. Overcharging may cause fire, burns, injury, etc.
- Page 11 2. Handling the handset Do not store or use the equipment in locations that are subject to humidity, dust, or high DANGER temperatures. May cause fire, burns, electric shock, etc. Refer to the following for details on Do not throw the handset into a fire or heat it. waterproofness/dustproofness. May cause fire, burns, injury, etc. →P. 2 4 If being used by a child, a guardian should Do not apply excessive force to the handset show them the proper way to handle such as by puncturing it (sharp object), hitting equipment, and do not allow improper use. it (hard object), or stepping on it. They may swallow parts, or may cause injury, May cause fire, burns, injury, etc. electric shock, etc. If substance in the handset gets in your eyes, Do not leave the equipment in the reach of mouth, etc., rinse with clean water and consult young children. a doctor immediately. They may swallow parts, or may cause injury, Substances in handset may cause loss of sight or electric shock, etc. other physical harm. Note that equipment may become warm if handset is used for a continued period or while WARNING charging. Be careful not to have unintended, continued contact with equipment such as by falling asleep with equipment in pocket, etc. Do not view a repeatedly flickering screen for The handset, battery pack, or adapter may become a prolonged period. warm if you use apps, calling, or data ...
- Page 12 Do not allow water or other liquids (beverage, When you are on a handsfree call, while sweat, seawater, pet urine, etc.), metal (cutter ringtone is playing loudly, when in standby, blades, staples, etc.), flammable material, or etc., be sure to keep handset at a safe other foreign objects to enter the docomo distance from your ears. nano UIM card slot or microSD card slot on Adjust to an adequate volume when using the handset. earphones with microphone or similar Note the correct locations and orientations for accessory to play games or play back videos/ inserting the docomo nano UIM card and music. microSD card. When making a handsfree call, handset emits sound loudly. May cause fire, burns, injury, electric shock, etc. Even in standby, the ringtone or alarm may ring Turn off the handset or set it to Airplane mode suddenly. before going aboard an airplane. Listening to loud sound continuously for a long Use of handset on board an aircraft is restricted. time may cause hearing impairment or other Follow instructions of the airline. difficulty. Radio waves may adversely affect an aircraft s In addition, not being able to hear surroundings electronic devices. may cause an accident. Prohibited use aboard an aircraft may be subject Users with a heart condition should adjust to penalty by law. vibration and ringtone volume as needed. For use at a hospital, follow the instructions of Handset suddenly vibrating and ringing for a new ...
- Page 13 Power off handset near electronic devices If display breaks and substance in the handset that use precision control or faint signals. leaks, do not let it get on your skin (face, hands, etc.) or clothes. Radio waves may cause electronic devices to malfunction or may adversely affect operation. May harm your eyes, skin, etc. * Take particular care with the following devices If substance in the handset gets in your eyes, Hearing aids, implanted cardiac pacemakers, mouth, etc. or on your skin or clothes, immediately implanted cardioverter-defibrillators, other rinse with clean water. electronic medical devices, and other automatically If it gets in your eyes, mouth, etc., rinse and controlled devices or equipment. If you are using immediately consult a doctor. an implanted pacemaker, implanted defibrillator, or Do not use more force than necessary to other electronic medical device, check with the remove the back cover. manufacturer or vendor regarding any effect that May break the back cover and cause injury, etc. radio waves may have on it. Avoid pinching your fingers or other part of If the display or camera lens is damaged, be yourself when attaching the back cover. careful of broken glass and the exposed inside May cause injury, etc. of the handset. Do not use the handset with the back cover Touching the broken or exposed parts may cause removed. burns, injury, electric shock, etc. May cause burns, injury, electric shock, etc. CAUTION Before using the handset in a car, check with the car manufacturer or dealer regarding any effect that radio waves may have on it. Do not swing the handset by its strap, etc.
- Page 14 3. Handling the battery pack If use of the handset causes any skin abnormalities, immediately stop using the DANGER handset and seek medical treatment. Handset use may cause itchiness, skin irritation, rashes, etc. depending on your physical condition. Do not touch connection terminals with Refer to the following for details on materials of anything metal or conductive (necklaces, each part. hairpins, etc.). In addition, do not carry or →P. 1 6 store the battery pack with such objects. Avoid pinching your fingers or other part of May cause fire, burns, injury, etc. yourself when opening or closing the handset. If you are having difficulty fitting the battery May cause injury, etc. pack to the handset, do not use excessive Handset earpiece/speaker (including at pressure to force the battery into place. If you exterior case) and the area near the voice/ are having difficulty removing the battery answering memo key use magnetic pack from the handset, do not use excessive components. Make sure that no metal objects pressure to force the battery out. (cutter blades, staples, etc.) are attached to May cause fire, burns, injury, etc. the handset. Refer to the following for details about fitting/ Attached objects may cause injury, etc. removing the battery pack. View the display in a well-lit place at an →P. 4 9 adequate distance.
- Page 15 Refer to the following for details about fitting the clothes. battery pack. May harm your eyes, skin, etc. →P. 4 9 If substance in the handset gets in your eyes, If substance in the battery pack gets in your mouth, etc. or on your skin or clothes, immediately eyes, mouth, etc., rinse with clean water and rinse with clean water. consult a doctor immediately. If it gets in your eyes, mouth, etc., rinse and Substance in the battery pack may cause loss of immediately consult a doctor. sight or other physical harm. Do not dispose of battery packs together with WARNING ordinary trash. May cause fire, burns, injury, etc. May also adversely affect the environment. Place tape over the terminals on old battery packs to insulate If there is anything unusual such as odor, them, and take them to a sales outlet such as a overheating, discoloration, deformation, etc., docomo Shop or follow municipal instructions for do not use the battery pack. recycling. May cause fire, burns, injury, etc. Do not use or charge a wet battery pack. If the battery pack leaks or emits an unusual May cause fire, burns, injury, etc. odor, immediately stop using it and move it away from any naked flames or fire. Leaking fluid may ignite, causing fire, rupture, etc. Prevent pets from biting the battery pack. A damaged battery pack may cause fire, burns, injury, etc. Contents/Precautions...
- Page 16 4. Handling adapters Do not use a voltage converter (travel converter for overseas use, etc.) when WARNING charging with an AC adapter. May ignite, overheat, cause electric shock, etc. Do not apply excessive force where the Do not use if the cord of the adapter is adapter is connected to the handset. damaged. May cause fire, burns, injury, electric shock, etc. May cause fire, burns, electric shock, etc. Do not handle the cord or charging terminal of DC adapters are only for use with minus-earth the adapter, the power plug, or a desktop vehicles. Do not use with plus-earth vehicles. holder with wet hands. May cause fire, burns, or electric shock. May cause fire, burns, electric shock, etc. Do not touch adapters if you hear thunder. Always use the specified power supply and May cause electric shock, etc. voltage. Also, use an AC adapter for global use when Do not short-circuit the charging terminal charging abroad. when connected to an outlet or accessory Using the incorrect power supply or voltage may socket. Do not allow any part of yourself cause fire, burns, electric shock, etc. (hands, fingers, etc.) to come in contact with AC adapter: 100 V AC (household AC power outlet the charging terminal. only) May cause fire, burns, electric shock, etc. AC adapter for global use: 100 V to 240 V AC (household AC power outlet only) Do not place heavy objects on the cord of the DC adapter: 12 V/24 V DC (only for use with adapter or apply excessive force such as by minus-earth vehicle) pulling.
- Page 17 Failure to do so may cause fire, burns, electric Always unplug the power plug from the outlet shock, etc. or accessory socket before cleaning the equipment. When unplugging from an outlet or accessory Cleaning while still plugged in may cause fire, socket, grasp the adapter body and do not pull burns, electric shock, etc. the cord or otherwise subject it to excessive force. CAUTION Pulling the cord of the adapter may damage it and cause fire, burns, electric shock, etc. Insert or remove the connector of the adapter Do not touch an adapter continuously when in/from the handset without bending or connected to an outlet or accessory socket. applying force such as pulling the cord. May cause burns, etc. Not inserting/removing it correctly may cause fire, burns, injury, or electric shock. 5. Handling the docomo nano UIM Cease using the adapter immediately if the card charging terminal is bent or otherwise deformed. Also, do not repair the charging CAUTION terminal to use the adapter. Short-circuiting of the charging terminal may cause fire, burns, injury, electric shock, etc. Be careful not to scratch yourself (finger, etc.) When not in use, unplug from the outlet or with the edges when handling the docomo accessory socket. nano UIM card. Leaving it plugged in may cause fire, burns, electric Edges may be sharp and cause injury. shock, etc. Contents/Precautions...
- Page 18 6. Handling near electronic medical Observe a medical facility's instructions when using handset. devices Radio waves may adversely affect operation of WARNING electronic medical devices. 7. Material list If you have an electronic medical device such as an implanted cardiac pacemaker or an „ Handset implanted cardioverter-defibrillator, always Surface carry or use your handset at least 15 cm Part Material treatment away from your implant. Outer case (Key PC + GF Radio waves may adversely affect operation of − case, LCD front case) plastic electronic medical devices. Outer case (LCD rear When using electronic medical equipment case, hinge cover), (other than implanted cardiac pacemakers/ notification PC plastic − defibrillators) outside medical facilities, check (charging) lamp with the equipment vendor or distributor for window information about the effects of radio waves. Phonebook/up key, Radio waves may adversely affect operation of ...
-
Page 19: Handling Precautions
Gold plating Gold plating area, internal PC plastic Terminals Copper (nickel base (element) subantenna area plating) Screws Iron Nickel plating Rubber gasket Silicone plastic − Handling precautions Stopper PP plastic − Card slot (docomo General notes − nano UIM/microSD) Circuit board Epoxy resin Acrylic resin z KY-41B is water resistant/dust resistant, however, do Sticker PET plastic − not allow water or other liquid (beverage, sweat, Gold plating seawater, pet urine, etc.) or dust or other matter to get inside the handset or to remain on bundled or Terminals Copper (nickel base ... - Page 20 Placing in a bag or other storage where many other z The handset can be wiped with a disinfectant alcohol things are stuffed, or carrying in a pocket and sitting sheet or cloth containing a small amount of alcohol down can cause display, internal circuitry, battery pack, (such that the cloth is dampened). The handset has etc. to malfunction or break. been wipe-tested with the following chemicals used May also cause malfunction or damage while an commonly in disinfectant alcohol sheets to test its external device is connected to the external connector chemical resistance. terminal. (1) Isopropyl alcohol, (2) ethanol, (3) sodium z Use optional accessories specified by NTT DOCOMO. hypochlorite Using unspecified accessories may cause malfunction No noticeable discoloration or fading was confirmed in or damage. testing assuming wiping with disinfectant alcohol z See individual instructions included with compatible sheets. However, handset resistance is verified under optional accessories. test conditions, and complete non-occurrence of z Do not drop or subject to impact. discoloration or fading is not guaranteed . May cause malfunction or damage. z Do not press or scratch the display forcibly. ...
- Page 21 Use near an electronic appliance (TV, radio, etc.) may commuter IC cards, etc. may be erased. cause interference. Distance the handset as much as A strong magnetic field may also cause the handset to possible. malfunction. z Be sure to back up the data you saved in the handset Notes about battery pack to a microSD card or PC, or make a separate note. DOCOMO is not responsible for any saved data that is z Always charge where at an appropriate temperature lost. (5° C to 35° C). z When connecting an external device to the external z Battery life depends on the usage and deterioration of connector terminal, avoid inserting at an angle, and the battery pack. avoid pulling while connected. z Since the battery pack is a consumable accessory, it May cause malfunction or damage. is not under warranty. z Do not close the handset on strap, etc. Depending on usage, the battery pack may bulge as it May cause malfunction or damage.
- Page 22 Wipe clean with a dry, soft cloth (such as for eye Notes about adapters glasses). z Be sure to back up the data you saved on the docomo z Always charge where at an appropriate temperature nano UIM card to a microSD card or PC, or make a (5° C to 35° C). separate note. z Do not charge in these locations. DOCOMO is not responsible for any saved data that is Where there is much humidity, dust, or vibration lost. Near an electronic device (TV, radio, etc.) z To protect the environment, take old docomo nano z An adapter may become warm while charging, but is UIM cards to where they are collected such as a normal. Continue use/charging. docomo Shop. z If charging using a DC adapter, do not use with the z Do not scratch, carelessly touch, or short-circuit the ...
- Page 23 Before using aboard an aircraft, check with the airline Notes on using the Bluetooth beforehand. function z Cautions on using Bluetooth devices The handset uses the same frequency band as used „ The handset is equipped with Bluetooth‒compliant by household appliances such as microwave ovens and security features for communication via Bluetooth. industrial, scientific, and medical equipment, (licensed) However, these may be inadequate depending on premises radio stations used to identify mobile units settings. Be aware when using Bluetooth. used in manufacturing lines, (unlicensed) specified „ DOCOMO is not responsible for any information which low-power radio stations, and amateur radio stations may be leaked during communication via Bluetooth. (below, other radio stations ). z Frequency bands 1. Before using handset, check that other radio To check frequencies the handset Bluetooth function stations are not in use nearby. uses: In the standby screen, z▶[Settings]▶[About 2. If interference should occur with other radio stations, phone]▶[Compliance information]. Label markings are immediately change handset location or power off as follows. the handset to avoid interference. 3. If there is anything you are unsure of, contact ① ②③...
- Page 24 „ A wireless LAN (WLAN) exchanges information using [About phone]▶[Compliance information]. Label radio waves, and allows you to freely establish a LAN markings are as follows. connection if you are within an area where radio waves reach. However, communication without ① ②③ ④⑤ appropriate security settings may allow communication to be intercepted by malicious parties. ⑥ It is recommended to make security settings, and is ① 2.4: Radio equipment using the 2,400 MHz band. at your discretion. ② DS: The modulation system is the DS-SS system. „ DOCOMO is not responsible for any information which ③ 4: Expected maximum interference range of about may be leaked during communication via wireless 40 m. LAN. ④ OF: OFDM modulation. z Wireless LAN ⑤ 4: Expected maximum interference range of about Do not use where there are devices with magnetic 40 m. fields (electrical products, AV/OA equipment, etc.) or ⑥ : Utilizes 2,400 MHz to 2,483.5 MHz where there is an electromagnetic field. band with mobile device bandwidth differentiation. Magnetic fields may increase electrical noise or may ...
- Page 25 1. Before using the handset, check that no premises Removing handset screws and modifying the handset radio stations for mobile identification, specific voids technical conformity certification. low-power radio stations, or amateur radio stations Using handset with its certification voided is a violation are in operation nearby. of the Radio Law and the Telecommunications 2. If use of the handset causes interference with Business Law. Never use with certification voided. regard to an in-place radio stations for mobile z Be careful of using the handset while driving a vehicle. identification, immediately change the usage Other than where excepted by law, looking at handset frequency, or discontinue use, then contact General screen or taking the handset in your hand to talk while Inquiries on the last page and ask about ways to driving are subject to prosecution. avoid interference (putting a partition in place, etc.). z Use the Bluetooth and wireless LAN (WLAN) functions 3. If the handset is otherwise a cause of interference within Japan. with regard to specific low-power radio stations for These functions are certified as compliant with mobile identification or amateur radio stations and Japanese domestic wireless standards. assistance is required, contact General Inquiries Use while abroad may be subject to penalty. on the last page. z Do not change the base software without authorization.
-
Page 26: Water, Dust, & Shock Resistance
handset may break if subjected to excessive shock Water, Dust, & Shock such as being thrown or dropped forcibly. Even if Resistance handset continues to function normally, dropping it may cause scratches, etc. Operation is not guaranteed for all conditions. KY-41B is water resistant to IPX5* , IPX8* and dust Warranty does not cover malfunctions resulting from resistant to IP5X* standards if the back cover is misuse. attached. The handset also has shock resistance compliant with MIL standards* (Kyocera testing What KY-41B water and dust methods). *1 IPX5: handset retains phone functioning after being resistance allows it to do subjected to a jet flow (12.5 L/min) discharged from z You can call without using an umbrella in the rain (for a nozzle (inner diameter: 6.3 mm), from all directions rainfall of approximately 20 mm per hour). (approximately 3 m from the handset) for 3 minutes z You can rinse off dirt from the handset. Wash the or more. handset with low-pressure water flow (6 L/min or less *2 IPX8: handset experiences no seepage and retains tap water at room temperature (5° C and 35° C)), phone functioning after it is slowly submerged to ... - Page 27 z The handset is not designed to be water resistant. Do Precautions before use not subject to direct, high water pressure or submerse under water for a long period. z Be sure the back cover is complete attached. The z Do not wash in a washing machine, sonic washer, etc. handset is water resistant when the back cover is z Do not immerse in a bathtub. The handset is not secured completely. designed to be heat resistant. z Never open or close the back cover while hands or the z Condensation from rapid changes in temperature may handset is wet. cause malfunction. Before bringing the handset into a z Do not immerse or expose the handset to liquids other bath room or other warm place from a cold place, let it than water (alcohol, seawater, pool water, hot spring adjust to room temperature. water, soap, detergent, water with bath salts, drink, z The handset does not float on water. alcohol beverage, food seasoning, etc.). Also do not use where exposed to pet urine. Back cover If exposed, immediately rinse with tap water. z Be sure the back cover is complete attached. Anything ...
- Page 28 Attaching the back cover Removing the back cover ❶ ❶ With the handset closed, align the back With your fingertip (fingernail) in the notch cover with the handset and attach in the back cover, lift as shown and remove Notch ❷ Slide your fingers around the back cover in If liquid other than water is on handset direction of ①, and press firmly in direction z If anything other than water (seawater, detergent, ② to attach it completely alcohol beverages, etc.) is on the handset, immediately rinse with water. z Wiping may be done using a soft cloth dampened with foam hand soap, isopropyl alcohol, ethanol, or sodium hypochlorite (→P. 2 8). ② z The handset can be washed with low-pressure water flow (6 L/min or less tap water at room temperature (5 ° C and 35° C)), holding it approximately 10 cm below the faucet or shower head. ① z If soiled, hold the handset making sure the back cover cannot open, and hand-wash without using a brush.
- Page 29 The rubber gasket on the handset when the back cover or dropped forcibly. is removed is important to handset water resistance. NOTE Do not scratch or remove. z Be careful not to pinch the rubber gasket when closing z To maintain water and dust resistance, it is the back cover. Forcing the back cover on with the recommended to replace parts every 2 years rubber gasket pinched will scratch the gasket and may regardless of their condition. The handset can be affect water resistance. Anything tiny (a single hair, submitted for parts replacement at a fee. Bring the etc.) caught in the sealing surfaces may allow ingress handset to a docomo-designated repair counter. of water. z Any liquid other than water on the gasket may affect gasket durability. z Do not insert anything pointed in the back cover gaps. May damage or deform the handset, and may scratch the gasket and allow ingress of water. z The rubber gasket at the back cover and handset sealing surfaces is important to handset water and dust resistance. Do not remove or scratch it. Do not allow dirt to get on the gasket. If the rubber gasket is scratched or deformed, contact a docomo-designated repair counter. Contents/Precautions...
- Page 30 If using alcohol Caring for the handset ❶ Dab a lint-free, soft cloth with a small Soiling on the handset can be wiped away with foam amount of isopropyl alcohol, ethanol, or handsoap, alcohol, etc. sodium hypochlorite (such that the cloth is z Before caring for the handset, power off the handset and remove all wire connections. dampened), and wipe the handset. * No noticeable discoloration or fading was confirmed in If using foam handsoap/foam body soap testing assuming wiping with disinfectant alcohol ❶ Squeeze a little foam handsoap/foam body sheets. However, handset resistance is verified under test conditions, and complete non-occurrence of soap onto a soft cloth and wipe briskly discoloration or fading is not guaranteed. z Be careful that no foam enters the holes in the * Always carefully read instructions for using any of earpiece/speaker, mouthpiece/microphone, vent, or isopropyl alcohol, ethanol, or sodium hypochlorite sold external connector terminal. as a disinfectant. Improper use can pose risks to ❷ Rinse away all foam completely health and as a flammable substance. z Rinse the holes in the earpiece/speaker, * Immersing the handset or directly spraying isopropyl mouthpiece/microphone, vent, or external ...
- Page 31 sources (bath room, shower, sink, basin, etc.). May z When caring for the handset, check that the back cause fire, burns, electric shock, malfunction, etc. Even cover is attached firmly. when not charging, do not bring in a bath room, etc. * Use domestic-brand foam-type handsoap/body May cause fire, burns, electric shock, malfunction, etc. soap. Do not mix different types of foam handsoap/ z Check that no moisture or dirt remains in the external foam body soap. connection terminal before use. Do not use: kitchen, business, non-additive, or alkaline handsoap, business, non-additive, or Draining water when the handset alkaline body soap, soap, detergent, bath salts, shampoo, rinse, facial cleanser, makeup remover, gets wet toothpaste, etc. If the handset is wet with water, always drain the holes If on the handset, immediately rinse with water. in the earpiece/speaker, mouthpiece/microphone, hinge, vent, and external connector terminal. Continuing to use When charging the handset wet cause wetting inside clothing or a bag or cause sound to be inaudible. z Accessories and optional parts are not waterproof/ dustproof. Check the following when and after ❶ Wipe off water on the handset with a charging. lint-free, dry, clean cloth z Never charge the handset while it is wet. May cause ...
- Page 32 ❷ ❸ Shake the handset Pat the handset gently on a lint-free, dry, clean cloth and wipe away the moisture in ① Hold the handset firmly and shake as shown until no more water drains out the gaps in the earpiece/speaker, z Before shaking the handset, check around you mouthpiece/microphone, hinge, vent, for hazards. external connector terminal, etc. z Hold the handset firmly so it does not fly out of your hand when draining water. ② Wipe off any water draining from the handset z Water is particularly difficult to drain from the earpiece/speaker, mouthpiece/microphone, vent, and external connector terminal. Hold each ❹ After adequately removing moisture from downward and pat on cloth to wipe. the handset, leave it to dry for at least an ③ Place on a dry towel or cloth, and leave for a while hour at room temperature to dry at room temperature z Moisture may be remaining in the handset. Do not place the handset near items you do not want to become wet. Use care, as it can cause wetting inside clothing or a bag. Contents/Precautions...
-
Page 33: Before Using The Handset
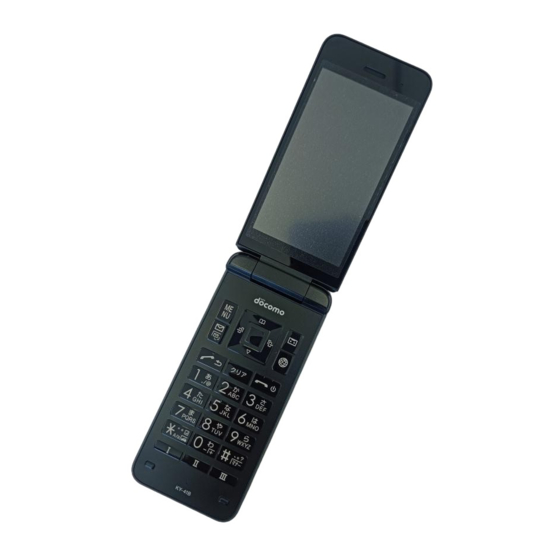
① Earpiece/speaker Before Using the Handset z Hear the other party's voice during a call, ringtone, music, alarm, etc. Part names and functions ② Display ③ qrop: Cursor keys z Move the cursor to select an item. ① ⑪ z May be described as u, v, w in operation steps. z Press the following keys in the standby screen to activate the following functions. q: Displays call history list r: Displays redial list ② o: Displays the phonebook ⑯ p: Use the focus mode ④ z: Menu key z Display the menu, or use the menu function in the operation guidance. ⑤ m: Mail key z Activate the mail app, or use the menu function in ③... - Page 34 ⑧ 1 - 9, *, 0, #: Dial keys ⑮ H: Power/end key z Enter phone numbers or characters. z Press for at least 2 seconds to power on the z In the standby screen, press the * key for at least handset (→P. 5 4). 1 second to enter/exit Drive mode. z Press for at least 1 second to power off the handset z Press the 0 key for at least 1 second in the (→P. 5 4). standby screen to enter a "+". z End active function and display the standby screen. z In the standby screen, press the # key for at least ⑯ Straphole 1 second to set/cancel Manner mode (→P. 1 02). z To attach a strap, remove the back cover (→P. 2 6), ⑨ $"y: Custom keys insert the strap through the straphole and around ...
- Page 35 ⑱ Incoming/charging lamp z Lights/flashes when a call is arriving or while charging. ⑲ Battery pack ⑱ ⑳ Back cover ㉑ Internal main antenna area* ㉒ docomo nano UIM card slot* ⑲ ㉓ Stopper ㉔ microSD card slot* ㉕ Internal GPS / Wi-Fi / Bluetooth antenna area* ㉖ Internal subantenna area* ⑳ *1 Antenna is built into handset. Covering antenna areas with hand may affect quality. *2 Note the correct locations and orientations for Back (top) Back (bottom) inserting the docomo nano UIM card and microSD card. Installing/removing →P. 4 1, P. 4 7 ㉑ microSD docomo nano card UIM card ㉒ ㉓ ㉔ Note the correct locations and orientations for inserting the docomo ㉕...
-
Page 36: Basic Operation
Selecting with the dial keys (shortcut Basic operation operation) This allows you to select menu items by pressing a The following describe basic handset operations such as corresponding dial key (0 - 9) and *, # when selecting items, or viewing screen display or icons. menu items have numbers (shortcut numbers) assigned. Using the cursor keys (selecting z Press the item number for the menu item. If a menu does not have item numbers, select with the cursor items) keys. z After moving the cursor, the color of the cursor Executing items at the screen bottom position changes or a frame appears around an item. Press the function keys (z, m, C, i) or center key (t) z Operation descriptions and operation on the handset is to use the menu and functions at the screen bottom. as follows. z Displayed items vary by screen. Description On handset ② ① ④ In the standby screen, z▶ In the standby screen, [Settings]▶[Wallpaper/ press z▶Point the cursor ③ ⑤ Display] to [Settings] using w and ... - Page 37 „ Moving the pointer Using the pointer Press o / p / q / r to move the pointer up/down, left/ right. Also, you can press o or p together with q or r Use o / p / q / r to move the pointer on the handset. to move diagonally. Activate a pointer-compatible function/app and activate the pointer to use the onscreen pointer. ❶ Activate a pointer-compatible function/app " " (off)/" " (on) appears in the status bar, and " " (pointer) appears when the pointer is activated. " " appears when the pointer is above a selectable button, item, etc. When using the pointer When using a browser, you can move the onscreen pointer up/down, left/right to navigate. „ Selecting buttons, etc. Press t when the pointer is above a button, item, etc. „ Activating the pointer you want to select to set (execute) it. ❶ When a pointer-compatible function/app is „ Scrolling the screen running, long-press y for at least 1 When the pointer is at the top, bottom, left, or right second screen edge, press o / p / q / r to move outward from The pointer switches on/off.
- Page 38 Using focus mode Standby screen layout Selecting the time/date or notification icons in the In the standby screen, you can check the current status standby screen allows you to activate corresponding and new arrival information. apps, view information, etc. ❶ In the standby screen, p/t ① z Focus mode activates. ❷ Select the status bar / time/date / a ③ notification icon z To deactivate focus mode: c/H z While in focus mode, pressing z / C / m / i does not display menus or activate functions. ② Status bar ① Status bar z Check current handset status with notification icons Time/date and status icons. ② Notification icons z Notifications for auto answering memos, missed calls, voicemail, etc. ③ Time/date Notification icons Before Using the Handset...
- Page 39 Checking notification details from „ Main notification icons notification counters New SMS P. 8 1 Notification counters appear in the standby screen when Sending SMS failed P. 8 1 a call is missed, new mail is received, etc. New mail P. 7 8 z Main notification counters and operation when New PC mail P. 8 4 selected are as follows. New Area Mail P. 1 30 (Answering memo): Display the Answering memo „ Error indication list. ― z Displayed when an error has occurred. ...
- Page 40 „ Main status icons Notifications list Battery level View notification details and activate corresponding ― 100% / no charge / charging apps. ❶ " (at least 1 second) Battery Care mode P. 1 15 Signal level ― Out of service area ― Data communication ― Airplane mode P. 1 08 ① 3G available ― 4G (LTE) available ― Manner mode Drive mode P. 1 03 ② Silent mode ① Notification area Pointer enabled P. ...
- Page 41 Changing settings Incoming/charging lamp When a checkbox, etc. appears for an item, you can z Incoming/charging lamp lights or flashes when a call is enable/disable the setting or switch [ON]/[OFF] by arriving, charging, etc. pointing the cursor to the item and then pressing t. „ Lit red: charging ] is enabled, [ ] is disabled. „ Flashing blue: call arriving / missed calls / answering z When [CheckAll]/[UnchkAll] appears in the operation memos / new mail/SMS guidance, press a corresponding function key to NOTE select/deselect all items. z The color of the incoming/charging lamp can be Example: Sound/Notification screen, alarm screen changed (→P. 1 02). Capturing screenshots Press s and 0 together for at least 1 second to capture an image of the current screen. z The captured image is saved to the handset memory and can be viewed in "Pictures" in the Data folder. NOTE z All or a part of image may not be saved depending on ...
- Page 42 „ Editing/using a profile Profile ❶ In the standby screen, z▶[Profile] Display your own phone number registered to the ❷ z▶[Edit]▶Set each item▶C docomo nano UIM card. You can register a name, mail address, etc. z Items that can be set →P. 7 4 z By default, only the phone number which is registered z Send the profile: z▶[Send data (share)]▶Follow to the installed docomo nano UIM card is displayed. the instructions on the screen Copy an item: Point the cursor to an item to copy▶ ❶ In the standby screen, z▶[Profile] ❷ Check/use the profile „ Checking the mail address ❶ ① In the standby screen, m ❷ [Mail settings]▶[My address] ② z Select [Update] to update My address information.
-
Page 43: Docomo Nano Uim Card
❷ Hook the strap securely on the strap pin, docomo nano UIM card and then pull strap outward The docomo nano UIM card is an IC card that contains personal information, such as your phone number. z You cannot use functions such as the phone or packet communication without inserting a docomo nano UIM Strap pin card. z In Japan, you cannot call emergency numbers (110, 119, or 118) without inserting a docomo nano UIM card. z The handset accepts only a docomo nano UIM card. If Straphole you have a docomo mini UIM card, docomo UIM card, or FOMA card, bring it to a docomo Shop for replacement. Installing/removing a docomo nano UIM card z Before installing or removing a docomo nano UIM card, ❸ Reattach the back cover power off the handset, turn the handset back-side up, and remove the back cover (→P. 2 6) and the battery NOTE pack (→P. 4 9). Hold the handset firmly with handset closed. After installing or removing a card, reattach the z Check that the strap is hooked securely on the strap ... - Page 44 ❷ Pull the tab and lift the stopper as shown Installing a docomo nano UIM card ❶ z Be careful not to lift the stopper forcefully. May Lift the tab as shown damage the stopper. Stopper Before Using the Handset...
- Page 45 ❸ ❹ With the IC (metal) portion of the docomo Lower the stopper until it clicks locked nano UIM card downward, slide as shown z If the stopper does not close, lift the stopper again and check that the docomo nano UIM card is in the docomo nano UIM card slot and inserted all the way correctly. push until it clicks z Note the location of the notch. Stopper Notch NOTE z Lock the stopper securely. If not locked, the docomo nano UIM card can come out of place if the handset is bumped, and cause the handset to automatically restart. Before Using the Handset...
- Page 46 ❷ Pull the tab and lift the stopper as shown Removing a docomo nano UIM card ❶ z Be careful not to lift the stopper forcefully. May Lift the tab as shown damage the stopper. Stopper Before Using the Handset...
- Page 47 ❸ ❹ Press the docomo nano UIM card in until it Lower the stopper until it clicks locked clicks (①), and then pull it straight out (②) Stopper ① ② NOTE z Be careful not to drop the docomo nano UIM card when removing it. z Make sure not to touch or scratch the IC (gold) on the docomo nano UIM card when handling it. Also, note that inserting or removing the docomo nano UIM card forcibly may damage it or deform the docomo nano UIM card slot cover. z Refer to the docomo nano UIM card user's guide or to the NTT DOCOMO website for more information on the docomo nano UIM card. z Do not misplace the docomo nano UIM card once it is removed. Before Using the Handset...
-
Page 48: Microsd Card
Security code for docomo nano UIM card microSD card A docomo nano UIM card has a security code called PIN code (→P. 1 05). You can save data on the handset to a microSD card or import data on a microSD card to the handset. z Commercially available microSD cards up to 2 GB and microSDHC cards up to 32 GB can be used with KY-41B (as of Apr. 2021). z Do not power off the handset immediately after inserting the microSD card in the handset (while writing information needed for handset operation) or while editing data on the microSD card. Data may be corrupted or the handset may not work properly. z Format unformatted microSD cards on the handset before use (→P. 1 17). microSD cards formatted by PCs or other devices may not be used properly on the handset. z Data saved on microSD cards from other devices may not be displayed or played on the handset. Some data saved on the microSD card from the handset may not be displayed or played on other devices. z Back up data saved on the microSD card or otherwise store in another place. DOCOMO shall not be liable for any loss or change of saved data. Before Using the Handset... - Page 49 ❸ With the terminals (metal) of the microSD Installing/removing a microSD card card downward, slide as shown in the z Before installing or removing the microSD card, power microSD card slot off the handset, turn the handset back-side up, and z Note the orientation of inserting the microSD card. remove the back cover (→P. 2 6) and the battery pack (→P. 4 9). Hold the handset firmly with handset closed. After installing or removing a card, reattach the back cover (→P. 2 6) and the battery pack (→P. 4 9). Installing the microSD Card ❶ Lift the tab (→P. 4 2) ❷ Pull the tab and lift the stopper (→P. 4 2) z Be careful not to lift the stopper forcefully. May damage the stopper. ❹ Lower the stopper until it clicks locked (→P. 4 3) z If the stopper does not close, lift the stopper again ...
-
Page 50: Battery Pack
Removing the microSD card Battery pack ❶ Lift the tab (→P. 4 2) Use the battery pack KY01 designed for the handset. ❷ Pull the tab and lift the stopper (→P. 4 2) z The battery pack is not waterproof. z Be careful not to lift the stopper forcefully. May damage the stopper. Installing/removing the battery ❸ Slide the microSD card as shown and pack remove from the microSD card slot z Before installing or removing the battery pack, power off the handset, turn the handset back-side up, and remove the back cover (→P. 2 6) . Hold the handset firmly with handset closed. After installing or removing a battery pack, reattach the back cover (→P. 2 6). ❹ Lower the stopper until it clicks locked (→P. 4 3) Before Using the Handset... - Page 51 Installing the battery pack Removing the battery pack ❶ ❶ Install the battery pack Remove the battery pack z Note where the battery pack connects, and slide z With your fingertip (fingernail) on the battery pack into place securely. at the notch in the handset, lift as shown and remove. Battery pack Notch Battery pack Battery connection NOTE z Check that the docomo nano UIM card and any microSD card are securely installed before installing the battery pack. Before Using the Handset...
-
Page 52: Charging
Frequently recharging the battery pack when it still has of its life, but this is not a concern. charge may shorten its usable life. It is recommended to use up the battery to a certain level (e.g. after the battery level decreases) before charging. z If the battery pack becomes warm, charging may stop Charging even if the battery pack has not been fully charged. z Approximate charging time and usable time after fully Charging resumes after the temperature lowers to an appropriate temperature. charging →P. 1 46 z The battery can also be charged with the handset z Check the NTT DOCOMO Online Shop for the latest adapter compatible with the handset. powered on (while charging, [ ] appears on the battery icon). ( h ttps://onlineshop.smt.docomo.ne.jp/options/search. html) (in Japanese only) Before Using the Handset... - Page 53 ❷ Insert the USB Type-C connector on the AC adapter and DC adapter z Refer to the AC Adapter 07 (sold separately) or DC AC adapter straight into the external Adapter 05 (sold separately) user guide. connector terminal z AC Adapter 07 accommodates from 100 to 240 V AC. z The USB Type-C connector can be inserted either z The shape of the plug for the AC adapter is for 100 V upward or downward. AC (for domestic use). To use an AC adapter of 100 to z Check that the charging lamp on the handset is lit 240 V AC overseas, a conversion plug adapter red. compatible with your country of stay is required. Do not z If the charging lamp flashes in blue, flashing in blue use a voltage converter for overseas travel to charge has priority. the battery pack. z When charging is complete, the charging lamp goes out. Charging with an AC adapter z Charging with AC Adapter 07 (sold separately) is Charging lamp described as an example.
- Page 54 ❷ Raise the power plug on the AC adapter Charging with a desktop holder and plug into an outlet z Charging with Desktop Holder KY01 (sold separately) Power plug and AC Adapter 07 (sold separately) is described as 100 V AC outlet an example. ❶ Insert the USB Type-C connector on the AC Adapter in the connection terminal on the desktop holder z The USB Type-C connector can be inserted either upward or downward. USB Type-C connector Before Using the Handset...
- Page 55 ❸ ❹ Place the handset in the desktop holder After charging is complete, remove the with the handset closed. handset from the desktop holder z Insert the handset as shown. Note the orientations ❺ Unplug the AC adapter from the outlet of the handset and the desktop holder, and ensure that the desktop holder inserts all the way straight Charging with a DC adapter and firmly in the external connector terminal. z Check that the charging lamp on the handset is lit DC Adapter 05 (sold separately) supplies power when red. charging from a vehicle accessory socket (12 V/24 V). z If the charging lamp flashes in blue, flashing in blue z To use DC Adapter 05, a USB Cable A to C 02 (sold has priority. separately) is required. z When charging is complete, the charging lamp goes z For details on usage, see the DC Adapter 05 and USB out. Cable A to C 02 user guides. Charging with a PC You can charge the handset by connecting the handset Charging lamp to a PC with a USB Cable A to C 02 (sold separately).
-
Page 56: Powering On/Off
Powering on/off Text entry Enter characters for functions or apps requiring text Powering on entry such as phonebook and mail on the handset. ❶ H (at least 2 seconds) A text entry screen z When you power on the handset for the first time, make initial settings (→P. 6 0). Multiple characters are assigned to each dial key. Character switches by pressing a key. Powering off ① ❶ H (at least 1 second) ❷ [Yes] Device Control ④ ② Control function such as phone and Wi-Fi individually, ③ ⑤ and make settings suitable for work simply using Device ① Cursor Control. Settings can be made from the handset, and z Point the cursor to a position to add text. does not require a PC. Copies of settings can be made ② Submenu easily. z You can copy/paste text, make text entry settings, z To use Device Control, enable Device Control when ... - Page 57 ④ Input mode Correcting text z Check the input mode. The current character type is shown with a blue icon. Back function ⑤ Emoji, D-Pict, emoticons, symbols At times such when pressing a key too many times and z Show emoji, D-Pict, emoticon, and symbol lists. going past a character you want to enter, you can press They may not be enterable depending on the app. i to go back to the previous character. Example: W hen wanting to enter "き" but have gone to "く", Kana entry and 2-touch entry press i to go back to "き". After switching the character type to kanji or katakana (em-/en-width), use either of two entry methods: "kana NOTE method" and "2-touch method" (→P. 5 8). z This function is available when "Input method" is any Converting characters setting other than "2-touch method". Enter hiragana and press C for a list of conversion Undo function candidates of katakana, alphabet, numbers, symbols, as well as predicted date and time, corresponding to the dial Press C (undo) to cancel the preceding action that you key you pressed while entering text. This is useful for finalized. entering alphanumerics, katakana, month and day, time, Prediction conversion etc. with the character type as "漢".
- Page 58 z You can press z and switch between prediction Key pressed for 2nd digit conversion candidates and normal conversion candidates. When "Conv mode" is set to "Normal conv", あ い う え お a b c d e press z to display normal conversion candidates. ぁ ぃ ぅ ぇ ぉ A B C D E z Press c before finalizing to cancel conversion. f g h i j か き く け こ 2-touch entry F...
- Page 59 & (Space) (Space) (Space) ヤ ユ ヨ Line break (Space) (Space) ャ ュ ョ ラ リ ル レ ロ @docomo. ̲ .ne.jp .co.jp .ac.jp ne.jp ワ ヲ ° ン ˜ 、 。 www. .com .html http:// https:// Press * to add daku-ten and switch between top and bottom rows. (with usable with characters) Before Using the Handset...
- Page 60 Submenu operations when entering Setting character entry characters Make iWnn IME settings. ❶ In a character entry screen, z▶[Input z Menu items vary by function, app, or condition of use. ❶ settings] In a character entry screen, z User Check saved vocabulary. Save new Quotation Enter phrases and data quotations dictionary words, as well as edit and delete (→P. 5 8). them. Select Select text to copy, cut, paste, or Phrase Check phrases Also, edit and area(Copy save as vocabulary. initialize phrases. etc) Input settings Make entry settings (→P. 5 8). Paste Paste copied/cut text. Input method Select from kana and 2-touch Undo Cancel the preceding action that methods.
- Page 61 Reset Word learning Set the handset to learn text finalized from a conversion ❶ In a character entry screen, z▶[Input candidates list when entering text settings]▶[Reset] other than Japanese. Wildcard input Set prediction based on number of Reset learning Delete all history of text you have characters. entered. z Entry history of emoji, emoticons, Auto space Set a space to be entered after D-Pict, and symbols is also input selecting a word from conversion deleted. candidates when entering en-width alphabet. Reset settings Initialize entry settings. Auto capitalize Set sentence-initial characters to be converted to upper case when entering en-width alphabet. Auto cursor Set the distance the cursor moves move to after entering characters. z You can still add "゛ " (daku-ten)/ "゜...
-
Page 62: Initial Settings
Setting docomo services Initial settings Alternatively, in the standby screen, z▶[Settings]▶ [docomo service] to set docomo services. An initial settings screen appears the first time the ❶ handset is powered on. Follow the instructions on the When the docomo service setting screen screen. is displayed, [Start setting] z To make initial settings in English, press t▶H▶[設定 を終了する](End setting) to skip the initial settings screen, then change the language to English from 設定 (Settings) menu, and then reboot the handset. The initial settings screen in English is displayed. z For changing display language →P. 6 0 "Changing screen display to English" ❶ When the "Perform initial setting" screen is displayed, t z To enable Device Control, instead of t, enter ❷ [Agree and set]▶Set d ACCOUNT *#*#*#. Device Control →P. 9 8 ❸ [OK] * Not usable when English is set as language. With ... -
Page 63: Managing Tasks
Managing tasks Using the custom keys You can save frequently used phone numbers and Using the used apps history Favorites functions to a custom key for quick access. View a history of recently used apps for quick access. Saving to the custom keys ❶ &$ (at least 1 second) ❶ In the standby screen, z▶[Settings]▶ z You can use this even when using function or app. [Custom key] ① ❷ Select the key to save to▶Select the function to save z To unsave: Select the key to unsave from▶[OFF] Using functions saved to the custom keys ❶ $ / " / y z If you press a key with no function saved, a screen ② ③ for saving a function is displayed. ① Used app history z Select from the history to activate an app. ② Submenu z Exit the displayed app and delete all history. ③ Remove z You can delete the history of the app the cursor ... -
Page 64: Calling
"186"/"184"to the head of the phone number. NOTE z To delete the last-entered digit: c VoLTE z To delete all entered digits: c (for at least 1 z With VoLTE, you can enjoy high-quality calling. second) z To move the cursor: v z To use VoLTE, your handset must meet the following requirements. „ Be in an area where VoLTE is available „ The call mode setting in mobile network settings must be on →P. 1 10 „ The preferred network mode in mobile network settings must be [4G/3G(Auto)] →P. 1 10 z In the DOCOMO LTE service area, if the call mode setting is off, data may temporarily switch to 3G. Calling... - Page 65 z Even after the call mode setting changes to on, voice Making a call with speed dials communication and data communication may not You can make a call quickly to another party who is immediately change from 3G to LTE (4G). registered to a speed dial. z Save a contact in advance (→P. 7 4). Entering touch-tone signals Saving to speed dials When using services in which you are required to enter ❶ numbers additionally during a call, such as a bank In the standby screenz▶[Phone]▶[Speed balance inquiry or ticket reservation, enter a pause (,)/ dial setting] wait (;) after entering the phone number to send an ❷ Select [<Not Registered>] of any number additional number added to the main phone number. to save▶Select a contact▶[OK] Adding a 2-second pause (,) z If multiple phone numbers are registered in a Once the call connects, the added number will be sent contact, select the number to save. automatically after about 2 seconds. ❶ In the standby screen, enter the phone Dialing with speed dials number▶# (for at least 1 second) ❶ In the standby screen, enter a speed dial ❷ Enter the number to send▶s number (0 - 99)▶s Adding a wait (;)
- Page 66 Emergency calls z In Japan, you cannot call to an emergency number (110, 119, or 118) when a docomo nano UIM card is not inserted, while the SIM PIN is locked, or from the Emergency calls Phone number PUK (PIN Unblocking Key) entry screen. Police z When calling 110, 119, or 118 from your handset, Fire and ambulance the police or fire department may return your call for Marine emergency verification purposes. State that you are calling from a mobile phone, and give your phone number and NOTE exact present location. z The handset supports "emergency call location Remain stationary to ensure that the call is not notification". disconnected while you are on the line, and keep the When you make a call to an emergency number such handset turned on to receive calls for approximately as 110, 119, or 118, the location dialed from 10 minutes afterwards. (location) is automatically sent to the agency that z Depending on the region, calls to the local police or has received the emergency call (e.g. the police). fire department may not be made. Depending on your location and the signal reception, z When you make a call to an emergency number (110, ...
-
Page 67: Answering A Call
International call (WORLD CALL) Answering a call WORLD CALL is an international calling service available ❶ When a call arrives, the ringtone sounds from DOCOMO devices in Japan. and the incoming lamp flashes For details of WORLD CALL, refer to the NTT DOCOMO website. z The caller ID may not be sent or displayed correctly depending on overseas network operators. In this instance, making a call with incoming history is not possible. ❶ In the standby screen, 0 (at least 1 second)▶Enter the country code▶Enter the region code (area code)▶s ❷ s NOTE z Alternatively, press t, 0 - 9, *, or # to z As for region codes (area codes) that begin with "0", answer calls. omit the first "0" when entering. Some countries, such ❸ To end a call, H as Italy, require a first "0". z After a call ends and a screen for recording calls appears, select "Yes" to set call recording. Call recording will activate from the next call. Check recorded calls from "Voice memo list" (→P. 6 9). - Page 68 Rejecting a call Missed calls ❶ When a call arrives, the ringtone sounds When you cannot answer an incoming call, the and the incoming lamp flashes notification counter [ ] appears on the standby screen. ❷ ❶ z▶[Reject call] In the standby screen, p▶Select the notification counter [ Rejecting a call and sending SMS z Incoming history list is displayed. ❶ When a call arrives, the ringtone sounds z Alternatively, in the standby screen, press q to and the incoming lamp flashes check the incoming history. ❷ z▶[Reject call with SMS] ❸ Select a message Responding with answering memo ❶ When a call arrives, the ringtone sounds and the incoming lamp flashes ❷ z▶[Auto answering memo] Playing an answering memo ❶ In the standby screen, p▶Select the notification counter [ Alternatively, in the standby screen, z▶[Phone]▶ [Call/Ans Memo]▶[Answering memo list] to check.
-
Page 69: Operations During A Call
⑧ Hold Operations during a call z Hold/unhold a call. You can use operations such as hands-free calling and NOTE adjusting the volume during a call. z Note the following when using hands-free calling. When calling outdoors, in a location where ④ surroundings are noisy, or where the sound echoes loudly, use an earphone/microphone. If the sound cracks during a hands-free call, lower the volume. ① Adjusting the in-call volume ⑤ ② ⑥ ❶ During a call, u ③ ⑦ ⑧ Adding a call ① Other party's name and number Place a current call on hold and make a call to another ② Submenu party. z Change between the redial/incoming history lists z Subscription to Call Waiting Service is required to add and Bluetooth calling. -
Page 70: Redial/Incoming History
Displaying the redial/incoming history lists Redial/incoming history ❶ During a call, z▶[Incoming history] / The handset memory keeps a record of the 50 each of [Redial] the most recent outgoing and incoming call history calls. z Alternatively, during a call, press q / r to display ❶ In the standby screen, q / r redial/incoming history. ② ② Switching voice output ① ① ③ ③ z You can only switch when a Bluetooth device is ④ connected. ❶ During a call, z▶[Switch to terminal call] / [Switch to Bluetooth call] Voice memos z You can only use voice memos when "Record later" is disabled. Incoming history list Redial list ❶ During a call, c ① Other party name/number z Recording starts. ... -
Page 71: Voice Memo/Answering Memo
calls and records the caller's message when you cannot notification: z▶[Call option]▶Set each item▶s answer. z Verify location: z▶[Verify location]▶[imadoco z Up to 100 voice memos and 50 answering memos can search] / [imadoco kantan search] be recorded. Record up to 60 seconds per answering The handset accesses [imadoco search] or memo and up to 60 minutes per voice memo. [imadoco kantan search] website. For details on z However, the maximum savable number of memos and imadoco search/imadoco kantan search, refer to recordable time per memo differ with available microSD the NTT DOCOMO website. card space. Packet communication charge is incurred for ❶ In the standby screen, z▶[Phone]▶[Call/ using the service. Ans Memo] z Save to the phonebook: z▶[Register]▶Select where to save▶Set each item▶C Answering Play answering memos as well as Register a number to block: z▶[Blocked number]▶ memo list delete, protect, unprotect, etc. [Register to Nuisance call blocking service] / ... - Page 72 Auto Enable an answering memo Playing voice/answering memos answering in response for when driving. Drive mode ❶ In the standby screen, z▶[Phone]▶[Call/ Record later Enable recording of calls after calls Ans Memo]▶[Answering memo list] / have ended. [Voice memo list] NOTE ❷ Select voice/answering memo to play z If the number of saved answering memos exceeds the z A playback window appears, and the voice/ maximum number that can be saved, old answering answering memo plays. memos which have not been protected are deleted z To stop playback, press t. starting from the oldest one. If all answering memos are used and protected, the handset does not respond to calls with an answering memo. z If the number of saved voice memos exceeds the maximum number that can be saved, old voice memos which have not been protected are deleted starting from the oldest one. z Alternatively, in the standby screen, press C to activate the function.
-
Page 73: Call Log/Call Settings
Other settings Other settings →P. 7 3 English Play guidance in English for setting guidance network services, when outside the Network service service area, etc. Remote Use voicemail service, call ❶ In the standby screen, z▶[Phone]▶[Call operation forwarding service, etc. from a log/Call settings]▶[Network service] touch-tone land-line phone, pay phone, DOCOMO mobile phone, Voicemail A service to answer calls with a etc. service reply message and record callers' Public mode When handset is powered off and a messages for you. (power OFF) call arrives, play guidance that you Call forwarding A service to forward calls. are where mobiles must be service powered of and are unable to Call waiting A service to place the current call answer, and then automatically ... - Page 74 Incoming Enable ringtone/vibration for Incoming call settings extension arriving extension calls. Also set a ❶ ringtone for arriving extension In the standby screen, z▶[Phone]▶[Call calls. log/Call settings]▶[Incoming call settings] Reject call setting Voice/Ans Voice/Ans memo →P. 6 9 memo ❶ In the standby screen, z▶[Phone]▶[Call Reject call Reject call setting →P. 7 2 log/Call settings]▶[Incoming call settings] setting ▶[Reject call setting] Set ring start Set to sound ringtone after time specified number of seconds have Reject Set to reject calls from callers not passed for a call from a party who unregistered saved in the phonebook. is not saved in the phonebook. call Edit rejection Edit a text to send as SMS after Reject Set to reject calls from callers not rejecting a call.
- Page 75 You can also specify phone numbers to reject from log/Call settings]▶[Other settings] [Block nuisance call] (→P. 7 1). Snooze of Enable the handset to notify you Outgoing call settings missed call again with a missed call after a set time (5, 10, 20, 60 minutes). ❶ In the standby screen, z▶[Phone]▶[Call Call Time Check accumulated call time. log/Call settings]▶[Outgoing call Contact Contact docomo →P. 7 3 settings] docomo Extension line Extension line service setting Prefix settings Set prefix numbers. service setting →P. 7 4 International Set international prefixes and outgoing call country codes. Contact docomo ❶ In the standby screen, z▶[Phone]▶[Call log/Call settings]▶[Other settings]▶...
-
Page 76: Phonebook
Extension line service setting Phonebook Make settings for holding & forwarding of the extension line service as well as a prefix. You can manage contacts. * The extension line service is geared to corporations and requires a separate subscription contract. Adding contacts to phonebook ❶ In the standby screen, z▶[Phone]▶[Call ❶ In the standby screen, z▶[Phone]▶ log/Call settings]▶[Other settings]▶ [PhoneBook]▶[Add to Phonebook] [Extension line service setting] ❷ [Add new entry] / [Add to entry] Hold & Set hold & transfer on or off. Also transfer make hold prefix and dial-fixed z When [Add to entry] is selected, select a contact. prefix settings. ❸ Set each item Prefix addition Set prefix addition on or off. Last name Enter a family name. z Edit a prefix: z▶[New First name Enter a first name. registration]▶Set each item▶C Phonetic last Enter a reading for the family name name. - Page 77 Ringtone Set a ringtone. Checking/using the phonebook z You can set ringtone from You can retrieve saved contacts from the phonebook to [Preset]/[Data Folder]. make calls and send mail. Event Register a birthday, anniversary, ❶ etc. In the standby screen, z▶[Phone]▶ Notes Register a memo. [PhoneBook]▶[Search contacts] / [Group Nickname Register a nickname. list] Address Register a postal code and z The phonebook list is displayed. address. z Alternatively, in the standby screen, press o. Company Register a company. Website Register a URL. ③ ① No Image Register an image. ② ② z Set an image to be displayed ...
- Page 78 ❶ In the phonebook list, point the cursor to a name▶z▶[Delete]▶[Delete one]▶[Yes] Contact details Delete selected items: In the phonebook list, z▶ [Delete]▶[Delete multiple]▶Select the name▶C▶ Making a call [Yes] ❶ In the contact details, select a phone Delete all: In the phonebook list, z▶[Delete]▶ number [Delete all]▶[Yes] Backing up/restoring phonebook Creating/sending SMS ❶ In the contact details, point the cursor to a ❶ In the phonebook list, z▶[SD/SIM card/ phone number▶C share] Creating/sending mail Backup/ Backup/restore to SD card →P. 9 7 ❶ In the contact details, select a mail restore to SD card address▶[docomo mail] / [PC Mail] Restore from Import contacts from SIM card. SIM card Sharing Send contacts via mail or Bluetooth transfer. Calling...
- Page 79 Adding groups Using groups ❶ In the group settings, z▶[Add new group] ❶ In the standby screen, z▶[Phone]▶ ▶[Group's name]▶Enter a group name [PhoneBook]▶[Group list] ❷ [Group's members]▶Select name▶C▶ ❷ z▶[Group settings]▶Use groups C▶[OK] z To rename group: In the group list, point the cursor to a group▶z▶[Edit group]▶[Group's name]▶ ENter a group name▶C▶[OK] ③ ① z Delete a group: In the group list, point the cursor to a group▶z▶[Delete group]▶[Yes]▶[OK] z Reorder groups: In the group list, z▶[Group ② Rearrange]▶[OK]▶Point the cursor to group to reorder▶t▶Point the cursor to new position▶t▶ C▶[OK] Group settings ① Groups Registering/unregistering contacts ② Number of contacts in group ❶ In the group list, point the cursor to a ③ Group name group ❷ z▶[Edit group]▶[Group's members]▶...
-
Page 80: Mail/Web Browser
Use docomo mail, SMS, etc. to send/receive messages, and use the web browser to view web pages. ❷ [Create new mail] z Alternatively, press m to display the mail creation docomo mail screen. You can send and receive mail using a DOCOMO mail address (@docomo.ne.jp). Exchanged mail is saved to a DOCOMO mail server, so you can easily migrate data when changing to a new device, or restore data if the handset is misplaced. With a d ACCOUNT, you can use the same email address across several devices such as the handset and a PC browser to send, receive, and view email. Mail creation screen z For details on docomo mail, refer to the NTT DOCOMO website. ❸ Select the recipient field ( ttps://www.nttdocomo.co.jp/service/docomo̲mail/) (in ❹ Select recipient adding option▶Enter a Japanese only) z When Welcome to docomo mail! screen is displayed, recipient▶C▶C press C. z Add recipient: m▶Select a recipient adding method ▶Enter a recipient▶C▶C z Delete one recipient: Point the cursor to a recipient... - Page 81 Select the message field▶Enter a „ Deleting an attachment file ❶ message In the mail creation screen, select the ❼ attachment field C ❷ z Save as draft: m Point the cursor to an attachment file▶ i▶[Delete 1]▶[Yes]▶C Attachments z Delete selected files: i▶[Delete selection]▶Select Attach still pictures, videos, etc. to docomo mail to send. attachment files▶C▶[Yes]▶C z Some files cannot be attached depending on the file z Delete all files: i▶[Delete all]▶[Yes]▶C format. ❶ In the mail creation screen, select the Decorating messages (Deco-mail ® attachment field You can decorate a mail message by inserting images, changing text color, font size, or background color, etc. ❷ Select a file to attach ❶ In the mail creation screen, select the ...
- Page 82 ❷ z▶[Deco]▶Select a decoration▶ End editing End docomo mail without saving Decorate without saving docomo mail that is being created. Receiving docomo mail docomo mail is automatically received. ❶ Receive docomo mail automatically z The notification counter [ ] appears in the standby screen and [ ] in the status bar. z Not receive automatically: In the standby screen, m▶[Mail settings]▶[Communication setting]▶ Decoration menu [Auto reception setting]▶[Confirm every time] / z Decorate entered text: z▶[Select area(Copy etc)] [OFF] ▶Select a start point to decorate▶[Deco]▶Select ❷ In the standby screen, p▶Select the a decoration▶Decorate notification counter [ Submenu operations on mail creation screen z Alternatively, in the standby screen, m▶[Inbox] to ❶ In the mail creation screen, z check. ❸...
-
Page 83: Sms
Inquiring for new mail You can retrieve new docomo mail from the center that is sent when you are out of service area, the handset is You can send and receive text messages with mobile turned off, etc. phone numbers serving as destinations. ❶ In the standby screen, m (at least 1 * For details on the number of characters which can be sent and received etc., refer to "ショートメッセージサービ second) ス (Short Message Service) (SMS)" on the NTT z Alternatively, in the standby screen, m▶[Check DOCOMO website. new mail / Update] to retrieve mail. ( ttps://www.nttdocomo.co.jp/service/sms/) (in Japanese only) z You can also exchange messages with those who use network of overseas network operators. For details on countries/regions and carriers where service is available, see the NTT DOCOMO website. Creating/sending SMS ❶ In the standby screen, z▶[Mail]▶[SMS] ❷ m▶Enter a recipient and message▶C Mail/web browser... - Page 84 NOTE Displaying SMS z If destinations are devices owned by those who use ❶ In the standby screen, z▶[Mail]▶[SMS] network of overseas network operators, enter "+", the country code and the recipient's mobile phone z Messages are grouped into threads according to number. If the phone number begins with "0", omit the their destinations/senders and displayed. first "0". Alternatively, enter "010", the country code, ① and the phone number. ② z Half-width katakana and special symbols in SMS messages may not appear correctly for recipient. z SMS cannot be sent when "186" or "184" is added. After receiving SMS A notification icon appears in the status bar (→P. 3 6). ① Destination/sender ② Number of unread messages Mail/web browser...
- Page 85 ❷ Select a thread Deleting SMS ① ❶ In the standby screen, z▶[Mail]▶[SMS] ❷ Select a thread ❸ Point the cursor to a message▶z▶ ③ ② ④ [Delete]▶[Yes] SMS settings ❶ ① Destination/sender In the standby screen, z▶[Mail]▶[SMS] ② Message ❷ z▶[Settings] ③ Date/time of SMS in or out ④ Notifications icon Notifications Set the ringtone to sound when a z Displayed for sent messages when notifications message is received. are enabled. SMS Delivery Notify you that sent messages ❸ Checking messages reports have been received every time a message is received. z Call to sender: z▶[Call] z Save sender to the phonebook: z▶[Add to ...
-
Page 86: Pc Mail
PC mail Creating/sending mail ❶ In the standby screen, z▶[Mail]▶[PC Configure a mail account provided by a service provider to exchange mail. Mail] ❷ C Setting up mail account ❶ In the standby screen, z▶[Settings]▶ [More settings]▶[Accounts]▶[Add account]▶[PC Mail] ❷ Enter an email address ❸ Enter the password▶C ❹ Set up the account▶C PC mail creation screen ❺ Enter the account name and displayed ❸ Select the recipient field▶[New] name▶C ❹ Select recipient adding option▶Enter a recipient▶C z Add recipient: [New]▶Select an recipient adding option▶Enter a recipient z Delete one recipient: Point the cursor at the recipient▶z▶[Delete]▶[Delete one]▶[Yes] z Delete selected recipients: z▶[Delete]▶[Delete multiple]▶Select recipients▶C▶[Yes] z Change recipient type: Point the cursor at the ... - Page 87 ❺ Select the subject field▶Enter a subject „ Deleting an attachment file ❶ ❻ In the mail creation screen, select the Select the message field▶Enter a attachment field message ❷ Point the cursor to an attachment file▶C ❼ C z Save as a draft: z▶[Save as draft]▶[Yes] Receiving/displaying mail z Discard mail being created: c▶[Yes] z Enter common phrases: z▶[Add preset message] ❶ In the standby screen, z▶[Mail]▶[PC ▶Select phrase Mail] Attachments ❷ Select a tray/folder▶Select the mail Attach still pictures, videos, etc. to PC mail to send. z Some files cannot be attached depending on the file ① format. ❶ In the mail creation screen, select the attachment field ②...
- Page 88 ④ Star icon ⑤ Attachment z Use it as a mark indicating that the mail is ⑥ Text body special or supposed to be dealt with later. ⑦ Submenu z You can check starred mails in the Starred folder. z You can reply to all, forward, add/remove star, ⑤ New etc. z Create new mail. ⑧ Reply ⑥ ▲/▼ ⑨ Previous/Next z Scroll the page. z Display the previous/next mail screen. ❸ Checking mail Replying to/forwarding mail z If "VIEW ENTIRE EMAIL" is displayed in the message field, select "VIEW ENTIRE EMAIL" to show entire ❶ In the standby screen, z▶[Mail]▶[PC mail text. Mail] ① ❷...
-
Page 89: Web Browser
Mail] z If wdoes not work when using the web browser, ❷ Select a tray/folder enabling the pointer may enable the cursor operation (→P. 3 5). ❸ z▶[Delete]▶Select the mail z Websites may not be displayed correctly. ❹ C▶[Yes]▶[OK] dmenu Mail settings In dmenu, you can easily access websites recommended by DOCOMO or the customer support. ❶ In the standby screen, z▶[Mail]▶[PC ❶ In the standby screen, i▶[Homepage] Mail] z Web browser activates and "dmenu" is displayed. ❷ z▶[Settings]▶[General settings] z If confirmation appears, follow the instructions on the screen. Set default Set the default account to use. z You can also set the website that appears after ... - Page 90 Website operations Web searching/URL entry z Move page display up/down: m / i You can enter a URL directly to display a website. Also, z Return page: c enter a keyword to search website information. z Advance page: z▶[Forward] ❶ In a website, z▶[Search / Enter URL] z Reload page: z▶[Refresh] z Alternatively, in the standby screen, i▶[Web z Change video playback volume (Down/Up): * / # Search] to display a website. z Zoom in/out: 3 / 1 ❷ Enter keyword/URL z Enlarge/shrink text: 6 / 4 z Display web page details: z▶[Page operation]▶[Page z To search by entering keywords, use the search info] engine set in [Set search engine] of [Advanced] in ...
- Page 91 Copying text Displaying websites from bookmarks ❶ ❶ In a website, z▶[Page operation]▶[Copy In a website, z▶[Bookmarks/History]▶v text] to display "Bookmarks" tab Alternatively, in the standby screen, i▶ ❷ Select a start point with the pointer [Bookmarks] to display tab. z Operate with w. ❷ Select bookmark ❸ Specify a range to copy ❹ Using website viewing history t▶[OK] ❶ Text search in a webpage In a website, z▶[Bookmarks/History]▶v ❶ to display "History" tab In a website, z▶[Page operation]▶[Find on page] z Alternatively, in the standby screen, i▶[History] to display tab. ❷ Enter keywords ❷ Select a day of viewing / [Most visited]▶ z Move to keywords with [ ...
- Page 92 Web settings Displaying download history Set the browser. Check history of downloaded images, etc. ❶ ❶ In a website, z▶[Web settings] In a website, z▶[Downloads] z Alternatively, in the standby screen, i▶[Web Alternatively, in the standby screen, i▶ settings] to set this. [Downloads] to display history. ❷ Select a download Set homepage Set homepage →P. 8 9 Storage Set where files are saved. Privacy & Set functions that use browsing security information for the purpose of improving convenience. Change text Set the text size. size Advanced Make search engine and website display settings. Load images Enable displaying images on a web page. Exit confirm Enable confirmation to be displayed when exiting the browser. Mail/web browser...
-
Page 93: Tools/Apps
Tools/Apps Registering new schedule events ❶ In the calendar, z▶[New event] Calendar ❷ Set each item▶C Display a calendar and manage a schedule. When a scheduled time arrives Displaying the calendar Set an alarm for a scheduled event to notify you when a set event has arrived. Press t, c, or H to stop an ❶ alarm. In the standby screen, z▶[Calendar] ❷ Check the calendar Using the calendar menu ① ❶ In the calendar, z New event Creating a schedule →P. 9 1 Go to Today Jump to the calendar display for the day. ② Go to Date Jump to the calendar display for the specified day and time. Holiday You can set holidays freely. ① Displayed year and month Settings ② Registered schedule event Notification You can enable/disable Settings notifications, set the time for ... -
Page 94: Alarm
Deleting from the schedule Alarm ❶ In the calendar, select the date Be prompted with an alarm or handset vibration at a ❷ Point the cursor to the schedule event▶z specified time. ❸ [Delete]▶[Yes]▶[OK] ❶ In the standby screen, z▶[Tools]▶[Alarm] ❷ Point the cursor to an unregistered alarm ▶C z Add an unregistered alarm: z▶[Add] ❸ Set each item ① ② ③ ④ ⑤ ⑥ ⑦ ⑧ ① Time alarm sounds at z Set the alarm time. ② Repeat z Set the alarm to repeat. ③ Alarm name z Enter an alarm name. Tools/Apps... - Page 95 While in Manner mode ④ Alarm sound z Set the alarm sound. ❶ In the alarm screen, z▶[Settings] ⑤ Alarm volume ❷ z Set the alarm volume. [Prioritize alarm] ⑥ Snooze Deleting registered alarms z Enable an alarm to be snoozed. ⑦ Vibration pattern ❶ In the alarm screen, z▶[Delete]▶[Delete z Enable the handset to vibrate. multiple] ⑧ Alarm time length z Delete an item: In the alarm screen, point the cursor z Set the alarm time length. to the alarm to delete▶z▶[Delete]▶[Delete one]▶ ❹ C [YES] ❷ NOTE Select the alarm to delete▶C▶[YES]▶ [OK] z An alarm does not sound if the handset is not ...
-
Page 96: Countdown Timer
While in Manner mode Countdown timer ❶ In the countdown timer screen, z▶ Be notified with an alarm or handset vibration after the [Settings] specified length of time passes. ❷ [Prioritize timer] ❶ In the standby screen, z▶[Tools]▶ [Countdown Timer] Stopwatch ❷ Select the countdown timer to use z To stop countdown: t You can use the stopwatch to time laps and split times. z To reset countdown: C ❶ In the standby screen, z▶[Tools]▶ z Be notified with an alarm or handset vibration once [Stopwatch] the specified length of time passes. To stop the ❷ timer, press t. t z Time laps, split times: z Registering countdown timers ❸ t ❶ In the countdown timer screen, z▶[Add] z Resume timing: t ... -
Page 97: Notepad
Notepad Sound recorder Create and manage notes. You can use the sound recorder function to take memos in meetings or negotiations. Registering a note z Available time per recording is up to approximately 3 hours. The maximum savable number of recordings ❶ In the standby screen, z▶[Notepad] differs with the available handset memory/microSD card. z If no notes are registered, a screen appears for ❶ entering a note. In the standby screen, z▶[Sound ❷ Recorder] z▶[New note]▶Enter the note▶t▶[OK] ❷ [Record]▶t Checking notes z If a microSD card is installed, select whether to save recording data to the card. ❶ In the standby screen, z▶[Notepad] ❸ t▶[OK] ❷ Select a note▶t z Recording data is saved and the playback screen z Edit notes: Select a note▶C ... -
Page 98: Calculator
z Jump to specified time: z▶[Jump to specific time] ❶ In the standby screen, z▶[Calculator] ▶Enter the time▶C z In the screen for selecting recording data, press C ❷ Use the calculator to switch file display (handset/microSD card). Sending recording data OfficeSuite ❶ Playing recording dataC View Word, Excel, and other files. ❷ [docomo mail] / [PC Mail] / [Bluetooth] ❶ In the standby screen, z▶[Tools]▶ Deleting recording data [OfficeSuite] ❶ ❷ In the recording data list, point the cursor Select the file to the recording data to delete ▶z▶ z Use the pointer in OfficeSuite. z Edit a file: Open the file to edit, [ [Delete] z Create a new file: [ ]▶[Create document]▶Select ... -
Page 99: Sd Card Backup
Install a microSD card in advance. Use a microSD card to migrate phonebook entries, ❶ In the SD card backup screen, [Backup] images, and other data or back up such data. z Data which can be backed up to/restored from ❷ Select a data category to save microSD Card is as follows. ❸ „ Phonebook C▶[Backup] „ docomo mail (local) ❹ t „ Images „ Videos NOTE „ Music data z When backing up the phonebook to microSD card, you „ Call history cannot copy phonebook data without name. -
Page 100: Data Backup Service
6 1). Set a custom key in advance. can be registered to phonebooks also differ between Setting with Device Control devices, and may be deleted when copied. ❶ Press the custom key ($ / " / y) Data backup service that has Device Control set ❷ Enter the password▶C You can quickly back up important schedule, memo, and z The initial password is "000000". other data with automatic updating. ❸ z For details on this data backup service, refer to the Set the policy NTT DOCOMO website. Wi-Fi Disable the Wi-Fi function. ❶ In the standby screen, z▶[Tools]▶[Data Bluetooth Disable the Bluetooth function. Security] Device Disable SMS, software updates, z Continue by following the instructions on the and SD card, and disapprove apps screen. with an unknown provider. Call Limit mobile network, phonebook editing, and incoming/outgoing ... - Page 101 ❹ [Accept] Reset Disable data initialization. Location Lock location information settings Receiving the set policy on another device as enabled. ❶ With another device, transfer the Device NOTE Control policy, and display the ID number z Software may not update correctly if software ❷ In the Device Control settings on the updating is disabled and then re-enabled. Either handset, z update software from handset settings (→P. 1 44), or power off the handset and power it on again (→P. 5 4). ❸ [Import policy] ❹ Enter the ID number displayed on the other Checking the current policy device▶C You can check the policy that Device Control is using. ❶ z If Wi-Fi or location settings are displayed, follow the In the Device Control screen, z onscreen instructions. ❷ [Status] NOTE z The policy is displayed.
- Page 102 Changing the password ❶ In the Device Control screen, z ❷ [Change password] ❸ Enter the new password▶Re-enter the password▶C NOTE z If password is forgotten, reset the handset. If reseting the handset is limited by policy, it cannot be reset. Contact "General Inquiries" on the last page. Tools/Apps...
-
Page 103: Handset Settings
Sound/ Make settings for Manner mode, Backlight time Backlight time →P. 1 02 Notification ringtone, vibration, etc. Key backlight Enable the backlight. Lock/Security Make settings for the security lock. Font size Set the text size. Wireless/ Make settings for Wi-Fi, Bluetooth, Network mobile networks, etc. Wallpaper docomo Make settings for docomo Set the image, clock, and calendar appearing in the service services. standby screen. Battery Check the battery level, etc. ❶ In the standby screen, z▶[Settings]▶ Custom key Set custom keys (→P. 6 1). About phone Update software, check handset [Wallpaper/Display]▶[Wallpaper] status, etc. Preset Select a standby screen image ... -
Page 104: Sound/Notification
Brightness level Sound/Notification Set the display brightness. Make settings for Manner mode, ringtone, vibration, etc. ❶ In the standby screen, z▶[Settings]▶ ❶ In the standby screen, z▶[Settings]▶ [Wallpaper/Display]▶[Brightness level] [Sound/Notification] ❷ u▶t Volume Volume →P. 1 03 Manner mode Manner mode →P. 1 03 NOTE Media sound in Enable media sound to play while z Note that continuous stand-by time is shortened Manner mode in Silent mode or Drive mode. when the brightness of the screen is increased. Manner of # Set the Manner mode that activates when pressing # for at Backlight time least 1 second. Phone Set the operation of the ringtone. Set the light duration of the backlight. ringtone ❶ In the standby screen, z▶[Settings]▶ Also vibrate ... - Page 105 Drive mode Ringtones and other handset Volume sounds are muted; handset does Set the volume for call ringtone, calls, etc. not vibrate for incoming calls/ ❶ messages, etc. When a call arrives, In the standby screen, z▶[Settings]▶ answering memo activates and a [Sound/Notification]▶[Volume] message plays to indicate that you ❷ Select an item are driving. Exit the Manner mode. Manner mode Entering/exiting Manner mode with one Set handset sound to avoid disturbing others when in touch public. ❶ In the standby screen, # (at least 1 ❶ In the standby screen, z▶[Settings]▶ second) [Sound/Notification]▶[Manner mode] z The handset enters/exits Manner mode. ❷ Select the Manner mode z * (at least 1 second) to enter/exit Drive mode. Manner mode Ringtones and other handset NOTE sounds are muted; handset z While in Silent mode or Drive mode, media playback ...
-
Page 106: Lock/Security
1111 , and 1234 . Keep a separate Usage Usage restriction →P. 1 07 memo of security codes. restriction z Keep security codes private. If security codes are Show Enable entered characters to be misused by others, DOCOMO shall not responsible passwords visible briefly as they are entered. whatsoever for any resulting damages. Device admin Enable device administration apps. z If you forget your security codes, visit a docomo Shop apps with documentation showing you are the contracted SIM card lock SIM card lock →P. 1 07 subscriber (driver s license,etc.), the handset, and the Encryption & Encryption & credentials →P. 1 08 docomo nano UIM card. credentials For details, contact "General Inquiries" on the last page. Trust agents Manage trust agents. - Page 107 Network security code z The PUK (Personal Unblocking Key) is indicated on the application (customer copy) you received when you A four-digit code required such as when verifying a subscribed at a docomo Shop. If you subscribed at a subscriber s identity when visiting a docomo Shop, location other than a docomo Shop, either visit a docomo information center, or customer support , or docomo Shop with documentation showing you are the when using network services. You set an arbitrary contracted subscriber (driver s license,etc.) and the number when subscribing, and you can also change the docomo nano UIM card, or contact "General Inquiries" number. on the last page. z For details on the network security code, refer to the NTT DOCOMO website. d ACCOUNT password d ACCOUNT is an account usable with docomo apps. SIM PIN You set an arbitrary code for your d ACCOUNT during A docomo nano UIM card has a security code called the your initial settings, but you can change the code at SIM PIN. It is set to 0000 when subscribing, but you anytime (→P. 1 14). can also change the number (→P. 1 07).
- Page 108 PIN Unblocking Key (PUK) Lock screen An eight-digit code for unlocking the card if it becomes ❶ In the standby screen, z▶[Settings]▶ locked. You cannot change the code. [Lock/Security]▶[Lock screen] z If you enter the wrong key 10 times continuously, the docomo nano UIM card is completely locked. If the card None The lock screen is not displayed. is completely locked, visit a docomo Shop. Set a four- to sixteen-digit number. Password Set four to sixteen digits of Operation password setting alphanumerics and en-width ❶ In the standby screen, z▶[Settings]▶ symbols* including one or more [Lock/Security]▶[Operation password letters. * Some en-width symbols are not setting] available. ❷ Enter the current application lock number NOTE ▶t z If no application lock number is unset , entering a About [Lock screen] current application lock number is not required. z If you enter the wrong security code five times ...
- Page 109 Usage restriction NOTE ❶ In the standby screen, z▶[Settings]▶ z In Japan, you cannot call to an emergency number (110, 119, or 118) when a docomo nano UIM card is [Lock/Security]▶[Usage restriction] not inserted, while the SIM PIN is locked, or from the ❷ Enter the application lock number▶t PUK (PIN Unblocking Key) entry screen. ❸ C▶Checkmark the function to lock z The setting is saved on the docomo nano UIM card. z If you selected "PC Mail account lock", select a If the handset becomes PIN-locked permission range from "Allow all", "Allow only specific domains", and "Restrict all". When selecting ❶ In the PIN-locked screen, enter the PUK "Allow only specific domains", press C and save the (PIN Unblocking Key) domain to permit. ❷ Enter a new SIM PIN NOTE ❸ Enter the new SIM PIN again z You can call to an emergency number (110, 119, or ❹ 118) even when you set a restriction on outgoing C calls.
-
Page 110: Wireless/Network
Encryption & credentials Wireless/Network ❶ In the standby screen, z▶[Settings]▶ Make network settings such as Airplane mode and a VPN. [Lock/Security]▶[Encryption & ❶ In the standby screen, z▶[Settings]▶ credentials] [Wireless/Network] Encrypt phone Encrypt data on the handset. z The handset is encrypted at time Wi-Fi Wi-Fi →P. 1 08 of purchase, and encryption Bluetooth Bluetooth →P. 1 26 cannot be cancelled or reset. Airplane mode Airplane mode →P. 1 10 Encrypt SD Encrypt data on an SD card. Mobile Mobile network →P. 1 10 card network Storage type Display the type of storage. Data usage Data usage →P. ... - Page 111 z Distance the handset and the Bluetooth device at z If you connect to an access point that is not least 10 m apart. connected to the Internet, or other icon appears, z If using the handset at less than 10 m, power off the and communication may be via the mobile network Bluetooth device. and not the Wi-Fi network. ❶ In the standby screen, z▶[Settings]▶ Detailed settings [Wireless/Network]▶[Wi-Fi] ❶ In the standby screen, z▶[Settings]▶ ❷ Checkmark [Wi-Fi] to enable it [Wireless/Network]▶[Wi-Fi] ❸ Select an access point ❷ [Wi-Fi preferences] z If you select a security-protected access point, press C. Open network Set the handset to display a z To register access points manually: [Add network] notification notification icon when an open ▶Enter the network name▶Set security▶C network is detected.
- Page 112 Wi-Fi Direct NOTE Connect to other Wi-Fi Direct-capable devices with the [Airplane mode] Wi-Fi function without an access point or the Internet. z If [Lock SIM card] is enabled, you cannot call an z Available when [Wi-Fi] is enabled (→P. 1 08). emergency number (110, 119, or 118). If it is ❶ In the standby screen, z▶[Settings]▶ disabled, you can call an emergency number (110, [Wireless/Network]▶[Wi-Fi]▶[Wi-Fi 119, or 118) even in Airplane mode. If you call an emergency number, [Airplane mode] is disabled and preferences]▶[Wi-Fi Direct] the call is made. z Continue by following the instructions on the z The Wi-Fi and Bluetooth functions can be enabled screen. even when [Airplane mode] is enabled. Disconnecting Mobile network ❶ In the standby screen, z▶[Settings]▶ [Wireless/Network]▶[Wi-Fi] Make settings for the calling mode, access points, etc. ❷ ❶ Select the connected access point▶z In the standby screen, z▶[Settings]▶ [Wireless/Network]▶[Mobile network] Airplane mode Mobile data...
- Page 113 ❹ [APN]▶Enter the access point name▶ Access point settings Access points for connecting to the Internet (sp-mode) [OK] are pre-registered. Add access points as required. ❺ Enter other items required by network For details of sp-mode, refer to the NTT DOCOMO operators▶z▶[Save] website. ( ttps://www.nttdocomo.co.jp/service/spmode/) (in NOTE Japanese only) To use mopera U or Business mopera Internet, you must z If the MCC or MNC settings are changed and they no add an access point manually. longer appear on the screen, either reset the handset For details on mopera U, refer to the mopera U website. to its initial settings, or set access points manually. ( ttps://www.mopera.net/) (in Japanese only) Resetting access points „ Checking the access point that is currently used Initializing access points returns them to their settings ❶ In the standby screen, z▶[Settings]▶ at time of purchase. [Wireless/Network]▶[Mobile network]▶ ❶ In the standby screen, z▶[Settings]▶...
- Page 114 Your data on mobile networks and Wi-Fi networks is use data, in the data usage screen, press [Data measured and displayed as a graph. warning & limit]▶Disable [Set data limit] or change ❶ In the standby screen, z▶[Settings]▶ the upper limit in [Data limit] to resume using data. [Wireless/Network]▶[Data usage] Alternatively, if "Mobile data limit reached" is displayed, select [Resume] to resume using data. XX MB mobile Display mobile data usage for the z The value displayed for data usage is an data time period set in [App data usage approximation recorded on mobile devices. You can cycle]. check on My docomo for the actual amount of data Mobile data Enable/disable Internet access on cellular networks. (packet communication) via the mobile network. Tethering Mobile data Display mobile data usage for the usage time period set in [Data warning & You can use the tethering function to connect Wi-Fi limit] as a graph. Check mobile devices as well as PCs, etc. connected via a USB cable data usage for individual apps. A to C 02 (sold separately) or Bluetooth to the Internet Data warning Set the time period of displayed by using the handset as an access point. & limit data usage as well as an alert level ...
- Page 115 ❶ In the standby screen, z▶[Settings]▶ VPN (Virtual Private Network) [Wireless/Network]▶[Tethering] Adding a VPN Wi-Fi hotspot Enable Wi-Fi tethering and make VPN (Virtual Private Network) is a connection method to settings for access point names, prepare and connect safely to a virtual dedicated line on security, etc. the network of a household PC or in an office from USB tethering Enable USB tethering. outside, etc. Bluetooth Enable Bluetooth tethering. z Obtain required security details from your network tethering administrator to set the VPN connection from the handset. NOTE z Set a PIN or password for the screen lock in advance [USB tethering] (→P. 1 06). z Tethering is available when the PC's OS is Windows ❶ In the standby screen, z▶[Settings]▶ 8.1 or Windows 10. [Wireless/Network]▶[VPN] z A microSD card inserted in the handset cannot be ...
-
Page 116: Docomo Service
Disconnecting a VPN NOTE ❶ In the standby screen, z▶[Settings]▶ z Some apps displayed in docomo services can be disabled. Disabled apps may not be displayed in [Wireless/Network]▶[VPN] docomo services. ❷ Select the VPN to disconnect from▶ z Anshin Manager is a paid service requiring [Disconnect] application. z For details on Anshin Manager, refer to the NTT docomo service DOCOMO website. Set docomo Services. ❶ In the standby screen, z▶[Settings]▶ [docomo service] d ACCOUNT Set a d ACCOUNT for using setting docomo apps. docomo Make settings for imadoco search, location imadoco kantan search, and Keitai information Osagashi Service functions. USB debug Enable USB debugging. switch Anshin ... -
Page 117: Battery
Battery NOTE Battery care mode Check battery usage, make Battery care mode settings, z Stopping charging at 85% prevents the battery from etc. deteriorating, and allows the battery to last longer. ❶ Usage times shortens with each charge. The In the standby screen, z▶[Settings]▶ charging lamp goes out once battery charge reaches [Battery] 85%. Battery level Check battery usage and other z Enabling Battery care mode after battery charge is items. already 86% or more prevents any charging until the Show battery Enable battery level to be shown battery has depleted to 85%. level as as percent in status bar. percent Battery care Charging stops at 85% when mode [Battery care mode] is on, and allows the battery to last longer. The battery does not charge to 86% or more. Battery saver Control battery consumption when [Battery saver] is on. Select [Turn on automatically] and you can enable Battery saver to turn on according to the battery level. -
Page 118: Handset Information (About Phone)
Handset Information (About More Settings Phone) Make settings for account, date and time, etc. ❶ In the standby screen, z▶[Settings]▶ You can check information about the handset. [More settings] ❶ In the standby screen, z▶[Settings]▶ [About phone] USB →P. 1 17 Pointer Enable confirmation to appear Software Software update →P. 1 44 when activating the pointer, make update size and speed settings, etc. Status Check handset status such as Storage Storage →P. 1 17 battery level and phone number. Apps Apps →P. 1 18 Legal Check terms of use and other legal Location Location →P. 1 18 information information. - Page 119 Storage You can change the settings for connecting the handset Check usage of handset internal storage and a microSD to a PC using a USB Cable A to C 02 (sold separately). card, as well as format, mount, and unmount microSD Selectable when connected by USB. cards. ❶ ❶ In the standby screen, z▶[Settings]▶ In the standby screen, z▶[Settings]▶ [More settings]▶[USB] [More settings]▶[Storage] ❷ [Internal storage] / [SD card] Charge this Use only for charging the handset. device z Format a microSD card: Point the cursor to [SD Transfer files This is a mode for transferring data card]▶z▶[Yes]▶[ERASE & FORMAT] to the handset memory or a z Mount/unmount a microSD card: Point the cursor microSD card using a PC to [SD card]▶C▶[Yes] compatible with MTP. NOTE Transfer This is a mode for transferring still photos (PTP) pictures to the handset memory Formatting microSD cards using a PC compatible with PTP. z All data on a microSD card will be deleted when ...
- Page 120 Apps Location Check app information, and set app permissions. You can make settings for positioning to obtain location information. ❶ In the standby screen, z▶[Settings]▶ ❶ In the standby screen, z▶[Settings]▶ [More settings]▶[Apps] [More settings]▶[Location] ❷ [App info]▶Select the app Location Enable use of location. Disabling an app z If confirmation is displayed, End operation of an app and remove it from the app select [Agree] / [Disagree]. screen without uninstalling it. Mode Change accuracy of obtaining z You can disable apps which cannot be uninstalled. location. ❶ App-level Enable use of location for a In the standby screen, z▶[Settings]▶ permissions selection of apps. [More settings]▶[Apps] Scanning Set use of Wi-Fi networks and ❷ [App info]▶Select the app▶[DISABLE]▶ Bluetooth devices to increase [Disable app] accuracy of location.
- Page 121 GPS is a function to retrieve the location information prevent radio waves from being received or prevent the of devices by receiving radio waves from GPS reception of radio waves from being satisfactory, satellites. It is necessary to enable Location to obtain resulting in an error of 300 m or more for location current location. information. z You cannot use the handset as a navigation system „ In or under a dense forest, in a high-density area with for aircraft, vehicles, persons, etc. or high-accuracy buildings or residences surveying GPS. DOCOMO is not responsible for any „ In or under buildings (pure economic loss (damages, etc.) resulting from lost „ Inside a basement or tunnel, underground, or opportunities such as checking location results or underwater communication due to malfunction, misoperation, „ Near high-tension lines external causes such as power stoppages (including „ Inside cars, trains, etc. power outages), etc. of the handset, when used for the „ In bad weather with heavy rain/snow, etc.
- Page 122 Date and Time Accessibility You can make settings for the date and time and their You can make settings for accessibility options. format. ❶ In the standby screen, z▶[Settings]▶ ❶ In the standby screen, z▶[Settings]▶ [More settings]▶[Accessibility] [More settings]▶[Date & time] Color inversion Set screen colors to be displayed Automatic Enable use of time information inverted. date & time provided from the network. Color Set screen colors to be corrected. Automatic Enable use of time zone correction time zone information provided from the Captions Make settings for captions. network. High contrast Set a higher contrast for onscreen Set date Set the date manually. text text. Set time Set the time manually. Select time Set the time zone manually. zone Use 24-hour Switch between 12-hour and ...
- Page 123 Reset options Erase all data in handset memory. ❶ In the standby screen, z▶[Settings]▶ [More settings]▶[Reset options] ❷ [Erase all data (factory reset)]▶[RESET PHONE]▶[ERASE EVERYTHING] z Reset all network settings: [Reset Wi-Fi, mobile & Bluetooth]▶[RESET SETTINGS]▶[RESET SETTINGS]▶[OK] z Reset all restrictions, etc. for disabled apps and permissions: [Reset app preferences]▶[Yes] NOTE z The following data are erased. „ Data that were created, saved, or registered „ Settings made in the Settings menu z When the battery level is less than 19%, an all-reset is not available. Handset Settings...
-
Page 124: Data Management
Data Management microSD card (external storage) Handset memory (internal You can save data on the handset to a microSD card or storage) import data on a microSD card to the handset. z microSD card →P. 4 6 The folder structure of handset memory (/storage/ emulated/0) and data saved in the folders at time of Working with files purchase are as follows. Alarms Alarm tones etc. are saved. You can categorize data that is saved in handset Android App data, etc. are saved. memory or on microSD card and play/view and manage DCIM Temporary files etc. of installed apps are saved. ❶ In the standby screen, z▶[Data] Download Files downloaded on web browser ❷ Select a category are saved. Movies Videos, etc. are saved. Pictures Display images. Music Music data, etc. is saved. Movies Movie: Display movies. Notifications Notification sounds, etc. are saved. - Page 125 ❸ Select data Details Display detailed information of selected data. z App corresponding to the data type activates to play/display the data. Copy Copy →P. 1 23 z For data saved on microSD card, is displayed. Move Move →P. 1 23 NOTE NOTE z Some data in Data Folder may not be displayed or [Set as] played. z Copyrighted data may not be used as registered data. z It may take time for data to be displayed or not all data may be displayed depending on data size. Changing data views ❶ In the data list, z▶[View mode] Data management View mode Change view modes (All / Years ...
-
Page 126: Pc Connection
Managing data with the file manager PC connection z Menu items may vary by usage function or condition of You can use a microSD card as external memory for a use. PC or transfer data by connecting the handset and the ❶ In the standby screen, z▶[Data]▶[File manager]▶z Connecting the handset and PC Set as Register a still picture to the ❶ phonebook entry or as wallpaper. Insert the Type-C plug on the USB cable A Set as Set a ringtone. to C 02 (sold separately) into the external ringtone connector terminal on the handset without Send Send data as an attachment or by bending Bluetooth transfer. ❷ Copy Copy folders/data. Insert the USB plug on the USB cable A to Move Move folder data. C 02 into the USB connector on the PC Paste Paste copied folder/moved data. without bending Delete Delete one folder/data item or z USB connection mode →P. 1 17 ... - Page 127 Transferring data You can transfer data from a PC to handset memory or microSD card. ❶ Connect the handset to a PC via a USB Cable A to C 02 (sold separately) ❷ [Allow] ❸ Transfer data ❹ Disconnect the Cable A to C 02 from the handset and the PC after use Data Management...
-
Page 128: Data Transfer
Data Transfer Using the Bluetooth function Before connecting the handset and the Bluetooth device, Bluetooth ® transfer pair them first. z Once paired, pairing information is saved. z A passcode (PIN) may be required to pair the devices. The Bluetooth function is a technology that enables The handset's passcode (PIN) is "0000". wireless connection with Bluetooth devices such as PCs If pairing cannot be completed after entering "0000", and handsfree headsets. see the instructions for the Bluetooth device. z Wireless connection with all Bluetooth devices is not z Check on the device to be paired that the Bluetooth completely guaranteed. function is on and that it is discoverable beforehand. z Supported Bluetooth profiles →P. 1 46 ❶ In the standby screen, z▶[Settings]▶ NOTE [Wireless/Network]▶[Bluetooth] z The Bluetooth on/off setting does not change with ❷ [Bluetooth] handset powered off. - Page 129 When receiving a registration request from a NOTE Bluetooth device or a connection request z You can connect up to 7 Bluetooth devices at the from an unregistered Bluetooth device same time. Bluetooth devices may not work properly ❶ or the number of Bluetooth devices which can be Registration request/connection request connected at the same time may differ depending on from Bluetooth device the profile. ❷ [Pair] z If connecting a Bluetooth device fails, connection may z Entering the Bluetooth passkey may be necessary be possible after re-registering it. depending on the other Bluetooth device. z When the Bluetooth function is set to [ON] and the z Confirmation for connection may be displayed. screen "Pair new device" is displayed, the handset is discoverable and can receive registration requests/ Unregistering Bluetooth devices connection requests from other Bluetooth devices. ❶ In the standby screen, z▶[Settings]▶ z While in connection stand-by, even if a connection [Wireless/Network]▶[Bluetooth]▶[Paired request from a Bluetooth device is received, ...
- Page 130 Submenu operations on the Bluetooth screen Receiving data z Set Bluetooth to [ON] beforehand. ❶ Data is sent from a sending Bluetooth ❶ In the standby screen, z▶[Settings]▶ device [Wireless/Network]▶[Bluetooth]▶z ❷ [Accept] Rename the Change handset name. ❸ In the standby screen, p▶Select the device status bar▶Select the receive notification Received files Display data received via Bluetooth ▶Select the received data transfer. NOTE Sending/receiving via Bluetooth z It may not be possible to receive all data depending transfer on the data type. z If space where data is being saved becomes Sending data insufficient while receiving data, data received to that Example: Still picture point is saved and receiving ends. ❶ In the standby screen, z▶[Data] ❷ Select a still picture ❸...
-
Page 131: Safety And Security Services
Safety and Security Disaster Voice Messaging Services Disaster Voice Messaging is a service which enables you to send information about safety as a voice message in case of a large-scale disaster such as as a Disaster message board "6-lower" or stronger earthquake. Record information about your safety by voice on the Disaster Message Board is a service which enables you handset and send the message to your family, etc. to register or check the safety of you and others in case For details on Disaster Voice Messaging, refer to the of a large-scale disaster such as a "6-lower" or stronger NTT DOCOMO website. earthquake. Type in and register information on your safety from the Sending a message handset. The information can be checked from your family's mobile phones, PCs, etc. ❶ In the standby screen,z▶[Anshin]▶ For details on Disaster Message Board, refer to the NTT [Disaster Voice Messaging] DOCOMO website. z When the confirmation screen is displayed, check ❶ In the standby screen, z▶[Anshin]▶ the content and press z. [Disaster Message Board] ❷ [Send voice message]▶Select a recipient z Continue by following the instructions on the selection method▶Select a recipient▶C screen. z If you selected [Direct input], enter the phone ... -
Page 132: Early Warning Area Mail
z Continue by following the instructions on the subscription. screen. z You can save up to 50 Area Mails. If the number of Area Mails saved in handset memory exceeds the maximum number that can be saved, they are deleted starting with the oldest one. Area Mail cannot be received in these situations. „ While powered off „ While in airplane mode „ During a software update „ While the entry screen for the PIN code is displayed „ When using a non-docomo SIM card „ During voice calls (except for voice calls with VoLTE) z You might not be able to receive Area Mail if free memory space is insufficient, or if tethering is set or you are using packet communication. Safety and Security Services... - Page 133 z Area Mail you were unable to receive (Earthquake Early Receiving early warning "Area Mail" Warnings) cannot be received again. Other Area Mail (Tsunami Warnings, special alerts from the After Area Mail is received, a notification is displayed, Meteorological Agency, and Disaster and Evacuation and the handset emits an alert buzzer sound or ringtone Information) is sent again, and can be received again if and vibrates. you could not receive it the first time. z The buzzer sound or ringtone cannot be changed. ❶ Automatically receive an Area Mail ❷ When the Area Mail is received, the handset alerts you (buzzer or ringtone), an icon appears in the status bar, and the Area Mail message appears Checking received Area Mail later ❶ In the standby screen, z▶[Anshin]▶[Early warning "Area Mail"] ❷ Select the received Area Mail Deleting Area Mail ❶ In the standby screen, z▶[Anshin]▶[Early warning "Area Mail"] ❷ Point the cursor to an Area Mail ❸ [Delete]▶[Delete] Safety and Security Services...
- Page 134 Use full volume Set the volume when Area Mail is Setting early warning "Area Mail" received. When enabled, the alert You can set whether to receive Area Mail, operation sounds at maximum volume even if when received, etc. in Manner mode. When disabled, ❶ the alert sounds according to the In the standby screen, z▶[Anshin]▶[Early set alarm volume. warning "Area Mail"] Check screen Check the receiving screen and ❷ z▶[Settings] image and sound (buzzer/ringtone) when Area beep tone Mail is received (Earthquake Early Receive Set whether to receive Area Mail. Warning, Tsunami Warning, setting Disaster and Evacuation Emergency Show a list of received Area Mail. Information/special alerts from the alert history Meteorological Agency). Vibration Set the handset to vibrate when やさしい日本語 Enable Earthquake Early Warnings Area Mail is received. 表示 (Easy and Tsunami Warnings to be Alert reminder Set whether the handset notifies Japanese) displayed in easy-to-understand ...
-
Page 135: Anshin Security
Anshin Scan sales calls or suspicious scam calls. ❶ In the standby screen, z▶[Anshin]▶ A warning screen appears to alert you when connecting [Anshin Security]▶[Anshin Number to sites where the handset is at risk of phishing or virus Check] infection, or Wi-Fi hotspots where there is a risk of transmitted data being altered or viewed. z Continue by following the instructions on the ❶ screen. In the standby screen, z▶[Anshin]▶ [Anshin Security]▶[Anshin Scan] NOTE z Continue by following the instructions on the z Anshin Number Check is a paid service requiring screen. subscription to Anshin Security. NOTE z For details on Anshin Number Check, refer to the NTT DOCOMO website. z docomo Anshin Scan is a paid service requiring subscription to Anshin Security. z For details on docomo Anshin Scan , refer to the NTT DOCOMO website. Safety and Security Services... -
Page 136: Anshin Filter
Anshin Filter This browser application allows parents/guardians to restrict apps and access to harmful sites according to a child's age and how they use the handset for worry-free handset operation. ❶ In the standby screen, z▶[Anshin]▶ [Anshin Filter] z If a confirmation screen is displayed, check the content and press C. z If initial settings are not completed, the initial settings screen appears. Follow the instructions on the screen. NOTE z For details on Anshin Filter for docomo, refer to the NTT DOCOMO website. z While using Anshin Filter for docomo, the handset's standard browser cannot be used. Safety and Security Services... -
Page 137: Appendix/Index
P. 8 4 z Data →P. 1 22 Calculator z Calculator →P. 9 6 Function menu Page Phone Homepage P. 8 9 On the last My docomo Function menu Page page PhoneBook P. 7 4 Bookmarks P. 8 9 docomo voicemail ― Web Search P. 8 8 Call/Ans Memo... - Page 138 Function menu Page Function menu Page Network service P. 7 1 Operation password P. 1 06 setting Incoming call settings P. 7 2 Call log/Call Lock screen P. 1 06 settings Outgoing call settings P. 7 3 Application lock P. 1 06 Other settings P. 7 3 Usage restriction P. 1 07 Speed dial setting P. ...
- Page 139 Tools Function menu Page d ACCOUNT setting P. 1 14 Function menu Page docomo location Alarm P. 9 2 P. 1 14 information Countdown Timer P. 9 4 docomo service USB debug switch P. 1 14 Stopwatch P. 9 4 Anshin Manager P. 1 14 OfficeSuite P. 9 6 Open source licenses P. ...
-
Page 140: Troubleshooting (Faq)
Cannot charge The charging lamp does not illuminate or it flashes Check here first Is the battery pack installed correctly? →P. 4 8 Is the power plug on the adapter firmly connected to z You can perform a diagnosis yourself if you think the an outlet or accessory socket? →P. 5 1 handset may be malfunctioning. Are the adapter and the handset connected For details, see the NTT DOCOMO website. properly? →P. 5 1 z Check if the software needs to be updated, and update If using an AC adapter (sold separately), is the it if necessary (→P. 1 44). connector on the AC adapter connected firmly to the z If problematic symptoms are not improved after going handset or the desktop holder (sold separately)? through the check items, contact "Troubleshooting & →P. 5 1, P. 5 2 Repairs" (in Japanese only) on the last page or a ... - Page 141 Handset operation z docomo nano UIM card is not recognized Is the docomo nano UIM card inserted facing the z Becomes hot while operating/charging right direction? →P. 4 1 The handset, battery pack, or the adapter may z Clock is incorrect become warm during use, charging, or if using apps, The clock time may become inaccurate if the etc. for a long period while charging, but this is handset is powered on for a long period. Make sure normal. Continue use. →P. 5 0 [Automatic date & time] in [Date & time] is enabled z Usable battery time is short and power the handset on again in a location with Is the handset outside of the service area and not good signal conditions. →P. 1 20 used for long periods? When out of the service area, z Handset operation is unstable the handset searches for a signal to enable ...
- Page 142 Is the answer time setting for voice memo set to during a call "0sec"? →P. 6 9 Have you changed the in-call volume? →P. 1 02 Is the ringing time for voicemail service or call forwarding service set to "0sec"? →P. 7 1 Mail z Calls cannot be made ([ ] does not disappear even z Mail is not automatically received after moving to another place or calls cannot be made/ Is the auto reception setting set to [Confirm every received even though signal status is not bad) time] or [OFF]? →P. 8 0 Power on the handset again or install the battery pack or docomo nano UIM card again. →P. 4 1, P. 4 8, P. 5 4 Appendix/Index...
- Page 143 Data management Error messages z Cannot use data transfer z [Insert SIM Card / Please reconfirm.] Are you using a USB hub? Using a USB hub may Check that the docomo nano UIM card is installed prevent normal use. →P. 1 24 correctly. →P. 4 1 z Data saved to microSD card does not appear z [Running out of storage] Reinstall the microSD card. →P. 4 6 Handset storage is full. Move or delete app data. z A "×" is displayed when an image is opened z [Enter PIN/Enter Password] This is displayed when the image data is damaged. Appears when an operation was attempted while the ...
-
Page 144: Warranty & After-Sales Service
If repair is required after inquiring Warranty & after-sales Bring the handset to a docomo-designated repair service counter. The handset can be accepted during the hours of service at the repair counter. Note that repairs may require several days depending on the malfunction/ Warranty breakage. z When purchasing the handset, a certificate of warranty „ During the warranty period is contained in the "Quick Start Guide" (in Japanese z Repair is made free of charge under the terms of the only) Read the warranty and keep it in a safe place. warranty. Warranty is for 1 year from date of purchase. z However, even if within the warranty period, repairs are z Battery Pack KY01, Back Cover KY01, and Desktop made at charge if malfunction/damage is a result of Holder KY01 are not covered by the warranty. customer mishandling (breakage of external connector z Note that the specifications and appearance of the terminal, display, etc.) or if the handset has been handset, including accessories, may change without repaired other than at docomo-designated repair notice. counter. z Information registered in the phonebook, etc. may ... - Page 145 The handset has been repaired other than at a Ornamentation adhered to the handset with glue, docomo-designated repair counter. etc. * Even if repairs can be made, repairs are not covered by Replacing the exterior or other component with a warranty and are made at charge. non-docomo-brand item, etc. „ Malfunction or damage due to modification will be „ If the warranty period has expired subject to repairs at cost even if within the warranty The handset can be repaired at cost upon request. period. „ Period that parts are stocked z Information such as function settings may cleared Repair parts (for maintaining handset performance) are (reset) through malfunction, repair, or other handling of usually stocked for at least 4 years after end of the handset. In this instance, make settings again. production. Making settings may incur packet transmission fees. For details on servicing when requesting repairs, see the z After the handset has been repaired, its MAC address NTT DOCOMO website. for using Wi-Fi and its Bluetooth address may be ...
-
Page 146: Software Updates
Functionality addition redownloading data. DOCOMO may replace the Preinstalled apps and handset functions are updated handset with a substitute handset in lieu of repairs at to improve functionality and usability and allow smooth DOCOMO's discretion. In this instance, with some data handset operation. excepted, such data cannot be transferred to the z Quality improvement substitute handset. Preinstalled apps and handset functions are updated to improve quality and allow smooth handset operation. z Latest security patch update A patch (software for patching a vulnerability) is applied to allow more worry-free handset operation. For details and time periods on software updates provided for the handset, see the NTT DOCOMO website. [ ドコモのホームページ] (DOCOMO website)▶[お客様サポー ト] (Support)▶[製品・サービスのご利用・ご活用情報] (Information on Using and Getting the Most Out of Products and Services)▶[製品アップデー ト情報] (Product Update Information)▶[提供中の製品アップデー ト情報] (Current Product Update Information) ttps://www.nttdocomo.co.jp/support/product̲update/) (in Japanese only) Appendix/Index... - Page 147 Update procedure Updating software Perform an update as follows. Follow the handset screen for instructions. Starting an update ❶ Perform any of the following to start an update. Download and install the update file z From an update notification The confirmations "Perform Now" and "Later" may In the status bar, select the notification "Software appear before the update file is downloaded and update notified" or "Software update available" and installed. If a confirmation is displayed, select either start the update. of the following to proceed with the update. z From a pop-up prompting an update (1) Select "Perform Now" Once notification of an update has arrived, the pop-up Immediately download or install the update file. "An update is available" is displayed regularly. Select (2) Select "Later" [OK] in the pop-up and start the update. Specify a time to download or install the update z From handset settings file. In the standby screen, z▶[Settings]▶[About phone]▶ A recommended time to download or install is [Software update], and start the upate. If software has prespecified. To change the time to download or already been updated, "No update required. Use your install, select [Change schedule] and specify a device as it is." appears. time. z To change this time later, in the standby screen, ...
-
Page 148: Main Specifications
Important Main specifications z After software is updated, the handset cannot be returned to the previous software. Handset z Information unique to the handset (model, serial number, etc.) is sent to a DOCOMO server during a Name KY-41B software update. DOCOMO does not use this Approx. 112 mm (H) x Approx. 51 mm (W) Size information for purposes other than software updates. x Approx. 17.9 mm (D) z Functions become temporarily unavailable during a Approx. 123 g (When battery pack Weight software update. installed) z If a SIM PIN is set, a SIM PIN entry window appears Type: TFT after software is overwritten and the handset is Size: Approx. 3.4 inches restarting. Enter the SIM PIN. Display Resolution: 480 pixels width × 854 pixels z If a software update fails and the handset becomes height (FWVGA) completely inoperable, bring the handset to a docomo- Internal ... - Page 149 *1 The entire memory space cannot be allotted to saving Version: 4.2 downloaded data, etc. For usable free space, see Output: Bluetooth standard Power Class 1 "Storage" (→P. 1 17). Line of sight distance : Approx. 10 m *2 Average usable time with the handset closed and in Bluetooth Supported profiles /codecs: HSP (1.2), strong signal conditions at rest. HFP (1.7) , A2DP (1.3) , AVRCP *3 Continuous standby time depends greatly on current (1.6), OPP (1.2), SPP (1.2), PBAP (1.2), settings, surrounding conditions, frequency of calls/ PAN (PAN-NAP) (1.0), PAN (PANU) (1.0) mail, etc. Video Supported codecs: MPEG-4, H.263, *4 If functions are used frequently, actual time may be playback H.264, VP8, VP9 less than half. Supported codecs: AAC-LC, AAC+, *5 Continuous call time depends greatly on current Music eAAC+, AAC-ELD, AMR-NB, AMR-WB, settings, surrounding conditions, frequency of calls/ playback FLAC, MP3, MIDI, Vorbis, PCM/WAVE, mail, etc.
-
Page 150: Specific Absorption Rate (Sar) Information Of Mobile Phones
*12 Sound codecs SBC and AAC are supported. Specific Absorption Rate Battery pack (SAR) Information of Mobile Name Battery Pack KY01 Phones Battery Lithium-ion battery Nominal voltage DC 3.8 V This model KY-41B mobile phone complies with the Nominal capacity 1500 mAh Japanese technical regulations and the international guidelines regarding human exposure to radio waves. This mobile phone was designed in observance of the Japanese technical regulations regarding exposure to radio waves (*1) and the limits of exposure recommended in the international guidelines, which are equivalent to each other. The international guidelines were set out by the International Commission on Non-Ionizing Radiation Protection (ICNIRP), which is in collaboration with the World Health Organization (WHO), and the permissible limits include substantial safety margins designed to assure the safety of all persons, regardless of age and health conditions. The technical regulations and the international guidelines set out the limits of exposure to radio waves as the Specific Absorption Rate, or SAR, which is the value of absorbed energy in any 10 grams of human tissue over a 6-minute period. The SAR limit for mobile phones is 2.0 W/kg. Appendix/Index... - Page 151 (*2) , and that when more detailed information regarding SAR. worn on the body is 0.414W/kg (*3) . There may be slight Ministry of Internal Affairs and Communications Website: differences of the SAR values in individual product, but https://www.tele.soumu.go.jp/e/sys/ele/index.htm they all satisfy the limit. The actual value of SAR of this Association of Radio Industries and Businesses mobile phone while operating can be well below the Website: indicated above. This is due to automatic changes in the https://www.arib-emf.org/01denpa/denpa02-02.html power level of the device to ensure it only uses the (in Japanese only) minimum power required to access the network. NTT DOCOMO, INC. Website: This mobile phone can be used in positions other than https://www.nttdocomo.co.jp/english/product/sar/ against your head. By using accessories such as a belt *1 The technical regulations are provided in Article 14-2 clip holster that maintains a 1.5cm separation with no of Radio Equipment Regulations, a Ministerial metal (parts) between it and the body, this mobile phone Ordinance of the Radio Act. is certified the compliance with the Japanese technical *2 Including other radio systems that can be regulations and the international guidelines. simultaneously used with LTE/FOMA. *3 Including other radio systems that can be The World Health Organization has stated that "a large simultaneously used with LTE/FOMA. number of studies have been performed over the last two decades to assess whether mobile phones pose a potential health risk. To date, no adverse health effects ...
-
Page 152: Export Control Regulations
Copyrighted contents you obtained from Internet regulations). They may also be subject to Export websites using this product by downloading or other Administration Regulations of the US. Before exporting means, such as documents, images, software, are or reexporting this product and its accessories, prohibited from reproduction, transformation and necessary procedures must be followed at your transmission over public lines without consent of the responsibility and expense. For details, contact the copyright holders, unless intended for personal use or Ministry of Economy, Trade and Industry of Japan or the any other purpose permitted by law. US Department of Commerce. You should also refrain from disclosing portraits of other people using this product by such means as posting it on an Internet website without their consent because of possible infringement of their right of portrait. Trademarks z "FOMA", "dmenu", "mopera U", "ビジネスmopera", "デコメ (R)", "Deco-mail", "i-mode", "WORLD WING", "公共モー ド", "WORLD CALL", "おまかせロック", "Kazashite-Link", "エリア メール", "イマ ドコ サーチ", "イマ ドコかんたんサーチ", "sp- mode", "Anshin Manager", the "dmenu" logo, the "Area Mail" logo, the "docomo mail" logo, and the "docomo phonebook" logo are trademarks or registered trademarks of NTT DOCOMO, INC. z "DIGNO" is a registered trademark of Kyocera Corporation. Appendix/Index... - Page 153 z "Catch Phone (Call waiting service)" is a registered ACTIVITY AND/OR WAS OBTAINED FROM A VIDEO trademark of Nippon Telegraph and Telephone PROVIDER LICENSED BY MPEG LA TO PROVIDE Corporation. MPEG-4 VIDEO. NO LICENSE IS GRANTED OR SHALL z "Bluetooth" is a registered trademark of Bluetooth SIG, BE IMPLIED FOR ANY OTHER USE. ADDITIONAL Inc., and used under license by Kyocera INFORMATION INCLUDING THAT RELATING TO Corporation. PROMOTIONAL, INTERNAL AND COMMERCIAL USES z Wi-Fi ® , Wi-Fi Protected Access ® (WPA), the Wi-Fi AND LICENSING MAY BE OBTAINED FROM MPEG LA, CERTIFIED logo, Wi-Fi CERTIFIED™, and LLC. SEE HTTP://WWW.MPEGLA.COM. WPA2™ are trademarks of Wi-Fi Alliance. THIS PRODUCT IS LICENSED UNDER THE AVC z Microsoft ® , Windows ® and Windows ® 8 / Windows ® PATENT PORTFOLIO LICENSE FOR THE PERSONAL 8.1 / Windows ®...
- Page 154 z All rights not indicated herein are those of their This product contains software with copyrights belonging respective owners. to Kyocera Corporation as well as software under license z The user is granted a license to use the software to Kyocera Corporation. Copyrights to software contained installed in the handset and described in this manual. in this product and designed/developed by Kyocera Note the following when using the software. Corporation in compliance with the standards and (a) Y ou must not copy, distribute, modify, analyze, licenses of open-source software are those of Kyocera reverse-engineer, or derive the source code of the Corporation and third parties, and the customer may not software in its entirety or in part. distribute, copy, modify, publicly transmit, etc. the (b) Y ou must not export the software in its entirety or software without the consent of Kyocera Corporation, in part in violation of law or regulation. except for any scope of use as permissible by copyright (c) N o warranty is implied for the software's law or any scope of use as permitted separately by merchantability, fitness for any particular purpose, Kyocera Corporation. non-infringement of third-party intellectual property License rights, etc. However, use of software included in the software is based on GNU General Public License ...
-
Page 155: Sim-Unlocking The Handset
LIMITED TO, PROCUREMENT OF SUBSTITUTE GOODS SIM-unlocking the handset OR SERVICES; LOSS OF USE, DATA, OR PROFITS; OR BUSINESS The handset can be SIM-unlocked. SIM-unlocking the INTERRUPTION) HOWEVER CAUSED AND ON ANY handset allows other-carrier SIM cards to be used with THEORY OF LIABILITY, WHETHER IN CONTRACT, STRICT LIABILITY, OR TORT (INCLUDING NEGLIGENCE z Some services, functions, etc. may have restrictions. OR OTHERWISE) ARISING IN ANY WAY OUT OF THE DOCOMO does not guarantee any operation of the USE OF THIS SOFTWARE, EVEN IF ADVISED OF THE handset. POSSIBILITY OF SUCH DAMAGE. z For details on SIM-unlocking procedures, see the NTT 【Original SSLeay License】 DOCOMO website. Copyright © 1995-1998 Eric Young (eay@cryptsoft.com) ❶ Insert a non-docomo SIM card All rights reserved. This product includes cryptographic software written by ❷ Power on the handset Eric Young (eay@cryptsoft.com) ❸ Enter the SIM unlock code THIS SOFTWARE IS PROVIDED BY ERIC YOUNG ''AS IS'' AND ANY EXPRESS OR IMPLIED WARRANTIES, ❹ C INCLUDING, BUT NOT LIMITED TO, THE IMPLIED WARRANTIES OF MERCHANTABILITY AND FITNESS FOR A PARTICULAR PURPOSE ARE DISCLAIMED. IN NO EVENT SHALL THE AUTHOR OR CONTRIBUTORS BE ... -
Page 156: Index
Index Back cover ........33 Attaching ....... . . 26 Removing . - Page 157 Continuous talk time ......146 docomo location information ....114 Converting text .
- Page 158 Focus mode ....... . . 36 docomo service ......114 Font size ...
- Page 159 Notification counters ......36 docomo mail ....... 78 Checking details .
- Page 160 Notification icon ......37 Sending ........84 Notification settings .
- Page 161 Prefix settings ....... 73 Profile ........40 Public mode (power OFF) .
- Page 162 Sending ........81 Input settings. . . . . . . . . . . . . . . . . . . . . . . . . . . . . . 58 Software update ......144 Phrase ...
- Page 163 Voice memo key ......32 Data usage ....... 112 VoLTE .
- Page 164 The handset and etiquette Be careful of where using the handset and the volume of your Please be considerate of those around you when using voice and ringtone the handset. „ Be careful of the volume of your voice when using the Always power off the handset in handset in a quiet place such as a restaurant or hotel these instances lobby. „ When out and around, use the handset where not a „ When in a location where use is prohibited hindrance to passers-by. For use onboard an aircraft or at a hospital, follow the instructions of the airline or facility. Power off the These functions help keep manners handset where its use is prohibited. in public Set Public Mode in these instances The handset has convenient functions such as letting you not to have to answer calls and muting the handset. „ When driving z Manner mode (→P. 1 03) Be careful of using the handset while driving a vehicle. Mutes the handset. Other than where excepted by law, looking at handset z Public mode (power OFF) (→P. 7 1) ...
- Page 165 We collect your old handsets and other devices irrespective of carrier. Bring them to a docomo Shop near you. * Collected devices: Mobile phone, PHS, battery pack, charger, desktop holder (irrespective of carrier) ...
- Page 166 ● If you lose your handset or have it stolen, immediately take the steps necessary for suspending the use of the handset. ● If the handset you purchased is damaged, bring your handset to a repair counter specified by DOCOMO after returning to Japan.
- Page 167 ●For Applications or epairs and After ales ervice, please contact the above mentioned information center or check the docomo hop etc. near you on the NTT DOCOMO website and contact. DOCOMO website https://www.nttdocomo.co.jp/english/ Inquiries for usiness docomo Corporate Information Center...
Need help?
Do you have a question about the DIGNO KY-41B and is the answer not in the manual?
Questions and answers