Roland RD-700NX Owner's Manual
Roland digital piano owner's manual
Hide thumbs
Also See for RD-700NX:
- Midi implementation manual (15 pages) ,
- Supplementary manual (4 pages) ,
- Brochure & specs (3 pages)
Table of Contents
Advertisement
Quick Links
Advertisement
Chapters
Table of Contents

Related Manuals for Roland RD-700NX


Summary of Contents for Roland RD-700NX
-
Page 2: Important Safety Instructions
202 + 3a All rights reserved. No part of this publication may be reproduced in any form without the written permission of ROLAND CORPORATION. Roland, GS, and SuperNATURAL are either registered trademarks or trademarks of Roland Corporation in the United States and/or other countries. -
Page 3: Using The Unit Safely
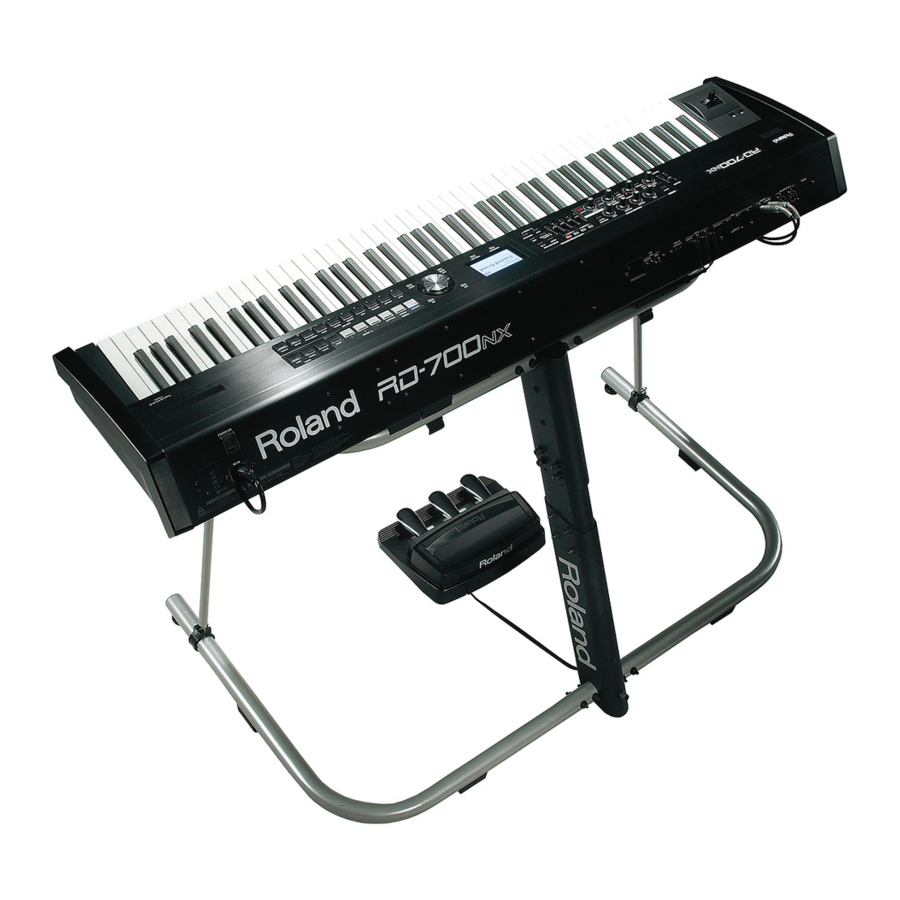
This unit should be used only with a rack or stand that is recommended by Roland. When using the unit with a stand recommended by Roland, the stand must be carefully placed so it is level and sure to remain stable. If not using a stand, you still need to make... - Page 4 The unit should be located so that its location or position does not interfere with its proper ventilation. 101c This (RD-700NX) for use only with Roland stand KS-G8. Use with other stands is capable of resulting in instability caus- ing possible injury.
-
Page 5: Important Notes
(such as when circuitry related to memory itself is out of order), we regret that it may not be possible to restore the data, and Roland assumes no liability concerning such loss of data. Additional Precautions • Please be aware that the contents of memory can be irretrievably lost as a result of a malfunction, or the improper operation of the unit. - Page 6 240 (2a-2) • MMP (Moore Microprocessor Portfolio) refers to a patent portfolio concerned with microprocessor architecture, which was developed by Technology Properties Limited (TPL). Roland has licensed this technology from the TPL Group. 238 (2a-5) • MPEG Layer-3 audio compression technology is licensed from Fraunhofer IIS Corporation and THOMSON Multimedia Corporation.
-
Page 7: Table Of Contents
Getting Ready . . . . . . . . . . . . . . . . . . . . . . . . . . . . . . . . . . . . . Placing the RD-700NX on a Stand ....... . 13 Connecting the Power Cord . - Page 8 Changing the USB Memory Setting ......90 Using the RD-700NX as a USB MIDI Interface ..... 90 Material .
-
Page 9: Panel Descriptions
[CONTROL/LAYER LEVEL] Button This determines the function of the LAYER LEVEL sliders (p. 73). [MIDI] Button Puts the RD-700NX in control of the external MIDI sound generator (p. 86). [SPLIT] Button This button selects “Split mode, ” whereby the keyboard is divided into two regions, allowing you to play separate sounds with the right and left hands (p. - Page 10 6. DISPLAY This shows the Live Set names and the values of various settings, etc. [LAYER EDIT] Button This allows you to change the Layer settings (p. 56). You can also use this to assign functions in some screens. [TONE EDIT] Button This allows you to change the tone settings (p.
-
Page 11: Rear Panel
Adjusts the display’s contrast (p. 18). 17. PEDAL Jacks (DAMPER, FC1, FC2) Connecting the pedal switch provided with the RD-700NX to the DAMPER jack allows you to use the switch as a damper pedal. With a pedal connected to the FC1 or FC2 jack, you can then assign a variety of functions to the pedal (p. -
Page 12: Getting Ready
Getting Ready Placing the RD-700NX on a Stand If you place the RD-700NX on a stand, you must use the KS-G8 (sold separately). When placing the RD-700NX on the KS-G8, place it in the position shown below. NOTE Using the RD-700NX with any other stand may produce an unstable situation, possibly causing the instrument to fall or overturn, and resulting in injury or damage. -
Page 13: Connecting The Power Cord
Is the volume level of the RD-700NX or connected amp turned all the way down? Is the power to the RD-700NX or connected amp turned off ? 2. Connect supplied power cord to the AC IN connector of the RD-700NX, and plug the other end into an AC outlet . -
Page 14: Connecting The External Equipment To Rd-700Nx
Connecting the External Equipment to RD-700NX The RD-700NX is not equipped with an amplifi er or speakers. In order to produce sound, you need to hook up audio equipment such as a monitor speaker or a stereo set, or use headphones. -
Page 15: Connecting Pedals
Is the power to the RD-700NX or connected amp turned off ? 2. Connect supplied power cord to the AC IN connector of the RD-700NX, and plug the other end into an AC outlet . 3. Connect the RD-700NX and the external devices . -
Page 16: Turning The Power On And Off
The unit is powered up, and the display’s backlighting comes on. NOTE • To prevent incorrect functioning of the Pitch Bend/Modulation Lever (p. 34), refrain from touching the lever while the power to the RD-700NX is turned on. • This unit is equipped with a protection circuit. A brief interval (a few seconds) after power up is required before the unit will operate normally. -
Page 17: Adjusting The Volume
• Carefully insert the USB memory all the way in-until it is fi rmly in place. MEMO If you’re using new USB memory, you must fi rst initialize (format) it on the RD-700NX. For details, refer to “Formatting Memory (Format)” (p. 81). -
Page 18: Connecting The Cd Drive
Connecting the CD Drive If you’re using a stand (KS-G8), you can use the screw holes on the bottom of the RD-700NX to attach a CD drive (sold separately). MEMO For information on turning on/off your CD drive and how to insert or remove a CD, refer to the owner’s manual that came with your CD drive. -
Page 19: Overview Of The Rd-700Nx
Overview of the RD-700NX Basic Organization of the RD-700NX The RD-700NX can be divided into two sections: a controller section and a sound generator section. Sound Generator Section Play Controller Section (controllers such as keyboard, pitch bend lever, etc .) About Memory Memory provides storage locations where Live Sets and other settings are stored. -
Page 20: About Live Sets
Layer The RD-700NX features four parts (UPPER 1, UPPER 2, LOWER 1, and LOWER 2) that you can use for freely controlling the Internal parts with the RD-700NX’s buttons and keyboard. These four parts that are used for controlling the Internal parts are collectively known as the “Layer. ”... -
Page 21: Basic Operation
ONE TOUCH Screen When the ONE TOUCH PIANO button or ONE TOUCH E. PIANO button is pressed, setting the RD-700NX to the optimal status for Piano or E. Piano performances, this screen is displayed (p. 26). Live Set Screen The currently selected Live Set is displayed (p. -
Page 22: Special Indications
[WRITE] Button Stores the current settings to “Live Set” (p. 45). Overview of the RD-700NX About the Cursor Buttons The Cursor buttons are used for switching screens, and for moving to an item whose setting you want to change (by moving the cursor). -
Page 23: Editing A Value
Overview of the RD-700NX Editing a Value When changing settings values, you can use the [DEC] and [INC] buttons, VALUE dial, or the LIVE SET buttons (numeric keys). [DEC] Button, [INC] Button Pressing the [INC] button increases the value, and the [DEC] button decreases it. -
Page 24: Listening To The Demo (Demo Play)
MEMO When you enter Demo mode, the various settings will be in the same state as they are immediately after the RD-700NX is powered up. Store any arrangements of settings that you want to keep in Live Set (p. 45). -
Page 25: Performance
Now, try performing with the piano. The RD-700NX lets you call up the ideal settings for piano performance at any time simply by pressing a button. You can also select your preferred tones and settings and store them to the RD-700NX’s buttons. -
Page 26: Performing With A Variety Of Live Sets
Performing with a Variety of Live Sets The RD-700NX comes with a many built-in Sounds. Each one of these individual sounds is called a “Live Set. ” Live Sets are assigned to the LIVE SET buttons according to the tone category selected. -
Page 27: Playing Multiple Tones With The Keyboard
Performance Playing Multiple Tones with the Keyboard The RD-700NX features four Internal layers (UPPER 1, UPPER 2, LOWER 1, and LOWER 2), and one tone can be assigned to each of these layers. You can perform using combinations of tones by turning each layer on or off . -
Page 28: Keyboard
Playing Diff erent Tones in Two Diff erent Sections of the Keyboard Such a division of the keyboard into right- and left-hand sections is called a “ Split, ” and the key where the division takes place is called the “Split Point. ” While in Split mode, a sound played in the right side is called an “UPPER part, ”... -
Page 29: Changing The Tone For A Layer
Performance Changing the Tone for a Layer 1. Press the [Layer EDIT] button to access the layer edit screen . 2. Use the Cursor [ ] buttons to select the layer whose tone you want to change . Layers that have their Layer switch turned off are dimmed in the screen. 3. Use the LIVE SET buttons to select the tone category, and then use the [DEC] [INC] buttons or the VALUE dial to select a tone . -
Page 30: Adjusting The Volume Level For Individual Layers
Adjusting the Volume Level for Individual Layers With the RD-700NX, each of the parts that is performed using the internal sound generator is referred to as a Layer. For each layer (UPPER 1, UPPER 2, LOWER 1, LOWER 2), you can use the Layer switch and Layer LEVEL slider to turn the sound on/off and adjust its volume. -
Page 31: Transposing The Key Of The Keyboard (Transpose)
Performance Transposing the Key of the Keyboard (TRANSPOSE) You can transpose performances without changing the keys you are playing, as well as change the pitch by an octave. This feature is called “ Transpose. ” This is a convenient feature to use when you want to match the pitch of the keyboard performance to a vocalist’s pitch, or perform using the printed music for trumpets or other transposed instruments. -
Page 32: Adding Reverberation To The Sound (Reverb)
Adding Reverberation to the Sound (REVERB) The RD-700NX can apply a reverb eff ect to the notes you play on the keyboard. Applying reverb adds pleasing reverberation to what you play, so it sounds almost as if you were playing in a concert hall. -
Page 33: Changing The Sound's Pitch In Real Time
Performance Changing the Sound’s Pitch in Real Time While playing the keyboard, move the lever to the left to lower the pitch, or to the right to raise the pitch. This is known as Pitch Bend. You can also apply vibrato by manipulating the lever away from you. This is known as Modulation. If you move the lever away from you and at the same time move it to the right or left, you can apply both eff ects simultaneously. -
Page 34: Adjusting The Levels Of Each Frequency Range (Equalizer)
3. To turn the equalizer off , press the EQUALIZER [ON/OFF] button, extinguishing its indicator . MEMO You can set the RD-700NX so that the equalizer settings are not changed when you change Live Sets (p. 44). Refer to“Preventing Equalizer Settings from Being Switched (EQ Mode)” ( p. 67). -
Page 35: Disabling The Button
Performance Disabling the Button By engaging the Panel Lock function, you can disable panel functions. This prevents settings from being changed inadvertently on stage or in other such situations. However, you’ll still be able to operate the following buttons and knobs even while Panel Lock is in force. • [VOLUME] slider • [DISPLAY CONTRAST] knob • Pitch Bend/Modulation lever... -
Page 36: Using The Convenient Functions In Performances
Using the Convenient Functions in Performances Playing Rhythm The RD-700NX features internal drum patterns complementing Jazz, Rock, and other various musical genres. These drum patterns are referred to as “ Rhythms. ” 1. Press the [SELECT] button to make the button indicator light . -
Page 37: Playing The Songs
2. Use the [DEC] [INC] buttons or the VALUE dial to select the desired media . Type Explanation Songs in the RD-700NX’s internal memory Songs in USB memory connected to the USB MEMORY connector Songs on a CD in a CD drive connected to the USB MEMORY connector 3. Press the Cursor [... -
Page 38: Changing Song Tempos
Caution when Playing Back Audio Files Playing back an MP3 fi le or changing the playback tempo of an audio fi le places a signifi cant processing burden on the RD-700NX, and in some cases may cause it to be unable to completely process all of the performance data from the keyboard. -
Page 39: Recording Audio
Using the Convenient Functions in Performances Recording Audio The RD-700NX lets you easily record your performance as an audio fi le. You can then play back the recording to evaluate your performance. Getting ready to record NOTE You must not disconnect the USB memory. -
Page 40: Applying Effects To The Sound (Mfx)
Applying Eff ects to the Sound (MFX) In addition to chorus (p. 33) and reverb (p. 33), the RD-700NX also allows you to apply “multi-eff ects” to sounds. Multi-eff ects provides a collection of 84 diff erent eff ects, such as distortion and rotary, from which you can choose. -
Page 41: Simulating The Creation Of Organ Tones
Using the Convenient Functions in Performances Simulating the Creation of Organ Tones When any of the “TW-Organ 1–10” Tones is selected for any of the layer, you can perform in “ Tone Wheel mode, ” in which the creation of organ sounds is simulated. -
Page 42: Changing The Undulation Of The Organ Tone (Rotary Effect)
Changing the Undulation of the Organ Tone (Rotary Effect) While the Tone Wheel screen is displayed, you can change the undulation rate of the Rotary effect with the Pitch Bend lever. The Rotary effect is an effect that recreates the sound of the rotating speakers used to augment the sound of an organ. Moving the pitch bend lever to left or right will toggle the Rotary effect between fast and slow regardless of the direction in which you move the lever. -
Page 43: Selecting Stored Settings (Live Set )
Selecting Stored Settings (Live Set ) The RD-700NX’s Layer (p. 56) and EXTERNAL Layer (p. 59) tone settings, eff ect settings, and other such settings are collectively referred to as a “ Live Set. ” Once you’ve stored your preferred settings, and settings for the songs to be performed as a Live Set, you can then switch whole groups of settings during a performance just by switching Live Sets. -
Page 44: Storing Settings To Live Sets
If you want to use the changed content as a new Live Set, use the following procedure to save the settings to user bank. You can store 100 Live Sets on the RD-700NX. You can also change the name of a Live Set. -
Page 45: Making Detailed Settings For The One Touch Tones
Making Detailed Settings for the ONE TOUCH Tones Making Detailed Settings for the Piano Tones You can make detailed settings to adjust the piano sound that’s used when you press the ONE TOUCH PIANO button (p. 26). These detailed settings can be saved for each variation. NOTE When you press one of the ONE TOUCH PIANO buttons, all settings other than the tone settings will be set to their power-up default values. - Page 46 Piano Parameters Parameter Value (Tone Name) – Stereo Width CENTER, L01-01R–L63-63R Nuance TYPE1, 2, 3 1–7 Damper Noise 0–127 Duplex Scale 0–127 String Resonance OFF, 1–127 Key Off Resonance OFF, 1–127 Hammer Noise -2–0–+2 Tone Character -5–0–+5 Sound Lift 0–127 Making Detailed Settings for the ONE TOUCH Tones Description Selects the tone.
-
Page 47: Changing The Key Touch
Making Detailed Settings for the ONE TOUCH Tones Changing the Key Touch You can make advanced settings for the touch used for the keys. Changing this setting also changes the Key Touch setting in Edit Mode (p. 71). Parameter Value Description SPR LIGHT An even lighter setting than LIGHT. -
Page 48: Making The Equalizer Settings
Parameter Value Description Amount of boost/cut produced by the filter at the specified Peaking Gain -15–+15 dB frequency region of the input sound Width of the frequency region boosted/cut by the Peaking Gain Peaking Q 0.5, 1.0, 2.0, 4.0, 8.0 parameter (larger values make the region narrower) Frequency at which the high-... -
Page 49: Making Detailed Settings For The E. Piano Tones
The RD-700NX contains a SuperNATURAL E. Piano sound generator. The SuperNATURAL E. Piano sound generator is Roland’s completely new sound generator, which faithfully models the varieties and characteristics of the vintage electric pianos of the ’60s through the ’80s. It is not limited to typical E. piano modeling, but also provides completely new types of E. piano sound. - Page 50 This is a new type of E. Piano. It is a variation of the Reed EP. This is the E. Piano 1 sound of the Roland RD-1000, which was released in 1986. This is the E. Piano 2 sound of the RD-1000.
-
Page 51: Selecting An Effect
Making Detailed Settings for the ONE TOUCH Tones Selecting an Effect You can apply a multi-effect you’ve selected from 84 different effect types. For details on the available effect types, refer to the Effect List (p. 96). Selecting the Type of Amp This switches the amp of the E. -
Page 52: Adjusting The Keyboard Touch Response
WURLY This combines REED EP with a variation of it, reproducing a typical E. piano sound of the ‘60s. Parameter Value Description Amount of boost/cut for the Treble -50–+50 high-frequency range Amount of boost/cut for the Bass -50–+50 low-frequency range Vibrato Sw OFF, ON Turns tremolo on/off. -
Page 53: Making Detailed Settings For Tones
Reverb and chorus are also provided as multi-effect types, and these are handled independently from the Reverb (p. 74) and Chorus (p. 75) effects described later. The RD-700NX lets you apply two multi-effects to the tones. The two multi-effects are connected in series. This sets the pitch of the tone. - Page 54 Parameter Value Description Specifies whether the tone will play polyphonically (POLY) or monophonically (MONO). The MONO setting is effective when playing a solo instrument tone such as sax or flute. Additionally, when this is set to “MONO LEGATO, ” you can have monophonic performances played legato. Legato is a playing style in which the spaces between notes are smoothed, creating a flowing feel with no borders between the notes.
-
Page 55: Making Layer Settings
Making Detailed Settings for Tones Making Layer Settings The RD-700NX features four Parts (UPPER 1, UPPER 2, LOWER 1, and LOWER 2) that you can use for freely controlling the internal parts with the RD-700NX’s buttons and keyboard. These four parts that are used for controlling the internal parts are collectively known as the “Layer. ”... - Page 56 Parameter Value Description VRL (Velocity This specifies the lower limit (VRL) and upper limit (VRU) of the range in which the tone is played according to the velocity. 1–127 Range Lower) Make this setting when you want the tone to change depending on the key velocity. VRU (Velocity 1–127 This setting is disregarded with certain tones.
-
Page 57: Using The Rd-700Nx As A Master Keyboard
You can control internal and external sound generators independently. If you press the [MIDI] button so the “MIDI” indicator is lit, the RD-700NX will be in a state where it can control an external MIDI sound module (EXTERNAL layer). You push the [MIDI] button to switch between control of the Layer and control of the EXTERNAL layer. -
Page 58: Adjusting The Volume Of Each Layer
NOTE If the System Edit parameter MIDI OUT3 Port Setting (p. 69) is set to “THRU, ” the performance data from the RD-700NX will not be transmitted from the MIDI OUT 3 connector; instead, the performance data received at the MIDI IN connector will be retransmitted without change (MIDI THRU). -
Page 59: Setting The Midi Transmit Channel
When you have fi nished connecting the external MIDI device, match the keyboard’s Transmit channel and the Receive channel for each of the external MIDI sound generator’s Parts. Sounds is produced when the MIDI channels for the sending device (the RD-700NX) and the receiving device (the external MIDI sound generator) are set to the same MIDI channel. -
Page 60: Selecting Sounds On An External Midi Device
] buttons to move the cursor, and use the [DEC] [INC] buttons or the VALUE dial to set the MSB, Settings 0–127, - - - (OFF) 0–127, - - - (OFF) - - - 1–128, (OFF) Using the RD-700NX As a Master Keyboard... -
Page 61: Detailed Settings For Transmitted Parts
Detailed Settings for Transmitted Parts 1. Press the [MIDI] button so the “MIDI” indicator is lit . The RD-700NX is set to control the external MIDI devices. NOTE The MIDI screen shown will not appear if Rec Mode is “ON” in the Rec Setting parameter located in Utility edit. -
Page 62: Changing The Range That Plays In Response To The Velocity (Velocity Range)
(Fine Tune) Higher value makes the special quality of the sound stronger; lower value reduce MEMO these characteristics. 1 cent = 1/100 semitone Using the RD-700NX As a Master Keyboard TX CC# Value CC65 ---, OFF, ON ---, 0–127 Value... -
Page 63: Setting The Range For The Change In Pitch With The Pitch Bend Lever (Bend Range)
Using the RD-700NX As a Master Keyboard Setting the Range for the Change in Pitch with the Pitch Bend Lever (Bend Range) This sets the amount of pitch change that will occur when you move the Pitch Bend lever (4 octaves). -
Page 64: Detailed Settings For Each Function
[ENTER] button to set the value . Leaving setting screen MEMO The following settings will be stored as common settings for the entire RD-700NX when you press the [LAYER EDIT] (WRITE) button in an edit screen. 0. System Getting the [MENU] 4. -
Page 65: Making System Settings
You’ll be returned to the Live Set screen or the One Touch screen. MEMO If you want to save this settings, press the [LAYER EDIT] (WRITE) button. Settings saved in the RD-700NX are not deleted even when the power is turned off. However, following settings are not memorized. -
Page 66: Tuning To Other Instruments' Pitches (Master Tune)
Hertz (Hz) of the middle “A” note. Parameter Value Master Tune 415.3–440.0–466.2 Adjusting the Volume (Master Volume) Adjusts the volume of the entire RD-700NX. Parameter Value Master Volume 0–127 Preventing Equalizer Settings from Being Switched (EQ Mode) You can store different equalizer settings (p. -
Page 67: Retaining The Current Tone Even When Tones Are Switched (Tone Remain)
Detailed Settings for Each Function Parameter Value 145: Live Set UP 146: Live Set DOWN Retaining the Current Tone Even When Tones are Switched (Tone Remain) This setting specifies whether the currently heard sound will continue (ON) or not (OFF) when another tone is selected. Parameter Value Tone Remain... -
Page 68: Using Program Change Messages To Switch Live Sets (Live Set Control Channel)
Refer to the “Changing the USB Memory Setting” (p. 90) Selecting the USB MIDI Thru Switch (USB MIDI Thru Switch) Refer to the “Using the RD-700NX as a USB MIDI Interface” (p. 90) Selecting the Function of the MIDI THRU/OUT 3 Connector (MIDI OUT3 Mode) This setting specifies the function of the RD-700NX’s MIDI THRU/OUT 3... -
Page 69: Setting The Tuning Method (Temperament/Key)
Detailed Settings for Each Function Setting the Tuning Method (Temperament/Key) This sets the tuning and keynote (tonic). Most modern songs are composed and played with the assumption that equal temperament will be used, but when classical music was composed, there were a wide variety of other tuning systems in existence. -
Page 70: Changing The Key Touch (Key Touch)
Changing the Key Touch (Key Touch) The setting below allows you to adjust the response you get from the keyboard when you finger the keys. Parameter Value SPR LIGHT LIGHT MEDIUM Key Touch HEAVY SPR HEAVY MEMO • This setting will change automatically depending on the Key Touch Offset setting described below. -
Page 71: Pedal/[S1] [S2] Buttons Assignments
Detailed Settings for Each Function Pedal/[S1] [S2] Buttons Assignments Here’s how to change the functions that are assigned to the pedals, the [S1] [S2] buttons, and the sliders. 1. Press the [MENU] button, getting the indicator to light . The Menu screen appears. 2. Press the Cursor [ ] buttons to select “2 .Control . -
Page 72: Assigning Functions To The [S1] [S2] Buttons (S1/S2 Assign)
Assigning Functions to the [S1] [S2] Buttons (S1/S2 Assign) This setting determines the function of the [S1] and [S2] buttons. Parameter Value 00: OFF COUPLE +1OCT COUPLE -1OCT COUPLE +2OCT COUPLE -2OCT COUPLE +5TH COUPLE -4TH OCTAVE UP OCTAVE DOWN S1/S2 START/STOP TAP TEMPO... -
Page 73: Reverb/Chorus Settings
Detailed Settings for Each Function Reverb/Chorus Settings Here you can edit the reverb and chorus settings. NOTE Making abrupt changes in the settings values may cause the sound to become distorted or overly loud. Carefully monitor volume levels while making the settings. 1. Press the [MENU] button, getting the indicator to light . -
Page 74: Setting Chorus And Delay
Setting Chorus and Delay Chorus adds depth and spaciousness to the sound. You can select whether to use this as a chorus effect or a delay effect. You can set the amount of Chorus applied separately for each individual tone (p. 56). Chorus Type You can select the chorus type. -
Page 75: Making The Compressor Settings
Detailed Settings for Each Function Making the Compressor Settings This is a stereo compressor (limiter) that is applied to the final output. With separate settings for the high-frequency range, midrange, and low-frequency range, this reduces inconsistencies in volume levels by compressing the sound when the volume exceeds a preset volume level. -
Page 76: File Management
A single, individual file containing a collection of 100 Live Sets registered to the RD-700NX is called a “Live Set file. ” This Live Set file can be saved in the RD-700NX’s internal memory or on USB memory (sold separately) connected to the USB MEMORY connector. -
Page 77: Calling Up Live Set Files (Live Set Load)
MEMO If you load a file with a name that contains characters that cannot be displayed by the RD-700NX, the file name is displayed as “?. ” 8. Press the [MENU] button, extinguishing its indicator . You’ll be returned to the Live Set screen or the One Touch screen. -
Page 78: Copying A Live Set File (Live Set Copy)
You can copy a Live Set file from the RD-700NX’s internal memory to USB memory (sold separately). You can also copy a Live Set file from USB memory to the RD-700NX’s internal memory. 1. Press the [MENU] button, getting the indicator to light . -
Page 79: Deleting A Song (Song Delete)
You’ll be returned to the Live Set screen or the One Touch screen. Copying a Song (SONG Copy) You can copy a song file from the RD-700NX’s internal memory to USB memory (sold separately). You can also copy a song file from USB memory to the RD-700NX’s internal memory. -
Page 80: Formatting Memory (Format)
“Formatting” is an operation that returns the internal memory to the factory-set condition, or prepares USB memory for use with RD-700NX. USB memory cannot be used with the RD-700NX unless it is formatted suitably for the RD-700NX. If you’re using newly purchased USB memory, you must first format it on the RD-700NX. -
Page 81: Making The Rhythm Settings
Detailed Settings for Each Function Making the Rhythm Settings The RD-700NX features internal drum patterns complementing Jazz, Rock, and other various musical genres. This kind of drum pattern is called a “Rhythm. ” 1. Press the [MENU] button, getting the indicator to light . -
Page 82: About V-Link
MIDI cable (sold separately). Connection Examples As an example, we will use a Live Set in which the RD-700NX is connected to the P-10. Use a MIDI cable to connect the RD-700NX’s MIDI OUT connector to the MIDI IN connector of the P-10. -
Page 83: Changing Settings Related To Song Playback
Detailed Settings for Each Function Changing Settings Related to Song Playback You can change a variety of settings related to song playback. 1. Press the [MENU] button, getting the indicator to light . The Menu screen appears. 2. Press the Cursor [ ] buttons to select “8 .Utility,”... -
Page 84: Restoring The Settings To The Factory Condition
Restoring the Settings to the Factory Condition The settings stored in the RD-700NX can be returned to their factory settings. NOTE • Executing “Factory Reset All” results in deletion of the Live Sets (p. 44). If you want to keep the recorded content, save the Live Set file to your USB memory (p. -
Page 85: Connecting External Midi Devices
When using the Rec Mode function, you can get the most suitable settings for recording the RD-700NX’s data to an external sequencer, without having to make all the Part and channel settings. 1. Press the [MENU] button, getting the indicator to light . -
Page 86: Exiting Rec Mode
Value Rec Mode Local Switch 4. Begin recording with the external sequencer . 5. Perform on the RD-700NX . 6. When the performance is fi nished, stop recording with the external sequencer . Recording is now complete. You can then listen to the recorded performance by playing it back on the external sequencer. -
Page 87: Playing The Rd-700Nx's Internal Sound Generator From An External Midi Device
MIDI Device Transmitting Bank Select (Controller Number 0, 32) and Program Change messages from the external MIDI device to the RD-700NX allows you to switch Live Sets and Tones. You can download the materials on MIDI from the Roland website. -
Page 88: Connecting To Your Computer
MIDI connector located on the RD-700NX’s rear panel to the USB connector of your computer, you’ll be able to do the following things. • Use the RD-700NX to play SMF music fi les played back by MIDI- compatible software. • By transferring MIDI data between the RD-700NX and your sequencer software, you’ll be able to enjoy a wide range of possibilities for music... -
Page 89: Switching Usb Drivers
6. Turn the power off, then on again . Using the RD-700NX as a USB MIDI Interface If the RD-700NX is connected to your computer, performance data from a MIDI device connected to the RD-700NX’s MIDI IN connector can be sent to your computer. Parameter Value... -
Page 90: Material
Material Troubleshooting If the RD-700NX does not function in the way you expect, first check the following points. If this does not resolve the problem, consult your dealer or a nearby Roland Service Station. * If certain messages appear in the display during operation, please refer to “Error Messages/Other Messages” (p . 94) . - Page 91 Is the “MIDI” indicator lit? When the “MIDI” indicator is lit, the external sound generator is controlled. To change the RD-700NX’s Tones and make settings in Keyboard mode, set the “MIDI” indicator to OFF. Is the Layer containing the Tone you want to change set to ON? Could a song be playing? Is a TW-Organ 1–10 Tone selected?
- Page 92 Set the System Rx GM System On or System Rx GM2 System On to ON in Edit mode. Are you playing back GS Format song data? Once the RD-700NX receives a GS Reset message, it then is enabled for GS Format. This permits playback of music files bearing the GS logo (GS music files). However, data created exclusively for the Sound Canvas Series may not play back properly on the RD-700NX.
-
Page 93: List Of Messages
These notes also have a somewhat different tonal character. RD-700NX faithfully simulate this characteristic of acoustic pianos. On the RD-700NX, the range that is unaffected by the damper pedal will change according to the key control setting. -
Page 94: Other Messages
Caution when Playing Back Audio Files Playing back an MP3 fi le or changing the playback tempo of an audio fi le places a signifi cant processing burden on the RD-700NX, and in some cases may cause it to be unable to completely process all of the performance data from the keyboard. -
Page 95: Effect List
Material Effect List THRU EQUALIZER SPECTRUM ISOLATOR LOW BOOST SUPER FILTR STEP FILTER ENHANCER AUTO WAH HUMANIZER SP.SIMULATR PHASER STEP PHASER MULT PHASER INF PHASER RING MODLTR STEP R.MOD TREMOLO AUTO PAN STEP PAN SLICER ROTARY VK ROTARY CHORUS FLANGER STEP FLANGR HEXA-CHORUS TREMOLO CHO... -
Page 96: About The Ivory Feel Keyboard
About the Ivory Feel Keyboard Features of an Ivory Feel keyboard Traditional piano keys are made from the best materials-ivory (for white keys) and ebony (for black keys). The Ivory Feel keyboard uses the latest in technology to reproduce the touch and feel of these materials. An Ivory Feel keyboard offers the following features. -
Page 97: Main Specifications
Main Specifications RD-700NX: Digital Piano (Conforms to General MIDI 2 System) [Keyboard Section] 88 keys (PHA III Ivory Feel Keyboard with Escapement) [Sound Generator Section] Maximum Polyphony 128 voices Parts Live Set (4 layers) +16 parts SuperNATURAL Piano SuperNATURAL E. Piano... -
Page 98: Index
Index AC Inlet ............ATK . - Page 99 Index Master Tune ........... Master Volume .
- Page 100 Temperament ..........Temperament Key .
-
Page 101: Purpose-Oriented Index
Purpose-Oriented Index This index lists the main setting items relevant to play of the RD-700NX’s keyboard. Volume Setting Changing the Volume for the entire RD-700NX ..........[VOLUME] slider (p. 18) . - Page 102 MEMO...
-
Page 103: Declaration Of Conformity
DECLARATION OF CONFORMITY Compliance Information Statement Model Name : RD-700NX Type of Equipment : Digital Piano Responsible Party : Roland Corporation U.S. Address : 5100 S. Eastern Avenue, Los Angeles, CA 90040-2938 Telephone : (323) 890-3700 Model Name : UA-5... - Page 104 For EU Countries For China...
- Page 105 Information When you need repair service, call your nearest Roland Service Center or authorized Roland distributor in your country as shown below. TAIWAN AFRICA ROLAND TAIWAN ENTERPRISE CO., LTD. 9F-5, No. 112 Chung Shan EGYPT North Road Sec. 2 Taipei 104, TAIWAN R.O.C.
Need help?
Do you have a question about the RD-700NX and is the answer not in the manual?
Questions and answers