Table of Contents
Advertisement
Quick Links
Advertisement
Table of Contents

Related Manuals for Bolt VD-420

Summary of Contents for Bolt VD-420
- Page 1 VD-420 WIRELESS MANUAL FLASH User Manual...
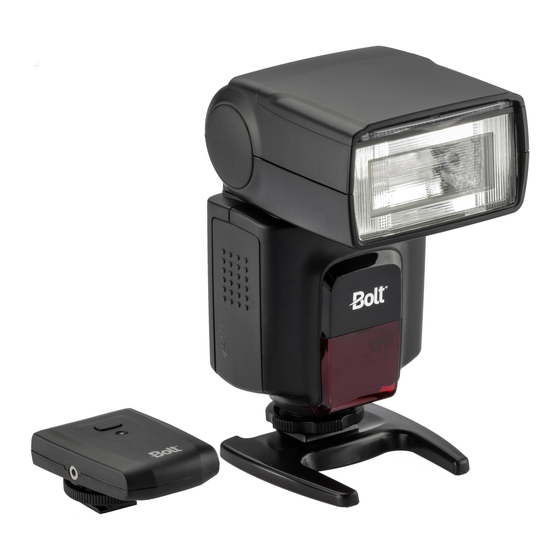
- Page 2 Use the flash on camera, or connect the included wireless transmitter to trigger it remotely. With eight power levels, up to 270° rotation, and -7° to +90° tilt, the Bolt VD-420 can help you get the perfect lighting for the perfect shot.
-
Page 3: Table Of Contents
Table of Contents Precautions ..............4 Extended Interface ........... 16 Overview ..............6 Using the Flash ............18 Installing Batteries............10 Bouncing Your Flash ..........20 Powering the Transmitter ..........11 Optical Slave Mode ..........23 Setting the Wireless Channel ........12 Positioning Remote Flash Units....... 25 Mounting the Flash and Transmitter ...... -
Page 4: Precautions
Precautions ⚠ ⚡ • Before using this product, thoroughly read the following • Always switch the flash off before changing the batteries. safety notices to ensure safe use and help prevent • Always install batteries of the same type, brand, and damage to your flash or injury to yourself and others. - Page 5 • This product is not water resistant. Keep it away from • For long-term storage, remove all batteries from this rain, snow, humidity, and general moisture. product to prevent the product from igniting or leaking • Should the product sustain physical damage, do not corrosive liquids.
-
Page 6: Overview
Overview Flash Reflection panel Output level indicator Diffuser panel Mode indicator Flash head Flash power level button (+/−) Wireless optical sensor Mode select button / wireless (on/off) Locking wheel Test button Mounting foot On/Off switch 3.5 mm sync socket Channel selector HV power socket Wireless indicator Power/ready indicator... - Page 7 Overview...
- Page 8 Transmitter Stand Trigger button Stand / tripod mount LED indicator Mounting foot Locking wheel Battery compartment screw Channel selector Also included 2.5 mm sync input • Drawstring pouch Overview...
- Page 9 Overview...
-
Page 10: Installing Batteries
• Lithium (1.5 V) To install batteries, make sure the VD-420 is turned off, and follow these steps: 1. Press down on the battery compartment cover and slide it in the direction of the arrow to open. -
Page 11: Powering The Transmitter
Powering the Transmitter The transmitter uses an included 23 A 12 V alkaline battery that is user replaceable and can last up to two years. To change the battery: 1. Use a Phillips screwdriver to unscrew the battery compartment screw on the back of the transmitter. -
Page 12: Setting The Wireless Channel
Setting the Wireless Channel The flash and transmitter can be set using the on-body channel selector switches. There are 16 individual channels available. Refer to the following chart to choose the channel and synchronize both the transmitter and flash by setting them to the same channel. Adjust to the same channel Setting the Wireless Channel... -
Page 13: Mounting The Flash And Transmitter
3. Rotate the locking wheel clockwise until snug, but don’t overtighten. Mounting the VD-420 on the included stand: You can mount the VD-420 on the included stand in the same way you would mount it on your camera. This allows you to set up the flash on a flat surface or attach it to a tripod head, light stand, or clamp that has a compatible 1/4-20 screw mount. -
Page 14: Turning On The Flash And Firing A Test
Turning On the Flash and Testing Wireless Sync Firing a Test Between the Flash and Transmitter To turn on the flash, slide the power switch to the On position. Make sure the flash’s wireless mode is turned on with the indicator lit blue. If not, press and hold the Mode When the flash is ready to fire, the ready indicator will button for about two seconds until the indicator turns glow red. -
Page 15: Automatic Power-Saving Function
The Ready indicator light will blink every three seconds, and other indicator lights will turn off. To reactivate the VD-420, press any button on the control panel. When in S1/S2 modes (see Optical Slave Mode below), the flash will enter power-saving mode after 60 minutes of inactivity. During long periods of inactivity, use the power switch to turn the flash off completely. -
Page 16: Extended Interface
You will need a CZ type cable (not included). Note: When the VD-420 is used with an external power source, the AA batteries must still be in the flash in order to operate. - Page 17 3.5 mm sync You can trigger your VD-420 via a PC cord between your camera and the VD-420’s 3.5 mm sync socket. This lets you position the flash off-camera for more lighting options. Note: The 3.5 mm sync socket on the VD-420 is only for synchronous signal input.
-
Page 18: Using The Flash
Using the Flash The VD-420 offers manual flash output adjustment. You can set the VD-420’s flash output level to 1/1, 1/2, 1/4, 1/8, 1/16, 1/32, 1/64, 1/128. The 1/1 setting is the full-power flash, and each successive setting halves the light output. - Page 19 To avoid overheating the VD-420 and damaging it, wait at least 10 minutes after 20 continuous flashes at full power. The flash will automatically shut off if the internal circuit overheats. It will also alter the recycle time from 10 to 25 seconds until the flash bulb cools down.
-
Page 20: Bouncing Your Flash
Bouncing Your Flash Using flash to directly illuminate a subject often Tip: Bouncing your flash off colored surfaces can creates harsh, unattractive shadows. To avoid this, tilt create a color cast in your images. Bouncing off a or swivel the flash to aim it at a large white or neutral- white or neutral-colored surface will not alter the colored surface, such as a ceiling, wall, or reflector. - Page 21 Using the Reflector Card Use the built-in reflector card for indirect lighting. Tilt the flash up and pull out the reflector to bounce the flash into the frame and toward the subject. Catchlights can make the eyes appear more lively and captivating. To use the reflector card, follow these steps: Pull the built-in reflector and diffuser panels out of their slot in the flash head.
- Page 22 Using the Diffuser Panel You can use the built-in diffuser panel to give the flash a much wider coverage area. The diffuser also softens the light, providing an alternative when no surface is available for bouncing the flash. To use the diffuser, follow these steps: 1.
-
Page 23: Optical Slave Mode
Optical Slave Mode In optical slave mode, the VD-420 can be set to To use the VD-420 flash unit as a slave, follow these fire whenever it detects light from another flash. steps: This works optically—the flash will instantaneously 1. Press the Mode button until the indicator light fire along with the master flash. - Page 24 Important! Some cameras, when set to red-eye reduction, will emit a series of quick flashes lasting a second or more. This may not work properly with any slave mode. We suggest you avoid using red-eye reduction when the VD-420 as a slave. Optical Slave Mode...
-
Page 25: Positioning Remote Flash Units
When positioning wireless slaves in S1 and S2 mode to light a subject, keep in mind the following: • The wireless sensors are on the front of the VD-420. Make sure the sensor is facing the master flash, and there are no obstructions between the two units. -
Page 26: Wired Camera Triggering
Wired Camera Triggering You can connect the transmitter to your camera via a PC sync to 2.5 mm cable (not included). 1. Plug a PC cord into your camera’s PC sync port and the transmitter’s 2.5 mm sync input. 2. Press your camera’s shutter-release button to fire the flash. -
Page 27: Specifications
Specifications Guide number 108.3 ft. (33 m) ISO 100 Flash power source 4 AA lithium, NiMH, or alkaline batteries; HV external power Flash duration 1/300 to 1/20,000 sec. source with CZ type cable Flash recycle time 0.1 to 5 sec. (AA, NiMH) Tilt positions -7°, 0°, 45°, 60°, 75°, 90°... -
Page 28: Troubleshooting
Troubleshooting Problem Solution The flash is turned on but won’t fire. Make sure fresh batteries are installed and in the proper orientation. (see Installing Batteries) The flash is set up as an optical slave but • Make sure the master flash is within the transmission range, and won’t fire. -
Page 29: Fcc Compliance
FCC Compliance This device complies with Part 15 of the FCC Rules. Operation is subject to the following two conditions: 1. This device may not cause harmful interference. 2. This device must accept any interference received, including interference that may cause undesired operation. -
Page 30: One-Year Limited Warranty
One-Year Limited Warranty This BOLT product is warranted to the original purchaser to be free from defects in materials and workmanship under normal consumer use for a period of one (1) year from the original purchase date or thirty (30) days after replacement, whichever occurs later. - Page 31 To obtain warranty coverage, contact the BOLT Customer Service Department to obtain a return merchandise authorization (“RMA”) number, and return the defective product to BOLT along with the RMA number and proof of purchase. Shipment of the defective product is at the purchaser’s own risk and expense.
Need help?
Do you have a question about the VD-420 and is the answer not in the manual?
Questions and answers