Advertisement
Quick Links
Assembly Instructions
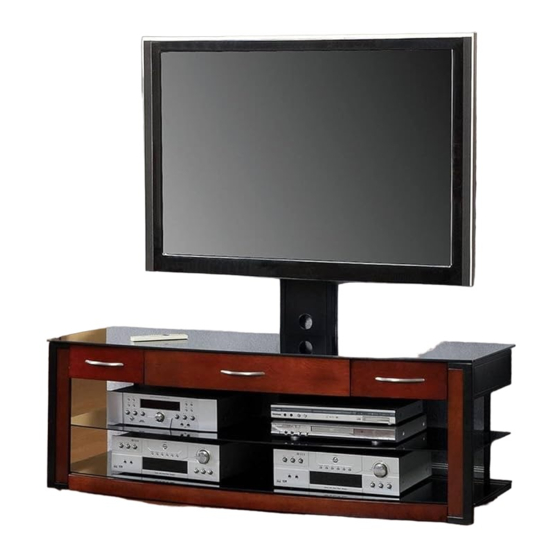
CM5003-TV
ASSEMBLY RATING
Tools Required for Assembly:
The Assembly Rating is a 5-point system that
shows the degree of effort needed in
Allen Wrench
(Included)
assembling a specific product (with 1 being
easy and 5 being difficult). For some
Phillips Screwdriver
products, two persons are recommended.
(Not Included)
DIFFICULT
EASY
2 PERSONS RECOMMENDED
Page 1 of 17
Rev.14-06-12
Advertisement

Related Manuals for Furniture of America CM5003-TV


Summary of Contents for Furniture of America CM5003-TV
- Page 1 Assembly Instructions CM5003-TV ASSEMBLY RATING Tools Required for Assembly: The Assembly Rating is a 5-point system that shows the degree of effort needed in Allen Wrench (Included) assembling a specific product (with 1 being easy and 5 being difficult). For some Phillips Screwdriver products, two persons are recommended.
- Page 2 Page 2 of 17...
- Page 3 CAUTION: WEIGHT AND SIZE LIMITATIONS This TV mount can accommodate a flat-panel TV 27” to 50” with the maximum weight capacity of 135 lbs. The maximum weight capacity for the top tier is 125 lbs. The maximum weight capacity for the middle or bottom tier is 40 lbs.
-
Page 4: Parts List
Before you begin, please read Page 2 “Assembly and Care Advice” and Page 3 “Weight and Size Limitations”. And remember, do not tighten until each step is completed or instructed. PARTS LIST Page 4 of 17... - Page 5 Due to the size and/or weight of this product, it is highly recommended that the assembly should be done near the area of its intended location. Make sure you have enough space to move around during the assembly. ALWAYS have at least two people to help with transporting and assembling the product to avoid any potential injury and/or damage.
- Page 6 BRACKET HARDWARE LIST Page 6 of 17...
- Page 7 Turn right (clockwise) to tighten Turn right (clockwise) to tighten Page 7 of 17...
- Page 8 Turn right (clockwise) to tighten Turn right (clockwise) to tighten Page 8 of 17...
- Page 9 Turn right (clockwise) to tighten Turn right (clockwise) to tighten Page 9 of 17...
- Page 10 Page 10 of 17...
- Page 11 Turn right (clockwise) to tighten Page 11 of 17...
- Page 12 Turn right (clockwise) to tighten Make sure the TV stand is rested on a flat surface and it does not feel loose or wobbly. If it does, double check that the bolts/screws are secured and properly tighten. Turn right (clockwise) to tighten ASSEMBLY IS COMPLETED Page 12 of 17...
- Page 13 SAFETY STRAP TO PREVENT TIP-OVER Drywall: Select a location where you want the TV stand to be strapped. Mark on the wall the location where the anchor (#M) will be placed. Drill a hole slightly smaller then the size of the screw (#O).
- Page 14 ATTACHING THE VERTICAL BRACKETS TO THE BACK OF TV The hardware kits to mount the vertical brackets onto the back of the flat-panel TV are included with the TV stand. These kits are compatible with flat-panel TVs having either flat, curved or recessed style on the back. Please choose the appropriate hardware kit for the type of TV that you have.
- Page 15 ATTACHING THE VERTICAL BRACKETS TO THE BACK OF TV The hardware kits to mount the vertical brackets onto the back of the flat-panel TV are included with the TV stand. These kits are compatible with flat-panel TVs having either flat, curved or recessed style on the back. Please choose the appropriate hardware kit for the type of TV that you have.
- Page 16 ATTACHING THE VERTICAL BRACKETS TO THE BACK OF TV The hardware kits to mount the vertical brackets onto the back of the flat-panel TV are included with the TV stand. These kits are compatible with flat-panel TVs having either flat, curved or recessed style on the back. Please choose the appropriate hardware kit for the type of TV that you have.
- Page 17 ATTACHING THE TV WITH BRACKETS ONTO THE TV MOUNT Due to the size and weight of the TV, it is highly recommended that you have at least two people to mount the TV onto the TV mount. Once you have the TV mounted, secure it with the two bolts shown below. Turn right (clockwise) to tighten Page 17 of 17...
Need help?
Do you have a question about the CM5003-TV and is the answer not in the manual?
Questions and answers