Table of Contents
Advertisement
Available languages
Available languages
Quick Links
Betriebs- und Wartungsanleitungen / Operating and maintenance
instructions / Notice d'Utilisation et d'Entretien / Istruzioni per l'uso e la
manutenzione / Instrucciones de uso y mantenimiento / Instruções de
operação e manutenção / Gebruiks- en onderhoudsinstructies / Instrucțiuni
de exploatare și întreținere / Drifts- och underhållsinstruktioner
POOLROBOTER / POOL CLEANER / ROBOT PISCINE /
ROBOT PISCINA / ROBOT / ROBÔ DE PISCINA /
ZWEMBADREINIGER/ CURATATOR DE PISCINA
Ref 107173 – EAN13 : 3660231414419
1
Advertisement
Table of Contents

Related Manuals for Orca 500


Summary of Contents for Orca 500
- Page 1 Betriebs- und Wartungsanleitungen / Operating and maintenance instructions / Notice d’Utilisation et d’Entretien / Istruzioni per l'uso e la manutenzione / Instrucciones de uso y mantenimiento / Instruções de operação e manutenção / Gebruiks- en onderhoudsinstructies / Instrucțiuni de exploatare și întreținere / Drifts- och underhållsinstruktioner POOLROBOTER / POOL CLEANER / ROBOT PISCINE / ROBOT PISCINA / ROBOT / ROBÔ...
-
Page 2: Allgemeine Bemerkungen
I.0 ALLGEMEINE BEMERKUNGEN Diese Bedienungsanleitung für den automatischen Schwimmbadbodensauger Orca 500 soll Ihnen alle Informationen, die Sie für die optimale Bedienung und Instandhaltung benötigen, geben. Aus Sicherheitsgründen ist es unbedingt notwendig, dass Sie sich mit diesem Dokument vertraut machen, es an einem sicheren und wieder auffindbaren Platz nach der Inbetriebnahme aufbewahren, um es in der Zukunft wieder benutzen zu können. -
Page 3: Technische Informationen
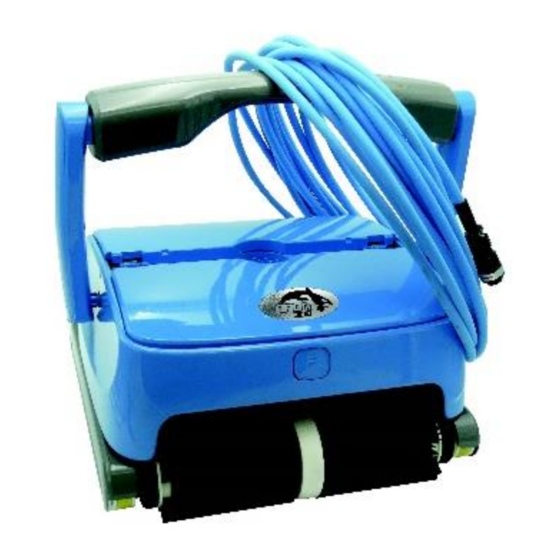
Platz außerhalb direkter Sonneneinstrahlung. I.2 Vorstellung Der Bodensauger ORCA 500 ist ein neuer, hocheffizienter und energiesparender Roboter für die Reinigung von Schwimmbecken. Dank eines hochentwickelten Programms reinigt er automatisch die Wände, den Boden und die Wasserlinie eines Schwimmbeckens. Zugleich filtert er das... - Page 4 Filtermaterial: 180 μm Geschwindigkeit: ca. 10,5 m/min Maximale Wassertiefe: 2m Empfohlene maximale Bodenfläche: 130 m² Umgebungsarbeitstemperatur: 0℃-40℃ Fernbedienung Distanz: >20m IP-Einstufung: Bodensauger IPX8; Frequenz der Fernbedienung:: 433MHz Transformator: IPX5 b. Ersatzteile Walze turbine Protection turbine Pumpenmotor Antriebsmotor Kabel...
- Page 5 Kontrolpanel Oberteil Kontrolpanel Unterteil Elektronikplatine 2.0 BEDIENUNGSANLEITUNG 2.1 Wichtig !! a. Positionierung des Transformators Der Transformator muss so platziert werden, dass der Bodensauger mit dem Schwimmkabel alle Stellen des Schwimmbeckens erreichen kann, jedoch in einem Mindestabstand von 3,5 m zu dem Schwimmbecken.
- Page 6 2.2 Wichtig ! a. Hineinsetzen in das Wasser Beim Hineinsetzen und beim Herausholen halten Sie den Bodensauger immer mit der Unterseite zur Beckenwand, um eventuelle Kratzer an der Beckenwand zu vermeiden. Halten Sie den Bodensauger am Griff und geben Sie ihn in das Wasser. Lassen Sie die in dem Gehäuse befindliche Luft entweichen und lassen Sie den Bodensauger zu Boden sinken.
-
Page 7: Erste Schritte
2.3 Erste Schritte Instruktionen für das Bedienungspanel Tafel : Instruktionen für Knopf und Anzeigen Zeichen Bedeutung Funktionsbeschreibung Bei Knopfdruck Einschalten des Bodensaugers. ON/OFF Anschalten/ Ausschalten Bei zweitem Knopfdruck Ausschalten. ALL: Reinigung Boden, Wände, Wasserlinie (einmal Boden, einmal wand) MODUS WALL: Reinigung nur der Wände... - Page 8 FLOOR: Reinigung nur des Bodens ALL + FLOOR: Dreifache Reinigung des Boden und einmal der Wände 1H: Reinigungszyklus 1 Stunde 2H: Reinigungszyklus 2 ZEIT Stunden 3H: Reinigungszyklus 3 Stunden Anzeige des Betriebsmodus und des Arbeitsstatus 2 or 3 Anzeigen Bodensauger stoppte leuchten “1H”...
- Page 9 “All” leuchtet Arbeitsmodus “ALL” “Wall” leuchtet Arbeitsmodus “WALL” “Floor” leuchtet Arbeitsmodus “FLOOR” “ALL” & “Floor” Arbeitsmodus “ALL” & “FLOOR” leuchten “ALL” >> “WALL”>>”FLOOR” Beschreibung : Vorwärts blinken in dieser Reihenfolge “FLOOR” >> “WALL”>>”ALL” Beschreibung : Rückwärts blinken in dieser Reihenfolge “3H”...
- Page 10 Kontrolle über App auf Smartphone via Bluetooth Dieser Bodensauger kann über Bluetooth ferngesteuert werden. Sie könnend ei App auf Ihr Tablet oder Smartphone herunterladen: Android : Google Play Download ‘ Winny’ IOS : Apple store Download ‘ My Winny’ Startseite Such Icon Sprachen Icon...
- Page 11 3 Knopf “BACKWARD” Manuelle Rückwärtsfahrt 4 Knopf “LEFT” Manuelle Wende nach links Manuelle Wendung nach 5 Knopf “RIGHT” rechts 6 Knopf “STOP” Stop Bemerkung: Anwender müssen “◀” or ”▶” gedrückt halten, um eine Wendung oder Kurve zu erzielen. Interface der automatischen Bedienung Zeichen Funktion ●...
- Page 12 Zeichen Funktion ● Disconnected 1 Verbindungsstatus ● Connected 2 Single cleaning Verzögerter Start Auswahlbereich: 1 – 23 Setting for single cleaning Stunden Bei Drücken dieses Knopfes sendet die App die voreingestellten Reserve next cleaning Reinigungszyklen an den interval Transformator über Bluetooth und startet gleichzeitig die Zeit dazu.
- Page 13 Entnahme der Filterkartuschen : Nehmen Sie die Filterkartuschen heraus: Drücken Sie die Knöpfe (Abb. 4- 1), die Abdeckungen klappen automatisch auf (Abb. 4-2), öffnen Sie die Abdeckungen (Abb. 4-3) und ziehen Sie die Filterkartuschen heraus ( Abb. 4- 4). Hier drücken Spülen und Reinigung der Filterkartuschen (Abb.
-
Page 14: Häufig Gestellte Fragen
Installation der Filterkartuschen. Achten Sie darauf, dass die Filterkartuschen gut einrasten, und schließen Sie die Abdeckungen, indem Sie die beiden Knöpfe drücken. Large face in the middle Appuyer 3.2 Installation der Schaumstoffkörper Sollte der Bodensauger Schwierigkeiten haben, mit gereinigten Filterkartuschen die Wände hinaufzufahren, installieren Sie die beiden beigepackten Schaumstoffkörper, einer jeweils auf der Unterseite der Kartuschenabdeckung. -
Page 15: Gewährleistung
Mögliche Ursache Lösung Beoabchtung Alle LED-Anzeigen Transformator Schalten Sie ihn ab und kontaktieren Sie blinken schnell mit überlastet das Service-Center Alarmton Prüfen Sie, ob irgendein Objekt die Die beiden Anzeigen Überlastung WALL+2H blinken schnell Antriebsriemen blockiert. Wenn nicht, Antriebsmotor 1 mit Alarmton kontaktieren Sie das Service-Center. - Page 16 Kontaktieren Sie Ihren Händler in jedem Gewährleistungsfall Environmental Programmes, WEEE European Directive Beachten Sie die Bestimmungen der Europäischen Union zum Schutz der Umwelt. Bringen Sie nichtfunktionierendes Elektrogerät zu den von der lokalen Gemeinde bestimmten Sammelstellen, die elektrisches und elektronisches Gerät sachgemäß aufarbeiten. Werfen Sie diese Gegenstände nicht in den Restmüll! Bei Gegenständen, die Batterien zum Tauschen beinhalten, entfernen Sie die Batterien vor der Entsorgung des Gerätes und entsorgen Sie die...
- Page 17 Anmeldung einer Reklamation Waterman Kundendienst Bahnhofstr. 68 D-73240 Wendlingen Tel.: + 49 (0) 7024/4048-666 Fax:: + 49 (0) 7024/4048-667 E-Mail: service@waterman-pool.com BITTE in DRUCKBUCHSTABEN ausfüllen! Ich habe am ____________________ bei der Firma ______________________________ PLZ ___________ Ort _____________ das Produkt Typ _________________ mit der Artikelnummer ______________________ gekauft.
- Page 18 I.0 PRE REQUIS Le manuel d’utilisation du robot Orca 500 a pour but de vous donner toutes les informations nécessaires à une installation et un entretien optimal. Pour des raisons de sécurité, il est indispensable de se familiariser avec ce document et de le conserver dans un lieu sûr et connu après installation pour des consultations ultérieures.
-
Page 19: Contenu Du Carton
I.2 Présentation Le robot ORCA 500 est un nouveau robot de nettoyage pour piscine très efficace et économe en énergie. Grâce à son programme élaboré, il peut nettoyer de manière automatique, les parois, le fond et la ligne d’eau de la piscine. En même temps, il filtre l'eau de la piscine et se débarrasse des particules en suspension, sans avoir besoin de remplacer l'eau de la piscine. - Page 20 Rouleau turbine Protection turbine Moteur de pompe Moteur d’entraînement Cable Partie supérieure du tableau de commande Partie inférieure du tableau de commande Carte électronique 2.0 INSTRUCTIONS DE FONCTIONNEMENT DES NETTOYEURS DE PISCINE...
- Page 21 2.1 Précautions L’unité d'alimentation secteur doit être correctement placée pour que l'appareil puisse atteindre tous les coins de la piscine et doit être fixée à une distance minimale de 3.50 mètres du bord du bassin. Avant la connexion de l'appareil de nettoyage à l'alimentation, vérifiez que la tension et la fréquence de votre réseau électrique correspondent aux indications figurant sur l'étiquette au dos de l'alimentation ET QUE VOTRE INSTALLATION COMPORTE UNE PROTECTION DIFFÉRENTIELLE DE 30 MA.
-
Page 22: Panneau De Commande
Utiliser la poignée pour sortir l’appareil de l’eau, et non pas le câble sous peine d’endommager l’appareil. Conseil : Sortir d’abord les boîtes filtrantes par la poignée pour diminuer le poids du robot, et puis sortir l’appareil. Prise en main a. - Page 23 Symbole Désignation Fonction Appuyer sur ce bouton, le robot s’allume. Appuyer une deuxième fois, ON/ OFF Marche /arrêt le robot démarre suivant le mode par défaut. Appuyer une troisième fois, le robot s’arrête. ALL : nettoyage fond, parois, ligne d’eau ( une fois le fond, une fois les parois) MODE WALL : nettoyage des...
- Page 24 ALL+FLOOR : nettoyage fond, parois, ligne d’eau. (trois fois le fond, une fois les parois) 1H: le voyant clignote, le robot fonctionne pendant une heure. 2H : le voyant clignote, le robot TIME fonctionne pendant deux heures. 3H : le voyant clignote, le robot fonctionne pendant trois heures.
- Page 25 lentement pendant 3 heures Mode de nettoyage choisi : fond, Le voyant ALL s’allume en parois, ligne d’eau (une fois le permanence. fond, une fois les parois) Le voyant WALL s’allume en Mode de nettoyage choisi : parois permanence. uniquement Le voyant FLOOR s’allume en Mode de nettoyage choisi : fond permanence.
- Page 26 Vérifier s’il y a un objet étranger Les 2 voyants WALL+2H Surcharge du coincé dans clignotent rapidement avec moteur les courroies. bip d’alarme d’entraînement 1 Sinon, contacter le SAV. Vérifier s’il y a un objet étranger Les 2 voyants FLOOR+3H Surcharge du coincé...
- Page 27 Android : Sur Google Play Télécharger ‘ Winny’ IOS : sur Apple store Télécharger ‘ My Winny’ • Ouverture de l’application Statut connexion Choix des langues Recherche • En premier lieu, connecter l’appareil : • Mode manuel...
- Page 28 Description Fonction ●Déconnecté Statut de connexion de signal bluetooth ●Connecté 2 Avancer Avancer en manuel 3 Reculer Reculer en manuel 4 Tourner à gauche Tourner à gauche en manuel 5 Tourner à droite Tourner à droite en manuel 6 Arrêter Arrêter en manuel Remarque : maintenir la touche ‘Tourner à...
- Page 29 ●Three floor one wall: nettoyage fond, parois, ligne d’eau (trois fois le fond, une fois les parois) ● Auto Play: fonctionnement automatique suivant la configuration précédente 3 Démarrer/ Arrêter ● STOP: Arrêter le fonctionnement automatique • Auto démarrage Description Fonction ●Déconnecté...
- Page 30 Appuyer sur cette touche, le réglage 4 Confirmation est confirmé. Appuyer sur cette touche, le réglage 5 Annulation est annulé. Auto démarrage périodique Choix du temps d’Auto 1-10 heures démarrage périodique 3.0 ENTRETIEN ET RÉGLAGE DES NETTOYEURS DE PISCINE 3.1 Nettoyage des filtres a.
- Page 31 Appuyer d. Rincer et nettoyer les filtres (4-5). Passer les filtres à l’eau claire jusqu’à ce que l’eau soit propre. e. Réinstaller les filtres. Remettre les filtres en faisant attention à leur bon positionnement (4-6), fermer les capots en appuyant sur les clips ( 4-7) Face la plus large au mileu Appuyer...
-
Page 32: Questions Fréquentes
3.2 Installation des blocs de mousse Si l’appareil monte difficilement le long de la paroi alors que les filtres sont propres, vous pouvez rajouter sous le capot les deux petits blocs de mousse fournis (Il s'agit d'un dispositif supplémentaire qui s’utilise uniquement dans cette situation particulière). Ouvrir le capot, positionner les deux blocs de mousse sur la face intérieure du capot, vérifier bien que les blocs soient au centre du capot, coller le bloc autocollant à... -
Page 33: Garantie
Les voyants Le robot est sorti de l’eau et n’arrive pas à Remettre le robot dans l’eau et WALL+FLOOR+2H+3H clignotent rapidement redémarrer redémarrer. avec bip d’alarme automatiquement 5.0 GARANTIE Ce produit est passé par différents essais de qualité et de sécurité effectués par le département technique de l'usine. -
Page 34: General Comments
I.0 GENERAL COMMENTS The Orca 500 pool cleaner user manual is intended to give you all the information you need for optimal installation and maintenance. For safety reasons, it is essential to familiarize yourself with this document and keep it in a safe and familiar place after installation for future reference. -
Page 35: Spare Components
I.2 Presentation The ORCA 500 cleaner is a new, highly efficient and energy-efficient pool cleaning cleaner. Thanks to its elaborate program, it can automatically clean the walls, bottom and water line of the pool. At the same time, it filters the pool water and removes suspended particles without the need to replace the pool water. - Page 36 Roller turbine Protection turbine Pump motor Drive motor Cable Upper part off control panel Lower part off control panel 2.0 OPERATING INSTRUCTIONS FOR POOL CLEANER...
- Page 37 Cautions a. Power supply unit position The power supply unit must be correctly positioned so that the device can reach all corners of the pool and must be fixed at a minimum distance of 3.50 metres from the edge of the pool. Before connecting the cleaning device to the power supply, check that the voltage and frequency of your electrical network correspond to the instructions on the label on the back of the power supply AND THAT YOUR INSTALLATION CONTAINS A...
- Page 38 Tip: First remove the filter boxes by the handle to reduce the weight of the cleaner, and then remove the device. 2.3 First-hand experience Instructions for operation panel Table : Instructions for button and indicator Sign Instruction Function description...
- Page 39 Press this button, the cleaner is power-on. ON/OFF Power on/off Press a second time, the cleaner is off. ALL: to clean pool floor, walls and water line (once floor once wall) WALL: to clean the pool walls only MODE FLOOR: to clean the pool floor only ALL + FLOOR: to clean the pool floor three times and...
- Page 40 2H: cleaner running for 2 hours 3H: cleaner running for 3 hours Indicates the operation mode and cleaner status 2 or 3 Cleaner stopped indicators on “1H” flashes Cleaner running for 1 slowly hour “2H” flashes Cleaner running for 2 slowly hours “3H”...
- Page 41 buzz overloaded after-sales “WALL” & “2H” Driving Check the flash quickly with motor 1 is belt buzz overloaded “FLOOR” & Driving Check the “3H” flash quickly motor 2 is belt with buzz overloaded Cleaner is “WALL”, Empty the out of water “FLOOR”, ”2H”...
- Page 42 Open the app and connect with the cleaner Interface of manual operation Illustration Function ● Disconnected 1 Connection status ● Connected 2 Button “FORWARD” Manual -- Walk forward 3 Button “BACKWARD” Manual -- Walk backward 4 Button “LEFT” Manual -- Turn left 5 Button “RIGHT”...
- Page 43 Interface of “Auto Start” Illustration Function ● Disconnected 1 Connection status ● Connected 2 Single cleaning Delay start Setting for single Range: 1 hour – 23hours cleaning By pressing this button, the APP on smartphone will send Reserve next cleaning the current reservation settings to the power supply via interval Bluetooth, and start the timing at the same time.
- Page 44 MAINTENANCE AND ADJUSTMENT OF POOL CLEANERS filter cleaning a. Unplug the device. Remove the device from the water If the device is in the pool, pull on the cable carefully until you can grab the handle. Use only the handle (absolutly not the cable) to pull it out of the water and then put the unit down until the largest amount of water flows out of the unit.
-
Page 45: Floating Block
d. Rinse and clean the filter (4-5). Put the filter under water until the water is clean. e. Reinstall the filters. Pay attention to the good position and close the covers by pressing the buttons. Large face in the middle Appuyer 3.2 Floating block It is difficult for the cleaner to climb the wall and clean the water line. - Page 46 4.0 QUESTIONS FRÉQUENTES Attention! In any case, always comply with the safety instructions set out in point I.I. at the beginning of this manual in order to avoid potential mechanical or physical damage.. Possible reason Solution Observation All LEDs flash quickly, Overload of the power Switch off and contact the after-sales with alarm beep...
-
Page 47: Warranty
5.0 WARRANTY This product has undergone various quality and safety tests carried out by the plant's technical department. Warranty information: 1. The warranty period is 24 months of use on the engine and electronic board, from the date of purchase and is established according to the terms of the consumer code, as well as the legal warranty against defects and hidden defects that applies in any case under the conditions of the items in the country of purchase. -
Page 48: Osservazioni Generali
I.0 OSSERVAZIONI GENERALI Questo manuale per il robot pulitore automatico per piscine Orca 300CL contiene tutte le informazioni necessarie per un corretto uso e una corretta manutenzione. Per motivi di sicurezza è assolutamente necessario familiarizzare con questo documento; dopo la messa in funzione conservarlo in luogo sicuro e facilmente reperibile per poterlo riutilizzare in futuro. -
Page 49: Contenuto Della Confezione
I.2 Presentazione Il robot aspiratore ORCA 500 è un nuovo robot per la pulizia delle piscine, altamente efficiente e a risparmio energetico. Grazie a un programma elaborato, pulisce automaticamente le pareti, il fondo e la linea d'acqua della vasca filtrando al tempo stesso l'acqua della piscina e rimuovendo le particelle di sporco, senza perdite d'acqua. -
Page 50: Dati Tecnici
I.4 Dati tecnici Frequenza: 50 Hz/60 Hz Tensione d'ingresso: 220 V Potenza assorbita: 200 W Tensione di uscita: 28 V corrente continua Cicli di pulizia: 1 / 2 / 3 ore Volume circolazione: ca. 16 m³/h Materiale filtrante: 180 μm Velocità: ca. - Page 51 c. Ricambi Rullo turbine Protection turbine Motore pompa Motore di azionamento Cavo Parte inferiore quadro comandi Parte superiore quadro comandi Scheda elettronica...
-
Page 52: Istruzioni Per L'uso
2.0 ISTRUZIONI PER L'USO 2.1 Importante! Posizionamento del trasformatore Posizionare il trasformatore a una distanza minima di 3,5 dal bordo vasca, ma in modo che il robot aspiratore con il cavo galleggiante possa raggiungere tutti i punti della vasca. Prima di collegare il robot aspiratore al trasformatore, controllare che la tensione e la frequenza della rete elettrica corrispondano ai dati riportati sull'etichetta applicata dietro al trasformatore. -
Page 53: Primi Passi
Quando si immerge e si toglie il robot dall'acqua, tenerlo sempre con il lato inferiore rivolto verso la parete della vasca per evitare di danneggiare la parete della vasca. Immergere il robot in acqua tenendolo per l'impugnatura. Far fuoriuscire l'aria presente nella scocca del robot e immergere il robot fino al fondo della vasca. - Page 54 Quadro comandi Quadro: istruzioni pulsanti e display Simbolo Significato Funzionamento Premendo il pulsante il robot si ON / accende. Accensione/spegnimento Premendo nuovamente il pulsante il robot si spegne. ALL: pulizia fondo, pareti, linea d'acqua (una volta il fondo, una volta le pareti) WALL: pulizia solo pareti MODE: FLOOR: pulizia solo fondo...
- Page 55 ALL + FLOOR: tre volte pulizia fondo, una volta pareti 1H: ciclo di pulizia 1 ora TIME 2H: ciclo di pulizia 2 ore 3H: ciclo di pulizia 3 ore Display modalità operativa e stato operativo 2 o 3 indicatori Robot aspiratore fermo illuminati L'indicatore "1H"...
- Page 56 Gli indicatori "ALL" >> "WALL">>"FLOOR" Descrizione: il robot avanza lampeggiano in questa successione Gli indicatori "FLOOR" >> "WALL">>"ALL" Descrizione: il robot va all'indietro lampeggiano in questa successione Gli indicatori "3H" >> "2H">>"1H" Descrizione: gira a sinistra lampeggiano in questa successione Gli indicatori "1H"...
- Page 57 Controllo tramite app su smartphone via Bluetooth È possibile controllare il robot aspiratore da distanza via Bluetooth. A tal fine scaricare l'app sul tablet o sullo smartphone: Android : Google Play Download ‘Winny’ IOS : Apple store Download ‘My Winny’ Schermata iniziale Ricerca Lingue...
- Page 58 Movimento manuale 3 Tasto "BACKWARD" indietro 4 Tasto "LEFT" Curva manuale a sinistra 5 Tasto "RIGHT" Curva manuale a destra 6 Tasto "STOP" Stop Nota: per curvare tenere premuti i tasti "◀" o "▶". Interfaccia del comando automatico Simbolo Funzione ●...
-
Page 59: Pulizia Delle Cartucce Filtranti
Simbolo Funzione ● Disconnected Stato della connessione ● Connected 2 Single cleaning Avvio ritardato Impostazione "single Possibilità di scegliere da 1 cleaning" a 23 ore Premendo questo tasto l'app invia i cicli di pulizia preimpostati al Reserve next cleaning trasformatore attraverso interval Bluetooth e contemporaneamente fa... - Page 60 Togliere le cartucce filtranti: premere i pulsanti (fig. 4-1), la copertura si apre automaticamente (fig. 4-2), aprire la copertura (fig. 4-3) e togliere le cartucce filtranti (fig. 4-4). Premere d. Lavaggio e pulizia delle cartucce filtranti (Fig. 4-5) Tenere le cartucce filtranti sotto acqua corrente fino a quando l'acqua è...
-
Page 61: Domande Frequenti
3.2 Installazione dei cuscinetti in espanso Qualora il robot non riuscisse a risalire le pareti con le cartucce filtranti pulite, installare i due cuscinetti in espanso forniti a corredo, applicandoli sul lato inferiore della copertura delle cartucce (i cuscinetti devono essere utilizzati solo in questa situazione). Osservazione: 3. - Page 62 Gli indicatori WALL+ Il robot aspiratore è Immergere nuovamente il robot in acqua e FLOOR+2H+3H+3H fuori dall'acqua e non riavviarlo. lampeggiano rapidamente può essere avviato. con un beep...
-
Page 63: Garanzia
5.0 GARANZIA Questo apparecchio ha superato tutti i controlli di qualità e i test di sicurezza eseguiti dal reparto gestione qualità della produzione. Informazioni sulla garanzia: 1. La garanzia copre il motore, l'accumulatore e la scheda elettronica per un periodo di due anni a partire dalla data dell'acquisto ed è... - Page 64 Segnalazione di contestazioni Servizio clienti Waterman Bahnhofstr. 68 D-73240 Wendlingen Tel.: + 49 (0) 7024/4048-666 Fax:: + 49 (0) 7024/4048-667 E-Mail: service@waterman-pool.com Compilare in STAMPATELLO! In data ____________________ presso l'azienda ______________________________ CAP ___________ località _____________ ho acquistato il prodotto tipo _________________ con numero di articolo ______________________.
-
Page 65: Observaciones Generales
I.0 OBSERVACIONES GENERALES El manual de usuario del robot Orca 500 tiene por objeto proporcionarle toda la información necesaria para una instalación y un mantenimiento óptimos. Por razones de seguridad, es esencial familiarizarse con este documento y mantenerlo en un lugar seguro y familiar después de su instalación para futuras consultas. -
Page 66: Contenido De La Caja
I.2 Presentación El robot ORCA 500 es un nuevo robot de limpieza de piscinas de alta eficiencia y eficiencia energética. Gracias a su elaborado programa, puede limpiar automáticamente las paredes, el fondo y la línea de agua de la piscina. Al mismo tiempo, filtra el agua de la piscina y elimina las partículas en suspensión sin necesidad de sustituir el agua de la piscina. - Page 67 Rodillo turbine Protection turbine Motor de bomba Motor de accionamiento Cable Parte superior del panel de control Parte inferior del panel de control Tarjeta electrónica...
- Page 68 2. INSTRUCCIONES DE USO DE LOS LIMPIAFONDOS 2.1 Precauciones La fuente de alimentación debe estar correctamente colocada para que el dispositivo pueda llegar a todos los rincones de la piscina y debe fijarse a una distancia mínima de 3,50 metros del borde de la piscina.
- Page 69 ¡Importante! Para sumergir el robot Levante el dispositivo por el asa o el cinturón y sumérjalo en la piscina. Presente el dispositivo verticalmente de cara a la pared. Incline la unidad hacia un lado para eliminar el aire atrapado desde el interior. El robot de limpieza se hundirá en el fondo de la piscina. Para sacar al robot del agua Utilice el mango para retirar la unidad del agua, no el cable, ya que de lo contrario la unidad podría resultar dañada.
-
Page 70: Puesta En Marcha
Puesta en marcha a. Pannel de control Símbolo Designación Función Presione este botón y el robot se encenderá. Púlselo una segunda vez y el ON/ OFF Marche /arrêt robot se iniciará en el modo predeterminado. Pulsar tercera vez, el robot se detiene. ALL : limpieza del fondo, paredes, línea de agua (una vez MODE... - Page 71 WALL : sólo limpieza de paredes FLOOR : sólo para la limpieza de fondos ALL+FLOOR : fondo de limpieza, paredes, línea de agua. (tres veces el fondo, una vez las paredes) 1H: la luz parpadea, el robot funciona durante una hora. TIME 2H : el LED parpadea, el robot funciona durante dos horas.
- Page 72 3H : el LED parpadea, el robot funciona durante tres horas. Luces indicadoras Dos o tres luces están Robot en modo de parada, permanentemente encendidas. encendido. El indicador 1H parpadea Funcionamiento automático durante lentamente 1 hora. El indicador 2H parpadea Funcionamiento automático durante lentamente 2 horas...
- Page 73 Todos los LEDs parpadean Sobrecarga de la Desconectar y rápidamente, con pitido de fuente de contactar con alarma alimentación el servicio postventa Los 2 LEDs WALL+2H parpadean Sobrecarga del Compruebe si rápidamente con un pitido de motor de hay objetos alarma.
- Page 74 Android: En Google Play Descargar''Winny'' IOS: en el Apple Store Descargar'My Winny'. • Apertura de la aplicación Estado de la conexión Elección de idiomas Investigación • Primero, conecte el dispositivo: • Mode manual...
-
Page 75: Modo Automático
Descripción Función Estado de la conexión de Desconectado señal Bluetooth Avanzar Conectado Retrocede Avanzar en modo manual Gire a la izquierda al Marcha atrás en modo manual final de la calle Gire a la derecha al final Giro a la izquierda en modo de la calle manual Parar... - Page 76 Tres piso una pared: fondo de limpieza, paredes, línea de agua (tres veces el fondo, una vez las paredes) Inicio/Detención Auto Play: funcionamiento automático según la configuración anterior STOP: Detener el funcionamiento automático • Inicio automatico Descripción Función Estado de la conexión de señal Desconectado Bluetooth Conectado...
-
Page 77: Limpieza De Los Filtros
3.0 MANTENIMIENTO Y AJUSTE DE LOS LIMPIAFONDOS DE PISCINAS 3.1 Limpieza de los filtros Desenchufe la unidad Apague el dispositivo. Retire la unidad del agua Si el dispositivo está en la piscina, tire de él por el cable hacia usted con mucho cuidado hasta que pueda agarrar el mango. - Page 78 Enjuagar y limpiar los filtros (4-5). Cambie los filtros a agua limpia hasta que el agua esté limpia. Reinstale los filtros. Vuelva a colocar los filtros, teniendo cuidado de que estén correctamente colocados (4-6), cierre las tapas presionando los clips ( 4-7) Cara más ancha en el medio Apoyar 3.2 Instalación de bloques de espuma...
-
Page 79: Preguntas Frecuentes
mismo ocurre con el otro lado. Para asegurar un contacto adecuado entre la campana y el bloque, no sumerja el robot en el agua durante 24 horas. 4.0 PREGUNTAS FRECUENTES ¡Atención! En cualquier caso, observe siempre las instrucciones de seguridad indicadas en el punto I.I. - Page 80 5.0 GARANTÍA Este producto ha sido sometido a diversas pruebas de calidad y seguridad realizadas por el departamento técnico de la planta. Información sobre la garantía: 1. El período de garantía es de 24 meses de uso en el motor y la placa electrónica, a partir de la fecha de compra y se establece de acuerdo con los términos del código del consumidor, así...
- Page 81 I.0 PREQUISITOS O manual do utilizador do robô Orca 500 destina-se a fornecer-lhe todas as informações de que necessita para uma instalação e manutenção ideais. Por razões de segurança, é essencial familiarizar-se com este documento e mantê-lo num local seguro e familiar após a instalação para referência futura.
-
Page 82: Informações Técnicas
I.2 Apresentação O robô ORCA 500 é um robô de limpeza de piscinas novo, altamente eficiente e energeticamente eficiente. Graças ao seu programa elaborado, pode limpar automaticamente as paredes, o fundo e a linha de água da piscina. Ao mesmo tempo, filtra a água da piscina e remove as partículas em suspensão sem necessidade de substituir a água da piscina. - Page 83 Rolo turbine Protection turbine Motor da bomba Motor de accionamento Cabos Parte superior do painel de controle Parte inferior do painel de controle Cartão eletrônico 2.0 MANUAL DE INSTRUÇÕES DOS ASPIRADORES DE PISCINAS...
- Page 84 Precauções A fonte de alimentação deve estar correctamente posicionada de modo a que o dispositivo possa alcançar todos os cantos da piscina e deve ser fixado a uma distância mínima de 3,50 metros do bordo da piscina. Antes de ligar o dispositivo de limpeza à fonte de alimentação, verifique se a tensão e a frequência da sua rede eléctrica correspondem às instruções na etiqueta no verso da fonte de alimentação E QUE A SUA INSTALAÇÃO CONTÊM Uma PROTECÇÃO DIFERENCIAL DE 30 2.2 Importante !
-
Page 85: Primeiros Passos
Use a alça para remover a unidade da água, não o cabo, caso contrário a unidade pode ser danificada. Sugestão: Primeiro, retire as caixas de filtro pela pega para reduzir o peso do robô e, em seguida, retire o dispositivo. Primeiros Passos a. - Page 86 Pressione este botão, o robô acende. Prima uma segunda vez, o robô ON/ OFF Ligar / Desligar inicia modo predefinido. Pressione uma terceira vez, o robô pára. ALL : limpeza do fundo, paredes, linha de água (uma vez o fundo, uma vez as paredes) MODE WALL : apenas limpeza de paredes...
- Page 87 ALL+FLOOR : a limpar o fundo, as paredes, a linha de água. (três vezes o fundo, uma vez as paredes) 1H: o LED pisca, o robô funciona durante uma hora. 2H : o LED pisca, o robô funciona TIME durante duas horas. 3H : o LED pisca, o robô...
- Page 88 O indicador ALL acende-se Método de limpeza selecionado: permanentemente. fundo, paredes, linha de água (uma vez o fundo, uma vez as paredes) O indicador WALL acende-se Método de limpeza seleccionado: permanentemente. apenas paredes O indicador FLOOR acende Modo de limpeza seleccionado: continuamente.
- Page 89 cintos. Caso contrário, contacte o serviço pós- venda. Os LEDs O robô está fora Volte a WALL+FLOOR+2H+3H+3H+3H de água e não colocar o piscam rapidamente com um sinal sonoro de alarme pode reiniciar robô na água automaticamente e reinicie. Desligado: sem autostart Ligado permanentemente: Início automático à...
- Page 90 • Primeiro, ligue o dispositivo: • Mode manual Descrição do produto Função Estado da ligação do sinal Bluetooth Desconectado Conectado Avançar Avanço em modo manual Backup Inverter em modo manual Vire à esquerda no final da estrada Vire à esquerda no modo manual Vire à...
- Page 91 • Modo automático Descrição do produto Função Estado da ligação do Desconectado sinal Bluetooth Conectado Escolha do modo de Pool floor: limpeza do fundo limpeza Pool wall : limpeza das paredes One floor one wall : limpeza do fundo, paredes, linha de água (uma vez o fundo, uma vez as paredes) Three floor one wall : limpeza do fundo, paredes,...
-
Page 92: Início Automático
• Início automático Descrição do produto Função Estado da ligação do Desconectado sinal Bluetooth Conectado Início retardado Escolha do prazo 1-2-3 h Confirmação Pressione esta tecla para confirmar a configuração. Cancelamento Pressione esta tecla, a configuração é cancelada. Início automático periódico Escolha da hora de início 1-10 horas... - Page 93 3.0 MANUTENÇÃO E AJUSTE DE LIMPADORES DE PISCINAS 3.1 Limpeza dos filtros a. Desligue a unidade da fonte de alimentação. Desligue o aparelho. b. Remova a unidade da água Se o aparelho estiver na piscina, puxe-o pelo cabo na sua direcção com muito cuidado até conseguir agarrar o cabo.
- Page 94 d. Lave e limpe os filtros (4-5) Troque os filtros por água limpa até que a água esteja limpa. e. Reinstale os filtros. Substituir os filtros, tendo o cuidado de garantir que estão correctamente posicionados (4- 6), fechar as tampas pressionando os clipes (4-7) O rosto mais largo no meio Pressione 3.2 Instalação de blocos de espuma...
-
Page 95: Perguntas Mais Frequentes
4.0 PERGUNTAS MAIS FREQUENTES Atenção! Em qualquer caso, cumpra sempre as instruções de segurança indicadas no ponto I.I. no início deste manual, a fim de evitar possíveis danos mecânicos ou físicos. Encontrar Possível causa Solução Todos os LEDs piscam Sobrecarga da fonte de Desligar e contactar o serviço pós-venda rapidamente, com alarme alimentação... - Page 96 OBSERVAÇÕES RELATIVAS À PROTECÇÃO DO AMBIENTE Em conformidade com a Directiva 2002/96/CE, e a fim de alcançar uma série de objectivos de protecção do ambiente, devem ser aplicadas as seguintes regras Dizem respeito aos resíduos de equipamentos eléctricos e electrónicos (REEE). Como consumidor, deve devolver este produto aos pontos de recolha previstos para o efeito.
-
Page 97: Algemene Opmerkingen
I.0 ALGEMENE OPMERKINGEN Deze gebruiksaanwijzing voor de automatische zwembadbodemzuiger Orca 300 CL geeft u alle informatie, die u nodig heeft voor de optimale bediening en onderhoud. Om veiligheidsredenen is het noodzakelijk dat u zich vertrouwd maakt met dit document en het op een veilige plaats bewaart, waar het na gebruik weer terug te vinden is, zodat u het in de toekomst opnieuw kunt gebruiken. - Page 98 I.2 Introductie De bodemzuiger ORCA 500 is een nieuwe, hoogefficiënte en energiebesparende robot voor de reiniging van zwembaden. Dankzij een uitgekiend programma reinigt het automatisch de wanden, bodem en waterlijn van een zwembad. Tegelijkertijd filtert het het zwembadwater en verwijdert het vuildeeltjes zonder waterverlies.
-
Page 99: Technische Informatie
I.4 Technische informatie Frequentie: 50 Hz/60 Hz Ingangsspanning: 220 V Opgenomen vermogen: 200 W Uitgangsspanning: 28 V gelijkstroom Reinigingscycli: 1/2/3 uren Circulatievolume: ca. 16 m³/h Filtermateriaal: 180 μm Snelheid: circa 10,5 m/min Maximale waterdiepte: 2 m Aanbevolen maximale bodemoppervlak: 130 m² Omgevingstemperatuurbereik: 0℃-40℃... - Page 100 Reserveonderdelen Wals turbine Protection turbine Pompmotor Aandrijfmotor Kabel Bedieningspaneel bovendeel Bedieningspaneel onderdeel Elektronicaprintplaat...
- Page 101 2. GEBRUIKSAANWIJZING 2.1 Belangrijk! a. Positionering van de transformator De transformator moet zo geplaatst worden dat de bodemzuiger alle delen van het zwembad kan bereiken met de drijvende kabel, maar op een minimale afstand van 3,5 m van het zwembad. Voordat u de bodemzuiger op de transformator aansluit, moet u controleren of de spanning en frequentie van uw elektrische voeding overeenkomen met de informatie op het etiket aan de achterkant van de transformator.
- Page 102 2.2 Belangrijk! a. Plaatsen in het water Houd de bodemzuiger altijd met de onderkant naar de zwembadwand gericht vast wanneer u hem in en uit het zwembad haalt om eventuele krassen op de zwembadwand te voorkomen. Houd de bodemzuiger aan de handgreep vast en zet hem in het water. Laat de lucht in de behuizing ontsnappen en laat de bodemzuiger naar de bodem zakken.
-
Page 103: Eerste Stappen
2.3 Eerste stappen Instructies voor het bedieningspaneel Paneel: instructies voor knop en indicatoren Symbool Betekenis Functiebeschrijving Bij een druk op de knop inschakelen van de bodemzuiger. ON/OFF Inschakelen/uitschakelen Bij een tweede knopdruk uitschakelen. ALL: reinigen bodem, wanden, waterlijn (eenmaal bodem, eenmaal wand) MODUS WALL: alleen reinigen van de... - Page 104 FLOOR: reiniging van alleen de bodem ALL + FLOOR: drievoudige reiniging van de bodem en eenmaal de wanden 1H: reinigingscyclus 1 uur TIME 2H: reinigingscyclus 2 uur 3H: reinigingscyclus 3 uur Weergave van de bedrijfsmodus en de werkstatus 2 of 3 indicatoren Bodemzuiger stopt branden “1H”...
- Page 105 “All” brandt Werkmodus "ALL" “Wall” brandt Werkmodus “WALL” “Floor” brandt Werkmodus "FLOOR" “ALL” & “Floor” Werkmodus “ALL” & “FLOOR” branden “ALL” >> “WALL”>>”FLOOR” Beschrijving: vooruit knipperen in deze volgorde “FLOOR” >> “WALL”>>”ALL” Beschrijving: achteruit knipperen in deze volgorde “3H” >> “2H”>>”1H”...
- Page 106 Controle via app op smartphone via Bluetooth Deze bodemzuiger kan via Bluetooth op afstand worden bestuurd. U kunt de app op uw tablet of smartphone downloaden: Android : Google Play Download ‘ Winny’ IOS : Apple store Download ‘ My Winny’ Startpagina Zoek Talen...
- Page 107 Interface van de handmatige bediening Symbool Functie ● Disconnected 1 Verbindingsstatus ● Connected 2 Knop “FORWARD” Handmatig vooruit rijden 3 Knop “BACKWARD” Handmatig achteruit rijden Handmatig draaien naar 4 Knop "LEFT" links Handmatig draaien naar 5 Knop “RIGHT” rechts 6 Knop “STOP” Stop Opmerking: gebruikers moeten “◀”...
- Page 108 Interface van de “Auto Start” Symbool Functie ● Disconnected 1 Verbindingsstatus ● Connected 2 Single cleaning Vertraagde start Setting for single Instelbereik: 1 – 23 uur cleaning Bij indrukken van deze knop zendt de app de vooringestelde Reserve next cleaning reinigingscycli aan de interval transformator via Bluetooth en...
- Page 109 Setting for periodic Instelbereik: 1 – 10 dagen reservation ONDERHOUD EN INSTELLING VAN DE BODEMZUIGER 3.1. Reiniging van de filterpatronen a. Maak de bodemzuiger los van de voedingsspanning. b. Neem de bodemzuiger uit het water Als de bodemzuiger in het zwembad is, trek hem dan voorzichtig aan de kabel naar u toe tot u bij de handgreep komt.
- Page 110 d. Spoelen en reinigen van de filterpatronen (afb. 4-5) Houd de filterpatronen onder stromend water tot het water helder is. e. Installatie van de filterpatronen Zorg ervoor dat de filterpatronen goed vastklikken en sluit de deksels door op de twee knoppen te drukken. Groot vlak in het midden indrukken 3.2 Installatie van het schuimstofelement...
-
Page 111: Veelgestelde Vragen
4.0 VEEL GESTELDE VRAGEN Let op! In ieder geval moet u de veiligheidsinstructies in punt 1.1 aan het begin van deze handleiding in acht nemen om eventuele mechanische of fysieke schade te voorkomen! Mogelijke oorzaak Oplossing Waarneming Alle led-indicatoren Transformator Schakel deze uit en neem contact op met knopperen snel met overbelast... - Page 112 5.0 GARANTIE Dit apparaat heeft alle kwaliteitscontroles en veiligheidstests die zijn uitgevoerd door de QM-afdeling van de productie doorstaan. Garantie-informatie: 1. De garantie heeft betrekking op de motor, de accu en de elektronische schakeling voor een periode van twee jaar vanaf de datum van aankoop en voldoet aan de voorwaarden van Richtlijn 1999/44/EG van 25 mei 1999 betreffende de garantie van consumentenproducten en de respectieve wetten van de lidstaten van de Europese Unie.
- Page 113 Indienen van een reclamatie Waterman klantenservice Bahnhofstr. 68 D-73240 Wendlingen Tel.: + 49 (0) 7024/4048-666 Fax:: + 49 (0) 7024/4048-667 E-mail: service@waterman-pool.com A.U.B. IN BLOKLETTERS invullen! Ik heb op ____________________ bij de firma ______________________________ postcode ___________ plaats _____________ het product type _________________ met het artikelnummer ______________________ gekocht.
-
Page 114: Observaţii Generale
I.0 OBSERVAŢII GENERALE Acest manual cu instrucţiuni de operare pentru aspiratorul automat de bază a bazinului Orca 300CL trebuie să vă ofere toate informaţiile care vă sunt necesare pentru o operare şi mentenanţă optimă. Din motive de siguranţă este obligatoriu necesar să vă familiarizaţi cu acest document, şi după... - Page 115 în afara radiaţiei solare directe. I.2 Prezentare Aspiratorul pentru baza bazinului ORCA 500 este un robot nou, de înaltă eficienţă şi cu economie de energie pentru curăţarea bazinelor de înot. Mulţumită unui program dezvoltat de nivel înalt, el curăţă în mod automat pereţii, baza şi oglinda apei unui bazin de înot. Simultan el filtrează apa bazinului de înot şi îndepărtează...
-
Page 116: Informaţii Tehnice
I.4 Informaţii tehnice Frecvenţă: 50 Hz/60 Hz Tensiune de intrare: 220 V Putere absorbită: 200 W Tensiune de ieşire : 28 V curent continuu Cicluri de curăţare: 1 / 2 / 3 ore Volum recirculat: cca. 16 m³/h Material de filtrare: 180 μm Viteza: cca. -
Page 117: Piese De Schimb
a. Piese de schimb Valţ turbine Protection turbine Motor pompă Motor de acţionare Cablu Panou de comandă parte superioară Panou de comandă parte inferioară Placă electronică... - Page 118 2.0 MANUAL CU INSTRUCŢIUNI DE OPERARE Important! a. Poziţionarea transformatorului Transformatorul trebuie astfel plasat încât aspiratorul pentru baza bazinului cu cablul flotant să poată ajunge la orice loc al bazinului, totuşi la o distanţă minimă de 3,5 m faţă de bazinul de înot Înainte de a racorda aspiratorul pentru baza bazinului cu transformatorul, verificaţi dacă...
- Page 119 2.2 Important ! a. Introducerea în apă La introducerea în apă şi scoaterea din apă ţineţi întotdeauna aspiratorul pentru baza bazinului cu partea inferioară către peretele bazinului, pentru a evita zgârieturi la peretele bazinului. Ţineţi aspiratorul pentru baza bazinului de mâner şi îl introduceţi în apă. Lăsaţi aerul aflat în carcasă să se disipeze şi lăsaţi aspiratorul să...
-
Page 120: Primii Paşi
2.3 Primii paşi Instrucţiuni pentru panoul de operare Panou : Instrucţiuni pentru buton şi afişaje Descrierea modului de Semnificaţie Semn funcționare Conectaţi aspiratorul prin apăsarea butonului. Conectare/ Deconectare (pornire/ ON/OFF Deconectaţi la a doua apăsare a oprire) butonului. ALL: Curăţarea bazei bazinului, pereţilor şi oglinzii apei (o dată... - Page 121 FLOOR: Curăţarea numai a bazei bazinului ALL + FLOOR: Curăţarea de trei ori a bazei bazinului şi o dată a pereţilor 1H: Ciclu de curăţare 1 oră 2H: Ciclu de curăţare 2 ore TIMP 3H: Ciclu de curăţare 3 ore Afişarea modului de lucru şi a stadiului de lucru luminează...
- Page 122 „All” luminează Mod de lucru „ALL” „Wall” luminează Mod de lucru „WALL” „Floor” luminează Mod de lucru „FLOOR” „ALL” & „Floor” Mod de lucru „ALL” & „FLOOR” luminează „ALL” >> „WALL”>>”FLOOR” Descriere : Înainte luminează intermitent în această succesiune „FLOOR” >> „WALL”>>”ALL”...
- Page 123 Comandă prin intermediul App pe Smartphone via Bluetooth Acest aspirator pentru baza bazinului poate fi comandat de la distanţă prin Bluetooth. Puteţi descărca App (aplicaţia) pe tableta sau smartphone-ul dumneavoastră: Android : Google Play Download ‘ Winny’ IOS : Apple store Download ‘...
- Page 124 Interfaţa operării manuale Funcţie Semn ● Disconnected (deconectat) 1 Stadiul conexiunii ● Connected (conectat) Buton „FORWARD” Deplasare manuală înainte (înainte) Buton „BACKWARD” Deplasare manuală înapoi (înapoi) Întoarcere manuală către 4 Buton „LEFT” (stânga) stânga Buton „RIGHT” Întoarcere manuală către (dreapta) dreapta 6 Buton „STOP”...
- Page 125 efectuate de dumneavoastră ● Stop: opreşte lucrul automat Interfaţa pentru „Auto Start” Funcţie Semn ● Disconnected (deconectat) 1 Stadiul conexiunii ● Connected (conectat) Single cleaning (o Start temporizat singură curăţare) Setting for single Domeniul de selectare: 1 – cleaning (setare pentru 23 ore o singură...
- Page 126 simultan timpul pentru aceasta. Şterge curăţarea planificată Cancel reservation (anulare rezervare) momentan Planificarea curăţărilor Periodic cleaning (curăţare periodică) periodice Setting for periodic Domeniul de selectare: 1 – reservation (setare pentru rezervare 10 zile periodică)
- Page 127 ÎNTREŢINEREA ŞI REGLAREA ASPIRATORULUI PENTRU BAZĂ DE BAZIN Curăţarea cartuşelor filtrante a. Separaţi aspiratorul pentru baza bazinului de la alimentarea curentului electric. b. Scoateţi aspiratorul din apă Dacă aspiratorul se află în bazin, trageţi spre dumneavoastră cu precauţie de cablu până când ajungeţi la mâner.
- Page 128 d. Spălarea şi curăţarea cartuşelor filtrante (Fig. 4-5) Menţineţi cartuşele filtrante sub apă curentă până când apa este limpede. e. Instalarea cartuşelor filtrante. Acordaţi atenţie să se înclicheteze bine cartuşele filtrante şi închideţi capacele prin apăsarea ambelor butoane. Suprafaţă mare în centru Apăsaţi 3.2 Instalarea corpului din material spongios Dacă...
-
Page 129: Întrebări Frecvente
4.0 ÎNTREBĂRI FRECVENTE Atenţie! În fiecare caz trebuie respectate instrucţiunile de siguranţă de la punctul 1.1 la începutul acestui manual cu instrucţiuni de operare, pentru a evita orice eventuale deteriorări mecanice sau vătămări fizice! Cauză posibilă Soluţie Supraveghere Toate afişajele LED luminează... - Page 130 5.0 GARANŢIE Acest aparat are îndeplinite toate controalele de calitate şi testele de siguranţă care au fost efectuate de către departamentul QM al producţiei. Informaţie referitoare la garanţie: 1. Garanţia acoperă motorul, acumulatorul şi placa electronică pe un interval de doi ani începând cu data achiziţionării şi corespunde condiţiilor Directivei 1999/44/CE din 25.
- Page 131 Indicarea unei reclamații Serviciul clienți Waterman Bahnhofstr. 68 D-73240 Wendlingen Tel.: + 49 (0) 7024/4048-666 Fax:: + 49 (0) 7024/4048-667 E-Mail: service@waterman-pool.com Vă rugăm să completați cu LITERE DE TIPAR! Am aciziționat la data____________________ de la firma______________________________ Cod postal ___________ loc _____________ tipul produsului _________________ cu numărul de articol ______________________ .
-
Page 132: Allmänna Upplysningar
I.0 ALLMÄNNA UPPLYSNINGAR Denna bruksanvisning för den automatiska bassängbottensugen Orca 300CL innehåller all information du behöver för att använda och underhålla produkten på bästa sätt. Av säkerhetsskäl är det absolut nödvändigt att du bekantar dig med detta dokument och förvarar det efter driftsättningen på... -
Page 133: Förpackningens Innehåll
I.2 Presentation Bottensugen ORCA 500 är en ny, högeffektiv och energisnål robot för rengöring av simbassänger. Tack vare det avancerade funktionsprogrammet rengör den automatiskt väggarna, botten och vattenlinjen i bassängen. Samtidigt filtrerar den simbassängens vatten och avlägsnar smutspartiklar utan att vatten går förlorat. Det är en mycket miljövänlig produkt. -
Page 134: Teknisk Information
I.4 Teknisk information Frekvens: 50 Hz/60 Hz Ingångsspänning: 220 V Energiförbrukning: 200 W Utgångsspänning: 28 V likström Rengöringscykler: 1 / 2 / 3 timmar Cirkulationsvolym: ca. 16 m³/tim Filtermaterial: 180 μm Hastighet: ca 10,5 m/min Maximalt vattendjup: 2 m Max. rekommenderad bottenyta: 130 m² Omgivande arbetstemperatur: 0 °C–40 °C Räckvidd för fjärrstyrning: >20 m Kapslingsklass: Bottensug IPX8;... - Page 135 a. Reservdelar Vals turbine Protection turbine Pumpmotor Drivmotor Kabel Kontrollpanel, överdel Kontrollpanel, underdel Elektronikkretskort...
- Page 136 2.0 BRUKSANVISNING Viktigt! A Placering av transformatorn Transformatorn måste placeras på ett sådant sätt att bottensugen med flottörkabeln kommer åt alla ställen i simbassängen, dock med ett avstånd på minst 3,5 m till bassängen. Innan du ansluter bottensugen till transformatorn, kontrollera att spänningen och frekvensen i dess strömförsörjning motsvarar angivna värden på...
-
Page 137: De Första Stegen
b. Uttagning ur vattnet När du lyfter upp bottensugen ur vattnet ska du alltid hålla den i handtaget, aldrig i kabeln. Annars finns risk för skador! Tips: Ta först ut filterpatronerna ur handtaget för att minska bottensugens vikt, och ta sedan ut bottensugen helt och hållet. - Page 138 Symbol Betydelse Funktionsbeskrivning Om knappen trycks in ON/OF kopplas bottensugen till. Tillkoppling/Frånkoppling Om knappen trycks in igen kopplas den ifrån. ALL: Rengöring av botten, väggar, vattenlinje (botten en gång, väggen en gång) WALL: Rengöring av endast väggar LÄGE FLOOR: Rengöring av endast botten ALL + FLOOR: Rengöring av botten tre gånger och...
- Page 139 2H: Rengöringscykel, 2 timmar 3H: Rengöringscykel, 3 timmar Indikering av driftläge och driftstatus 2 eller 3 indikeringar lyser Bottensugen stoppad ”1H” blinkar långsamt Rengöringscykel i 1 timme ”2H” blinkar långsamt Rengöringscykel i 2 timmar ”3H” blinkar långsamt Rengöringscykel i 3 timmar ”All”...
- Page 140 Drivmotor 1 ”WALL” och ”2H” blinkar Undersök är snabbt, med summer drivremmen överbelastad Drivmotor 2 ”FLOOR” och ”3H” blinkar Undersök är snabbt, med summer drivremmen överbelastad Släpp ut den Bottensugen sista luften ”WALL”, ”FLOOR”, ”2H” är ute ur och ”3H” blinkar snabbt, med vattnet och bottensugen summer...
- Page 141 Styrning med app i smartphone via Bluetooth Denna bottensug kan fjärrstyras via Bluetooth. Du kan ladda ner appen till din surfplatta eller smartphone: Android: Google Play Ladda ner ”Winny” IOS: Apple store Ladda ner ”My Winny” Startsida Sökningsik Språkikon Anslutningsstat Öppna appen och ansluta till bottensugen Gränssnitt för manuell styrning Symbol...
- Page 142 3 Knapp ”BACKWARD” Manuell förflyttning bakåt Manuell vändning åt 4 Knapp ”LEFT” vänster 5 Knapp ”RIGHT” Manuell vändning åt höger 6 Knapp ”STOP” Stopp OBS: Användaren måste hålla ”◀” eller ”▶” intryckt för att göra en vändning eller kurva. Gränssnitt för automatisk styrning Symbol Funktion ●...
- Page 143 Symbol Funktion ● Frånkopplad 1 Anslutningsstatus ● Ansluten 2 Single cleaning Fördröjd start Inställning för Single Inställningsområde: 1 – 23 timmar cleaning Om denna knapp trycks in skickar appen de förinställda Reserve next cleaning rengöringscyklerna till transformatorn via Bluetooth och interval börjar samtidigt räkna tiden för dem.
- Page 144 Tryck här d. Sköljning och rengöring av filterpatroner (Bild 4–5) Håll filterpatronerna under rinnande vatten tills vattnet är klart. e. Installation av filterpatroner Se noga till att filterpatronerna hakar i ordentligt, och stäng luckorna genom att trycka på de båda knapparna.
-
Page 145: Vanliga Frågor
3.2 Installation av skumgummidelar Om bottensugen skulle ha svårt att klättra upp för väggarna med rengjorda filterpatroner kan du installera de båda medföljande skumgummidelarna, en vardera på patronlockets undersida. (Dessa skumgummidelar ska endast användas om ovannämnda situation uppstår.) Anmärkning: Du kan även fästa skumgummidelarna på utsidan, utan att ta av locket.För att locket och skumgummidelen ska fästa ordentligt i varandra bör du inte använda bottensugen under de närmaste 24 timmarna och inte sänka ner den i vattnet. - Page 146 Indikeringarna WALL, Bottensugen är ute ur Sänk ner bottensugen i vattnet igen och FLOOR, 2H och 3H vattnet och kan inte starta den på nytt. blinkar snabbt, med startas. larmton 5.0 GARANTI Denna apparat har godkänts i alla kvalitetskontroller och säkerhetstester som utförts av kvalitetsavdelningen under produktionen.
- Page 147 Så gör du en reklamation Waterman kundtjänst Bahnhofstr. 68 D-73240 Wendlingen Tel: 49 (0) 7024/4048-666 Fax: 49 (0) 7024/4048-667 E-post: service@waterman-pool.com Var god TEXTA! Jag har den ____________________ av företaget ______________________________ postnr ___________ ort _____________ köpt en produkt av typ _________________ med artikelnummer ______________________.
Need help?
Do you have a question about the 500 and is the answer not in the manual?
Questions and answers