Advertisement
Quick Links
Pent Summer Shed Assembly Manual
Pressure Treated Tanalised Timber for Longer Lasting Life!
Ready To Build - 6ft Range
Thank you for purchasing your Total Shed.
All of our sheds are made from only the finest selected timber which are
(Tanalised), specially pressure treated for a longer and lasting durable life
span to the elements.
Each shed is carefully packed and delivered on a pallet
ready to be assembled.
FEATURES NEW FLEXIBLE,
INTER-CHANGEABLE DESIGN
FOR YOUR INDIVIDUAL STYLE.
2 Persons Recommended for Assembling Shed
Tools Required:
DRILL DRIVER
HAMMER
HAND SAW
PLEASE NOTE: Use extreme caution when using any tools. Always wear safety gear where
necessary. It is advisable that at least 2 or more persons assemble the shed for health and safety
purposes. We are not responsible for any injuries caused whilst assembling this shed.
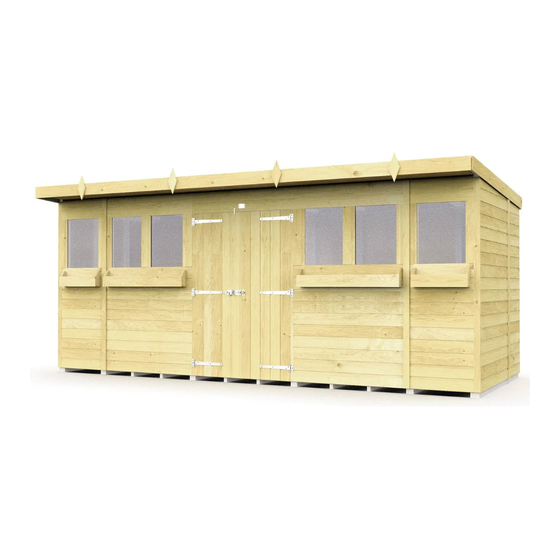
Ready to Build Shed
Featured Build of the Pent 14x6ft Summer Shed
Includes 4x6ft to 20x6ft Instructions
STANLEY KNIFE
Version 1.2
DELIVERED FLAT PACKED IN
EASY TO INSTALL SECTIONS
Advertisement

Subscribe to Our Youtube Channel
Related Manuals for total sheds Pent Summer Shed


Summary of Contents for total sheds Pent Summer Shed
- Page 1 Pent Summer Shed Assembly Manual Pressure Treated Tanalised Timber for Longer Lasting Life! Ready To Build - 6ft Range Version 1.2 Thank you for purchasing your Total Shed. All of our sheds are made from only the finest selected timber which are (Tanalised), specially pressure treated for a longer and lasting durable life span to the elements.
- Page 2 CONTENTS - 2ft Window Panel Step 10 & Step 11 Shed Range & List of Parts 4x6ft to 12x6ft - 3ft Window Panel - Front Door Panel Shed Range & List of Parts 14x6ft to 20x6ft Step 12 & Step 13 - Front Window arrangement - Pent Angle Tops List of Contents...
- Page 3 Use RED areas as joining points. 1b. Repeat this process for all other sheds in similar fashion. This Manuals Diagrams are based on the 14x6ft Pent Summer Shed 1c. Check that all floor sections are securely attached 2ft Floor and in a straight line to avoid any problems later 3ft Floor on the build stage.
- Page 4 STEP • 2 STEP • 3 IMPORTANT 2ft RIGHT SIDE PANEL All Sheds With 3 or Place first panel againts More Floor Pannels far right of shed floor have the smallest Floor as shown. Panel on the End. (2ft wide blank panel) As shown on this diagram.
- Page 5 STEP • 4 STEP • 5 4ft SIDE PANEL SIDE & REAR PANELS Place first panel againts Fix 2ft Wide Blank far right of shed floor Sections. Create a Corner as shown. for Balance. (4ft wide blank panel) 4ft SIDE PANEL SIDE &...
- Page 6 STEP • 6 STEP • 7 4ft REAR PANEL 3ft REAR PANELS Fix 3ft Wide Blank Section Fix 4ft Wide Blank Section Back Panel 3ft Section Back Panel 4ft (Middle) 3ft REAR PANEL 4ft REAR PANEL INFORMATION 6a. Now place a blank 3ft panel side as shown. Repeat this step for all other sheds.
- Page 7 STEP • 8 STEP • 9 2ft LEFT SIDE PANEL 4ft LEFT SIDE PANEL Attach 2ft Blank Section Now attach Left Side to the Left Side Wall Panel (4ft wide section) 4ft LEFT SIDE PANEL 2ft LEFT SIDE PANEL 8a. Place the 2ft panel at 9a.
- Page 8 STEP • 10 STEP •11 FRONT WINDOW FRONT WINDOW PANEL PANEL Attach Second Front Attach First Front Panel Window Panel (2ft Window Panel) (3ft Window Panel) 2ft FRONT WINDOW PANEL 3ft FRONT WINDOW PANEL 10a. Start back from the Right side placing 11a.
- Page 9 STEP • 12 STEP • 13 FRONT DOOR PANEL FRONT WINDOW PANELS Attach Door Front Panel (4ft Door Panel) Attach Last Front Panel (2ft + 3ft Door Panel) 3ft WINDOW PANELS FRONT DOOR PANEL 12a. Now place the 4ft Door Panel as shown.
- Page 10 STEP • 14 STEP •15 PENT FRONT TOPS SIDE PENT ANGLE TOPS Place the front tops of Now attach all the 6ft shed. Use 2ft Section for Side Tops of Pent Shed below models. End Panels. (Over the top of both side panels). SIDE PENT ANGE TOPS PENT FRONT TOPS 14a.
- Page 11 STEP • 16 STEP • 17 PENT ROOF PANELS SIDE & CORNER STRIPS Place First roof section. Hide the panel edges. Repeat for all Roof Panels Cover the framework & (2ft, 3ft, 4ft) seams. PENT ROOF PANELS SIDE & CORNER STRIPS 16a.
- Page 12 STEP • 18 STEP •19 PENT ROOF PENT ROOF ADD-ON OVERHANGS Fix Both Add-ons Place First Overhang Inplace. (Left and Right) Section. Repeat for all Roof Overhangs (2ft, 3ft, 4ft) PENT ROOF OVERHANGS PENT ADD-ON 18a. Place the 2ft Roof Overhang into INFORMATION 19a.
- Page 13 STEP • 20 STEP • 21 ATTACH THE ROOF FELT ATTACH FELT STRIPS Use the felt lengths Create the Final Roof provided. Edges. Final steps finishing off the roof. FELT STRIPS ROOF FELT 21a. Using the felt strips provided cover the edges 20a.
- Page 14 STEP • 22 STEP •23 ATTACH PLANTERS DIAMOND CAPS Attach Planter Boxes. Add the Finishing Final steps finishing off Touch. (Optional) the Summer Shed. PLANTER BOXES DIAMOND CAPS 22a. Align the Planter boxes around 50mm Below the windows on each window panel. (Theses can be adjusted to your desired Height) 22b.
Need help?
Do you have a question about the Pent Summer Shed and is the answer not in the manual?
Questions and answers