Table of Contents
Advertisement
Quick Links
Advertisement
Table of Contents

Subscribe to Our Youtube Channel
Related Manuals for Gilson Platemaster P20


Summary of Contents for Gilson Platemaster P20
- Page 1 User’s Guide...
-
Page 2: Table Of Contents
TABLE OF CONTENTS INTRODUCTION | 3 Unpacking | 4 Safety | 4 INSTALLATION | 5 General View | 6 Technical Data | 6 OPERATION | 7 Description | 7 Moving PLATEMASTER | 7 Height Adjuster | 7 Volume Setting | 8 Tip Fitting | 8 Pipetting | 9 Pipetting 384 wells | 10... -
Page 3: Introduction
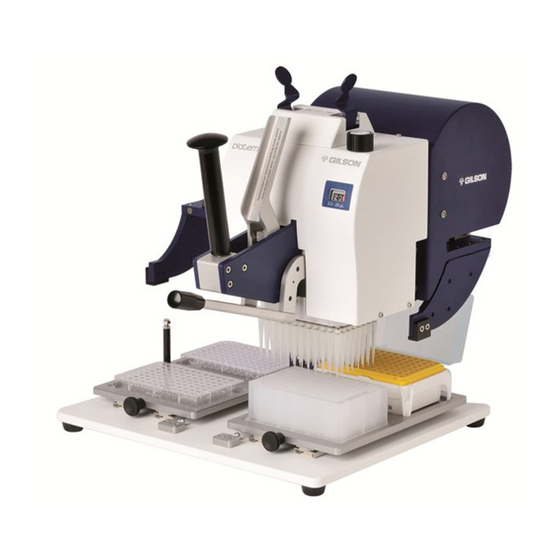
Enhancement of existing automation: assay development and adaptation to 96-channel systems • Back-up solution for maintenance and downtime • Workflows of automated systems involving pipetting on a 96-well or 384-well scale Figure 1 Gilson PLATEMASTER ® PLATEMASTER ® USER’S GUIDE... -
Page 4: Unpacking
Safety PLATEMASTER is designed for research purposes only. If PLATEMASTER is used in a manner not specified by Gilson, the protection provided by the instrument may be impaired. Gilson will not be responsible for damages. For all transportation, Gilson recommends removing the pipetting head from the base unit and using the original shipping box. -
Page 5: Installation
Chapter 2 INSTALLATION Read this section carefully before installing and operating PLATEMASTER. The instrument described in this user’s guide should only be operated by qualified personnel in a laboratory or similar indoor environment. Cleaning, installation, dismantling, maintenance, adjustment, and repair should be performed by appropriately trained personnel aware of the hazards involved. -
Page 6: General View
Tip fitting handle Pin-plate Pipetting handle Figure 7 PLATEMASTER parts ® Technical Data MODEL PLATEMASTER P20 PLATEMASTER P220 Part Number F110761 F110762 0.5 to 20 µL 2 to 220 µL Volume Range Volume can be adjusted Volume can be adjusted in 0.1 µL increments... -
Page 7: Operation
Chapter 3 OPERATION Description The pipetting head moves both vertically and horizontally. Vertical movements are made to fit tips and pipette liquid. Horizontal movements are made to transfer liquids. This movement is possible only when the head is fully raised. Two drawers can hold up to three different microplates and can be used at the same time. -
Page 8: Volume Setting
Volume Setting Do not adjust the volume without squeezing both parts of the pipetting handle The volume of liquid to be aspirated is set using the volume adjustment wheel With the pipetting handle fully squeezed, the volume is set by slowly turning the volume adjustment wheel to reach the required setting. -
Page 9: Pipetting
Pipetting Place a vessel containing the solution to be pipetted in the front location of the right drawer. The solution should be under the pipetting head. Liquids containing protein solutions and organic solvents can leave a film of liquid on the inside wall of the tip; pre-rinse the tip to minimize any errors related to this phenomenon. -
Page 10: Pipetting 384 Wells
DISPENSING • Place a 96-well microplate at the front location of the left drawer and keep it fully retracted in the rear position. • Move the pipetting head to the left and align the tips with the microplate. • Pull the pipetting head slowly down into the wells, but do not touch the bottom of the wells. -
Page 11: Tip Ejection
STEP 3: • Move the microplate on to the third position of the 384-well plate adapter using the blue wheel. • Aspirate the solution. Move the pipetting head over the microplate and dispense 96 wells. STEP 4: • Move the microplate on to the fourth position of the 384-well plates adapter using the blue wheel. -
Page 12: General Guidelines For Good Pipetting
General Guidelines for Good Pipetting Place PLATEMASTER in a dry and clean environment at the recommended ambient temperature of 20°C to 25°C. These conditions should stay constant, as significant variations in temperature or humidity may affect precision. PLATEMASTER is completely portable and requires no electricity; it can be operated anywhere in the lab. -
Page 13: Accessories
Chapter 4 ACCESSORIES DESCRIPTION PART NUMBER Adapter 384-well Plate positioning done by wheel F1077602 Adapter 384-well Plate positioning done by hand F1077603 Alu-heater block for PLATEMASTER, 96 x 0.2 mL, for PCR tubes, ∅ stripes & PCR plates 7.8 mm F1077604 Pipetting head height adjuster F1077605... -
Page 14: Associated Tips
DF300ST *Validated for use with 384-well plates. PIPETMAN DIAMOND Tips DL10, DL10ST, DSL10*, and DSL10ST could be used under a specific product configuration. For more information, please contact Gilson Technical Support at techsupport@gilson.com. AMPLIPUR® EXPERT TIPS — STANDARD FILTER TIPS*... -
Page 15: Service
Chapter 6 SERVICE GLP Features The serial number is engraved on the back of the pipetting head. It provides unique identification of your PLATEMASTER and the date of manufacture. The certificate of conformity provides traceability of your PLATEMASTER. Cleaning and Decontamination Do not use corrosive and acid reagents to clean or decontaminate PLATEMASTER. -
Page 16: Specifications
SPECIFICATIONS PLATEMASTER is a high quality 96-channel manual pipetting system that offers excellent accuracy and precision. The values given in the “Gilson maximum permissible errors” table below were obtained using PIPETMAN DIAMOND Tips. These values are guaranteed only when genuine PIPETMAN DIAMOND Tips are used. -
Page 17: Warranty
This warranty shall also be void in the event devices are altered or modified by any party other than Gilson or its designates. Gilson’s sole liability under this warranty shall be limited to, at Gilson’s sole option, repair or replacement of any defective components of devices or refund of the purchase price paid for such devices. - Page 18 NOTES PLATEMASTER ® NOTES...
- Page 19 NOTES PLATEMASTER ® USER’S GUIDE...
- Page 20 Specifications subject to change without notification - errors excepted. Reproduction, adaptation, or translation without prior written permission is prohibited, except as allowed under copyright laws. gilson.com/contactus LT801549/I | ©2022 Gilson, Inc. All rights reserved.
Need help?
Do you have a question about the Platemaster P20 and is the answer not in the manual?
Questions and answers