Sign In
Upload
Download
Table of Contents
Contents
Add to my manuals
Delete from my manuals
Share
URL of this page:
HTML Link:
Bookmark this page
Add
Manual will be automatically added to "My Manuals"
Print this page
×
Bookmark added
×
Added to my manuals
Manuals
Brands
Manitowoc Manuals
Commercial Food Equipment
LuminIce
Installation, operation and maintenance manual
Manitowoc LuminIce Installation, Operation And Maintenance Manual
Hide thumbs
1
2
3
4
Table Of Contents
5
6
7
8
9
10
11
12
13
14
15
16
17
18
19
20
21
22
23
24
25
26
27
28
page
of
28
Go
/
28
Contents
Table of Contents
Bookmarks
Table of Contents
Table of Contents
General Information
Compatible Ice Machine Models
Indigo Models
U Models
Luminice
Luminice® Kits
Luminice® Replacement Bulbs
Remote LED Indicator
Before You Begin Installation
Installation
Luminice® Installation Ice Beverage (IB) Single Evaporator Models
Luminice® Installation 22" & 30" Wide Single Evaporator Models
Luminice® Installation 48" Wide Single Evaporator Models
Luminice® Installation Two-Evaporator Ice Machines
Luminice® Installation NEO (U Models)
Maintenance
Replacement Bulb Usage
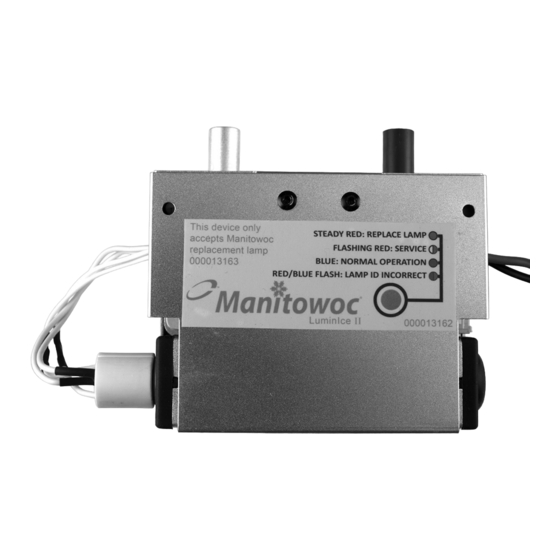
Luminice® II Indicator Lights
Bulb Replacement Frequency
Luminice® Reminder Setup for Indigo Model Ice Machines
Bulb Replacement
Cleanup Procedure for Accidental Bulb Breakage
Before Cleanup
During Cleanup
After Cleanup
Cleanup Steps for Hard Surfaces
Cleanup Steps for Carpeting or Rugs
Future Cleaning of Carpeting or Rugs
Advertisement
Quick Links
Download this manual
LuminIce® Growth Inhibitor
Ice Machine Accessory
Installation, Operation and Maintenance Manual
Part Number 000008463 Rev 02 3/16
Table of
Contents
Previous
Page
Next
Page
1
2
3
4
5
Advertisement
Table of Contents
Need help?
Do you have a question about the LuminIce and is the answer not in the manual?
Ask a question
Questions and answers
Related Manuals for Manitowoc LuminIce
Refrigerators Parts & Accessories Manitowoc LuminIce K-00424 Installation, Use & Care Manual
(30 pages)
Commercial Food Equipment Manitowoc U65 Installation, Operation And Maintenance Manual
Undercounter ice machines (26 pages)
Commercial Food Equipment Manitowoc Delfield 18600 Series Service And Installation Manual
(28 pages)
Commercial Food Equipment Manitowoc Delfield N8100B Service, Installation And Care Manual
International drop ins (20 pages)
Commercial Food Equipment Manitowoc Frymaster FilterQuick FQE30 Series Service Manual
(52 pages)
Commercial Food Equipment Manitowoc Cleveland KET-3-T Operator's Manual
Electric table top kettles (10 pages)
Commercial Food Equipment Manitowoc Delfield ST20-S-KFC Service, Installation And Care Manual
Kfc pre-breading blast chiller (16 pages)
Commercial Food Equipment Manitowoc mini mobil Operating And Installation Instruction
(46 pages)
Commercial Food Equipment Manitowoc Garland Induction Designer Series Installation, Operation And Maintenance Manual
Rtcs built-in line single cook zone and wok (56 pages)
This manual is also suitable for:
Luminice ii
K00424
K00450
K00451
K00452
K00434
...
Show all
K00440
Table of Contents
Print
Rename the bookmark
Delete bookmark?
Delete from my manuals?
Login
Sign In
OR
Sign in with Facebook
Sign in with Google
Upload manual
Upload from disk
Upload from URL


Need help?
Do you have a question about the LuminIce and is the answer not in the manual?
Questions and answers