Table of Contents
Advertisement
Available languages
Available languages
Quick Links
MANUAL DE INSTRUCCIONES
INSTRUCTION MANUAL
UBHC3-18/ UBHMCB6-18/ UBHMCNEGRO6-19 /
UBHMINOX7-18 / UBHMDIG7-18
Horno convencional / Horno multifunción cristal blanco /
Horno multifunción cristal negro / Horno multifunción inox /
Horno multifunción digital
Built in conventional oven / Built in White glass oven / Built
in Black glass oven / Multifunction built in oven / Digital
multifunction built in oven
www.universalblue.es
P.I. Media Legua C/Decenio,1 30565
Las Torres de Cotillas (Murcia)
Advertisement
Table of Contents

Related Manuals for universalblue UBHC3-18


Summary of Contents for universalblue UBHC3-18
- Page 1 MANUAL DE INSTRUCCIONES INSTRUCTION MANUAL UBHC3-18/ UBHMCB6-18/ UBHMCNEGRO6-19 / UBHMINOX7-18 / UBHMDIG7-18 Horno convencional / Horno multifunción cristal blanco / Horno multifunción cristal negro / Horno multifunción inox / Horno multifunción digital Built in conventional oven / Built in White glass oven / Built...
-
Page 2: Table Of Contents
Horno convencional / Horno multifunción cristal blanco / Horno multifunción cristal negro / Horno multifunción inox / Horno multifunción digital Built in conventional oven / Built in White glass oven / Built in Black glass oven / Multifuncion built in oven / Digital multifunction built in oven ÍNDICE ESPAÑOL... - Page 3 4. ELECTRIC CONECTION ............... 48 5. FIRST USE ..................50 6. USING YOUR APPLIANCE ............52 7. COOLING FAN OPERATION ............59 8. COOKING TIPS ................60 9. CLEANING AND MAINTENANCE ..........62 10. OVEN TRANSPORTATION ............65 11. AFTER SALES SERVICE ............... 66 12.
-
Page 4: Español
ESPAÑOL Felicidades por haber adquirido este producto. recomendamos dedique algún tiempo leer cuidadosamente este Manual de Instrucciones / Instalación con el fin de hacer un buen uso del mismo. Lea cuidadosamente todas las instrucciones de seguridad antes de utilizar el aparato y conserve este Manual de Instrucciones / Instalación para poder consultarlo en el futuro. - Page 5 preocupe, es completamente normal. Si ocurre, espere hasta que el olor desaparezca para cocinar dentro. • Compruebe que la tensión de red corresponde a la indicada en el aparato. • No utilice el aparato en el exterior y siempre colóquelo en un lugar seco.
- Page 6 • Cuando la puerta del horno esté abierta, no deje nada encima. El aparato podría desiquilabrarse y la puerta podría romperse. • Si no va a utilizar el aparato durante mucho tiempo, se recomienda desenchufarlo. • Si el cable de alimentación está dañado, debe ser reemplazado por una persona cualificada para evitar posibles riesgos.
-
Page 7: Descripción Del Producto
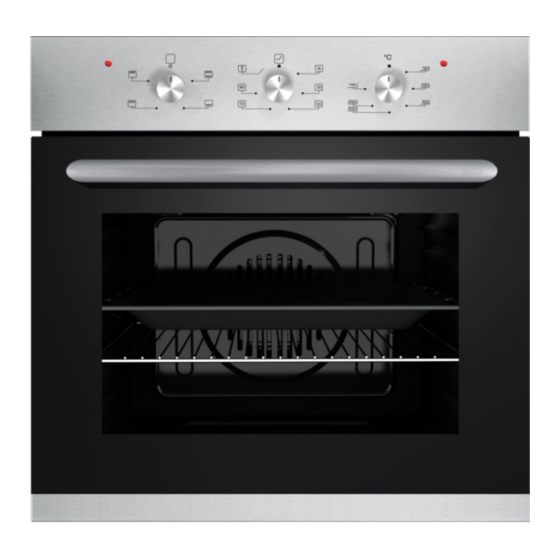
2. DESCRIPCIÓN DEL PRODUCTO UBHC3-18 UBHMCB6-18/ UBHMCNEGRO6-19 Horno eléctrico Horno eléctrico Frontal de 60 cm Frontal de 60 cm Capacidad 70 litros Capacidad 62 litros 6 funciones: elemento calefactor 4 funciones: elemento calefactor superior, inferior, superior e inferior, superior, inferior, superior e inferior y superior e inferior con convección,... - Page 8 Temporizador mecánico Temporizador eléctrico Función grill y turbo Función grill y turbo Potencia: 3300 W Potencia: 3300 W Modelo UBHC3-18 1. Luz de advertencia 2. Selección de funciones 3. Ajuste de temperatura 4. Luz de temperatura 5. Panel de control 6.
- Page 9 8. Luz interior 9. Etiqueta del producto 10. Cristal del horno 11. Puerta del horno 12. Ventilador turbo Nota: La localización de los botones podría diferir del modelo MODELO UBHMDIG7-18 1. Luz de advertencia 2. Selección de funciones 3. Reloj electrónico 4.
- Page 10 Bandeja profunda Se utiliza para hornear pasteles, grandes piezas de comida y platos de tipo estofado o para recolectar los goteos al asar a la parrilla. Rejilla o rejilla con bastidor Se utiliza para asar, calentar u hornear alimentos.
-
Page 11: Instalación
3. INSTALACIÓN La instalación debe ser llevada a cabo por un instalador autorizado de acuerdo con las instrucciones. Nuestra empresa no se hace responsable de daños, daños medioambientales o materiales derivados de una instalación incorrecta. Notas para una correcta instalación •... - Page 12 • Si el horno está instalado debajo de una placa de cocina incorporada, la distancia entre ambos aparatos eléctricos debe ser de al menos 50 mm. • Asegúrese de que las piezas aislantes y protectoras estén instaladas de manera tal que puedan quitarse sin la necesidad de una herramienta.
- Page 13 Figura 2 Figura 3...
-
Page 14: Conexión Eléctrica
Cómo mover el horno a la cabina Tenga en cuenta las siguientes notas de seguridad a la hora de mover el horno a la cabina. • Centre y equilibre el producto en el gabinete incorporado. • Abra la puerta del horno, alinéelo con los orificios de montaje (A) en los lados del cuerpo y use los tornillos de montaje para montarlo en la encimera de la cocina. - Page 15 Antes de la conexión eléctrica del producto • Asegúrese de que la alimentación de la red eléctrica cumpla con la potencia indicada en la placa de características en la parte inferior del producto. • El valor actual del fusible utilizado para el producto debe ser de 16A mínimo.
-
Page 16: Primer Uso
• El horno debe ubicarse de manera que el enchufe utilizado para la conexión eléctrica o el interruptor bipolar sea de fácil acceso. • No coloque el cable de alimentación de manera que pueda entrar en contacto con superficies calientes. •... - Page 17 • Cuando estos procesos terminen, use un paño suave ligeramente humedecido para limpiar el interior del horno y séquelo con otro paño. ADVERTENCIA: Antes de usar el horno por primera vez, enjuague cuidadosamente los accesorios, como las bandejas para hornear y la rejilla. Adicionalmente, le recomendamos considerar las siguientes notas para usar el producto economizando la energía consumida.
-
Page 18: Funcionamiento
6. FUNCIONAMIENTO BOTÓN DE CONFIGURACIÓN DE TEMPERATURA Se usa para ajustar la temperatura de cocción de 50 a 285 ºC (con una variación de ± 15ºC) mientras el horno está funcionando. Debe estar configurado en Max. posición sólo con la función Grill. (Ver Figura 7). - Page 19 Figura 8 A continuación se añade una tabla con el significado de cada una de las funciones. Rogamos dedique algún tiempo a analizar qué funciones incorpora el horno adquirido y cómo funciona cada una de ellas. ADVERTENCIA: todas las funciones se activarán una vez que la temperatura se haya ajustado al nivel deseado.
- Page 20 Resistencia superior e inferior: Se activarán las 2 resistencias simultáneamente. Ambas superficies de su comida serán horneadas uniformemente. Esta función es adecuada para pasteles y se recomienda utilizarla con una bandeja. Resistencia interior + Ventilador (Convección inferior): La resistencia inferior y el ventilador se activarán simultáneamente.
- Page 21 Grill + Ventilador: La resistencia grill y el ventilador se activarán simultáneamente. Esta función es adecuada para asar en forma uniforme piezas de carne de tamaño grande o mediano que se colocarán en la parte superior del horno y para platos a la parrilla, como pescado.
- Page 22 1. TEMPORIZADOR MECÁNICO Puede configurar el tiempo hasta 90 minutos girando el botón del minutero en el sentido de las agujas del reloj. (Ver. Figura 9) El temporizador asegura que el horno funcione dentro del tiempo establecido y se apaga automáticamente una vez que se acabe el tiempo.
- Page 23 2. TEMPORIZADOR ELECTRÓNICO Con el temporizador electrónico se garantiza que los alimentos estén listos para servir en el momento deseado programando simplemente el tiempo de cocción y la hora a la que deben estar listos. La función y el principio de funcionamiento de los relojes electrónicos pueden variar según el modelo de producto adquirido.
- Page 24 Alarma del temporizador La alarma del temporizador se puede activar independientemente de otros programas. Se puede configurar desde 1 minuto a 23 horas y 59 minutos. Para configurar la alarma siga las siguientes indicaciones: • Presione el Botón 1 hasta que el icono del temporizador de alarma comience a parpadear;...
- Page 25 • Presione el Botón 1 hasta que "dur" y "0.00" comiencen a parpadear en los dígitos. El icono de horneado automático también parpadeará. • Use los botones 2 y 3 para configurar el tiempo de horneado. El tiempo de cocción se puede configurar de 1 minuto a 10 horas. •...
-
Page 26: Funcionamiento Del Ventilador
• El icono de hornear desaparecerá. El horno no comenzará a hornear hasta la hora de inicio (18:30 en este ejemplo), que es igual a la diferencia entre el tiempo de finalización y el tiempo de cocción. • Cuando termina la cocción, se escuchará una alarma durante aproximadamente 7 minutos y el ícono de horneado automático comenzará... -
Page 27: Consejos De Uso
El principio de funcionamiento del ventilador puede variar según el modelo del producto. Su producto tiene uno de los siguientes principios operativos. • Cuando el horno está encendido, el ventilador comienza a funcionar automáticamente. Cuando el horno está apagado, se desactiva automáticamente. - Page 28 • Use placas de metal adecuadas con revestimiento antiadherente o recipientes de aluminio o moldes de silicona resistentes al calor. • Al hornear, coloque el recipiente / molde de horneado en el medio de la bandeja o rejilla. • Seleccione la posición correcta de la bandeja o rejilla antes de encender el horno.
- Page 29 TIEMPO POSICIÓN TEMPERATURA APROX ALIMENTO FUNCIÓN (°C) (minutos) HRONO Pastel en 25-30 bandeja Pastel en 40-50 molde Pastel en recipiente 25-30 de papel Pastel 5-10 esponjoso Galletas 20-30 Masa filo 30-40 Hojaldre 25-35 Masa con 35-45 levadura Lasaña 30-40 Pizza 15-20 Macarrones 180-200...
-
Page 30: Mantenimiento
25 min. Steak 250/max. 100-120 Después 190 Pescado 20-30 Ternera 190-200 Albóndigas 190-200 8-10 Al hornear con dos bandejas al mismo tiempo, coloque la bandeja profunda en el estante superior y la bandeja de hornear en el estante inferior. Precaliente el horno para todos los procesos de cocción. 9. - Page 31 • Para limpiar el cristal interno y externo del horno, utilice esponjas o trapos húmedos. • Para una limpieza en profundidad el cristal interno del horno puede extraerse del cuerpo. Para ello: o Como se muestra en la figura 12, mientras la puerta está abierta, deslice el vidrio fuera del lado interno del tambor.
- Page 32 Junta del horno La junta del horno puede ensuciarse con el tiempo. En este caso, puede limpiarla con un paño húmedo. Nunca use agentes de limpieza fuertes o abrasivos para este procedimiento. Si la junta está desgastada o desgarrada, comuníquese con el proveedor del aparato.
-
Page 33: Transporte
*Nota: Sólo algunos modelos de horno cuenta con este sistema de raíles. Lámpara del horno Antes de reemplazar la lámpara del horno, asegúrese de que el productoesté completamente apagado y no llegue electricidad • La lámpara del horno debe tener las siguientes especificaciones. o Resistente al calor hasta 300ºC, o Valores de potencia: 220-240V ~ 50Hz, o Potencia: 15 W... -
Page 34: Servicio Postventa
• Si no tiene el embalaje original, tome las medidas necesarias para que las superficies externas de su producto no sufran daños. No coloque cargas pesadas sobre el producto. • Al transportar, coloque el producto en paralelo al suelo, con la parte superior hacia arriba. - Page 35 El horno no se calienta. • El botón de función y / o temperatura puede no estar ajustado. Establezca la función y/o la temperatura. • Para modelos con reloj / temporizador, el tiempo del horno puede no ajustarse. Establece el tiempo. •...
-
Page 36: Informacion Inherente Medioambiente
• Para hacer uso de la garantía acuda al centro donde compró este producto o bien contacte con nosotros de cualquiera de las siguientes formas: A través del email sat@universalblue.es, adjuntando la factura de compra e indicando sus datos de contacto y brevemente qué problema presenta su termo eléctrico. - Page 37 Por favor acuda a la papelera de reciclaje más cercana de su localidad o tienda habitual. Se ruega cumplir con sus obligaciones legales y contribuir a la protección de nuestro medio ambiente. Puedes descargar este manual en nuestra página web: www.universalblue.es...
-
Page 38: English
ENGLISH Congratulations on the purchase of your product. We recommend you to spend some time to read this Instruction Manual in order to fully understand how to use it correctly. Read all the safety instructions carefully before use and keep this Instruction / Installation Manual for future reference. - Page 39 completely normal. If it happens, wait until the smell disappears to cook inside. • Check that the mains voltage corresponds to that indicated on the device. • Do not use the appliance outdoors and always place it in a dry place. •...
-
Page 40: Product Description
Products that are not used constitute a safety risk for children. For this reason, keep the oven out of the reach of children. 2. PRODUCT DESCRIPTION UBHC3-18 UBHMCB6-18 / UBHMCNEGRO6-19 Electric oven Electric oven 60 cm frontal panel... - Page 41 6 funciones: Upper heating element, 4 functions: Upper heating element, bottom, up and down heating elemnet, bottom h.e., up and down heating up and down with convection, element and grill convection and grill Stainless Steel panel Tempered White/Black glass Black glass Pull—push knobs Mechanical knobs Aluminium handle...
- Page 42 UBHC3-18 Model 1. Function warning light 2. Function selection button 3. Temperature setting button 4. Temperature warning light 5. Control panel 6. Heating elements 7. Inner lighting lamp 8. Type label 9. Oven door inner glass 10. Oven door UBHMCB6-18,...
- Page 43 Note: Location of the minute timer button might be different than the figure. UBHMDIG7-18 Model 1.Function warning light 2.Function selection button 3.Electronic clock 4.Temp. setting button 5.Temperature warning light 6.Control panel 7.Heaters 8.Inner lighting lamp 9.Type label 10.Oven door inner glass 11.Oven door 12.Turbo fan 13.Turbo heater...
-
Page 44: Installation
It is used to bake pastry, large pieces of food and stew-type dishes or to collect the drippings when grilling. Wire rack or baking tray with rack It is used for grill, heat or baking food 3. INSTALLATION Installation must be carried out by an authorized service provider according to the instructions. - Page 45 of up to 100°C. Synthetic laminates or adhesives or plastics that are not resistant to high temperatures may be damaged. • Some types of kitchen unit finishes (eg, vinyl) are damaged and discolour at high temperatures. • Make sure that the power cord is not bent or twisted, and does not come into contact with hot product parts.
- Page 46 Figure 1...
- Page 47 Figure 2 Figure 3...
-
Page 48: Electric Conection
MOUNTING THE OVEN TO A CABINET Please, take into account the following safety notes when moving the oven to the cab. • Center and balance the product in the built-in cabinet. • Open the oven door, align it with the mounting holes (A) on the sides of the body and use the mounting screws to mount it on the kitchen countertop. - Page 49 • Current value of the fuse used for the product must be 16A minimum. If the current value of the fuse is lower than 16 A, have a qualified electrician connect a 16 A fuse. • The power supply cable of your oven is equipped with a grounded plug.
-
Page 50: First Use
• The oven must be located in a manner that the socket used for electrical connection or the double-pole switch is easily accessible. • Do not place the power supply cable in a way that it can contact hot surfaces. •... - Page 51 • Repeat this process for the grill function. • When these processes are over, use a soft cloth slightly dampened to clean the inside of the oven and dry it with another cloth. WARNING: Before using the oven for the first time, carefully rinse accessories, such as baking sheets and rack.
-
Page 52: Using Your Appliance
6. USING YOUR APPLIANCE TEMPERATURE SETTING BUTTON It is used to set the cooking temperature from 50 to 285ºC (± 15ºC) while the oven is working. It must be set to the Max. position only with the Grill function. (See. Figure 7) This function and the operating principle might vary depending on the preferred product model. - Page 53 Figure 8 Please, find below a table with the meaning of each oven function. Please note that not all ovens have all fucntions. Take some tome take to check the functions included in your oven and how they work. WARNING: All functions will become activated once the temperature is set to the desired level.
- Page 54 Upper and Lower Heaters (Static Baking) Upper and lower heaters will be activated simultaneously. Both surfaces of your meal will be baked evenly. This function is suitable for cakes, patty pastries, cakes in molds, and stews. Please bake with one tray. Lower Heater + Fan (Convection Baking From Below): Lower heater and turbo fan will be activated simultaneously.
- Page 55 Turbo Heater + Fan (Turbo Baking): Turbo fan and the turbo heater around it will be activated. The hot air heated by the turbo heater is distributed evenly and quickly inside the oven with the help of the fan. This function is suitable for baking at different racks as well as baking many types of meals (meat, fish) ensuring that their smells and tastes do not mix with each...
- Page 56 you can set the time manually. For manual use, turn the minutes timer knob and adjust the timer using . To end with the cooking process, turn the timer knob from to ‘0’ position Figure 9 2. ELECTRONIC TIMER With the electronic timer it is guaranteed that the food is ready to serve at a certain time by simply programming the cooking time and the time at which the food should be ready.
- Page 57 When the oven is connected to the power, "0.00" and "AUTO" flash on the screen. • Press Button 1 for approximately 1 second; the dot icon will begin to flash. Use buttons 2 and 3 to set the time. About 7 seconds after the time has been set, the time setting ends.
- Page 58 If you want the oven to finish baking at a certain time, you can set the switch-off time. This process is called semiautomatic cooking. • Press Button 1 until "dur" and "0.00" begin to flash in the display. The automatic bake icon will also blink. •...
-
Page 59: Cooling Fan Operation
• When cooking is finished, an alarm will sound for approximately 7 minutes and the automatic bake icon will begin to flash again. Place the control and thermostat buttons in the off position. Press Button 1, 2 or 3 to stop the alarm and switch to manual operation. -
Page 60: Cooking Tips
• On touch control models, the fan is activated and deactivated by the electronic circuit board. In this case, since the fan works according to the temperature or time, it works for a while even if the oven is off and then it is automatically deactivated. Figure 11 8. - Page 61 • If you are roasting on the rack, place a baking sheet on the bottom to pick up the drops. Put some water on the baking sheet for easy cleaning. • Foods that are not suitable for roasting can cause fires. Do not place food on top of the oven.
-
Page 62: Cleaning And Maintenance
Cookies 20-30 Phyllo Dough 30-40 Pastry Pogaca (Stuffed Puff 25-35 Pastry) Leavened 35-45 Dough Lasagna 30-40 Pizza 15-20 Baked 180-200 30-45 Macaroni 25 min. Steak 250/max. then 100-120 Fish 20-30 Fillet of Beef 190-200 Grilled 190-200 8-10 Meatballs Mille-Feuille 170-190 20-30 When baking with two trays at the same time, place the deep tray to the upper rack and the baking tray to the lower rack. - Page 63 • Use stainless steel cleaners and liquids to clean the stainless steel surfaces of the oven. • Make sure that cleaning agents do not contain particles that can scratch enamel or painted surfaces. • When cleaning the oven door and the glass, do not use any material that may damage the surface such as hard abrasive cleaning agents, metal scrapers or bleach.
- Page 64 Figure 12 Oven drum seal Drum seal is necessary for the oven to operate efficiently. (See. Figure 13). The seal may become dirty in time. In this case, you can clean the seal with a damp cloth. Never use heavy or abrasive cleaning agents for this procedure.
-
Page 65: Oven Transportation
Before carrying out this procedure, make sure that the product is not supplied with electricity. • The oven lamp must have the following specifications: o Heat resistance up to 300ºC, o Power settings: 220-240V ~ 50Hz, o Power: 15 W •... -
Page 66: After Sales Service
• When transporting, place the product parallel to the ground, with the upper part facing up. • When transporting, place cardboard, aligned with the wire rack and the baking sheet, on the inside of the oven door to make sure they do not damage the oven door. - Page 67 • To make use of the guarantee go to the store where you purchased this product or contact us by: • By email, sat@universalblue.es. Please, attach the invoice, add your contact details and explain briefly what the issue is. • By phone, calling us to (0034) 968 893691.
-
Page 68: Enviromental Information
ENVIROMENTAL INFORMATION This appliance is labelled in compliance with European directive 2002/96/EC for Waste Electrical and Electronic Equipment (WEEE). By ensuring that this appliance is disposed of correctly, you will help prevent any possible damage to the environment and to human health, which might otherwise be caused if it were disposed of in the wrong way. - Page 69 Please comply with your legal obligations and contribute protecting our environment. Download this manual in our web site: www.universalblue.es...
- Page 70 www.universalblue.es...
Need help?
Do you have a question about the UBHC3-18 and is the answer not in the manual?
Questions and answers