
Subscribe to Our Youtube Channel
Related Manuals for VTech CS2000 Series


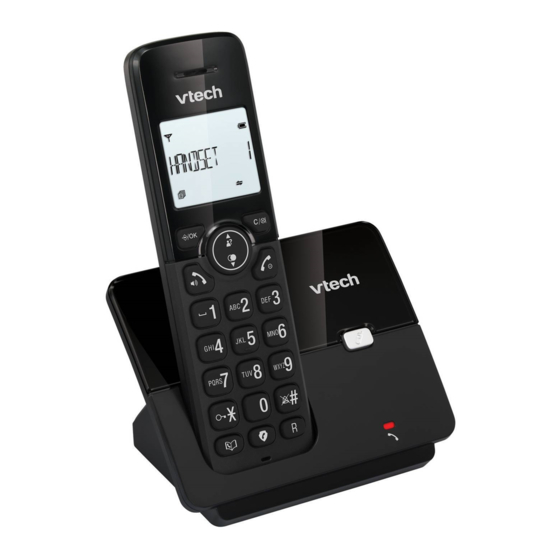
Summary of Contents for VTech CS2000 Series
- Page 1 2000/2001/ 2002/2003 2050/ 2051/ 2052/2053 Scan the QR code or go to euphones.vtech.com/support for support information...
- Page 2 Important safety instructions. This manual has all the feature operations and troubleshooting necessary to install and operate your new VTech telephone. Please review this manual thoroughly to ensure proper installation and operation of this innovative and feature rich VTech product.
-
Page 3: Important Safety Instructions
Unplug this product from the wall outlet and refer with general household waste. For proper servicing to VTech/distributor under the following treatment, recovery and recycling of old conditions: products and batteries, please take them to applicable... - Page 4 (2014/53/EU) and the UK’s Radio Regulations 2017 on VTPL: VT05EEU06045 radio systems and telecommunication equipment. AOHAI: A318-060045W-EU1 VTech Telecommunication Ltd. hereby declares that Input 100-240V AC 50/60Hz 0.15A, this telephone CS2000-2001-2002-2003 | CS2050- Output 6VDC 0.45A 2.7W (EU plug). 2051-2052-2053 is in compliance with the essential requirements and other relevant provisions of EU’s...
- Page 5 Breakages to the LCD screen are not covered by the warranty. Products returned to VTech Electronics Europe Plc, should be sent to the address shown below and packed carefully to avoid damage in transit. Please do not include batteries or adaptors.
-
Page 6: Table Of Contents
Charge the battery Check the battery level Check for dial tone If you do not hear a dial tone Set date and time Operating range Handset Overview Handset display icons overview Telephone charger Overview Telephone base Overview CS2000 series CS2050 series... - Page 7 Install | Set up Menu navigation In idle mode Call list Phonebook Call blocker BS settings (CS2000 series) (CS2050 series) HS settings Registration Default Ans. Machine (CS2050 series)
- Page 8 Make, answer or end a call Phonebook Predial a call Add a phonebook entry Answer a call Review the phonebook entries 24 Using a cordless handset Check number of phonebook entry used End a call Dial a phonebook entry Using a cordless handset Edit a phonebook entry Turn the handset ringer on/off 21 Delete a phonebook entry/ all...
- Page 9 Operate Review call block list Edit a call block entry Delete a call block entry Retrieve voicemail Answering system (CS2050 series only) Message playback Control the playback Delete all messages Record memo Turn on/ off the answering system...
- Page 10 Handset settings ECO range and mode Set ECO range Set languages Turn on or off Full ECO Set date and time Register a handset Set date format Set time format Reset phone settings Set date Answering system and settings Set time (CS2050 series only) Ringer Set your built-in answering...
- Page 11 Configure | Settings Avoid rough treatment Avoid water Electrical storms Cleaning your telephone Storage Frequently asked questions...
-
Page 12: What Is In The Box
What is in the box CS2000 series CS2050 series Your telephone package contains the following items. Save your sales receipt and original packaging in case it is necessary to ship your telephone for warranty service. CS2000 series CS2050 series IMPORTANT... -
Page 13: Connect And Charge
Connect and charge Connect the telephone base NOTES Install the battery • Use only the adapters provided. • Make sure the electrical outlets are NOTES not controlled by wall switches. • Use only the battery provided. • Connect the power adaptor in a •... -
Page 14: Connect The Charger
If full battery Place the handset in the telephone base charging is or charger to charge. reached, the Battery CS2000 series icon will stop charging in flashes animation in progress. cycle even the handset is on charging cradle. -
Page 15: Check The Battery Level
Check the battery level When it is fully charged, you can expect the following performance: After you have installed the battery, check the battery level on the handset Operation Operating time screen. While in handset use 13 hours • If the battery icon is (talking*) flashes, then go to Set the date and While not in use... -
Page 16: Set Date And Time
Set date and time Handset Overview After you install your telephone or CS2000 series power returns following a power outage and battery depletion, the handset will prompt you to set the date and time. 1. Use the dialing keys (0-9) to enter the month (MM), date (DD) and year (YY). - Page 17 • Press and hold to set and Earpiece turn the ringer on/off. LCD display • During a call, press to mute/ • Use as a flash during call. unmute the microphone. • Enter to call blocker menu. • When the handset is •...
-
Page 18: Handset Display Icons Overview
Handset display icons • On when the handset is within the range of the overview base. • Flashes when the handset is in marginal range to the base. • Off when the handset is out of the coverage range. • Left and right soft keys. •... -
Page 19: Telephone Charger Overview
1 Charging pole Fast forward/ next message. Telephone base • Play message. • Stop message. Overview Reverse/ previous message. CS2000 series Show number of messages 2 LCD Window recorded in the answering system. Increase the base volume. Press to page all handsets. - Page 20 • DELETE • DELETE ALL In idle mode • PB STATUS Call blocker BS settings 1. Press (CS2000 series) • BLACK LIST • DELETE HS 2. Press ▲/▼ of to scroll to • SETTINGS • DIAL MODE • BLOCK MODE •...
-
Page 21: Make, Answer Or End A Call
Make, answer or end a Share call You can use two cordless handsets at a call time on an outside call. Predial a call To make a 3-way conversation 1. Enter the telephone number. 1. Press on the handset during a •... -
Page 22: Call Waiting
Call waiting Redial list When you subscribe to call waiting Review a redial list entry service with your telephone service provider, you hear an alert tone if there is 1. Press to enter the redial list. an incoming call while you are on another call. -
Page 23: Delete A Redial List Entry
Find handset NOTE • If there is no number in the list, the display shows EMPTY. This feature helps you find all system handsets. Delete a redial list entry CAUTIONS 1. Press to enter the redial list. • Do not press and hold for more than four seconds. -
Page 24: Use The Phone Menu
Use the phone menu entry. • Press to confirm. • Press to delete. 1. Press when the phone is not in • NUMBER displays. use. 5. Press , and then enter the 2. Press ▼/▲ until the screen displays telephone number of the entry. the desired feature menu. -
Page 25: Check Number Of Phonebook Entry Used
Dial a phonebook entry through the phonebook. NOTES 1. Search for the desired entry in • If the telephone number in the the phonebook (see Review the directory exceeds 12 digits, phonebook entries). appears on the display instead of 2. -
Page 26: Delete A Phonebook Entry/ All Entries
Caller ID Delete a phonebook entry/ all entries This feature is available if you have 1. Search for the desired entry in subscribed to the Caller ID service from the phonebook (see Review the your local service provider telephone phonebook entries). company. -
Page 27: While Entering Names And Numbers
6. Press ▼/▲ to select your preferred Dial a caller ID log entry ringtone from MELODY 1 to MELODY 1. Search for the desired caller ID log entry (see Review the caller ID log). 7. Press to save. 2. When the desired entry displays, •... -
Page 28: Block Unknown Calls
Block unknown calls Call block You can block all incoming calls with If you subscribe to caller ID service, you unknown numbers automatically. can set the telephone to block unknown calls and certain undesired calls. The call 1. Press when the phone is not in block list can store up to 30 entries, use. -
Page 29: While Entering Names And Numbers
Edit a call block entry While entering names and numbers • Press ▼/▲ to move the cursor to 1. Search for the desired call block the left or right. entry (see Review a call block list). • Press on the cordless handset 2. - Page 30 Retrieve voicemail 1. Press when the phone is not in use. When you received a voicemail, the 2. Press ▼/▲ to scroll to ANS. MACHINE, handset and the telephone base display and then press to select. New voicemail and/or 3. Press ▼/▲ to scroll to MSG PLAYBACK, and press to select.
- Page 31 3. Press ▼/▲ to scroll to MEMO, and stops and return to previous menu. FORWARD ( press . It will start recording. Play the next new messsage if • Select and press to stop available. PREVIOUS ( and save the recording, or Play the current messsage from •...
-
Page 32: Handset Settings Set Languages
Handset settings Set date format 1. Follow Set date and time and reach Set languages DATE FORMAT. Press to select. 2. Press ▼/▲ to choose DD-MM-YY or The LCD language is preset to German. You can select English, French, Italian, MM-DD-YY format. -
Page 33: Ringer
Ringer Set ringer volume You can set the ringer volume or turn 1. Press when the phone is not in the ringer off on each handset. use. When the ringer is off, appears on 2. Press ▼/▲ to choose HS SETTINGS, the screen. -
Page 34: Tone Settings
Tone settings Alarm Set key tone on or off Set alarm on or off and alarm time You can turn the key tone on or off for You can set the ALARM alert with handset. each handset and the telephone base. If 1. -
Page 35: Configure Handset Display
Select base • Press to delete and the keypad to enter. You can select the handset to register to a different base if you have a multi- Configure handset display handset system of CS2000/CS2050. Display handset name or time 1. Press when the phone is not in use. -
Page 36: Base Settings
Base settings Set dial mode The dial mode is preset to touch-tone Delete handset dialing. If you have pulse (rotary) service, you need to change the dial mode to 1. Press when the phone is not in pulse dialing before using the telephone use. -
Page 37: Change The System Pin
Change the system PIN ECO range and mode select save power 1. Press when the phone is not in consumption provide some use. reduction in transmission power and 2. Press ▼/▲ to choose BS SETTINGS, range. and then press to select. 3. -
Page 38: Register A Handset
Register a handset registration process completes. • The registration process takes about 60 seconds complete. When your handset is deregistered from the telephone base, follow the steps NOTE below to register it back to the telephone • If your handset is new, make sure base. -
Page 39: Answering System And Settings (Cs2050 Series Only)
Answering system and back later. 1. Press when the phone is not in settings (CS2050 series use. only) 2. Press ▼/▲ to scroll to ANS. MACHINE, and then press select. Set your built-in answering 3. Press ▼/▲ to scroll to TAM SETTINGS, system and press to select. -
Page 40: Default Outgoing Message
Default outgoing message Play and delete your outgoing message The telephone is preset with a greeting that answers calls with “Hello, please 1. Press when the phone is not in leave a message after the tone.” You can use. use this preset outgoing message, or 2. -
Page 41: Options During Playback
Set record time NOTE • After you deleted your own Use this feature to set the message recorded outgoing message, the recording time. answering system answers calls with 1. Press when the phone is not in the default outgoing message use. -
Page 42: Turn On/ Off Remote Access
5. Press ▼/▲ to choose ON or OFF. 5. Enter your current 4-digit remote access PIN. 6. Press to save. XXXX • The PIN is masked as • You hear a confirmation tone. 6. Press to enter or to cancel. Turn on/ off remote access •... -
Page 43: General Product Care
General product care Storage When you are not going to use the telephone for some time, unplug Taking care of your telephone adapter(s), remove Your cordless telephone contains rechargeable battery from the handset. sophisticated electronic parts, so it must Store the telephone base, the handset, be treated with care. - Page 44 Below are the questions most frequently asked about the cordless telephone. If you cannot find the answer to your question, visit our website at https://euphones.vtech.com. Make sure the telephone base is installed My telephone properly, and battery is installed and does not work charged correctly.
- Page 46 (EU) for the Go to latest VTech product news. Specifications are subject to change without notice. © 2021 VTech Communications, Inc. All rights reserved. v1.1. 12/21 CS2000_CS2050_UK_WEBCIB_v1.1_211207...
Need help?
Do you have a question about the CS2000 Series and is the answer not in the manual?
Questions and answers
How long do the batteries take to charge for the first time
The batteries in the VTech CS2000 Series should be charged without interruption for at least 30 minutes initially. Full charging time is not explicitly stated, but the battery icon will stop flashing once charging is complete.
This answer is automatically generated