Advertisement
Quick Links
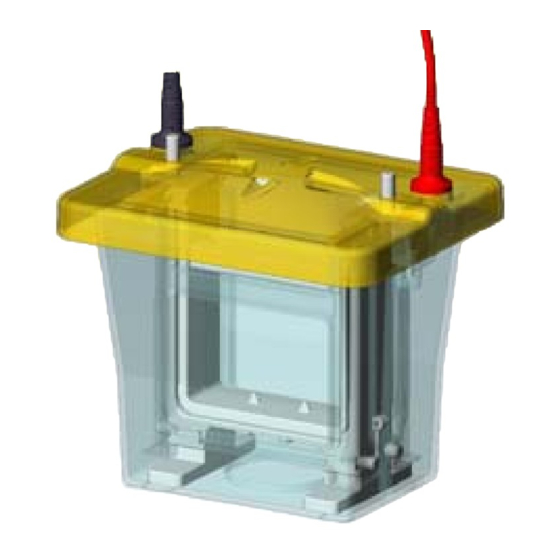
PAGEr™ Minigel Chamber
IMPORTANT USER INFORMATION
This Instruction Manual will explain how to use this
product safely and effectively. Please read and
carefully follow the instruction manual in its entirety.
The triangle/exclamation mark symbol
alerts the user of the product to important
operational, maintenance, and/or warranty
requirements.
The triangle/lightning bolt symbol alerts the
user of the product to potentially hazardous
electrical exposure.
Failure to adhere to the instructions could result in
personal and/or laboratory hazards, as well as invalidate
any warranty. Always turn off the DC power source prior
to disconnecting power cords from the product.
Disconnect power cords from the power source first and
then from the product. For maximum safety, always
operate this system in an isolated, low traffic area, not
accessible to unauthorized personnel. Never operate
damaged or leaking equipment.
WARRANTY AND LIABILITY
This product was produced utilizing the highest practical
standards of materials, workmanship, and design.
Lonza Rockland, Inc. warrants that the product has been
tested and will meet or exceed published specifications.
This warranty is valid only if the product has been
operated and maintained according to the instructions
provided.
Lonza Rockland, Inc., warrants this product to be free
from defects in materials and workmanship under normal
service for one year from date of shipment. If the
product proves defective during this period, Lonza
Rockland, Inc., will repair or replace it at our option, free
of charge, if returned to us postage prepaid. This
warranty does not cover: damage in transit, damage
caused by carelessness, misuse or neglect, normal wear
through frequent use, damage caused by solvent
corrosion, damage caused by improper handling or user
Lonza Rockland, Inc.
www.lonza.com
biotechserv@lonza.com
Tech Service: 800-521-0390
Customer Service: 800-341-1574
Document # 18928-0305-01
Rockland, ME 04841 USA
alteration, nor unsatisfactory performance as a result of
conditions beyond our control. Lonza Rockland, Inc.,
shall in no event be liable for incidental nor
consequential damages, including without limitation, lost
profits, loss of income, loss of business opportunities,
loss of use and other related damages, however caused,
nor any damage arising from the incorrect use of the
product.
SECTION 1
General Information
1.1 Introduction
The PAGEr Minigel Chamber is designed for optimal
performance of PAGEr
The unit is also compatible with many standard precast
minigels. The simple lock-in-place core design assures a
tight, flat fit and eliminates the risk of buffer leaks. There
is no need to remove the core from the reservoir, simply
insert the gels, close the clamps, fill with buffer and run.
The chamber can run one or two gels and
accommodates a tank blotting module.
Table 1: Components of the PAGEr Minigel Chamber
Cat No
Description
59905
PAGEr Minigel Chamber
59906
PAGEr™ Blot Module
59907
PAGEr Minigel Chamber and
Blot Module Kit
(Includes chamber, blotting
cassettes and sponge pads)
1.2 Safety
Power to the PAGEr Minigel Chamber is to be supplied
by an external DC voltage power supply that must be
ground isolated so that the DC voltage output floats with
respect to ground. For any power supply used, the
maximum specified operating parameters for the units
are:
1
®
Precast Gels (Lonza).
Advertisement

Related Manuals for Lonza PAGEr Minigel Chamber


Summary of Contents for Lonza PAGEr Minigel Chamber
- Page 1 1.2 Safety service for one year from date of shipment. If the Power to the PAGEr Minigel Chamber is to be supplied product proves defective during this period, Lonza by an external DC voltage power supply that must be Rockland, Inc., will repair or replace it at our option, free...
- Page 2 Maximum Limits Section 3 250 VDC Instructions for Electrophoresis 30 watts power 150 mA current Preparing the Electrophoresis Unit 60ºC ambient temperature 1. Place unit in authorized work area. Remove safety Current to the unit, provided from the external power cover from the assembled unit by simultaneously supply, must enter the unit through the lid assembly, pressing down on white push pins with your thumbs,...
- Page 3 Banana jack receptacles Figure 6 Figure 4 6. Close doors and relatch by pressing down on the white latches so that the assembly looks like that 2. See section 5.3 for recommended buffers. shown in figure 5. Pour only enough freshly prepared buffer into lower chamber so that the final buffer level is just below bottom of sample wells.
- Page 4 Removing the Gel 1. Turn the power supply off and disconnect the leads Soak membrane 5 minutes in 1X Towbin buffer from the power supply. Remove the safety cover until it no longer floats. Do Not Allow from the unit, by simultaneously pressing down on Membrane to Dry.
- Page 5 6. Close doors and re-latch by pressing down on the white latches. If running one blot, slide blank SECTION 5 adapter plate into the side without the blotting Running Conditions cassette. Recommended Power for Slab Gels: Precise electrophoresis conditions will vary according to Electro-Blotting Procedure the number and type of gels used, buffer conditions employed, power input, and the general goal of the...
- Page 6 The platinum wire is secured to the banana jack by compression between a stainless washer and the jack nut. The nut/washer interface should be tight and free of corrosion. PAGEr and AccuGENE, are trademarks of Lonza Group or its subsidiaries. ©2007 Lonza Rockland, Inc. All rights reserved.
Need help?
Do you have a question about the PAGEr Minigel Chamber and is the answer not in the manual?
Questions and answers