Table of Contents
Advertisement
Quick Links
Advertisement
Table of Contents

Subscribe to Our Youtube Channel
Related Manuals for GREEN INSTRUMENTS G4130 NOX/O2


Summary of Contents for GREEN INSTRUMENTS G4130 NOX/O2
- Page 1 G4130 NOX/O2 ANALYZING SYSTEM WITH DIFFUSION PROBE MANUAL PART NUMBER: 02156...
- Page 3 Version 1.1 – Revision Jan 2019 – Part nr.: 02156...
-
Page 4: Table Of Contents
G4130 NO Analyzing System Content NTRODUCTION BOUT THIS ANUAL NQUIRIES AND EEDBACK YSTEM PECIFICATIONS YSTEM NSTALLATION ONTROL AT ELIVERY HERE TO NSTALL THE YSTEM AFETY SPECTS IFFUSION ROBE NALYZING OARD 3.5.1 Mounting Panel 3.5.2 Air Supply Connection 3.5.3 Span NO Gas Connection 3.5.4 Analyzer and Electrical Connections... - Page 5 Content ABLE OF IGURE – 3-1: I IGURE NSTALLATION LAYOUT OF THE DIFFUSION PROBE WELDING TYPE – 3-2: I IGURE NSTALLATION LAYOUT OF THE DIFFUSION PROBE THREAD TYPE – 3-3: D IGURE IFFUSION PROBE STANDARD WELDING TYPE – 3-4: D IGURE IFFUSION PROBE SHORT WELDING TYPE...
-
Page 6: Introduction
Should situations not described in the manual occur, which cannot be solved in accordance with normal known practice and good workmanship, the operator should contact Green Instruments A/S for instructions. This manual does not claim to cover all details or variations in equipment or to provide for every possible contingency that may arise during installation, opera- tion, or maintenance. -
Page 7: Inquiries And Feedback
Green Instruments A/S reserves the copyright of the manual. Without prior written permission of Green Instruments A/S, the manual may not be copied and given to unauthorized people. Inquiries and Feedback All claims and inquiries for spares shall be addressed to Green Instruments A/S or our distributors. -
Page 8: System Specifications
G4130 NO Analyzing System 2 System Specifications Gas Connection For 6/4 mm tubing – max. 1 bar Span NO gas connection 1/8” BSP connection – max. 8 bar Air supply filter regulator Air supply quality Instrument air quality according to ISO 8573-1, class 3 Analyzer See details in the G41 NOx/O... - Page 9 System Specifications Umbilical cord Cord length 3.0 m Tubing In 28 mm nylon conduit Optional Equipment Remote display with alarm relays Recording and visualization Extension kit for umbilical cord Specifications are subject to changes without notice. Version 1.1 – Revision Jan 2019 – Part nr.: 02156...
-
Page 10: System Installation
– choose what provides the greatest length. See Figure 3-1 and Figure 3-2 for the installation layout of the probe. If you find it difficult es- timating where to install the probe, please contact Green Instruments A/S for more instructions. -
Page 11: Figure 3-1: Installation Layout Of The Diffusion Probe
System Installation The analyzing board shall be placed and installed where the ambient tem- perature is below 55 C at any time. The system shall be installed in a clean place away from dust, oil mist, and moisture. The elements of the system shall be installed at viewing level so that it is easy accessible in connection with operation and service. -
Page 12: Safety Aspects
G4130 NO Analyzing System Exhaust Duct Maintenance space: 700 mm Socket: Yard supply to be welded Distance to the outlet: min. 3 duct diamters Thread size: Distance to the next downstream bent: 1½” BSP min. 1 duct diameters NOx/O2 Probe 600 mm Sample to be drawn from the inner 80% of the duct diameter. -
Page 13: Diffusion Probe
System Installation and certified personnel, and that Green Instruments A/S does not take any respon- sibility for the operation of the system and associated equipment whatsoever. The successful and safe operation of this equipment is dependent upon proper han- dling, installation, operation, and maintenance. -
Page 14: Figure 3-3: Diffusion Probe Standard
G4130 NO Analyzing System Figure 3-3: Diffusion probe standard – welding type Figure 3-4: Diffusion probe short – welding type... -
Page 15: Figure 3-5: Diffusion Probe Standard
System Installation Figure 3-5: Diffusion probe standard – Thread type Figure 3-6: Diffusion probe short – Thread type Version 1.1 – Revision Jan 2019 – Part nr.: 02156... -
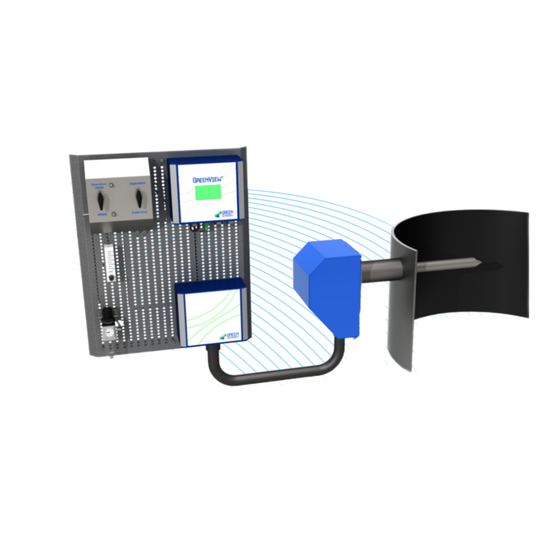
Page 16: Analyzing Board
G4130 NO Analyzing System 3.5 Analyzing Board 3.5.1 Mounting Panel The analyzing board is designed for mounting with the G41 NO Analyzer (see Figure 3-7). The board has two angle iron mounting brackets. The brackets are made of ordinary mild steel and can be welded or bolted directly to a chosen location structure as required. -
Page 17: Figure 3-7: Analyzing Board Dimensions
System Installation Figure 3-7: Analyzing board dimensions Version 1.1 – Revision Jan 2019 – Part nr.: 02156... -
Page 18: Figure 3-8: Piping And Connection Diagram
G4130 NO Analyzing System Figure 3-8: Piping and connection diagram... -
Page 19: Commissioning
Commissioning 4 Commissioning 4.1 Installation and Set-up Pre-checks After completing the installation and before starting the system for the first time, please check the following: Check and confirm that all electrical connections are carried out according to the manuals and the technical drawings. Check that the air supply is connected to the air supply filter regulator without leaking and in accordance with good installation practice. -
Page 20: System Operation
G4130 NO Analyzing System 5 System Operation 5.1 Calibration Mode In the calibration mode (both Zero and Span), the selector valve must stay at the Calibration position. For zero calibration Turn the selector valve to Zero position. Check that the instrument air (zero NO gas) is connected to the air supply filter regulator. -
Page 21: Measurement Mode
System Operation 5.2 Measurement Mode In the measurement mode, both selector valves must point to the Operation posi- tion. The instrument air for back-flushing is regulated by the solenoid valve which is controlled by the analyzer. For back-flushing, the solenoid valve will be opened automatically to allow the probe back-flushing with high air flow. -
Page 22: Routine Maintenance
G4130 NO Analyzing System 6 Routine Maintenance 6.1 Calibration The system must be calibrated regularly and always after each start-up of the analyzer. The frequency of calibration depends on each specific application, but we recommend the calibration before making any measuring report or at least once a month. -
Page 23: Sensor
Routine Maintenance 6.3 Sensor Warning The analyzer must be turned off and the air supply must be disconnect- ed before you start changing the sensor. If you remove the sensor while there is exhaust gas in the stack, there is a risk that hot exhaust gas will come out of the sensor house. -
Page 24: Diffusion Probe
G4130 NO Analyzing System 6.4 Diffusion Probe The probe filter element is normally cleaned by back-flushing. The period be- tween back-flushings depends on the actual flue gas condition and how dirty the filter gets. Regular back-flushing will normally keep the filter clean. However, a slow re- sponse to NO changes in the flue gases indicates that the probe filter may be contaminated. - Page 25 Routine Maintenance To clean the probe filter, please go through the following steps: Turn off the analyzer and disconnect the air supply. Unscrew the nuts and remove the blue cover plate of the probe. Unbolt the 3 bolts at the sensor and filter flange. Take the sensor and filter flange out and unscrew the threaded filter Clean or change the filter.
-
Page 26: Parts List
G4130 NO Analyzing System 7 Parts List Spare parts are not included in the standard delivery. Spare parts can be ordered when necessary. When ordering spare parts, please mention the serial number of the analyzer, which you can find on the label on the right side of the blue analyzer box. - Page 27 Parts List The specific appearance of the spare Part Consumable Parts parts is subject change without notice; the - Part Description function however will not change 01061 Back flush valve 01251 Fuse for analyzer 2 AT (pkg of 10) 01248 G41 NO Analyzer 100-230 VAC Manual G41 NO...
- Page 28 G4130 NO Analyzing System The specific appearance of the spare Part Consumable Parts parts is subject change without notice; the - Part Description function however will not change Umbilical cord complete with sensor cable 02199 and air hoses - 3 m Additional meters for # 02199 Umbilical 02200 Cord (per additional meter)
- Page 29 Parts List The specific appearance of the spare Part Consumable Parts parts is subject change without notice; the - Part Description function however will not change 33592 Signal amplifier (4-20 mA) (optional) Other optional equipment – e.g. flow alarm, remote digital display, visualization, recording and data logging, monitoring of gas temperature, pressure, and load –...
- Page 32 Green Instruments A/S Green Instruments USA, Inc. Green Instruments (S) Pte. Ltd. sales@greeninstruments.com usa@greeninstruments.com pua@greeninstruments.com Erhvervsparken 29 6750 N. Andrews Avenue Suit 200 240 Woodlands Industrial Park E5 9700 Brønderslev, Denmark...
Need help?
Do you have a question about the G4130 NOX/O2 and is the answer not in the manual?
Questions and answers