
Related Manuals for Rice Lake RL1200


Summary of Contents for Rice Lake RL1200
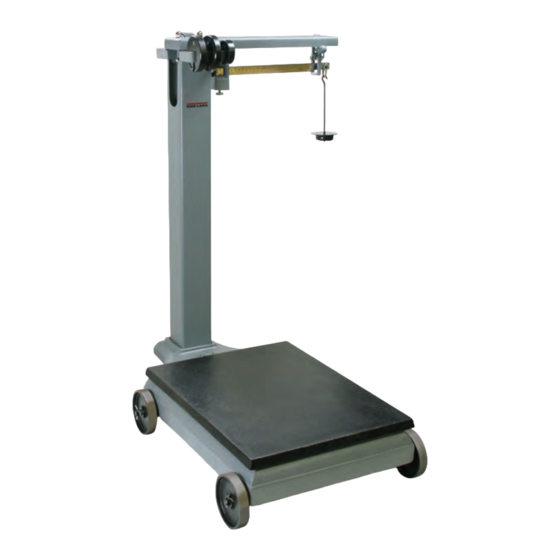
- Page 1 RL1200 Portable Beam Scale Installation & Operation Manual June 7, 2022 PN 157986 Rev A...
- Page 2 All information contained within this publication is, to the best of our knowledge, complete and accurate at the time of publication. Rice Lake Weighing Systems reserves the right to make changes to the technology, features, specifications and design of the equipment without notice.
- Page 3 General enhancements to the manual and changed out indicator that is used Table i. Revision Letter History Technical training seminars are available through Rice Lake Weighing Systems. Course descriptions and dates can be viewed at www.ricelake.com/training or obtained by calling 715-234-9171 and asking for the training department.
-
Page 4: Table Of Contents
Specifications ..................1 Rice Lake continually offers web-based video training on a growing selection of product-related topics at no cost. -
Page 5: Introduction
Introduction Introduction This manual provides assembly and operating instructions for the RL1200 portable beam scale, which is available in both avoirdupois and metric. Please read all instructions carefully before assembling the scale. This manual covers the installation and setup of two versions of the RL1200: •... -
Page 6: Safety
There are certain precautions that should be taken to prevent personal injury to the user and damage to the scale. Care should be exercised to assure proper assembly and operation of the RL1200. The RL1200 should be assembled only by a trained scale technician. -
Page 7: Unpacking The Scale
Item Description Quantity Scale base Weight rack Beam cap assembly Beam cap washers Axle washers Wheel Wheel axle Trig loop assembly Table 2-1. RL1200 Parts © Rice Lake Weighing Systems ● All Rights Reserved... - Page 8 Beam assembly Counterpoise assembly Loop clamp Axle cotter pins Axle locking bolts Cap nut for beam cap Counterpoise weights, 100 lb (1), 200 lb (2), 400 lb (1) Steel shot for counterpoise Table 2-1. RL1200 Parts (Continued) www.RiceLake.com Visit our website...
-
Page 9: Repacking
Table 2-1. RL1200 Parts (Continued) Repacking If the RL1200 must be returned for modification or repair, it must be properly packed with sufficient packing materials. Whenever possible, use original carton when shipping the scale back. IMPORTANT: Damage caused by improper packaging is not covered by the warranty. -
Page 10: Scale Setup
Assemble Wheels onto Frame Use the following steps to assemble wheels onto the RL1200 frame. 1. It is preferable to set the scale base on a box or other item to keep the scale base up off the floor. Tip the scale base on its side. - Page 11 Figure 2-5. Secure Wheel Axle to Frame Using Axle Locking Bolts on Each Wheel 6. Stand the scale base on the floor on its wheels. Figure 2-6. Place Scale Base on Floor © Rice Lake Weighing Systems ● All Rights Reserved...
-
Page 12: Attach Pillar To Scale Base
RL1200 Portable Beam Scale 2.3.2 Attach Pillar to Scale Base Use the following steps to attach the pillar to the scale base. 1. Screw the pillar rods into the scale base frame approximately three turns. Ensure ample threads are available to place the beam weight rack and beam cap assembly on the pillar. - Page 13 Figure 2-9. Attach Hook to Nose Iron Assembly 4. Temporarily hang the steelyard rod on the cutout in the pillar as shown. Figure 2-10. Steelyard Hook on Pillar Cutout If assembling the Mechanical to Electronic version of the RL1200, please proceed to IMPORTANT: Section 4.0 on for further assembly instructions.
- Page 14 RL1200 Portable Beam Scale 6. Place the beam cap assembly over the weight rack (facing same direction as hook and steelyard hook) using acorn bolts and washers and snug the beam cap assembly. Figure 2-12. Attach Beam Cap Assembly 7. Attach the two loop clamps onto beam assembly.
-
Page 15: Trig Loop Assembly
The beam must not touch or rub the sides to ensure accurate weighments. 5. Once the trig loop assembly is centered, tighten the beam cap assembly and weight rack to the pillar. © Rice Lake Weighing Systems ● All Rights Reserved... - Page 16 RL1200 Portable Beam Scale 6. Hang the counterpoise assembly from the loop assembly at the tip of the beam. Figure 2-17. Hanging Counterpoise Assembly 7. Place the scale on a firm, level surface. 8. Set poise(s) at zero and lock. Release the beam lock. Adjust the back balance assembly to bring the beam to a horizontal position with the tip centered in the trig loop.
- Page 17 Installation 11. Hang the counterpoise weights on the weight rack until needed. Figure 2-20. Add Counterpoise Weights Until Needed © Rice Lake Weighing Systems ● All Rights Reserved...
-
Page 18: Operation
RL1200 Portable Beam Scale Operation Use the following steps to safely and correctly operate the RL1200 platform scale. 1. With no load on the scale platform, position the sliding poise at zero. Unlock the trig loop. The beam should be centered vertically in the trig loop. -
Page 19: Mechanical To Electronic Installation Instructions
• Pre-drilled mounting bracket • All necessary conversion hardware The conversion kit requires no special tooling or equipment. Assembly requires only ordinary hand tools. Prior assembly of the RL1200 through Step 4, Figure 2-10 on page 9 still applies. Unpacking The Conversion Kit... -
Page 20: Indicator And Load Cell Installation
Table 4-1. Conversion Kits Parts List Indicator and Load Cell Installation Use the following steps to attach the indicator and load cell to the RL1200. 1. Take the indicator base plate and lay it on its side. 2. Note the orientation of the load cell. Put the 3.5 inch bolt through the long bolt washer and through the top of the indicator base plate. - Page 21 7. Tighten the indicator base plate to the pillar by using lock washers and acorn nuts as shown in Figure 4-4. 8. Run load cell cable through the tilt stand on the indicator. Figure 4-5. Run Load Cell Cable Through Bottom of Indicator Tilt Stand © Rice Lake Weighing Systems ● All Rights Reserved...
- Page 22 RL1200 Portable Beam Scale 9. Set indicator on base plate and secure with four bolts and lock washers. Figure 4-6. Secure Indicator to Base Plate 10. Wrap excess cable around cable hooks on handle. Figure 4-7. Store Excess Load Cell Cable 11.
-
Page 23: Final Adjustment, Calibration And Troubleshooting
Figure 4-8. 482 Legend Series Indicator Board Final Adjustment, Calibration and Troubleshooting Final adjustment, calibration and troubleshooting of the 482 indicator can be found in the 482 Technical Manual, PN 165124. © Rice Lake Weighing Systems ● All Rights Reserved... -
Page 24: Appendix
RL1200 Portable Beam Scale Appendix Check frequently for correct balance with no load on the platform, the poise(s) set at zero, and no counterpoise weights applied. • Keep the beam locked until the load has been applied to the platform. - Page 25 Appendix RL1200 Portable Beam Scale Limited Warranty Rice Lake Weighing Systems (RLWS) warrants that all RLWS equipment and systems properly installed by a Distributor or Original Equipment Manufacturer (OEM) will operate per written specifications as confirmed by the Distributor/OEM and accepted by RLWS.
- Page 26 RL1200 Portable Beam Scale www.RiceLake.com Visit our website...
- Page 28 © Rice Lake Weighing Systems Specifications subject to change without notice. 230 W. Coleman St. • Rice Lake, WI 54868 • USA U.S. 800-472-6703 • Canada/Mexico 800-321-6703 • International 715-234-9171 • Europe +31 (0)26 472 1319 PN 157986 Rev A June 7, 2022 www.ricelake.com...
Need help?
Do you have a question about the RL1200 and is the answer not in the manual?
Questions and answers