Advertisement
Quick Links
Advertisement

Related Manuals for Snow Peak Zekka TP-710


Summary of Contents for Snow Peak Zekka TP-710
- Page 1 取扱説明書 Ver 2.00 TP-710 ゼッカ...
- Page 2 この度は、 スノーピーク製品をお買い上げいただき、 誠にあ り がと う ご ざいます。 本製品は、 キャ ンプ用シェルターで す。 安全にご使用いただ く ためにも下記の取扱説明書をよ く読んでから ご使用く ださい。 また、 読み終わった後も 大切に保管して く だ さい。 説明内容で理解出来ない点及び製品に不具合が確認された際には直ちに使用を中 止しご購入いただき ま した販売店様も し く は弊社ユーザーサービスまでお問い合わせ く だ さい。 セッ ト内容 ※ご使用の前にセ ッ ト内容 、 付属品が全て揃っているかを確認 して く だ さ い。 本体...
- Page 3 安全上の注意事項 ご使用の前によ く 読んで予測さ れる事故を回避 し安全にご使用く だ さ い。 危険 明らかに生命に関わる重大な事故が予測される行為を示します。 ●このシェルターの素材は難燃性ではあ り ません。 シェルター内では燃焼式のラ ンタ ンやコンロ、 ヒーターな どの熱源 や、 マ ッ チ、 ローソク、 ライ ター、 タバコな どの裸火や炎は絶対に使用 しないで く だ さ い。 限られた空間での火気の使 用は火災や酸欠、 一酸化中毒な どの恐れがあ り大変危険です。 ●シ ェルター内で燃料を保管 した り、 燃料を補給するな ど、 引火性のある ものを持ち込ま ないで く だ さ い。 警告...
- Page 4 使用前の準備 縫製部分には シームテープによ る防水処理が施 してあ り ますが、 本体のベンチレー シ ョ ン部やフ ァ スナー部、 イ ンナールー ムのボ トムシー トの一部は製造の都合上、 ま たは構造上、 シームテープが施せない部分があ り ます。 通常の雨には十分対 応で き ますが、 長時間の大雨や横な ぐ りの雨、 地面に雨水が溜ま っている よ う な状態では、 縫い目か ら雨水が侵入する こ と があ り ますので必要に応じ て縫い目にシームグ リ ッ プ剤 (目止め液) を塗布 して く だ さ い。 シームグ リ ッ プ剤は縫い目に沿っ て表裏の両面か...
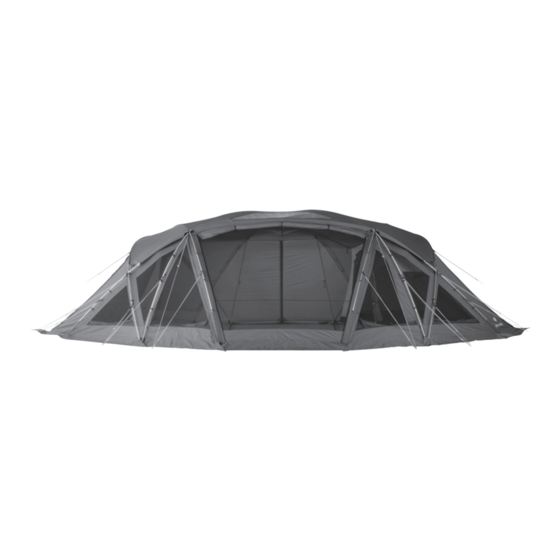
- Page 5 設営の手順 よ り安全に設営するためにも必ず 2人以上で設営 して く だ さ い。 本体を設営する平坦な場所に広げて く だ さ い。 その時正面パネル、 背面パネルの向き を考慮 して広げて く だ さ い。 ※ビルディ ングテープ6本すべてのバッ クルが接続さ れている事を確かめて く だ さ い。 も し外れている場合は設 営前に必ず接続を して く だ さ い。 背面パネル 赤色フラ ッ プ ゼッ...
- Page 6 ②同様に、 も う一本のク ロス フ レーム を黄色テー プがついている ス リ ー ブに入れて く だ さ い。 ③同様に黄色ペグダウ ンループが付いた リ ングピン (背面パネル側) を クロス フ レームの先端 (黄色) に差 し込 んで く だ さ い。 ⑤ クロスフ レームの ④ 先端 (黄色) 黄色テープ 黄色ペグダウ...
- Page 7 クロス フ レームの先端 (グ レー色) に、 グ レー色ペグダウ ンループが付いた リ ング ピン (大) を差 し込んで く だ さ い。 差 し込む前にス リ ー ブを し っか り手前に引き寄せる と リ ング ピンに差 し込みやす く な り ます。 クロスフ レームの 先端 (グレー色) グレー色ペグダウ...
- Page 8 テン ト フ レームの先端 (無色) を少 しずつ継ぎ、 グ レー色テープが端部についているス リ ー ブに通 して く だ さ い。 その後、 背面のリ ングピンに差 し込みやすい位置にフ レームの先端が く る まで押 し入れて く だ さ い。 ※テン ト フ レームに前後はあ り ません。 テン ト フ レームは クロス...
- Page 9 リ ッ ジフ レームの先端 (紺色) と ス リ ーブのテープの色 (紺色) が合っている こ と を確認 し、 リ ッ ジフ レームをス リ ー ブに差 し込んで く だ さ い。 ※リ ッ ジフ レームに前後はあ り ません。 リ ッ ジフ レームの節を少 しずつ継ぎながら ス リ ー ブに通 して く だ さ い。 リ...
- Page 10 クロスフ レーム/Cフ レーム/テン ト フ レームにプラスチッ クフ ッ ク を掛けて く だ さ い。 また、 フ レームの交差部はベ ルクロ付きテープをOリ ングに通 して固定 して く だ さ い。 フレーム交差部のテープ取付け手順 図のよ う に3本ま と めてテープで固定 して く だ さ い。 ベルクロのオス メ ス を 合わせ固定...
- Page 11 ビルディングテープをはずす場合 お子様などがビルディ ングテープに足を引掛けるこ と を防ぐため、 ビルディ ングテープをはずすこ とがあ り ます。 ビル ディ ングテープをはずすと シ ェルターの強度は さ がるため、 基本的にはビルディ ングテープははず さ ないで く だ さ い。 本体裾部につ く ビルディ ングテープ6本 ビルディ ングテープを外 した際、 シ ェルターが外側へ広がるの を防ぐためペグダウ ンループを固定 しているペグ を本体外側 か ら内側へ打ち換え て く だ さ い。 ペグ...
- Page 12 シールドルーフの取付け シール ドルーフ を本体の背面に広げ前後を確認 して く だ さ い。 ( 左右対称) PUコーテ ィ ン グ面 (てか り のあ る面) が裏面にな り ま す。 下記図はPUコーテ ィ ン グ面が見え ている裏面の状態です。 正面側S字フ ッ ク (自在付きロープ) 正面側 (天窓がある側) シール ドルーフ (裏面) 背面側 赤色テープ (ゴムループ根本) 背面側S字フ...
- Page 13 シール ドルーフ正面側S字フ ッ ク (自在付き ロープ) を二人で持ち、 ゼッ カ本体の天面にシール ドルーフ を被せて く だ さ い。 裏面 表面 シール ドルーフ を取付けやすいよ う正面パネルのジ ッパー を開けて く だ さ い。 シール ドルーフの正面側中央の黒色ベルクロテープ (オス) を、 リ ッ ジポールス リーブ中央の黒色ベルクロ テープ (メ ス) に取付けて く だ さい。 シール...
- Page 14 リ ッ ジフ レーム とCフ レーム、 テン ト フ レームが3本交差する箇所の下を潜る よ う にシール ドルー フのOリ ング とS字 フ ッ ク を取り つけま す。 取付けた ら シール ドルー フ裏側についている赤色ベルクロテープを リ ッ ジフ レームに巻き付 けて く だ さ い。 シール ドルーフ正面側のS字フ ッ ク (自在付きロープ) をテン ト フ レームとの交点についているOリ ングに引掛け ます。...
- Page 15 テン トフレームが通るスリーブ中央の黒色ベルクロ テープに、 シール ドルーフの赤色ベルクロテープを取り 付けて く だ さ い。 その後シール ドルーフ裏面の赤色ベルクロテープをテ ン ト フ レームに巻き付け、 自在付きロープについている S字フ ッ クを交点のOリ ングに取付け、 自在を引張り、 調整 して く だ さ い。 最後にシール ドルーフ背面側の各ベルクロテープを フ レームに取りつけた う えで、 背面側の自在付き ロープ、 ゴムループのフ ッ ク を、 フ レームの延長線上のOリ ング やテープに引掛けて...
- Page 16 グラ ン ド シー ト各コーナーにある ゴムループを伸ば し、 対応するペグに引掛けて く だ さ い。 ( 4カ所) イ ンナールーム上部奥側に付く フ ッ ク 3 ヶ所を本 体 (フライ) のO リ ングに全て引掛けて く だ さ い。 本体 (フライ) のOリ ングに フ ッ ク を掛けて く だ さ い イ...
- Page 17 セーフティーベルトの活用 本製品には、 強風時に側面か らの風に対 して安定性を保つセーフティ ーベル ト、 セーフティ リ ング を備えています。 ク ロス フ レーム内側に下図のよ う にセ ッ ティ ング して く だ さ い。 ■あ く まで も補助対策です。 あ ら ゆる悪天候に耐え られる ものではあ り ません。 一時的な強風時や、 即座に撤収が困 難な場合にのみご使用 く だ さ い。 セー フテ ィ ー リ ングに体重を かける な ど しないで く だ さ い。 シ ェ ルタ ー倒壊の恐れがあ り...
- Page 18 撤収の手順 (必ず2人以上で撤収 して く だ さ い) 撤収は設営と逆の手順で行って く だ さ い。 イ ンナールームの中、 本体の中にものが入っていないこ と を確認 してか ら 作業を開始して く だ さ い。 イ ンナールームやシール ドルーフ、 グラ ン ドシー ト、 フ レームは本体か ら取り はず し、 イ ンナー ルームの出入口のファスナー を少 し開いてお く と巻き取りやす く な り ます。 ①クロス...
- Page 19 結露について 空気中に含まれている水分が急激に冷やさ れて霧状になった ものが結露と して現れます。 特に狭いテン ト等の空間 では、 通常の室内よ り も水蒸気の濃度が高く な り、 結露の発生する確率が高く な り ます。 原因と しては、 人体構成要 素の約60% を占める水分が、 呼吸や汗な どによ り放出さ れ、 水蒸気と な り テン ト内に結露が発生 し ます。 テン ト内で は、 特にフライ シー ト ・ ボ トム部分な どの防水性能が高い部分に結露が発生 しやす く な り ます。 結露は優れた透湿防水 素材で...
- Page 20 品質保証について お買い求めいただ き ま した製品は万全を期 してますが万一不備な点がご ざいま した ら、 お買い求めの販売店ま たは弊 社までご連絡く だ さ い。 製造上の欠陥が原因の場合は無償で修理ま たは交換さ せていただ き ます。 その他の場合は 適正な価格で修理さ せていただ き ます。 修理 ・ 交換の判断は弊社の裁量による ものと さ せていただ き ます。 ま た、 以下 の場合は保証、 修理で き ない場合もあ り ますので、 あ ら か じ めご了承 く だ さ い。 ...
- Page 21 Product Manual : Ver 2.00 TP-710 Zekka...
- Page 22 Thank you for purchasing this Snow Peak Product.This product is a shelter designed for camping.To ensure your safety when using this product, please read these instructions carefully before use.Please be sure to keep this manual in a safe place for future reference.If you find anything in the instruction manual that is difficult to understand, or if you find a defect with the product, stop using it immediately and contact the dealers where you purchased the product or Snow Peak Customer Service.
- Page 23 ●Before using the product, check each part for abnormalities.If there are abnormalities, take the product to the dealer or Snow Peak Customer Service for inspection or repair. ●Pay close attention to the weather. If extreme weather is in the forecast, pack up camp and evacuate to a safe place.
- Page 24 Snow Peak Customer Service. Attaching the rope with rope tensioner, peg down position There are two types of rope peg down positions on the front for normal and strong winds.Change the tension...
- Page 25 Setup procedure Please make sure to set up with at least two people. Spread the shelter on the area to set up.Pay attention to orientation of the front and back panel when spreading. * Make sure that the buckles are connected to all 6 building tapes.If they are not, be sure to connect them before setup.
- Page 26 In the same manner as ②, insert the other cross frame in the sleeve with yellow tape. In the same manner as ③, insert the ring pin with the yellow peg down loop (on the back panel) into the tip of the cross frame (yellow). ⑤...
- Page 27 Insert the ring pin (large) with the gray peg down loop into the tip (gray) of the cross frame.If you pull the sleeve firmly toward you before insertion, it will be easier to insert into the ring pin. Tip of the cross frame (gray) Ring pin with gray peg down...
- Page 28 Gradually join the tip (colorless) of the tent frame and pass it through the sleeve with the gray tape on the end. Then push until the tip of the frame comes to a position where the back ring pin can be easily inserted. * The tent frame does not have a front or back.
- Page 29 Make sure that the tip of the ridge frame (dark blue) matches the color of the tape on the sleeve (dark blue), and insert the ridge frame into the sleeve. * The ridge frame does not have a front or back.Pass through the sleeve while gradually joining the joints of the ridge frame.
- Page 30 Attach the plastic hook to the cross frame/C frame/tent frame. At the intersection of the frames, pass the tape with Velcro through the O-ring to secure in place. Tape attachment procedure at the frame intersection Secure all three together with tape as shown in the figure. Align the male and female Velcro to O-ring...
- Page 31 When removing the building tape You can remove the building tape to prevent children from getting their feet caught on them.In normal circum- stances, do not remove the building tape because doing so will reduce the strength of the shelter. 6 building tapes attached ...
- Page 32 Attaching the shield roof Spread the shield roof on the back of the shelter and confirm the front and back.(Bilateral symmetry)The PU coated surface (shiny surface) is the back.The figure below shows the back where the PU coated surface is visible. Front side S-hook (rope with tensioner) Front side (side with a roof window) Shield roof (back)
- Page 33 Have two people hold the S-hook (rope with tensioner) on the front side of the shield roof, and cover the top of the Zecca shelter with the shield roof. Back Front Open the zipper on the front panel to make it easier to attach the shield roof. Attach the black Velcro tape (male) at the center of the front side of the shield roof to the black Velcro tape (female) at the center of the ridge pole sleeve.
- Page 34 Attach the shield roof O-ring and S-hook so that they go under the intersection of the ridge frame, C frame, and tent frame.Once installed, wrap the red Velcro tape on the back side of the shield roof around the ridge frame. Attach the S-hook (rope with rope tensioner) on the front side of the shield roof to the O-ring (large) at the intersection with the tent frame.After attaching, repeat steps ⑦...
- Page 35 Attach the red Velcro tape on the shield roof to the black Velcro tape at the center of the sleeve through which the tent frame passes. Then wrap the red Velcro tape at the back of the shield roof around the tent frame, attach the S-hook on the rope with rope tensioner to the O-ring (large) at the intersection, and pull the tensioner to adjust.
- Page 36 Stretch the rubber loops at each corner of the ground sheet and attach them to the corresponding pegs. (4 locations) Attach all three hooks at the back of the top of the inner room to the O-rings of the shelter (fly). Attach the hook to the O-ring of the shelter (fly).
- Page 37 Using the safety belts This product is equipped with safety belts and safety rings that maintain stability against lateral wind during strong gusts.Set the inside of the cross frame as shown in the figure below. ■This is just an assisting measure.It cannot withstand all bad weather conditions.Use only in temporary strong winds or when immediate withdrawal is difficult.or when immediate withdrawal is difficult.Do not put your weight on the safety rings.Doing so may collapse the shelter.
- Page 38 Disassembly procedure Always disassemble this product with two or more people. For disassembly, perform the setup procedure in reverse order.Make sure there is nothing inside the inner room and shelter before starting.The fabric will be easier to roll up if you remove the inner room, shield roof, ground sheet, and frame from the shelter, and slightly open the zipper at the inner room entrance.
- Page 39 Regarding condensation Moisture suspended in the air rapidly cools down and turns into mist, which appears as condensation.In smaller spaces such as inside a narrow tent, the concentration of water vapor is higher than in an ordinary room and frequently results in more condensation.The water that comprises about 60% of the human body is released by breathing and sweating, which becomes water vapor and causes condensation in the tent.In the tent, condensation is more likely to occur on highly waterproof parts such as the fly sheet and bottom part.Depending on the surrounding conditions,...
-
Page 40: Specifications
Snow Peak makes every effort to ensure our products are free from defects or flaws for proper function and longev- ity. If you feel this product is defective or needs repair, please contact Snow Peak or go to the Snow Peak dealer where you purchased this product.If the cause is defective manufacturing, we will repair or replace the product free...
Need help?
Do you have a question about the Zekka TP-710 and is the answer not in the manual?
Questions and answers