
Related Manuals for Quantum QS-500 Series


Summary of Contents for Quantum QS-500 Series
- Page 1 Model QS-500 Series Floor-to-Ceiling/Wall Tubestand Installation and Operation Manual Manual Part No. DC30-005 Revision B...
- Page 2 This manual is copyrighted and all rights are reserved. No portion of this document may be copied, pho- tocopied, reproduced, translated, or reduced to any electronic medium or machine readable form without prior consent in writing from Quantum Medical Imaging, LLC. Copyright© 2001 By QMI Quantum Medical Imaging, LLC Made in U.S.A.
- Page 3 Revision History REVISION HISTORY REVISION DATE TYPE OF MODIFICATION 10/18/00 Initial Release. 2/15/00 Added UL Mark LIST OF EFFECTIVE PAGES Page Page Page Number Number Number i - x 1 - 44 Model QS-500 Tubestand...
- Page 4 Revision History THIS PAGE INTENTIONALLY LEFT BLANK Model QS-500 Tubestand...
-
Page 5: Table Of Contents
Table of Contents Table of Contents Section 1, Introduction Section 2, Specifications Section 3, Assembly & Installation Section 4, Operation Section 5, Maintenance Model QS-500 Tubestand... - Page 6 Table of Contents THIS PAGE INTENTIONALLY LEFT BLANK Model QS-500 Tubestand...
- Page 7 Safety Notices WARNING Quantum Medical Imaging, LLC disclaims all responsibility from any in- jury resulting from improper application of this equipment. This equipment is sold to be used exclusively under the prescribed direc- tion of a person who is licensed by law to operate equipment of this na- ture.
- Page 8 Safety Notices REGULATORY COMPLIANCE The Model QS-500 Tube Stand is not a CDRH certifiable product. However, it must be compatible and operate in conjunction with other components in the x-ray sys- tem so that the x-ray system performs in compliance with H.E.W. Performance Standards.
- Page 9 Warranty Information WARRANTY STATEMENT Quantum Medical Imaging, LLC (herein known as “QMI”) warrants to buyer that any new product manufactured by QMI will be free from defects in material and manufactur- ing and conform substantially to applicable specifications in effect on the date of ship- ment when subjected to normal, proper and intended usage by properly trained person- nel.
- Page 10 2) Failure of Buyer/Dealer to provide the proper incoming power required to sup- port the equipment in accordance with the recommendation of QMI. 3) Any modification of product performed by a party other than Quantum Medical Imaging. 4) Combining incompatible products.
- Page 11 B) By making available any necessary repaired or replacement parts or as- semblies. Quantum Medical Imaging shall have the option to furnish either new or ex- change replacement parts or assemblies. All returned parts shall become the property of Quantum Medical Imaging.
- Page 12 Warranty Information THIS PAGE INTENTIONALLY LEFT BLANK Model QS-500 Tubestand...
-
Page 13: Section 1, Introduction
Chapter INTRODUCTION... - Page 15 Chapter 1 Introduction OVERVIEW This manual provides information for installing, operating, and maintaining Quan- tum Medical Imaging’s Floor-to-Ceiling/Wall Tubestand, Model QS-500 (hereinafter referred to as the Tubestand). It is imperative that all safety procedures described NOTE in this manual be strictly adhered to in order to ensure the safety of both patient and user.
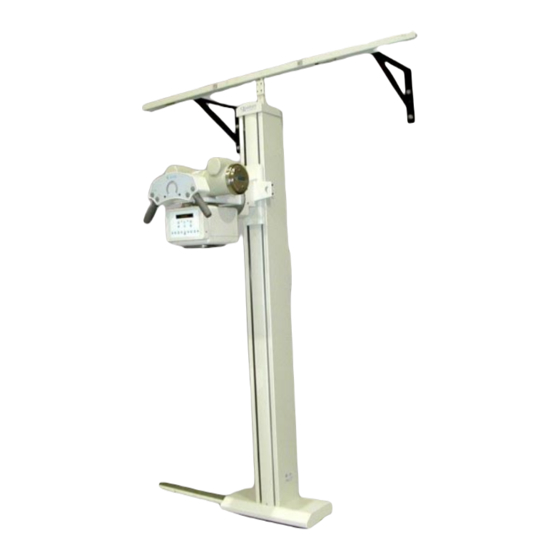
- Page 16 See Figure 1. The Model QS-500 Tubestand contains: 1 X-Ray Tube 2 Handgrips 3 Wall/Ceiling Track 4 Support Arm 5 Vertical Column 6 Serialization Label 7 Base Assembly 8 Floor Track 9 Collimator Figure 1. Floor-to-Ceiling/Wall Tube Stand, Model QS-500 Series Model QS-500 Tubestand...
-
Page 17: Section 2, Specifications
Chapter SPECIFICATIONS... - Page 19 Chapter 2 Specifications PHYSICAL SPECIFICATIONS The following are physical specifications for the Tubestand (see Figure 2): System Specifications Column Height: 85.0 inches (2159.0 mm) • Vertical Travel • (x-ray tube): 60.5 inches (1536.7 mm) Tubestand Longitudinal • Travel: 6’ Track = 48.0 inches (1219.2 mm) 8’...
- Page 20 Chapter 2 Specifications Electrical Specifications Mode of Operation: Continuous • Input Power: +24 VDC @ 1.0 Ampere • Note: The following specifications are for the Tubestand only and do not apply to the x-ray tube or collimator. Refer to x-ray tube and collimator manufacturer’s documentation (supplied with the Tubestand) for related specifications.
- Page 21 • to sea level COMPATIBILITY STATEMENT The Quantum Medical Imaging, LLC Tubestand is compatible with all Quantum Medical Imaging, LLC manufactured tables, wall stands and high-voltage x-ray generators, and with other manufacturer’s equipment having equivalent means for indication of SID and perpendicularity.
- Page 22 Chapter 2 Specifications Figure 2. Model QS-500 Tubestand Dimensions Model QS-500 Tubestand...
-
Page 23: Section 3, Assembly & Installation
Chapter ASSEMBLY & INSTALLATION... - Page 25 Chapter 3 Assembly & Installation OVERVIEW This chapter describes the steps required to assemble and install the Model QS-500 Tubestand, including making all required electrical connections, and performing all required alignments and calibrations. NOTE ROOM CONSTRUCTION Examine all car- tons and crates A conventional radiographic room construction should be used in the area carefully at time where the Tubestand is to be installed.
- Page 26 If any damaged parts are found, notify the shipping or freight company immediately (the manufacturer is relieved of any responsibility for damage during shipment after unit is picked up by the carrier). Should there be a shortage of parts, notify Quantum Medical Imaging’s Service Department. INSTALLATION INSTRUCTIONS...
- Page 27 Chapter 3 Assembly & Installation To assemble and install the Tubestand, refer to Figures 3 through 19 and pro- ceed as follows: Top Track Installation 1. Place the Top Track, with attached mounting brackets, in the proper mounting location on the wall or ceiling and mark the mounting hole loca- tions.
- Page 28 Chapter 3 Assembly & Installation BASE ASSEMBLY (BOTTOM VIEW) SHIPPING BOLT Figure 3. Removing the Shipping Bolt fit the Top Trolley Wheel in the Top Track. BASE ASSEMBLY FLOOR TRACK Figure 4. Tubestand Installed on Floor Track Model QS-500 Tubestand...
- Page 29 Chapter 3 Assembly & Installation TOP TROLLEY WHEEL CUT TOP TROLLEY EXTEN- SION SO HEIGHT FROM BOT- TOM OF WHEEL TO EXTEN- SION BASE EQUALS THE DIS- TANCE MEASURED FROM VERTICAL COLUMN TOP TO TOP TRACK TOP TROLLEY EXTENSION Figure 5. Measuring and Cutting the Top Trolley Extension STOP BUMPERS (TWO PER TRACK) Figure 6.
- Page 30 Chapter 3 Assembly & Installation 10. Check for proper position of Top Trolley Wheel. If necessary, loosen eight (8) set screws and adjust the position of the Top Trolley Wheel up or down as required. Re-tighten all set screws when finished. 11.
- Page 31 Chapter 3 Assembly & Installation Vertical Column Angle Adjustment 1. Place a double-bubble level, two feet in length minimum, on the front of the Vertical Column (see Figure 8). VERTICAL COLUMN Figure 8. Checking the Tubestand Vertical Angle 2. If not level, adjustment can be made by moving the Floor Track in or out from wall.
- Page 32 Chapter 3 Assembly & Installation Installing the X-Ray Tube, Collimator and Handgrips CAUTION! The angulation lock is not a mechanical lock; electr CAUTION! The angulation lock is not a mechanical lock; CAUTION! The angulation lock is not a mechanical lock; electr electri- cal power must be applied to hold angulation.
- Page 33 Chapter 3 Assembly & Installation X-RAY TUBE COLLIMATOR MOUNTING PLATE Figure 10. Tube and Collimator Mounting Plate Installed HANDGRIPS 1/4-20 X 1” HEX HEAD SCREWS AND LOCK- D-CONNECTOR WASHERS (4X) Figure 11. Handgrips Installed Model QS-500 Tubestand...
- Page 34 Chapter 3 Assembly & Installation Leveling Support Arm (Standard Equipment Support Arms) 1. Verify that Support Arm is level as shown in Figure 12. If Support Arm is not level (±1.0°), verify that the Floor Track and Tubestand are level. If Floor Track is level, then level Support Arm/Transverse Arm as follows: LEVEL PLACED ON SUPPORT ARM...
- Page 35 Chapter 3 Assembly & Installation Counterweight Balancing Instructions 1. Verify the counterweight is balanced properly so it provides a smooth up and down motion of the tube head. 2. If additional weights are necessary, add trim weights at the rear side of the Vertical Column (see Figure 14).
- Page 36 Chapter 3 Assembly & Installation Horizontal SID Switch Assembly Installation The Horizontal SID Switch Assembly mounts inside the Base Assembly (on the cathode side) as shown in Figure 15. Proceed as follows: 1. Loosely mount the Horizontal SID Switch Assembly to the Base Assembly using two (2) 10-32 x 1/2"...
- Page 37 Chapter 3 Assembly & Installation Vertical SID Switch Assembly Installation The Vertical SID Switch Assembly mounts to the lower section of the Cable Clamp (on the anode side) as shown in Figure 16. Proceed as follows: 1. Install two (2) Cable Clamp lower sections on each side of Support Arm us- ing two (2) 1/4-20 x 2"...
- Page 38 Chapter 3 Assembly & Installation Tubestand Input Power The Tubestand requires a +24 VDC power input. The +24 VDC power source must be double (or reinforced) insulated and meet construction/performance criteria per UL 2601-1. Connect the +24 VDC input to terminal board TB1-1, and the +24 VDC RTN input to TB1-2 (refer to Tubestand Interconnect Diagram, Figure 17).
- Page 39 Chapter 3 Assembly & Installation Connection of the High-Voltage Cables/Cable Routing 1. Install the Anode and Cathode terminals to the x-ray tube housing. Allow sufficient cable drape (see Figure 18) in order to angulate the x-ray tube 90 degrees in either direction. 2.
- Page 40 Chapter 3 Assembly & Installation Horizontal SID Switch Actuator/Indicator Installation Install the Horizontal SID switches actuators and indicator decals as follows: 1. Position the Tubestand at 40" and 72" SID and mark each position on Floor Track. 2. Clean marked area with alcohol and secure actuator in marked location us- ing double-sided tape.
- Page 41 Chapter 3 Assembly & Installation Vertical Distance Scales Installation The Vertical Distance Scales mount on the front side of Vertical Column (see Figure 19). The Vertical Distance Scales indicate the focal spot-to-film and focal spot-to-table top distance. Bucky SID NOTE 1.
- Page 42 Chapter 3 Assembly & Installation table first, then the vertical wall stand. Alignment instructions are provided in the installation and operation manual provided with each component. Refer to the collimator manual for additional alignments and performance verifi- cations associated with beam limiting devices. Collimator Light Field Versus Actual X-Ray Field 1.
-
Page 43: Section 4, Operation
Chapter OPERATION... - Page 45 Chapter 4 Operation TUBESTAND OPERATION This chapter explains how to operate the Tubestand. Refer to Table 1 for de- scriptions and functions of the Tubestand’s controls and indicators. WARNING! All movable assemblies and parts of this equipmen WARNING! All movable assemblies and parts of this equipment WARNING! All movable assemblies and parts of this equipmen must be operated with reasonable care.
- Page 46 Chapter 4 Operation Figure 21. Model QS-500 Tube Stand Controls and Indicators Table 1. Tubestand Controls and Indicators Item Title Type Description Longitudinal Lock Control Releases magnetic lock to allow Release tubestand longitudinal motion along floor track. Tube Angulation Indicator Indicates angle of tube rotation.
- Page 47 Chapter 4 Operation Table 1. Tubestand Controls and Indicators (Continued) Item Title Type Description Tubestand Handle Control Operator handle to aid in moving Tubestand. Vertical Lock Control Releases magnetic lock to allow Release vertical tube motion. SID at 180 cm or 72 Indicator Indicates SID is at 180 cm or 72 inches (Wall receptor only).
- Page 48 Chapter 4 Operation THIS PAGE INTENTIONALLY LEFT BLANK Model QS-500 Tubestand...
-
Page 49: Section 5, Maintenance
Chapter MAINTENANCE... - Page 51 Chapter 5 Maintenance OVERVIEW The Tubestand will function reliably when maintained according to the instructions provided in this chapter. WARNING! Only properly trained service personnel should se WARNING! Only properly trained service personnel should WARNING! Only properly trained service personnel should se ser- vice or maintain this equipment.
- Page 52 26 show the locations of the replaceable parts in the system. ORDERING INFORMATION To order replacement parts for the Tubestand, contact the Service Department Quantum Medical Imaging, LLC 2905 Veterans Memorial Highway Ronkonkoma, New York 11779 Phone: (631) 587-5800...
- Page 53 Chapter 5 Maintenance Table 2. Replaceable Parts ITEM DESCRIPTION PART NUMBER QTY USED ON SYSTEM SID Indicator, Blue EL31-003 Pushbutton Switch, Longitudinal Lock EL50-002-2 Release Pushbutton Switch, All Locks Re- EL50-002-3 lease Pushbutton Switch, Angulation Lock EL50-002-5 Release Pushbutton Switch, Vertical Lock Re- EL50-002-6 lease SID Switch Actuator...
- Page 54 Chapter 5 Maintenance Figure 22. Model QS-500 Tubestand Parts Location Diagram Figure 23. Model QS-500 Tubestand Parts Location Diagram Note: Vertical SID switch and actuator are shown in Figure 23; Horizontal SID Switch, located in the Base Assembly, and longitudinal actuators have the same part numbers. Model QS-500 Tubestand...
- Page 55 Chapter 5 Maintenance (LONGITUDINAL MAGNET) Figure 24. Model QS-500 Tubestand Parts Location Diagram (ROTATIONAL MAGNET) Figure 25. Model QS-500 Tubestand Parts Location Diagram Model QS-500 Tubestand...
- Page 56 Chapter 5 Maintenance Figure 26. Model QS-500 Tubestand Parts Location Diagram Model QS-500 Tubestand...
Need help?
Do you have a question about the QS-500 Series and is the answer not in the manual?
Questions and answers