Table of Contents
Advertisement
Quick Links
Advertisement
Table of Contents

Subscribe to Our Youtube Channel
Related Manuals for resideo Honeywell Home PROA7 Series


Summary of Contents for resideo Honeywell Home PROA7 Series
- Page 1 PROA7/PROA7PLUS Series User Guide 800-25080A 10/20 Rev A...
- Page 2 Ademco Inc. (“Resideo”), for use with your security system. Your security system is not designed for use with any device that may be attached to your security system's keypad or other communicating bus if Resideo has not approved such device for use with your security system.
-
Page 3: Table Of Contents
Table of Contents GETTING TO KNOW YOUR SYSTEM .......................... 1 Introduction ....................................1 About This Guide ...................................1 General Information ..................................1 Features ......................................1 False Alarm Prevention ..................................2 The Home Screen ..................................3 Status LED Indications ...................................3 Arming Modes and Status Displays ..............................3 Menu ......................................4 Menu Features ....................................4 OPERATING THE SECURITY SYSTEM ........................ -
Page 5: Getting To Know Your System
Getting to Know Your System Introduction Congratulations on your ownership of the Resideo PROA7/PROA7PLUS 7” Touchscreen Partitioned Security & Automation System. You've made a wise decision in choosing it, for it represents the latest in security protection technology today. Millions of premises are protected by Resideo systems. -
Page 6: False Alarm Prevention
Getting to Know Your System (Continued) Features (Continued) Security Codes At the time of installation, the Dealer asks the homeowner to choose a personal 4-digit security code, known as the “Master Code”. Other users can be added, typically with less control over the system than the Master User. -
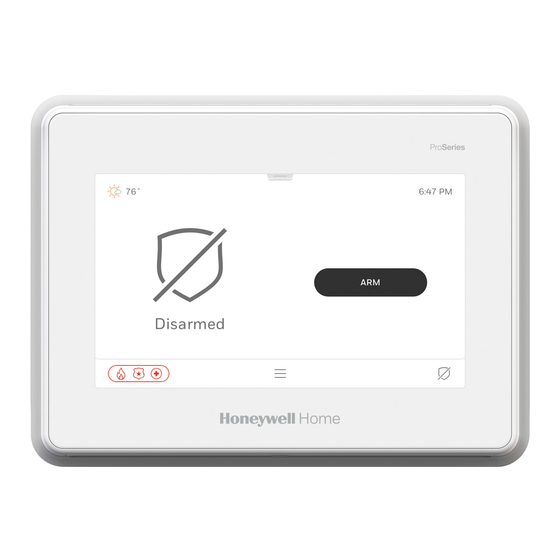
Page 7: The Home Screen
Getting to Know Your System (Continued) The Home Screen • Power and Status LED’s above the screen. • Built-In Camera takes Disarm pictures (PROA7PLUS). • System status at the left and bottom-right. • Arming options at the right of the screen. •... -
Page 8: Menu
Getting to Know Your System (Continued) Menu The Menu gains access to many system features pictured below. Some provide a list of selectable options while others direct you to a different screen. Scroll down in the Menu to see all features. Details on each of the features are explained throughout this manual. -
Page 9: Operating The Security System
Operating the Security System Understanding Your Sensors There are numerous types of sensors that can be part of the Security System: • Doors • Motion • Smoke / Heat • Medical / Panic Pendants • Water • Windows • Glass Break / Shock •... -
Page 10: Adding User Codes
Operating the Security System (Continued) Understanding Your Sensors (Continued) Touchscreen Display Description Review “More Information” for important details about each sensor. Scroll down to see all information. When all sensors are closed and there is no activity, no faults are displayed, and the system reflects a simple “Disarmed”... -
Page 11: Arming Your Single Partition System
Operating the Security System (Continued) Adding User Codes (Continued) Touchscreen Display Description 13. Enter the Master or Partition Master code in the displayed keypad to add the new user in the system. The new user’s information is displayed. NOTE: Limited-access users such as babysitters, guests, and cleaning staff should not be instructed on system functions other than those they are using. - Page 12 Operating the Security System (Continued) Arming Your Single Partition System (Continued) Arming while “Not Ready to Arm”, Manually Bypassing Sensors Touchscreen Display Description 1. Select to display a list of all sensors which indicates faulted sensors that can be bypassed. 3 Windows Open QS-038-V0_not_ready 2.
- Page 13 Operating the Security System (Continued) Arming Your Single Partition System (Continued) Choose Your Arming Mode Touchscreen Display Description 1. Choose your arming mode: – You are leaving and are away from the premises. All doors, windows, and motion detectors are armed. –...
-
Page 14: Disarming Your Single Partition System
Operating the Security System (Continued) Disarming Your Single Partition System Touchscreen Display Description 1. If the system is armed Home, Home INSTANT, Night, o Night INSTANT and you are still in the premise, simply select NOTE: If the “Quick Exit” feature has been enabled by your Dealer, the system displays this option anytime it is armed Home, Home INSTANT, Night, or Night INSTANT. -
Page 15: Arming Your Multi-Partitioned System
Operating the Security System (Continued) Arming Your Multi-Partitioned System Up to 4 partitions can be enabled in the security system by your Dealer. Partitioning allows a system to be divided into separate parts which are controlled independently from each other. Some examples of partitions would be the garage, out building, pool house, storage room, or even the basement, however, it is not necessary. - Page 16 Operating the Security System (Continued) Intrusion – Door, window, shock, glass break, and motion sensors are active only when the system is armed. In the event of an intrusion, the installed sensors activate the security system, triggering a loud, steady tone at the Control Panel, Touchscreens, Keypads, and Sirens. The Control Panel’s and Touchscreen’s sounds alternate with the voice announcement.
- Page 17 Operating the Security System (Continued) In Case of an Alarm (Continued) Touchscreen Display Description 1. Intrusion alarms are accompanied by a solid tone from the Control Panel, Touchscreens, Keypads, and Sirens. It displays the partition name (if partitions are enabled) and the first sensor that activated the alarm along with a Keypad to enter a valid code to disarm and acknowledge the alarm.
-
Page 18: Panic Alarms
Operating the Security System (Continued) Panic Alarms Touchscreen Display Description 1. Select to advance to the Emergency screen. This panic icon is selectable from most screens. 2. Select Fire, Police, Medical, or Silent Alarm for activation. To exit this screen without activating any panics, select “X”. -
Page 19: Alerts
Operating the Security System (Continued) Alerts Alerts are potential system and sensor trouble conditions that are displayed in the lower right corner of the Control Panel and Touchscreens and are accompanied by beeping. They continue to beep until you acknowledge it. Contact your Dealer if the system displays any of the following Alerts: •... -
Page 20: Activity Log
Operating the Security System (Continued) Activity Log Your system logs up to 4,000 events. Once the Activity Log is full, the oldest events are removed as newer events are logged. Each event that is logged has a respective “restore” that is logged as well. There are different types of events that are logged by your system: •... - Page 21 Operating the Security System (Continued) Activity Log Events (Continued) Event Activity Log Display Cellular Communication Transmitter Trouble / Cellular Cellular Comm. Trouble / Cellular Comm. Restore Communication Restore Failure to Communicate Event / Communications Restored Fail to Communicate / Comm. Restore Sensor Faulted / Sensor Restored Sensor Faulted / Sensor Fault Restored Fire Trouble / Fire Trouble Restore...
-
Page 22: System Information
Operating the Security System (Continued) System Information Touchscreen Display Description 1. Select 2. Scroll down then select “Tools” 3. Enter the Master or Partition Master code in the displayed keypad. 4. Select “System Information”. 5. Select the “Down Arrow” to expand each option. “General” displays the current version of the PROA7/PROA7PLUS system. -
Page 23: Cameras
Operating the Security System (Continued) Cameras The PROA7PLUS Control Panel has a built-in camera above its screen which takes a picture of the person who is disarming the system (does not apply to the PROA7). Additionally, if your Installer has installed any Motion Viewers, their pictures and videos can be viewed in “Cameras”... -
Page 24: Wi-Fi Setup
Operating the Security System (Continued) Wi-Fi Setup Your Dealer typically sets this up for you during the initial installation of your system. If you ever change your router or its SSID (network name) and / or the password, you need to reconnect the system to your network using the following steps. There are 3 different methods available to connect to your network. - Page 25 Operating the Security System (Continued) Wi-Fi Setup (Continued) WPS Setup Touchscreen Display Description 1. Select “WPS”. 2. Activate WPS on your router. Refer to your router’s instructions on how to do this. 3. Select 4. The system displays connection status. NOTE: It may take a minute or two for the system to connect.
-
Page 26: Automation
Automation Introduction to Automation Your PROA7/PROA7PLUS is a Primary Z-Wave Controller which controls a mesh network of wireless Z-Wave and Z-Wave Plus ™ devices. This system may be used with all devices certified with the Z-Wave Plus certificate and should be compatible with such devices produced by other manufacturers. -
Page 27: Adding Automation Devices
Automation (Continued) Adding Automation Devices The following procedure explains how to “Include” Z-Wave products along with explaining other Z-Wave features. When accessing this feature, there are options for the following: • Update Network – Use this after adding, removing, or relocating a Z-Wave device. This allows the panel to remap signals to each device in the network. -
Page 28: Removing Automation Devices
Automation (Continued) Removing Automation Devices The following procedure explain how to exclude Z-Wave products from a Z-Wave network, so they can be used in a different network. This can also be used if you are having problems including a device in to a network, which allows a device to be included after being excluded. Touchscreen Display Description 1. - Page 29 Automation (Continued) Operating Your Automation System Some plug-in modules are dimmable while others are not. They are simply on or off. The same applies to in-wall switches and receptacles. There are many different manufacturers of Z-Wave devices available and they all have their own Z-Wave feature sets that look and operate differently from the devices in the following examples.
-
Page 30: Scenes
Automation (Continued) Operating Your Automation System (Continued) Touchscreen Display Description For thermostat control, adjust the desired temperatures by selecting the up and down arrows on the right along with the Mode and Fan controls on the left. When changing the Mode and Fan controls, touch each icon, then, a pop-up window is displayed with selectable options for each. -
Page 31: Alexa
Automation (Continued) Alexa If you want the Alexa feature, it must be enabled in your system by your Dealer (PROA7PLUS control panel only). If you are unable to setup the Alexa feature in the procedure below, contact your Dealer to enable Alexa. Each Touchscreen installed on your system, including the Control Panel, is considered a separate device to Alexa. -
Page 32: Bluetooth Disarm
Automation (Continued) Alexa (Continued) Touchscreen Display Description After the Alexa feature has been enabled on the Control Panel and each Touchscreen, the “Display & Audio Settings ” screen displays a toggle button for Alexa Voice Commands on each enabled device. If Alexa is not enabled on a Touchscreen, Alexa Voice Commands are not displayed here. -
Page 33: Maintenance
Maintenance The system is designed to require little maintenance. However, testing your system is strongly recommended while regular care and cleaning is suggested. Software Updates Software updates for the Control Panel are published periodically. Most updates requests user permission. Select Accept, Yes or OK to install the update. -
Page 34: Testing The Sensors
Maintenance (Continued) Testing the Sensors • Test the system monthly. • Test your system after any alarm occurs. Before testing, the system should be disarmed, and all protected doors and windows closed. The status LED shows green when “Ready to Arm”. This test mode can be entered while sensors are faulted, but you must still close and open these sensors to test them. -
Page 35: Testing The Communicators
Maintenance (Continued) Testing the Communicators Touchscreen Display Description 1. Select 2. Scroll down and select “Tools” 3. Enter the Master or Partition Master code in the displayed keypad. 4. Select “System Test”. 5. Select “Test Communicator”. 6. Select “Test Wi-Fi”, “Test Cellular” or “Test All”. 6A. -
Page 36: Wireless Touchscreens, Keypads, & Key Fobs
Wireless Touchscreens, Keypads, & Key Fobs PROWLTOUCH Wireless Touchscreen Wireless Touchscreens (if installed), are functionally the same as the Control Panel. They duplicate the Control Panel’s displays and functions. Most of what can be done at the Control Panel can also be done at the Touchscreen. The Touchscreens communicate to the Control Panel via Wi-Fi through your router. -
Page 37: Prosixlcdkp Wireless Alpha Keypad
Wireless Touchscreens, Keypads, & Key Fobs (Continued) PROSiXLCDKP Wireless Alpha Keypad The PROSIXLCDKP Wireless Alpha Keypad provides a LCD display with 2 lines of 32 total characters allowing it to display the Keypad’s partition number, system status, sensor status, and various messages. This non-voice Keypad also displays programmed descriptors such as “Front Door”, “Kitchen Window”, etc. - Page 38 Wireless Touchscreens, Keypads, & Key Fobs (Continued) PROSIXLCDKP Alpha Wireless Keypad (Continued) PROSiXLCDKP Alpha Keypad Commands When entering any commands, sequential key depressions must be made within a few seconds of one another. If a few seconds elapse without a key depression, the entry is aborted and must be restarted from its beginning.
-
Page 39: Wireless Key Fobs
Wireless Touchscreens, Keypads, & Key Fobs (Continued) Wireless Key Fobs Your system may also include one or more wireless Key Fobs, which can perform various functions programmed by your Dealer. Key Fobs are typically programmed to Arm Stay, Arm Away, Disarm, and a Panic. Additional buttons can also be used to activate / deactivate Z-Wave Automation devices, such as lights via Scenes. -
Page 40: Nfpa Recommendations
NFPA Recommendations National Fire Protection Association Smoke Detector Recommendations: Regarding the number and placement of smoke and heat detectors, we subscribe to the recommendations contained in the National Fire Protection Association's (NFPA) Standard #72 noted below. Early warning fire detection is best achieved by the installation of fire detection equipment in all rooms and areas of the household. The equipment should be installed as follows: A smoke detector installed outside of each separate sleeping area, in the immediate vicinity of the bedrooms and on each additional story of the family living unit, including basements and excluding crawl spaces and unfinished attics. - Page 41 NFPA Recommendations (Continued) Emergency Evacuation Establish and regularly practice a plan of escape in the event of fire. The following steps are recommended by the National Fire Protection Association: 1. Position your detector or your interior and/or exterior sounders so that they can be heard by all occupants.
-
Page 42: Regulatory Agency Statements
Regulatory Agency Statements FEDERAL COMMUNICATIONS COMMISSION (FCC) & INDUSTRY CANADA (IC) STATEMENTS The user shall not make any changes or modifications to the equipment unless authorized by the Installation Instructions or User's Manual. Unauthorized changes or modifications could void the user's authority to operate the equipment. CLASS B DIGITAL DEVICE STATEMENT This equipment has been tested to FCC requirements and has been found acceptable for use. - Page 43 Regulatory Agency Statements (Continued) OWNER'S INSURANCE PREMIUM CREDIT REQUEST This form should be completed and forwarded to your homeowner's insurance carrier for possible premium credit. A. GENERAL INFORMATION: Insured's Name and Address: Insurance Company: Policy No.: PROA7/PROA7PLUS ___________________________ Other Type of Alarm: Burglary Fire Both...
-
Page 44: Your System Information
Your System Information Your local Resideo dealer is the person best qualified to service your alarm system. Arranging a program of regular service is advisable. Security Company / Dealer: Name: Phone: Address: Audio Alarm Verification enabled (Two-Way Voice) PARTITION 1 DELAY DURATIONS AND ARMING OPTIONS... -
Page 45: System Users
Your System Information (Continued) System Users Keep track of authorized system users in the chart below. This record should be kept secure by the Master User. User Code Authority Partition Comment / Description Master User 1, 2, 3, 4 Can add and modify all Users. - Page 46 Your System Information (Continued) System Users (Continued) User Code Authority Partition Comment / Description...
-
Page 47: Sensor List
Your System Information (Continued) System Users (Continued) User Code Authority Partition Comment / Description Sensor List Zone Location / Description... - Page 48 Your System Information (Continued) Sensor List (Continued) Zone Location / Description...
- Page 49 Your System Information (Continued) Sensor List (Continued) Zone Location / Description...
- Page 50 Your System Information (Continued) Sensor List (Continued) Zone Location / Description...
- Page 51 Your System Information (Continued) Sensor List (Continued) Zone Location / Description...
- Page 52 Your System Information (Continued) Sensor List (Continued) Zone Location / Description...
-
Page 53: Z-Wave Automation Devices
Your System Information (Continued) Z-Wave Automation Devices Type Name Location... - Page 54 Your System Information (Continued) Z-Wave Automation Devices (Continued) Type Name Location...
-
Page 55: Limitations Of This Alarm System
Limitations of This Alarm System WARNING! While this system is an advanced design security system, it does not offer guaranteed protection against burglary or fire or other emergency. Any alarm system, whether commercial or residential, is subject to compromise or failure to warn for a variety of reasons. - Page 56 P.O. Box 9040, Melville, NY 11747 © 2020 Resideo Technologies, Inc. All rights reserved. Ê800-25080A2Š The Honeywell Home trademark is used under license from Honeywell International, Inc. 800-25080A 10/20 Rev A This product is manufactured by Resideo Technologies, Inc. and its affiliates.
Need help?
Do you have a question about the Honeywell Home PROA7 Series and is the answer not in the manual?
Questions and answers