Table of Contents
Advertisement
Advertisement
Table of Contents

Related Manuals for LONGER RAY5


Summary of Contents for LONGER RAY5
- Page 2 More information please refer to: 1. Please contact us via email (support@longer3d.com). 2. Facebook page and Youtube channel as shown below. Facebook : Longer Laser Engraver Official Group Youtube: https://www.youtube.com/c/Longer3D/featured...
-
Page 3: Table Of Contents
Contents Safety Precautions ......................2 A. Product information ....................9 (1) Model parameter ......................9 (2) Packing List ......................... 11 (3) Machine assembly ..................... 12 (4) Leveling ........................13 (5) Installation of the filament ..................14 B. Machine operation ....................15 (1)Machine control interface description ............... -
Page 4: Safety Precautions
Safety Precautions 1)The RAY5 engraves and cuts materials by the means of a high- energy diode laser beam. The hazards associated with a high-energy diode laser beam include the possibility of fires, generation of hazardous and/or irritating toxic fumes, but more importantly damage to eyes and skin. - Page 5 RAY5 • DO NOT allow unsupervised access to the RAY5 to children; • DO NOT allow access near the RAY5 to pets; • DO NOT modify or disable any safety features of the laser system;...
- Page 6 Some materials are prone to catch fire during cutting operations creating flame, fumes and smoke. Although the RAY5 has a built in flame sensor, this technology should NOT be considered 100% accurate and should be seen only as a warning system.
- Page 7 It is strongly recommended that a Fire Extinguisher should be located within close proximity to the RAY5. Extinguishers should be halogen or multi-purpose dry chemical. Alternatively or in conjunction with the Fire Extinguisher it is recommended a “Fire Extinguisher Ball” is positioned beside the RAY5.
- Page 8 8) Environmental requirements Temperature requirement: 10°C~30°C, humidity requirement: 20%~50%, this RAY5 laser engravers can work normally within this range; beyond this range, this laser engravers will unable to achieve the best engraving results. 9) Below a list of some of the most known hazardous materials that the user SHOULD NOT attempt to engrave or cut on.
- Page 9 10) The RAY5 has built in technology and algorithms to keep its users and the surrounding environment safe. This said its important to understand the RAY5 is not a toy and should be operated with care and respect. Important information regarding your RAY5 12v power system: Never Use a different voltage Power Adapter.
- Page 10 • Once the RAY5 detects 12v present you will see the motherboard emit a light red glow on the LED of the Motherboard. This mean the your motherboard is powered.
-
Page 11: Product Information
Laser Parameter Laser Technology Diode Laser Wavelength 455nm Power Input 12V 3A 5W - Item Number is: RAY5 Optical Output (W) 10W - Item Number is: RAY10 Focus Type Fixed Focus - 30mm Focal Range Dot Size at optimal Focus 0.08x0.15mm Laser Class FDA Class IV;... - Page 12 www.longer3d.com info@longer3d.com...
-
Page 13: Packing List
Packing List www.longer3d.com info@longer3d.com... -
Page 14: Machine Assembly
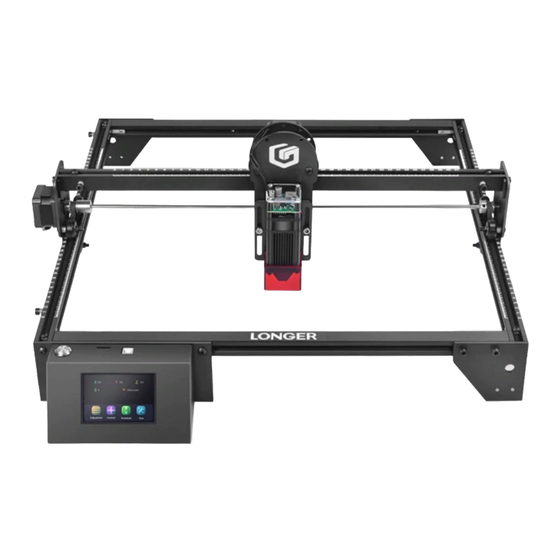
Machine assembly LASER MACHINE INTRODUCTION 1. Y-axis motor 2.X-axis beam 3.Laser transmitter 4.Leg sheet metal 5. Synchronized optical axis 6.touch screen 7.Left frame profile 8.Rear frame profile 9. X-axis motor 10.Right frame profile 11..X-axis right sheet metal 10.Front frame profile 13.Motherboard 14.X-axis l www.longer3d.com... - Page 15 1. Preparation: X-axis beam, synchronous shaft, 42 stepper motor\, M3 spring washer, M3x8 screw x4. 1.1Install the motor on the sheet metal on the right side of the beam as shown in the figure, connect the motor shaft with the synchronous shaft, and tighten the coupling screws.
- Page 16 3. Preparation: X-axis beam, and the frame to complete the assembly. 3.1Install the X-axis beam in the V-groove of the left and right profiles along the direction of the arrow. 3.2Pay attention to adjusting the eccentric nut to prevent the roller from www.longer3d.com info@longer3d.com...
- Page 17 being damaged by the groove. 4. Preparation: Support feet x3, engraving machine control box, M5x20 hexagon socket cup head screw x1, M5x16 hexagon socket cup head screw x7, M5x8 hexagon socket round head screw x1, M5 spring washer x8, nylon isolation column (7*5* 6) x1.
- Page 18 Note: Do not obstruct the movement stroke of the engraving machine with the round head screws 6. Preparation: laser head, M5x8 hexagon socket round head screw x2, M3x6 www.longer3d.com info@longer3d.com...
- Page 19 hexagon socket round head screw x2, nylon isolation column (5x3x3) x2; 6.1Use M5x8 round head screws to fix the laser head to the X-axis beam laser head sheet metal, and the height of the laser head should not be too high; 7.
- Page 20 Lightburn Step1. Software installation steps 1. Please download the trial version of Lightburn from the following website: https://lightburnsoftware.com/pages/trial-version-try-before-you-buy 2. Install the software on your computer and run it. 3. Start the application from your computer (Windows, MAC, Linux). 4. If this is the first time you have started LightBurn, you will be prompted to enter the new device wizard.
- Page 21 8. Select Front Left as your origin X, Y and activate Auto “Home”, then press Next. 9. Select RAY5, and then press Set as default. 10. Your RAY5 is ready to be used in LightBurn software. PS. If you think the trial version is good, you can buy it for a fee.
- Page 22 You can complete the selection of engraving/cutting graphics by ①importing computer pictures or files/②making graphics on the drawings. ①When importing computer pictures or files, affected by the file format, change the supported format to "all supported items" to find the imported content. ②Make graphics on the drawing, you can use the graphics editing function on the left to make any pattern on the drawing Step3.
- Page 23 Take the current graph as an example. The green point in the lower left corner of the graph is the origin of the laser (the current position is the original position where the laser starts to work). After placing the sheet under the laser, click "Border" to make the laser go through the outline of the picture to ensure the picture It can completely cover the inside of the board.
- Page 24 cable. 3. Advanced Settings Introduction 4. Setting Procedure www.longer3d.com info@longer3d.com...
- Page 25 5. Please start the engraving. For your information: Please click this icon, to home X、Y axis. www.longer3d.com info@longer3d.com...
- Page 26 Please click these icons, to move the laser unit to be the correct position you want. Please click this icon, to set up the current position as the starting point of the engraving. Please click this icon to start engraving. www.longer3d.com info@longer3d.com...
- Page 27 Touch screen 1. Start interface after power-on 2. Test to light up the laser www.longer3d.com info@longer3d.com...
- Page 28 3. Control interface 4. Read SD card file interface www.longer3d.com info@longer3d.com...
- Page 29 5. Go to the border and start carving the interface 6. Start carving interface www.longer3d.com info@longer3d.com...
- Page 30 7. Set speed interface 8.Terminate the engraving interface www.longer3d.com info@longer3d.com...
- Page 31 9. Engraving complete interface 10. WIFI selection interface www.longer3d.com info@longer3d.com...
- Page 32 11. Find WIFI interface 12. Enter WIFI password www.longer3d.com info@longer3d.com...
- Page 33 13. Connect to WIFI interface www.longer3d.com info@longer3d.com...
- Page 34 14. After connecting to the WIFI, read the IP address, enter the same IP address in the mobile phone or computer, and the offline control interface will pop up. Select the corresponding file on the SD card to engrave, the method is the same as the above two software.
-
Page 35: Installation And Use Of Cura 4.8 Slicing Software
C. Installation and use of Cura 4.8 slicing software (1) Software installation The 3D printer reads Gcode files and prints. It is necessary to convert 3D files (such as STL files) into Gcode files for the machine to recognize. Software that converts the 3D file into Gcode files is called slicing software. -
Page 36: D. Faq Manual
D. FAQ manual Question1: How to update the firmware? 1. Connect the data cable to your computer and printer and open the cura4.8. www.longer3d.com info@longer3d.com... -
Page 37: Question 2:What If The Filament Does Not Discharge From The Machine
Question 2:What if the filament does not discharge from the machine? 1. After the machine nozzle is heated, the consumables are normally fed into the feeding mechanism by hand, and then passed through the Teflon tube to enter the nozzle. 2. -
Page 38: Question 3
Question 3: When the machine returns the filament, it can't be returned. What should I do when stuck in the pneumatic joint? 1. Before returning the material, please heat the nozzle first, and then withdraw the consumables as soon as possible. If you can't pump it, you can re-feed the material with the advanced material, and melt the extruded block formed at the end of the consumable in... -
Page 39: Stuck In The Pneumatic Joint
3. Because the end of the consumables in the nozzle will be deformed by heat, if the end deformed consumables directly pulled out, it may be stuck to the pneumatic joint or the limit switch for damage detection. (The limit switch for the broken material detection is single. -
Page 40: Question 5
Question 5: The left side of the platform can be leveled, but the right side cannot be leveled. If this happens, the X-axis beam is generally loose. At this time, the hex socket on the right side of the machine can be adjusted with a wrench to adjust the tightness. -
Page 41: Question6
Question6: Filament does not stick to the platform 1. After the user gets the 3D printer, if the leveling is found to be curled on the first layer of silk, it feels like it is gently falling on the platform. It can be judged that the leveling is not adjusted, and the nozzle is too high from the hot bed. -
Page 42: Question7
Question7: Print online encounters no content on the right side. First, install the driver files. https://drive.google.com/file/d/1VeoTU4RIrx- EUwmA7G5sweaPux4-1Xl_/view?usp=sharing Please refer to the video operation in the link below. https://www.youtube.com/watch?v=KwmKZmtTOPw&t=6s NOTE: After completing the operation, restart the software to start Print online。 www.longer3d.com info@longer3d.com... -
Page 43: Question8
Question9: Warranty Periods For LONGER official stores and LONGER designated distributors, RAY5 has an One-year International Limited Manufacturer warranty from the date of purchase of RAY5. Please note the following warranty terms. One-year International Limited Manufacturer Warranty means that LONGER will provide the following free warranty services: •... - Page 44 (e.g., photos or videos) 3. On the initial contact for Customer Support further tests and diagnostic steps might be required to identify the root cause of the problem. Some parts of the RAY5 inevitably “get used up” over time. For these www.longer3d.com info@longer3d.com...
- Page 45 Warranty does not apply on normal wear and tear P.S. 1. The warranty does not cover normal, expected wear and tear caused by using the RAY5 for its intended purpose. 2. In case we have provided a free replacement part, the warranty does not reset.
- Page 46 Any damage caused by improper use, maintenance or operation of the printer. • Any damage caused by long-term lack of maintenance. • Using the RAY5 in improper conditions (temperature, dustiness...). • Upgrades, modifications or add-ons that are not officially supported.
- Page 47 If you encounter any problems, please send an email to "support@ longer3d.com" to report any issue with Longer products. Our professional after-sale service would respond within 24 hours and help you to solve the issues.
Need help?
Do you have a question about the RAY5 and is the answer not in the manual?
Questions and answers
Can't get my longer5ray 20 watt laser to connect to my wifi. When I enter enter my password, and press connect it reads Can't connect
To fix the WiFi connection issue on your LONGER RAY5 20W laser:
1. Confirm WiFi Compatibility: Ensure the laser supports WiFi connection with LightBurn. Not all models support wireless connection.
2. Use 2.4GHz Network: The laser must connect to a 2.4GHz WiFi network. Make sure both the laser and your computer are on the same 2.4GHz network.
3. Check Firmware: Verify that your laser has the correct firmware (e.g., DLC32 version 2.1, firmware 2.2) as shown on the device touchscreen.
4. Try USB Connection: If WiFi fails, connect your computer to the laser using a USB cable to confirm the laser works and is recognized.
5. Use Touchscreen Settings: Use the laser's touchscreen to access network settings and confirm it is connected to the WiFi.
6. Check LightBurn Console: If the console says “Waiting for connection,” the software may not be communicating with the laser. Double-check the device settings in LightBurn.
If the issue persists, WiFi support may not be available or reliable for your specific model. Use USB for stable operation.
This answer is automatically generated
why is the screen on but blank?
The screen on the LONGER RAY5 goes blank because it is not fully connecting to the LightBurn software. When LightBurn attempts to connect, the machine displays an endless stream of “G0” commands and the LCD screen remains blank until LightBurn is disconnected. After disconnection, the machine reboots and the screen returns to normal. This indicates a communication issue between the software and the machine.
This answer is automatically generated
How do I get a new cable for my 10 watt Longer Ray 5 Laser
Contact Longer3D customer support at support@LONGER3d.com. If the product was bought from a reseller, contact Longer3D first for diagnostics, then turn to the reseller for spare parts if needed. Provide the machine purchase order number, nameplate number, a brief problem description, and clear evidence such as photos or videos.
This answer is automatically generated
How do I know where want my home to be set on the graver itself? Does it start from home? Center if cut line? Directly over beam?
To set the home position on the LONGER RAY5 engraver, go to the Control page on the touch screen and select "Set zero position." You can also use the "Home to zero" option to move the machine to its default home position.
This answer is automatically generated
the flame sensor keeps going on and I cant engrave
The flame sensor on the LONGER RAY5 keeps activating and preventing engraving because it can be triggered by external factors such as sunlight. If direct sunlight hits the sensor, it may falsely detect a flame and shut down the laser. Additionally, the sensor is not 100% accurate and should only be considered a warning system, meaning it may sometimes activate even when no actual flame is present.
This answer is automatically generated