Table of Contents
Advertisement
Quick Links
Advertisement
Table of Contents

Related Manuals for Barco ClickShare CSE-200+


Summary of Contents for Barco ClickShare CSE-200+
- Page 1 ClickShare CSE-200+ User guide ENABLING BRIGHT OUTCOMES...
- Page 2 Barco NV Beneluxpark 21, 8500 Kortrijk, Belgium www.barco.com/en/support www.barco.com Registered office: Barco NV President Kennedypark 35, 8500 Kortrijk, Belgium www.barco.com/en/support www.barco.com...
- Page 3 Barco. If the purchaser or a third party carries out modifications or repairs on goods delivered by Barco, or if the goods are handled incorrectly, in particular if the systems are operated incorrectly or if, after the transfer of risks, the goods are subject to influences not agreed upon in the contract, all guarantee claims of the purchaser will be rendered invalid.
- Page 4 ClickShare applications (each a “Barco ClickShare Product”). • Term The Software can be used under the terms of this EULA from the date of first use of the Barco ClickShare Product, for as long as you operate such Barco ClickShare Product. •...
- Page 5 Agreement. “Documentation” means all technical, reference and installation manuals, user guides, published performance specifications and other written documentation provided by Barco generally to its licensees with respect to the Software, along with any modifications and updates thereto; “DRM” means Barco’s digital rights management platform used to provide access to and access conditions of the Software.
- Page 6 You may own the carrier on which the Software is provided, but the Software is owned and copyrighted by Barco or by third party suppliers. Your license confers no title or ownership and is not a sale of any rights in the Software or its Documentation.
- Page 7 6.1 ‘Reporting and Audit’. In addition to good practice record-keeping obligations, you agree to report the use of the Software and relating billing metrics in the DRM or otherwise as agreed. You grant to Barco and its designated auditors, at Barco’s expenses, the right to verify your Software deployments and to examine your books, records and accounts during your normal business hours so as to verify your compliance with the License Agreement.
- Page 8 (ii) any information designated as confidential by Barco or which has the necessary quality of confidence about it and (iii) any license key provided by Barco to you hereunder. 8.2 ‘Non-Disclosure’. You agree not to divulge any Confidential Information to any persons without Barco's...
- Page 9 Documentation. After such 60-day period, Barco shall have no obligation to maintain or provide any User Data, and as provided in the Documentation will thereafter delete or destroy all copies of User Data in Barco’s systems or otherwise in Barco’s possession or control, unless legally prohibited.
- Page 10 TO, THE IMPLIED WARRANTIES OF MERCHANTABILITY AND FITNESS FOR A PARTICULAR PURPOSE. IN NO EVENT SHALL THE COPYRIGHTHOLDER OR ANY OTHER CONTRIBUTOR BE LIABLE FOR DIRECT, INCIDENTAL, SPECIAL, EXEMPLARY OR CONSEQUENTIAL DAMAGES, EVEN IF ADVISED OF THE POSSIBILITY OF SUCH DAMAGES, HOWEVER CAUSED AND ON ANY THEORY OF LIABILITY, WHETHER IN CONTRACT, STRICT LIABILITY, OR TORT (INCLUDING NEGLIGENCE OR OTHERWISE) ARISING IN ANY WAY OUT OF THE USE OF THIS OPEN SOURCE SOFTWARE.
- Page 11 PACKAGE VERSION SOURCE SITE xlib_libXau 1.0.8 http://xorg.freedesktop.org/releases/individual/lib xutil_util- 1.19.2 http://xorg.freedesktop.org/releases/individual/util macros xlib_ 1.1.3 http://xorg.freedesktop.org/releases/individual/lib libXdmcp libdaemon 0.14 http://0pointer.de/lennart/projects/libdaemon libglib2 2.56.4 http://ftp.gnome.org/pub/gnome/sources/glib/2.56 elfutils 0.176 https://sourceware.org/elfutils/ftp/0.176 bzip2 1.0.8 https://sourceware.org/pub/bzip2 util-linux 2.33 https://cdn.kernel.org/pub/linux/utils/util-linux/v2.33 linux-pam 1.3.1 https://github.com/linux-pam/linux-pam/releases/download/v1.3.1 flex 2.6.4 https://github.com/westes/flex/files/981163 readline http://ftpmirror.gnu.org/readline bellagio 0.9.3 http://downloads.sourceforge.net/project/omxil/omxil/Bellagio% 200.9.3 bitstream...
- Page 12 PACKAGE VERSION SOURCE SITE c-ares 1.15.0 http://c-ares.haxx.se/download ca-certificates 20190110 http://snapshot.debian.org/archive/debian/20190513T145054Z/pool/ main/c/ca-certificates collectd 5.7.2 http://collectd.org/files libgcrypt 1.8.4 https://gnupg.org/ftp/gcrypt/libgcrypt libgpg-error 1.33 https://www.gnupg.org/ftp/gcrypt/libgpg-error lm-sensors V3-5- https://github.com/lm-sensors/lm-sensors/archive/V3-5-0 crda 4.14 https://git.kernel.org/pub/scm/linux/kernel/git/mcgrof/crda.git/ snapshot libnl 3.4.0 https://github.com/thom311/libnl/releases/download/libnl3_4_0 cryptsetup 2.0.6 https://cdn.kernel.org/pub/linux/utils/cryptsetup/v2.0 json-c 0.13.1 https://s3.amazonaws.com/json-c_releases/releases lvm2 2.02.183 ftp://sources.redhat.com/pub/lvm2 libaio 0.3.111 https://releases.pagure.org/libaio popt...
- Page 13 PACKAGE VERSION SOURCE SITE libvdpau 1.1.1 http://people.freedesktop.org/~aplattner/vdpau llvm 7.0.1 http://llvm.org/releases/7.0.1 xlib_ 1.1.4 http://xorg.freedesktop.org/releases/individual/lib libXdamage xlib_libXrandr 1.5.1 http://xorg.freedesktop.org/releases/individual/lib xlib_ 0.9.10 http://xorg.freedesktop.org/releases/individual/lib libXrender xlib_ 1.1.4 http://xorg.freedesktop.org/releases/individual/lib libXxf86vm xlib_ http://xorg.freedesktop.org/releases/individual/lib libxshmfence libvorbis 1.3.6 http://downloads.xiph.org/releases/vorbis libogg 1.3.3 http://downloads.xiph.org/releases/ogg libvpx v1.7.0 https://github.com/webmproject/libvpx/archive/v1.7.0 opus 1.3.1 https://downloads.xiph.org/releases/opus speex 1.2.0 https://downloads.xiph.org/releases/speex...
- Page 14 PACKAGE VERSION SOURCE SITE 60.2 http://download.icu-project.org/files/icu4c/60.2 libxkbcommon 0.8.2 http://xkbcommon.org/download pcre2 10.32 https://ftp.pcre.org/pub/pcre xcb-util- 0.4.0 http://xcb.freedesktop.org/dist image xcb-util 0.4.0 http://xcb.freedesktop.org/dist xcb-util- 0.4.0 http://xcb.freedesktop.org/dist keysyms xcb-util-wm 0.4.1 http://xcb.freedesktop.org/dist pulseaudio 12.2 http://freedesktop.org/software/pulseaudio/releases libtool 2.4.6 http://ftpmirror.gnu.org/libtool xlib_libXtst 1.2.3 http://xorg.freedesktop.org/releases/individual/lib xlib_libXi 1.7.9 http://xorg.freedesktop.org/releases/individual/lib gst1-vaapi 1.14.4 https://gstreamer.freedesktop.org/src/gstreamer-vaapi htop 2.2.0...
- Page 15 PACKAGE VERSION SOURCE SITE libpciaccess 0.14 http://xorg.freedesktop.org/releases/individual/lib libqrencode 4.0.0 http://fukuchi.org/works/qrencode libsha1 https://github.com/dottedmag/libsha1/archive/0.3 libuv v1.25.0 https://github.com/libuv/libuv/archive/v1.25.0 libyaml 0.2.1 http://pyyaml.org/download/libyaml libzip 1.5.1 http://www.nih.at/libzip lighttpd 1.4.53 http://download.lighttpd.net/lighttpd/releases-1.4.x linux- 1baa34868- http://git.kernel.org/pub/scm/linux/kernel/git/firmware/linux-firmware. firmware b2c0a004d- c595- b20678145- e3fff83e7 logrotate 3.13.0 https://github.com/logrotate/logrotate/archive/3.13.0 memtester 4.3.0 http://pyropus.ca/software/memtester/old-versions monit 5.25.3 http://mmonit.com/monit/dist mtdev 1.1.4...
- Page 16 PACKAGE VERSION SOURCE SITE qt5quickcontrols2 5.12.4 https://download.qt.io/archive/qt/5.12/5.12.4/submodules qt5serialport 5.12.4 https://download.qt.io/archive/qt/5.12/5.12.4/submodules qt5svg 5.12.4 https://download.qt.io/archive/qt/5.12/5.12.4/submodules qt5websockets 5.12.4 https://download.qt.io/archive/qt/5.12/5.12.4/submodules qt5x11extras 5.12.4 https://download.qt.io/archive/qt/5.12/5.12.4/submodules ramspeed 2.6.0 http://www.alasir.com/software/ramspeed rsync 3.1.3 http://rsync.samba.org/ftp/rsync/src rsyslog 8.22.0 http://rsyslog.com/files/download/rsyslog strace 4.26 https://strace.io/files/4.26 tcpdump 4.9.2 http://www.tcpdump.org/release tpm-tools 1.3.9.1 http://downloads.sourceforge.net/project/trousers/tpm-tools/1.3.9.1 trousers 0.3.14 http://downloads.sourceforge.net/project/trousers/trousers/0.3.14 tzdata 2018e http://www.iana.org/time-zones/repository/releases...
- Page 17 PACKAGE VERSION SOURCE SITE xapp_ 1.4.2 http://xorg.freedesktop.org/releases/individual/app xkbcomp xapp_ 1.5.0 http://xorg.freedesktop.org/releases/individual/app xrandr xdata_ 1.1.2 http://xorg.freedesktop.org/releases/individual/data xbitmaps xdriver_xf86-input- 2.10.5 http://xorg.freedesktop.org/releases/individual/driver evdev xserver_xorg- 1.20.5 https://xorg.freedesktop.org/archive/individual/xserver server xfont_font-util 1.3.2 http://xorg.freedesktop.org/releases/individual/font xkeyboard- 2.23.1 http://www.x.org/releases/individual/data/xkeyboard-config config xlib_ 0.4.4 http://xorg.freedesktop.org/releases/individual/lib libXcomposite xlib_ 1.1.15 http://xorg.freedesktop.org/releases/individual/lib libXcursor xlib_libXfont2 2.0.3 http://xorg.freedesktop.org/releases/individual/lib xfont_...
- Page 18 PACKAGE VERSION SOURCE SITE fbset http://users.telenet.be/geertu/Linux/fbdev gzip http://ftpmirror.gnu.org/gzip i2c-tools https://www.kernel.org/pub/software/utils/i2c-tools 1.29 http://ftpmirror.gnu.org/tar devmem2 http://bootlin.com/pub/mirror efibootmgr https://github.com/rhboot/efibootmgr/archive/15 efivar https://github.com/rhboot/efivar/archive/35 parted http://ftpmirror.gnu.org/parted linux v4.9.90 https://mirrors.edge.kernel.org/pub/linux/kernel/v4.x/ ibmswtpm 4720 https://sourceforge.net/projects/ibmswtpm/files/ grub 2.02- https://github.com/coreos/grub/releases beta2 rockbox v3.10 https://github.com/Rockbox/rockbox/tree/v3.10 libcap 2.25 https://www.kernel.org/pub/linux/libs/security/linux-privs/libcap2 1.5.2 ftp://ftp.infradead.org/pub/mtd-utils procps-ng 3.3.12 http://downloads.sourceforge.net/project/procps-ng/Production hidapi 0.5.2...
- Page 19 EN55032-CISPR32 Class B ITE (Information Technology Equipment) This is a class B product. In a domestic environment this product may cause radio interference in which case the user may be required to take adequate measures. If this equipment does cause interference to radio or television reception, the user may try to correct the interference by one or more of the following measures : •...
- Page 20 The radiated output power of the Barco Wireless Device is below the Industry Canada (IC) radio frequency exposure limits. The Barco Wireless Device should be used in such a manner such that the potential for human contact during normal operation is minimized.
- Page 21 Déclaration d'antenne d'Industrie Canada (IC) Conformément à la réglementation d'Industrie Canada, le présent émetteur radio peut fonctionner avec une antenne d'un type et d'un gain maximal (ou inférieur) approuvé pour l'émetteur par Industrie Canada. Dans le but de réduire les risques de brouillage radioélectrique à l'intention des autres utilisateurs, il faut choisir le type d'antenne et son gain de sorte que la puissance isotrope rayonnée équivalente (p.
-
Page 23: Table Of Contents
Table of contents 1 Introduction........................................25 Versions of the product ................................26 About this guide ....................................26 Symbols and fonts..................................26 2 Introduction to CSE-200+................................29 About the CSE-200+ ..................................30 About the Base Unit..................................31 About the Button....................................32 Mobile Device Support.................................33 3 Getting started......................................35 Activating the Base Unit ................................36 Basic Use, with Button .................................36 Basic Use, with ClickShare desktop app ...........................38 User Interface....................................41... - Page 24 R5900086 /07 ClickShare CSE-200+...
-
Page 25: Introduction
Introduction Versions of the product .........................26 About this guide..........................26 Symbols and fonts ........................26 R5900086 /07 ClickShare CSE-200+... -
Page 26: Versions Of The Product
Introduction 1.1 Versions of the product Regional versions Depending on the location where you buy the CSE-200 + product, the Base Unit and accessories are regionalized. By the time of release of this manual, 4 regional versions of CSE-200+ are available: •... - Page 27 Introduction Info, term definition. General info about the term Note: gives extra information about the described subject Tip: gives extra advice about the described subject Font overview • Buttons are indicated in bold, e.g. OK. • Menu items are indicated in italic. •...
- Page 28 Introduction R5900086 /07 ClickShare CSE-200+...
-
Page 29: Introduction To Cse-200
Introduction to CSE- 200+ About the CSE-200+ ........................30 About the Base Unit ........................31 About the Button...........................32 Mobile Device Support ........................33 R5900086 /07 ClickShare CSE-200+... -
Page 30: About The Cse-200
Introduction to CSE-200+ 2.1 About the CSE-200+ CSE-200+ sets CSE-200+ makes connecting to the meeting room’s video system a matter of clicking a Button. This CSE-200+ not only helps the presenter get the presentation on-screen in a second, but it also allows the other people in the meeting to participate more actively. -
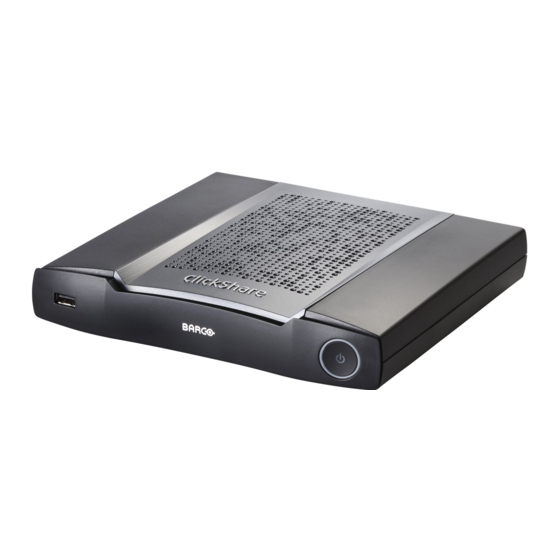
Page 31: About The Base Unit
Introduction to CSE-200+ 2.2 About the Base Unit Base Unit functionality The Base Unit receives the wireless input from the Buttons and controls the content of the meeting room display and the sound of the meeting room's audio system. The Base Unit can be inside a cabinet in the meeting room, or put on the meeting room table or mounted on a wall. -
Page 32: About The Button
Introduction to CSE-200+ LEDs behavior Explanation red blinking • an error occurred dark • deep standby/off Power button The button at the front of the Base Unit has a standby function once the Base Unit is powered. • When the system is in normal operational mode, a push makes the system goes into a pre-defined standby mode. -
Page 33: Mobile Device Support
Introduction to CSE-200+ Explanation LEDs behavior white blinking • the Button is plugged in the laptop and initializing or waiting for the user to start the ClickShare application. • pairing/software update of the Button in the Base Unit is in progress. - Page 34 Introduction to CSE-200+ R5900086 /07 ClickShare CSE-200+...
-
Page 35: Getting Started
Getting started Activating the Base Unit ........................36 Basic Use, with Button ........................36 Basic Use, with ClickShare desktop app ..................38 User Interface ..........................41 Shared desktop: primary - extended....................41 Audio configuration ........................43 Pairing ............................45 Blackboarding & Annotation ......................46 Touch Back ..........................50 R5900086 /07 ClickShare CSE-200+... -
Page 36: Activating The Base Unit
Take a Button and Insert the Button into a USB port of your laptop. Depending on the USB port on your laptop and/or on the USB connector of the Button, a convertor must be used. This convertor is not delivered by Barco. R5900086 /07... - Page 37 Two situations are possible now: • A launcher is preinstalled on your laptop (downloaded from the Base Unit or Barco website, or deployed company-wide by your IT department). ClickShare is immediately available. You can continue with go to step 4.
-
Page 38: Basic Use, With Clickshare Desktop App
Getting started On a Windows computer: On a Macintosh: When the system is ready for use, the icon appears in the systray icon. Image 3–5 The LEDs of the Button are static white. To share your screen on the display, click the Button. The LEDs of the Button become static red and your screen appears on the display. - Page 39 Getting started you will never have to enter IP addresses or scroll long lists of meeting rooms before being connected to your meeting room. The ClickShare desktop app can be used with or without a Button. ClickShare desktop app installation When the ClickShare desktop app is not pre-deployed in your IT environment, you can download and install the software without administrator rights from www.clickshare.app...
- Page 40 Getting started Image 3–10 Ready to share Click the white circle to start sharing your content. When the sharing is started, the ClickShare desktop app will minimize to the side through an animation. A subtle red bar remains visible on your screen. Hover over the red bar on the side to open the full interface of the ClickShare app.to either pause your sharing session and freeze the content on the screen while you work on your laptop (invisible for people in the meeting room), to change what you are sharing (a single application or your full screen) or to stop...
-
Page 41: User Interface
Getting started 3.4 User Interface User Interface functionality After launching the client, the ClickShare icon appears in the system tray. ClickShare context menu The content of the context menu is related to the operating system. Click the hamburgen menu icon in the ready message. The context menu appears. - Page 42 Getting started Image 3–17 PC with two extended screens connected. The first extended screen, screen 2 will always be captured and displayed on the meeting room display. To know if your system supports the extended desk top feature, press Window key + P. It should bring up the following pop-up on screen: Image 3–18 How to select...
-
Page 43: Audio Configuration
Getting started Image 3–19 Known issue • Virtual Extended Desktop requires the ClickShare Extension Pack to be installed on Windows 8 and Windows 10 systems. 3.6 Audio configuration Audio configuration The connected user must control his own audio signal using the audio configuration of his computer. If he does not want to broadcast his audio signal, he has to mute audio on his computer. - Page 44 Getting started Image 3–20 Speakers ClickShare, default (example Windows 7) Click Playback devices (2). The Sound window opens on the Playback tab. Select Speakers ClickShare (3) and click Set default (4). Click Apply or OK to activate the new setting. Set ClickShare as default on MAC Click on the Apple logo on the menu bar (1) and select System Preferences..
-
Page 45: Pairing
Getting started Image 3–21 Speakers ClickShare, default Click on the Speaker icon (3). The Sound window opens. Select the Output tab (4) and activate ClickShare (5). Short way to select ClickShare as audio device: Click with the mouse on the Speaker symbol in the menu bar while holding ALT. -
Page 46: Blackboarding & Annotation
Base Unit without plugging the Buttons to the Base Unit. The Buttons are plugged in to your laptop. For more information about the Button Manager, consult the Button Manager’s user guide which can be downloaded from Barco’s website. 3.8 Blackboarding & Annotation About blackboarding Blackboarding allows you to use the meeting room’s touchscreen as a writing board to write or sketch ideas... -
Page 47: Start The Blackboarding Mode
Getting started With only one tap on the touch screen, you can select the blackboarding functionality. Combining a touch display and a wireless collaboration tool drives the productivity and engagement in your meeting room. With an additional tap on the screen, you can select the 'save' option. Saved sessions can be found on your laptop under c: \Users \username \Documents \clickshare-downloads. -
Page 48: Drawing Tools
Getting started To start the annotation functionality, tap on Annotation. Image 3–25 Start annotation Note: When tapping next to menu, the Base Unit will return to the presenter mode. No clients should be disconnected. The current shared screen(s) will be captured and used as background. -
Page 49: Saving A Drawing On A Usb Stick
Getting started Clear Click on the Clear icon to clear the current drawing. A warning message “Are you sure you want to clear the page?” will be displayed. Click on OK to clear the content. Click on Cancel to keep the content. 3.8.3 Saving a drawing on a USB stick How to save Insert a USB stick in one of the USB inputs of the Base Unit. -
Page 50: Touch Back
You need a Button successfully paired and updated with the corresponding Base Unit. • A supported touch panel display. A list of supported displays is listed on Barco’s website in “The ClickShare Supported Touch Panels Whitepaper”. How to use Touch Back •... -
Page 51: Troubleshooting
Troubleshooting R5900086 /07 ClickShare CSE-200+... -
Page 52: Basic Troubleshooting
Troubleshooting 4.1 Basic Troubleshooting Problem solving In this chapter some problems that might occur while using CSE-200+ are listed. For each problem possible causes are given and a solution is proposed. If you cannot solve the problem yourself, please contact your local IT administrator. - Page 53 Capture mode Barco knowledge base and YouTube videos Go to the product page on Barco’s website and select in the right column Support. You will get access to Barco’s Knowledge base and Latest tutorial videos. For more YouTube videos, consult https://www.youtube.
- Page 54 Troubleshooting R5900086 /07 ClickShare CSE-200+...
- Page 56 R5900086 /07 | 2022-01-19 www.barco.com...
Need help?
Do you have a question about the ClickShare CSE-200+ and is the answer not in the manual?
Questions and answers