
Related Manuals for Black Box AVS-HDMI2-4X4-R2


Summary of Contents for Black Box AVS-HDMI2-4X4-R2
- Page 1 USER MANUAL AVS-HDMI2-4X4-R2 VIDEO MATRIX SWITCHER - HDMI 2.0, 4X4 24/7 TECHNICAL SUPPORT AT 1.877.877.2269 OR VISIT BLACKBOX.COM...
-
Page 2: Table Of Contents
NEED HELP? LEAVE THE TECH TO US LIVE 24/7 TABLE OF CONTENTS TECHNICAL SUPPORT 1.877.877.2269 SAFETY PRECAUTIONS ..................................4 CHAPTER 1: SPECIFICATIONS ................................. 5 1.1 Resolution Downscaling ...................................6 CHAPTER 2: OVERVIEW ................................... 7 2.1 Introduction .......................................7 2.2 Features ........................................7 2.3 What’s Included ......................................7 2.4 Hardware Description ....................................8 2.4.1 Front Panel .......................................... - Page 3 NEED HELP? LEAVE THE TECH TO US LIVE 24/7 TABLE OF CONTENTS TECHNICAL SUPPORT 1.877.877.2269 8.3.4 Lock/Unlock Commands ............................................27 8.3.5 Audio Commands ........................................28 8.3.6 HDCP COMPLIANCE ......................................29 8.3.7 EDID Management .........................................30 8.3.8 CEC Control ..........................................31 CHAPTER 9: FIRMWARE UPGRADE ............................... 34 CHAPTER 10: TROUBLESHOOTING ...............................
-
Page 4: Safety Precautions
NEED HELP? LEAVE THE TECH TO US LIVE 24/7 CHAPTER 1: HEADLINE SAFETY PRECAUTIONS TECHNICAL SUPPORT 1.877.877.2269 To ensure the best performance from the product, please read all directions carefully before using the device. Save this manual for future reference. Š... -
Page 5: Chapter 1: Specifications
NEED HELP? LEAVE THE TECH TO US LIVE 24/7 CHAPTER 1: SPECIFICATIONS TECHNICAL SUPPORT 1.877.877.2269 TABLE 1-1 MATRIX SWITCHER SPECIFICATIONS SPECIFICATION DESCRIPTION Video Video Input Signal (4) HDMI Video Input Connector (4) HDMI Type A female Video Input Video Resolution Up to 4K @ 60 Hz 4:4:4 Video Output (4) HDMI... -
Page 6: Resolution Downscaling
NEED HELP? LEAVE THE TECH TO US LIVE 24/7 CHAPTER 1: SPECIFICATIONS TECHNICAL SUPPORT 1.877.877.2269 TABLE 1-1 MATRIX SWITCHER SPECIFICATIONS CONTINUED SPECIFICATION DESCRIPTION General Transmission Distance 4K/60Hz/444 5m, 4K/60Hz/420 10m, 1080p 15m Bandwidth 18 Gbps Operation Temperature 23 to 131° F (-5 to +55° C) Storage Temperature -13 to 158°... -
Page 7: Chapter 2: Overview
2.1 INTRODUCTION The AVS-HDMI2-4x4-R2 is a professional 4x4 HDMI 2.0 Matrix Switcher with Audio Matrix. It includes 4 HDMI inputs and 4 HDMI outputs. The last two outputs have downscaling function, which is designed for switching two HDMI2.0 and HDCP2.3 compliant signals. It also features 4 SPDIF and 4 analog audio outputs for audio matrix. -
Page 8: Hardware Description
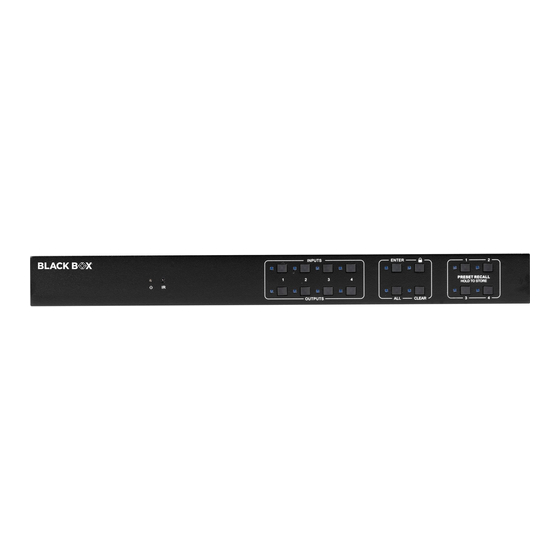
NEED HELP? LEAVE THE TECH TO US LIVE 24/7 CHAPTER 1: HEADLINE CHAPTER 2: OVERVIEW TECHNICAL SUPPORT 1.877.877.2269 2.4 HARDWARE DESCRIPTION Figures 2-1 and 2-2 show the front and back panels of the HDMI matrix switcher. Tables 2-1 and 2-2 describe their components. 2.4.1 FRONT PANEL FIGURE 2-1: FRONT PANEL TABLE 2-1. -
Page 9: Rear Panel
NEED HELP? LEAVE THE TECH TO US LIVE 24/7 CHAPTER 1: HEADLINE CHAPTER 2: OVERVIEW TECHNICAL SUPPORT 1.877.877.2269 2.4.2 REAR PANEL FIGURE 2-2: REAR PANEL TABLE 2-2 REAR PANEL COMPONENTS NUMBER IN COMPONENT DESCRIPTION FIGURE 2-2 Inputs (4) HDMI input ports that connect with HDMI sources (4) ports that connect with HDMI displays Outputs The latter four HDMI ports have downscaling function. -
Page 10: Chapter 3: System Connection
NEED HELP? LEAVE THE TECH TO US LIVE 24/7 CHAPTER 1: HEADLINE CHAPTER 3: SYSTEM CONNECTION TECHNICAL SUPPORT 1.877.877.2269 3.1 USAGE PRECAUTIONS Š Make sure all components and accessories are included before installation. Š System should be installed in a clean environment with proper temperature and humidity. ... -
Page 11: Chapter 4: Panel Button Control
NEED HELP? LEAVE THE TECH TO US LIVE 24/7 CHAPTER 1: HEADLINE CHAPTER 4: PANEL BUTTON CONTROL TECHNICAL SUPPORT 1.877.877.2269 4.1 I/O CONNECTION SWITCHING The front panel features four input selection buttons and four output selection buttons for switching the I/O connection. 1. -
Page 12: Chapter 5: Ir Control
NEED HELP? LEAVE THE TECH TO US LIVE 24/7 CHAPTER 1: HEADLINE CHAPTER 5: IR CONTROL TECHNICAL SUPPORT 1.877.877.2269 The HDMI Matrix Switcher features one built-in IR receiver to receive an IR signal from an IR remote to enable IR control. If the external IR receiver or other IR control device needs to be used, the IR EYE port on rear panel can be connected. -
Page 13: Chapter 6: Gui Control
NEED HELP? LEAVE THE TECH TO US LIVE 24/7 CHAPTER 1: HEADLINE CHAPTER 6: GUI CONTROL TECHNICAL SUPPORT 1.877.877.2269 The matrix can be controlled via TCP/IP. The default IP settings are: IP Address: 192.168.0.178 Subnet Mask: 255.255.255.0 Gateway: 192.168.0.1 Type 192.168.0.178 in your Internet browser. It will then display the below log-in screen: FIGURE 6-1: LOG IN SCREEN USERNAME: admin PASSWORD: admin... -
Page 14: Switching Tab
NEED HELP? LEAVE THE TECH TO US LIVE 24/7 CHAPTER 1: HEADLINE CHAPTER 6: GUI CONTROL TECHNICAL SUPPORT 1.877.877.2269 6.1 SWITCHING TAB You can use the 4x4 button grid on the Switching Tab to set which inputs are directed to which outputs. For example, clicking the button on the Input 1 row and Outp ut 1 column directs input 1 to output 1. -
Page 15: Audio Tab
NEED HELP? LEAVE THE TECH TO US LIVE 24/7 CHAPTER 1: HEADLINE CHAPTER 6: GUI CONTROL TECHNICAL SUPPORT 1.877.877.2269 6.2 AUDIO TAB You can set and modify the matrix switcher’s audio settings and volume on the audio tab. Use the Setting and Volume buttons on this tab to view and modify these settings. -
Page 16: Audio Volume
NEED HELP? LEAVE THE TECH TO US LIVE 24/7 CHAPTER 1: HEADLINE CHAPTER 6: GUI CONTROL TECHNICAL SUPPORT 1.877.877.2269 6.2.2 AUDIO VOLUME Use four pairs of analog Left/Right (L/R) audio to control their output’s volume. FIGURE 6-5: AUDIO VOLUME SETTINGS 6.3 CONFIGURATION TAB You can set and modify EDID options on the Configuration tab. -
Page 17: Edid Setting
NEED HELP? LEAVE THE TECH TO US LIVE 24/7 CHAPTER 6: GUI CONTROL TECHNICAL SUPPORT 1.877.877.2269 6.3.2 EDID SETTING FIGURE 6-7: EDID CONFIGURATION SCREEN 1. Select the compatible built-in EDID for the selected input source. 2. Upload the user-defined EDID by following the steps below: Š... -
Page 18: Cec Tab
NEED HELP? LEAVE THE TECH TO US LIVE 24/7 CHAPTER 6: GUI CONTROL TECHNICAL SUPPORT 1.877.877.2269 6.4 CEC TAB If the input source devices/output display devices support CEC, they can be controlled through the CEC interface. Use the Input and Output tabs on this tab to control supported devices. -
Page 19: Output Display Device Control
NEED HELP? LEAVE THE TECH TO US LIVE 24/7 CHAPTER 6: GUI CONTROL TECHNICAL SUPPORT 1.877.877.2269 6.4.2 OUTPUT DISPLAY DEVICE CONTROL FIGURE 6-9: OUTPUT TAB SCREEN To control an output device, select the Output tab if it is not already selected. After you select an output source device to be controlled, press the desired function button(s) to control it. -
Page 20: Interface Tab
NEED HELP? LEAVE THE TECH TO US LIVE 24/7 CHAPTER 6: GUI CONTROL TECHNICAL SUPPORT 1.877.877.2269 6.6 INTERFACE TAB You can set and modify the title bar label and the button labels on the Interface tab. FIGURE 6-11: INTERFACE TAB To change label text, click in the corresponding box on this tab and edit the text. -
Page 21: Access Tab
NEED HELP? LEAVE THE TECH TO US LIVE 24/7 CHAPTER 6: GUI CONTROL TECHNICAL SUPPORT 1.877.877.2269 6.8 ACCESS TAB You can set and modify the device’s password and the front panel lock setting on the Access tab. FIGURE 6-13: ACCESS TAB Š... -
Page 22: Chapter 7: Gui Upgrade
NEED HELP? LEAVE THE TECH TO US LIVE 24/7 CHAPTER 7: GUI UPGRADE TECHNICAL SUPPORT 1.877.877.2269 GUI updates are available online. 7.1 GUI UPGRADE PROCESS Visit http://192.168.0.178:100 to check for an available GUI online upgrade. Type the username and password to log into the configuration interface. NOTE: Use the same username and password that you used for the GUI log in. -
Page 23: Chapter 8: Rs-232 Control
Uninstallation: Delete all the control software files in the corresponding file path. 8.2 BASIC SETTINGS Connect the AVS-HDMI2-4X4-R2 with necessary input devices and output devices. Then, connect it to a PC with installed RS-232 control software. Double-click the software icon to run this software. -
Page 24: Rs-232 Communication Commands
FUNCTION FEEDBACK EXAMPLE POWERON. Power on Power ON! POWEROFF. Power off Power OFF! /*NAME. Query the name of matrix AVS-HDMI2-4X4-R2 /*TYPE. Query the model of matrix V1.0.0 /^VERSION. Query the firmware version CPLD:V1.0.0 RST. Reset to factory default Factory Default! 1.877.877.2269... -
Page 25: Control Management
NEED HELP? LEAVE THE TECH TO US LIVE 24/7 CHAPTER 8: RS-232 CONTROL TECHNICAL SUPPORT 1.877.877.2269 8.3.2 CONTROL MANAGEMENT TABLE 8-2. CONTROL MANAGEMENT COMMAND FUNCTION FEEDBACK EXAMPLE Enable downscaling function for output device(s) [xx]=00 to 02 HDMI OUT xx Down DS[XX]ON. -
Page 26: Query Commands
Set the baud rate of local serial port BAUDRATEXXXX. Set Local RS232 xxxx=115200, 57600, 38400, 19200, or 9600 Baudrate Is 9600! GUI Or RS232 Query Status: Black Box AVS-HDMI2-4X4-R2 V1.0.0 STA. Query status Power ON! Front Panel UnLock! Local RS232 Baudrate Is 9600! GUI_IP:192.168.0.178! -
Page 27: Lock/Unlock Commands
NEED HELP? LEAVE THE TECH TO US LIVE 24/7 CHAPTER 8: RS-232 CONTROL TECHNICAL SUPPORT 1.877.877.2269 TABLE 8-3. QUERY COMMANDS CONTINUED COMMAND FUNCTION FEEDBACK EXAMPLE Preset 01 Sta: Query the preset Out 01 In 01! PRESETSTA[XX]. [xx]=01 to 09 Out 02 In 01! (xx=01 to 09 is the number of preset.) Out 03 In 01! Out 04 In 01! -
Page 28: Audio Commands
NEED HELP? LEAVE THE TECH TO US LIVE 24/7 CHAPTER 8: RS-232 CONTROL TECHNICAL SUPPORT 1.877.877.2269 8.3.5 AUDIO COMMANDS TABLE 8-5. AUDIO COMMANDS COMMAND FUNCTION FEEDBACK EXAMPLE SPDIF OUT and ANALOG OUT (They are same input audio source at one group.) Select the input audio source. -
Page 29: Hdcp Compliance
NEED HELP? LEAVE THE TECH TO US LIVE 24/7 CHAPTER 8: RS-232 CONTROL TECHNICAL SUPPORT 1.877.877.2269 8.3.6 HDCP COMPLIANCE TABLE 8-6. HDCP COMPLIANCE COMMAND FUNCTION FEEDBACK EXAMPLE OUT 01 HDCP ON! Force enable the output HDCP 1.4 OUT 02 HDCP ON! HDCP[XX]ON. -
Page 30: Edid Management
NEED HELP? LEAVE THE TECH TO US LIVE 24/7 CHAPTER 8: RS-232 CONTROL TECHNICAL SUPPORT 1.877.877.2269 8.3.7 EDID MANAGEMENT TABLE 8-7. EDID MANAGEMENT COMMAND FUNCTION FEEDBACK EXAMPLE All Input EDID Set EDIDMINIT. Restore the factory default EDID data for each input Default! Upgrade EDID via Serial Port [XX]=00 to 04... -
Page 31: Cec Control
NEED HELP? LEAVE THE TECH TO US LIVE 24/7 CHAPTER 1: HEADLINE CHAPTER 8: RS-232 CONTROL TECHNICAL SUPPORT 1.877.877.2269 TABLE 8-7. EDID MANAGEMENT CONTINUED COMMAND FUNCTION FEEDBACK EXAMPLE Query EDID status of Input port [xx]=00 to 04 Input 01 EDID From (xx=01 to 04 is the number of input port. - Page 32 NEED HELP? LEAVE THE TECH TO US LIVE 24/7 CHAPTER 1: HEADLINE CHAPTER 8: RS-232 CONTROL TECHNICAL SUPPORT 1.877.877.2269 The “[DD]” represents the specific command from the next table. TABLE 8-8. CONTROL FOR INPUT SOURCE COMMAND EXAMPLE AND COMMAND DESCRIPTION RESPONSE CECI02044400 CECI[AA][BB][CC]00.
- Page 33 NEED HELP? LEAVE THE TECH TO US LIVE 24/7 CHAPTER 1: HEADLINE CHAPTER 8: RS-232 CONTROL TECHNICAL SUPPORT 1.877.877.2269 TABLE 8-9. CONTROL FOR OUTPUT DISPLAY DEVICE COMMAND EXAMPLE AND COMMAND DESCRIPTION RESPONSE CECO04404441. CECO[AA][BB][CC]41. Volume up CEC Output 05 Send Success! CECO04404442.
-
Page 34: Chapter 9: Firmware Upgrade
NEED HELP? LEAVE THE TECH TO US LIVE 24/7 CHAPTER 1: HEADLINE CHAPTER 9: FIRMWARE UPGRADE TECHNICAL SUPPORT 1.877.877.2269 The matrix switcher has a FIRMWARE port on the switcher’s rear panel for firmware upgrades. Follow these steps to upgrade the firmware: 1. -
Page 35: Chapter 10: Troubleshooting
1. Replace the battery. 1. The battery is depleted. 2. Contact Black Box Technical Support 2. The IR remote is broken. at 877-877-2269 or info@blackbox.com. 3. Beyond the effective range of the IR signal Cannot control the device via IR remote 3. -
Page 36: Appendix A: Regulatory Information
NEED HELP? LEAVE THE TECH TO US LIVE 24/7 CHAPTER 1: HEADLINE APPENDIX A: REGULATORY INFORMATION TECHNICAL SUPPORT 1.877.877.2269 A.1 FCC STATEMENT This equipment has been tested and found to comply with the regulations for a Class B digital device, pursuant to Part 15 of the FCC Rules. -
Page 37: Nom Statement
NEED HELP? LEAVE THE TECH TO US LIVE 24/7 APPENDIX A: REGULATORY INFORMATION TECHNICAL SUPPORT 1.877.877.2269 A.4 NOM STATEMENT 1. Todas las instrucciones de seguridad y operación deberán ser leídas antes de que el aparato eléctrico sea operado. 2. Las instrucciones de seguridad y operación deberán ser guardadas para referencia futura. 3. -
Page 38: Appendix B: Disclaimer/Trademarks
B.1 DISCLAIMER Black Box Corporation shall not be liable for damages of any kind, including, but not limited to, punitive, consequential or cost of cover damages, resulting from any errors in the product information or specifications set forth in this document and Black Box Corporation may revise this document at any time without notice. - Page 39 NEED HELP? LEAVE THE TECH TO US LIVE 24/7 TECHNICAL SUPPORT 1.877.877.2269 © COPYRIGHT 2021. BLACK BOX CORPORATION. ALL RIGHTS RESERVED. AVS-HDMI2-4X4-R2_USER_REV2.PDF...
Need help?
Do you have a question about the AVS-HDMI2-4X4-R2 and is the answer not in the manual?
Questions and answers