Table of Contents
Advertisement
Quick Links
Advertisement
Table of Contents

Subscribe to Our Youtube Channel
Related Manuals for Thor Kitchen HRE Series


Summary of Contents for Thor Kitchen HRE Series
- Page 1 COOK LIKE...
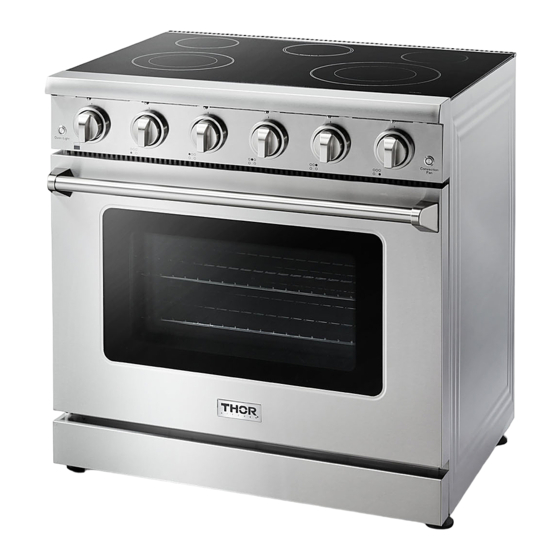
- Page 2 USE AND CARE MANUAL PROFESSIONAL ELECTRIC RANGES HRE MODELS HRE3601 HRE3001 HRE2401...
- Page 3 TABLE OF CONTENTS SAFETY...
- Page 4 TABLE OF CONTENTS...
- Page 5 BEFORE YOU BEGIN READ THESE INSTRUCTIONS COMPLETELY AND CAREFULLY. IMPORTANT NOTE TO THE INSTALLER • Read all instructions contained in these installation instructions before installing the range. • Remove all packing materials from the oven compartments before connecting the electric supply to the range. •...
-
Page 6: Anti-Tip Device
ANTI-TIP DEVICE WARNING To reduce the risk of tipping the range,the range must be secured by a properly installed Anti-Tip device. AFTER THERANGEHAS BEEN INSTALLED,CONFIRM THATTHE ANTI-TIP DEVICE HAS BEEN PROPERLY INSTALLED AND VERIFY THAT THE ANTITIP DEVICE IS PROPERLY ENGAGED. a) If the anti-tip device is not installed, a child or adult can tip the range and be killed. -
Page 7: What You Need To Know About Safety Instructions
IMPORTANT SAFETY INSTRUCTIONS CALIFORNIA PROPOSITION 65 WARNING CAUTION Cancer and Reproductive Harm-www.P65Warnings.ca.gov. Important safety instructions Read and follow all instructions before using your oven to prevent the risk of fire, electric shock, personal injury, or damage when using the range.This guide does not cover all possible conditions that may occur. -
Page 8: Important Safety Instructions
IMPORTANT SAFETY INSTRUCTIONS FOR YOUR SAFETY When using electrical appliances, you should follow basic safety precautions, including the following: CAUTION • Use this appliance only for its intended purpose as described in this Owner’s Manual. • Potentially hot surfaces include the cooktop, areas facing the cooktop, oven vent opening, surfaces near the opening, crevices around the oven door. -
Page 9: Surface Cooking Units
IMPORTANT SAFETY INSTRUCTIONS SURFACE COOKING UNITS • Never leave surface units unattended at high heat settings. Boilovers cause smoking and greasy spillovers that may ignite. • Protective Liners – Do not use aluminum foil to line surface unit drip bowls or oven bottoms, except as suggested in the manual. -
Page 10: Electrical Safety
IMPORTANT SAFETY INSTRUCTIONS ELECTRICAL SAFETY • Proper Installation - Be sure your appliance is properly installed and grounded by a qualified technician. • Flush - mounted appliances may be operated only after they have been installed in cabinets and workplaces that conform to the relevant standards. This ensures that the appliances are installed in compliance with the appropriate safety standards. - Page 11 IMPORTANT SAFETY INSTRUCTIONS OVEN • DO NOT TOUCH THE HEATING ELEMENTS OR INTERIOR SURFACES OF THE OVEN. Heating elements may be hot even though they are dark in color. Interior surfaces of an oven become hot enough to cause burns. During and after use, do not touch or let clothing or other flammable materials contact the heating elements or interior surfaces of the oven until they have had sufficient time to cool.
-
Page 12: Ventilating Hood
IMPORTANT SAFETY INSTRUCTIONS VENTILATING HOOD • Clean ventilating hoods frequently. Do not let grease accumulate on the hood or filter. • When flaming foods under the hood, turn the fan on. GLASS/CERAMIC COOKING SURFACES • DO NOT TOUCH SURFACE UNITS OR AREAS NEAR UNITS. Surface unitsmay be hot even though they are dark in color.Areas near surface units may become hot enough to cause burns. -
Page 13: Usage Cautions
IMPORTANT SAFETY INSTRUCTIONS • This appliance must be properly grounded. • Do not ground the appliance to a gas pipe, plastic water pipe, or telephone line. - This may result in electric shock, fire, an explosion, or problems with the product •... - Page 14 IMPORTANT SAFETY INSTRUCTIONS • Do not stand on top of the appliance or place objects (such as laundry, oven cover, lighted candles, lighted cigarettes, dishes, chemicals, metal objects, etc.) on the appliance. - Items, such as a cloth, may get caught in the door. - This may result in electric shock, fire, problems with the product, or injury.
-
Page 15: Product Dimensions
PRODUCT DIMENSIONS... -
Page 16: Checking The Installation Site
PRODUCT DIMENSIONS CHECKING THE INSTALLATION SITE Clearances and dimensions To install the range, refer to the following figure. For installation in CANADA, a Free-standing range is not to be installed closer than 12mm from any adjacent surface. CAUTION This range has been designed to comply with the maximum allowable wood cabinet temperatures of 194°F. -
Page 17: Preparing To Install The Range
PREPARING TO INSTALL THE RANGE Minimum dimensions IMPORTANT To eliminate the risk of burns or fire caused by reaching over heated surface units, cabinet storage space located above the surface units should be avoided. If cabinet storage is to be provided, the risk can be reduced by installing a range hood that projects horizontally a minimum of 5"... -
Page 18: Connecting The Power
CONNECTING THE POWER STEP 1. MEETING ELECTRICAL CONNECTION REQUIREMENTS CAUTION For personal safety, do not use an extension cord with this appliance. Remove house fuse or open circuit breaker before beginning installation. This appliance must be supplied with the proper voltage and frequency, and connected to an individual properly grounded branch circuit, protected by a circuit breaker or fuse having amperage as specified on the rating plate. - Page 19 CONNECTING THE POWER 2. For power cord installations only, hook the strain relief over the power cord hole located below the rear of the drawer body. Insert the power cord through the strain relief and tighten the device. • You must install the power cord with a strain relief. •...
- Page 20 CONNECTING THE POWER STEP 4 3-wire power cord WARNING Electrical Shock Hazard Electrical ground is required on this appliance. Do not connect to the electrical supply until appliance is permanently grounded. Disconnect power to the circuit breaker or fuse box before making the electrical connection. This appliance must be connected to a grounded, metallic, permanent wiring system, or a grounding connector should be connected to the grounding terminal or wire lead on the appliance.
- Page 21 KD INSTALLATION PROCEDURES...
- Page 22 KD INSTALLATION PROCEDURES...
- Page 23 RUBBER PAD INSTALL ON BACK PANEL...
-
Page 24: Introducing Your New Range
INTRODUCING YOUR NEW RANGE 24 INCHOVERVIEW 30/36 INCH OVERVIEW... - Page 25 INTRODUCING YOUR NEW RANGE Before you begin Clean the oven thoroughly before using it for the first time. Then, remove the accessories, set the oven to bake, and then run the oven at 350 °F for 30 minutes. There will be a distinctive odor. This is normal. Ensure your kitchen is well ventilated during this conditioning period.
-
Page 26: Cooktop Cooking
COOKTOP COOKING CAUTION BEFORE COOKING • Do not use the glass cooktop surface as a cutting board. • Do not place or store items that can melt or catch fire on the glass cooktop, even when it is not being used. •... - Page 27 COOKTOP COOKING Location of the radiant surface elements and controls The radiant control knobs operate the radiant surface elements on the cooktop as shown below.
- Page 28 COOKTOP COOKING Cooking areas The cooking areas on your range are identified by permanent circles on the glass cooking surface. For the most efficient cooking, fit the pan size to the element size. Pans should not extend more than .5 to 1 in.
- Page 29 COOKTOP COOKING What your cookware is made of determines how evenly and quickly heat is transferred from the surface burner to the pan bottom. Protecting the ceramic cooktop Cleaning • Clean the cooktop before using it for the first time. •...
-
Page 30: Positioning The Oven Racks
POSITIONING THE OVEN RACKS You can remove and reposition the oven racks in any of the six rack positions. Each oven rack has a built- in stop to prevent it from accidentally being pulled completely out. Correct positioning of the oven racks provides the best cooking results. -
Page 31: Operating The Oven
OPERATING THE OVEN Oven Burner Use To light the oven burner, push and turn the appropriate control knob counterclockwise the (150°F~500°F) position. Once burner ignition has been achieved, turn the burner control knob to adjust the desired temperature setting. Do not push and turn the control knob clockwise from the “OFF” position. Do not turn the control knob without pushing it. - Page 32 OPERATING THE OVEN Oven Cooking Safety Guidelines √ Do not block the ducts on the rear of the range when cooking in the oven. It is important that the flow of moist warm air from the oven and fresh air into the oven burner never be interrupted.
- Page 33 OPERATING THE OVEN 3. Preheat the oven to the temperature stated in the recipe. Depending on the temperatureand the size of the oven, preheating will vary. For better cooking performance and exact oven cavity temperature, preheating time will be 10 mins per 100 Degrees. 4.
- Page 34 OPERATING THE OVEN Broiler Operation CAUTION Door must be closed during broiler operation. Broiling is a method of cooking tender cuts of meat directly under the infrared broiler in the oven. Broiling in the oven is accomplished with the oven door closed. It is normal and necessary for some smoke to be present to give the food a broiled flavor.
- Page 35 CLEANING & MAINTANANCE WARNING • Always make sure that the controls are off and all surfaces are cool before removing or cleaning any of the range parts. This will prevent you from getting burned. • If your range is pulled out from the wall for any reason, make sure that the anti-tip device is reengaged after your range has been pushed back into place.
- Page 36 CLEANING & MAINTANANCE Cleaning the oven door CAUTION • DO NOT clean the oven door gasket. The oven door gasket is made of a woven material which is essential for a good seal. Care should be taken not to rub, damage, or remove this gasket.
- Page 37 CLEANING & MAINTANANCE Cleaning the surface burner control knobs WARNING Do not use spray cleaners on the surface burner control panel. Spray entering the valve holes could contact electrical components resulting in death, personal injury, or product damage. 1. Make sure that all surface burner knobs are in the OFF position. 2.
- Page 38 CLEANING & MAINTANANCE Cleaning sugary spills and melted plastics NOTE If pitting or indentations in the glass surface have already occurred, they can’t be repaired.The cooktop glass will have to be replaced. Sugary spillovers (such jellies, fudge, candy, and syrups) or melted plastics can cause pitting of the cooktop surface.
-
Page 39: Removing The Oven Door
REMOVING THE OVEN DOOR Removing and replacing the oven door Do not lift the oven door by its handle.Doing so may damage the door. Make sure the oven and the door are cool before you begin to remove the door. IMPORTANT Before removing the door,make sure there is a large enough clear,protected surface in the kitchen to rest the door on. - Page 40 REMOVING THE OVEN DOOR Replacing the oven door...
-
Page 41: Troubleshooting
TROUBLE SHOOTING Thorkitchen works hard to ensure that you don’t have problems with your new gas range. If you experience a problem, look first for a solution in the table below. If, after trying the suggested solution, you’re still having trouble, call Thorkitchen at 877-288-8099. - Page 42 TROUBLE SHOOTING...
- Page 43 TROUBLE SHOOTING...
-
Page 44: Warranty And Service
WARRANTY WARRANTY AND SERVICE This product has been manufactured by Thor Group, 4651 E Airport Drive. California 91761. For the most up to date warranty and service policy, please refer to our website WWW.THORKITCHEN.COM/WARRANTY-REGISTRATION For in-warranty service requests, please visit our website at WWW.THORKITCHEN.COM/SERVICE Please Note: You must provide proof of purchase or installation date for any inwarranty service requests... -
Page 45: Warranty Registration
WELCOME TO THE C LUB You chose THOR Kitchen to enhance your culinary journey and we’re stoked to have you in the club. Think of it as a secret society of really savvy people, such as yourself, choosing professional power and performance at an affordable price.
Need help?
Do you have a question about the HRE Series and is the answer not in the manual?
Questions and answers