Table of Contents

Summary of Contents for Intelligent Lighting Controls LightLEEDer
- Page 1 -u sa .c om | 952 .8 29. 19 00 ng con rols EVO-INT Relay Panel Operations Manual Includes product details, installation, and wiring information for the LightLEEDer EVO Integrated Relay Panel www.ilc-usa.com...
- Page 2 O P E R A T I O N M A N U A L Includes product details, installation, and wiring information for the LightLEEDer EVO Integrated Relay Panel Version 1A 6/11/2021 Class A FCC Device Statement (PENDING) Warning: Changes or modifications to this unit not expressly approved by the party responsible for compliance could void the user’s authority...
- Page 3 Introduction Thank you for purchasing the IlC lightleeDer EVO Integrated Relay Panel. The lightleeDer line is a very flexible and quality product to meet all of your lighting control needs. These panels are microprocessor-based programmable lighting controllers with networking capabilities. You can program each of the controller’s inputs or data line devices to control any or all of the relay outputs.
-
Page 4: Table Of Contents
TABLE OF CONTENTS Section 1: Lighting Controller Details .................... 5 1.0 Enclosure ............................. 5 1.1 Controller Board .......................... 5 1.2 Output Board ............................ 6 1.3 LightLEEDer Network .......................... 7 Section 2: Installation .......................... 8 2.0 Pre‐Installation Checklist ........................ 8 2.1 Mounting the Enclosure ........................ 8 2.1.1 Location ............................ 8 2.1.2 Environmental Considerations ..................... 8 2.1.3 Mounting ............................ 8 2.2 Wiring the EVO‐INT .......................... 8 2.2.1 Line and Load Wires ........................ 8 2.2.2 Hardwired Inputs ......................... 9 2.3 Network Cable Installation ........................ 10 2.3.1 Cable Installation Guidelines ..................... 10 2.3.2 Data Line Cable .......................... 11 2.3.3 Cable Installation ........................ 11 2.3.4 Cable Distances .......................... 11 ... - Page 5 Section 4: Appendix ........................... 14 Appendix A: LightLEEDer EVO‐4X/8X ...................... 14 Appendix B: ILC Photo Sensor Head ....................... 15 Appendix C: Networked Relay Panels ..................... 15 4 ...
-
Page 6: Enclosure
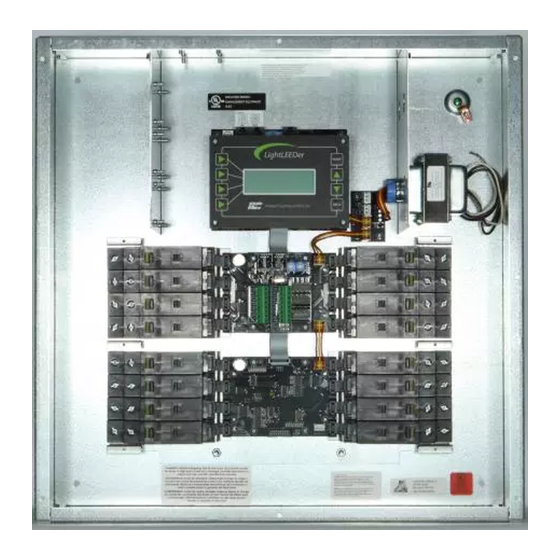
Section 1: LightLEEDer EVO Integrated Panel Details Figure 1.1 – ILC LightLEEDer EVO Integrated Relay Panel 1.0 Enclosure The enclosure is NEMA 1 rated and is provided with a screw cover door for surface mounting. All panels are supplied with 4 pre‐drilled holes for easy mounting onto the wall. Enclosures come in one size of 10” x 10” x 3” to accommodate 4 to 8 integrated relays. Enclosures are configured with both Class 2 and high voltage sides for easy and separated routing of wires. Included is a high voltage barrier to separate Class 1 and Class 2 wiring. 1.1 Controller Board The controller board provides the intelligence to control relays, monitor inputs, and to communicate in various ways. The integrated components include: Power supply used to convert the switcher supply 24 VAC into DC voltages used by the controller and photocell. Relay status LEDs driven by controller. Four hardwired inputs with 24VDC for switches, occupancy sensor, or nurse call station. Accepts momentary, momentary push button, or maintained switch types. 5 ... -
Page 7: Output Board
Local LightSync data line port for direct connection of up to 17 remote devices. RJ45 Photocell port for CAT‐5 connection to ILC Photo Sensor Head. Real‐Time clock provides all time‐controlled functions including time of day, day of week, day, and daylight‐saving time. It will keep the time for at least 45 days without power to the CPU. Non‐volatile memory for storing programming information. Retains data for up to 200 years without any power to the CPU. Data line communications through RJ45 for communicating with other panels and LightSync data line devices. Relay override switches “All On” or “All Off” for operation of relays. Figure 1.2 – LLEVO Integrated Controller Board 1.2 Output Board The output board includes the relays, power supply, and terminals for wiring connections. The integrated components include: Switching power supply to convert 120/277 VAC line voltage to low voltages used by the controller board. Screw down terminals for line, load, neutral, and 0‐10V dimming connections. On‐board relays populated in either 4 or 8 relay configurations. Each set of 4 relays is powered by a single line voltage 16A circuit. 6 ... -
Page 8: Lightleeder Network
Figure 1.3 – LLEVO Integrated Relay Output Board 1.3 LightLEEDer Network Panels and LightSync devices can be linked together with standard CAT‐5 cable using RJ45 connectors that easily plug into the controllers and devices. With the use of a network controller you are able to link together up to 254 panels on the network. 7 ... -
Page 9: Section 2: Installation
Section 2: Installation 2.0 Pre‐Installation Checklist ☐ Unpack the lighting control panel. ☐ Report any damage to the freight carrier. ☐ Remove the enclosure cover and set aside. ☐ Determine appropriate mounting location for panel. ☐ Mount the panel to the wall. ☐ Punch additional knockout holes for high and low voltage conduit runs as required ☐ Pull the line, neutral, and ground wires from circuit breaker box to the panel and terminate. ☐ Pull load wires from lighting loads to panel and terminate. ☐ Pull CAT5 data line wires to panels and devices and terminate with RJ45 connectors. ☐ Test all cables with the appropriate cable tester. ☐ Pull all low voltage input wires and terminate to the appropriate connectors. ☐ Clean the cabinet of any construction debris and dust. ☐ Double check all high voltage connections. ☐ Apply power to the panel. 2.1 Mounting the Enclosure 2.1.1 Location Determine the proper location for mounting the lighting controller. Typically, the panels are mounted near the lighting loads to be controlled. 2.1.2 Environmental Considerations The EVO Integrated Relay Panel is installed in a NEMA 1 enclosure designed for indoor applications. The panel should be mounted in an area with an ambient temperature between 0 and 50° C (32°‐122°F), humidity from 10 to 90% non‐condensing, non‐explosive/corrosive atmosphere, and stationary. 2.1.3 Mounting The enclosure is provided with 4 holes located at each corner of the enclosure. Secure the enclosure to the mounting surface with the appropriate hardware for the application. 2.2 Wiring the EVO‐INT 2.2.1 Line and Load Wires Pull a 16A 120VAC or 277VAC circuit to the Line 1 (L1) terminal for powering the first four relays (LD1‐4) and controller board. An additional 120VAC or 277VAC circuit can be terminated at Line 2 (L2) for an additional 16A capacity on the second set (LD5‐8) of relays. Pull all wires from lighting loads to the enclosure. Connect each load and its dimming wires to the appropriate terminal on the relay output board. Cap the unused lead to prevent electrical shock. See Figure 2.1 below. 8 ... -
Page 10: Hardwired Inputs
Figure 2.1 – EVO Integrated Output Wiring 2.2.2 Hardwired Inputs Pull the wires from switches, occupancy sensors, or nurse call stations from their respective locations to the enclosure. Be sure to isolate the Class 2 wiring from the high voltage wiring as shown in the diagram below. 9 ... -
Page 11: Network Cable Installation
Figure 2.2 – Class 2 and HV wiring areas 2.3 Network Cable Installation 2.3.1 Cable Installation Guidelines Observe all ILC Data Cable Requirements and LightSync Cable Run Distance Requirements as they pertain to your project in laying out the cable runs. Maintain the twists of the pairs all the way to the point of termination, or no more than 1” untwisted. Make gradual bends of the cable, where necessary. No sharper than a 1” radius Dress the cables neatly with cable ties. Use low to moderate pressure. Use low to moderate force when pulling cable. Use cable pulling lubricant for cable runs that may otherwise require great force to install. Do not pull ANY data cable or switch wires with or along any high voltage wires. Keep all low voltage totally separate from ALL high voltage. Failure to do so will void the ILC warranty. 10 ... -
Page 12: Data Line Cable
Keep cables 2’‐3’ away from any potential sources of EMI as possible. (Line voltage runs, transformers, light fixtures, etc.) Install proper cable supports, spaced no more than 5 feet apart. Always label every termination point. Use a unique number for each cable segment. This will make moves, adds, changes and troubleshooting as simple as possible. Document these onto the riser provided. Always test every installed segment with a CAT‐5 cable tester. Always leave extra slack in the cable run, neatly coiled up in the ceiling or nearest concealed place. Always use grommets to protect the cable when passing through metal studs or anything that can possibly cause damage. Always follow all local and national building and fire codes. Be sure to “fire stop” all cables that penetrate a firewall. Use plenum rated cable where it is mandated. Always contact ILC on installations between buildings or cable pulled underground. Special considerations may be needed. 2.3.2 Data Line Cable The data line cables required for communications between panels and devices uses standard Category 5. RJ45 connectors must be rated for the type of cable being terminated to. Be sure that cable run in a plenum is rated for that use. Any cable run underground must have underground rated cable, have a 12AWG solid Cu wire pulled along with it grounded at one end, and have surge suppressors installed. Contact ILC for job specific questions. 2.3.3 Cable Installation Data line cables need to interconnect all the lighting control panels and all LightSync data line devices. Each controller has a local port that connects LightSync devices only. The controller also includes “in” and “out” ports for connecting panels together, which can also connect LightSync devices, but it is suggested that they are connected to the local port. Note: A network controller is required if using Data IN/OUT ports. Data cable to either panels or LightSync devices are run in a daisy chain pattern to form a network. “T” connections are permitted with the use of a Power Supply Repeater (PSR) and home‐run LightSync devices may be done with a LightSync Hub. 2.3.4 Cable Distances Data and power is carried across the network cable. There are limitations how far data can be run, how many devices are on the line, and how much power is on the line. See Figure 2.3 for details. With the addition of a Power Supply Repeater or Power Supply Repeater 6 data and power can be renewed. ... -
Page 13: Cable Termination And Testing
Figure 2.3 – Network Cable Run Distance Detail 2.3.5 Cable Termination and Testing Data cables will be required to be terminated with the proper RJ45 crimp‐on connectors for the cable being used. Follow the pin‐out shown in Figure 2.4. Be sure the color‐coded wires are terminated exactly as shown. Always visually inspect for a completely seated crimp, as damage could occur to the mating connector on the processor or device. 12 ... -
Page 14: Connect Cable
Figure 2.4 – RJ45 Cable Termination Detail Test every cable prior to installation for shorts, opens, and inducted voltage. Be sure not to connect your tester to a cable connected to any hardware as damage may occur. 2.3.6 Connect Cable After cables are tested, they can be plugged into the panels and devices. Cables start at the “Out” port, go to the next panel or device and enters the “In” port. This is continued until all devices are connected. 2.4 Pre‐Power‐Up Checklist ☐ Verify all ribbon cables between controller/output boards are well seated. ☐ Verify all high voltage wires are terminated and the high voltage barriers is installed. ☐ Verify all data cables, sensor wires, dimming wires, input wires are terminated properly. 2.5 Power‐Up and Check Out 2.5.1 Power‐Up The controller will turn on once the Line 1 and Neutral wires are terminated and the circuit is energized. The power LED located in the lower left should light up. 2.5.2 Verify Relay Operation With the controller powered up press the “ALL ON” push button switch located on the lower left side of the controller; all the relays should turn ON. Press the “ALL OFF” button and verify that all relays turned OFF. The relays have an on‐board LED that indicates their state. 2.5.3 Clearing Memory It is very critical to clear the memory in the controller prior to programming to eliminate any possible unwanted mapping. In the ILC LightLEEDer Software, connect to the panel with a diagnostic tool on the network port. Once connected navigate to the virtual keypad on the “Connect” screen. From the keypad/display push “Edit”, then scroll down to “Special Functions”, then scroll down to “Firmware Re‐ vision”, press both up and down scroll buttons simultaneously to enter a hidden menu, and then scroll down to “Clear All Memory”. 13 ... -
Page 15: Set The Internal Clock
2.5.4 Set the Internal Clock Clock settings must be set in the controller if the panel runs time schedules or turns on/off lights in reference to sunrise/sunset. In the ILC LightLEEDer Software, connect to the panel with a diagnostic tool on the network port. Once connected navigate to the virtual keypad on the “Connect” screen. From the keypad/display push “Edit” and scroll down to the “Clock” menu. From this part of the menu, you can set the time and date, set up the daylight‐saving time settings, set the astronomical parameters, and view the current sunrise/sunset settings. See Section 3 for more details. Section 3: Programming 3.0 Overview The LightLEEDer Pro Single Panel & LightLEEDer Network Configuration Software are ILC priority software packages designed for the ILC LightLEEDer series lighting control panels. The LL Pro Single panel can be utilized on single panels, while the LL Pro Network Configuration Software requires an Network Controller in the system. Note: For programming information and software installation see LightLEEDer Pro Software Manual. Section 4: Appendix Appendix A: LightSync EVO‐4X/8X In addition to the on‐board relays provided with the LightLEEDer EVO Integrated Relay Panel, additional relays can be added with the LightSync EVO‐4X/8X Panel. The LSEVO‐X is available in 4 or 8 relay configurations and expands any LightLEEDer controller to operate additional relays. Connect the “Local” port of the LLEVO‐INT Controller to the “In” port of your first 4X/8X board, and the “Out” port to each subsequent LightSync device. The LLEVO‐INT can operate up to 20 total relays, including the on‐board relays. Refer to Figure 4.1 for LSEVO‐04X,8X address switch settings. Figure 4.1 – LSEVO‐4X/8X Address Switch Settings 14 ... - Page 16 Appendix B: ILC Photo Sensor Head The LightLEEDer EVO Integrated Relay Panel has a RJ45 port for connection to a single Photo Sensor Head. Run a CAT‐5 cable from the Photocell port of the controller to the desired location of the photo sensor. Terminate the CAT‐5 cable pairs as shown below in Figure 4.2. Figure 4.2 – ILC Photo Sensor Termination Appendix C: Networked Relay Panels LightLEEDer Network Controllers have the capability to control up to 255 LightLEEder panels including the LightLEEDer EVO Integrated Relay Panel. The remote EVO‐INT panels are connected to the network CAT‐5 “Out” port from the LLNC and addressed as one of the 255 LightLEEDer panels in the same manner as all other LightLEEDer panels. All standard LightLEEDer networking operations are supported with the LLEVO‐INT. 15 ...
- Page 17 For more information, please contact: ilc -u sa .c om | 952 .8 29. 19 00 ng con rols...
Need help?
Do you have a question about the LightLEEDer and is the answer not in the manual?
Questions and answers