
Related Manuals for tepro TORONTO COMBI


Summary of Contents for tepro TORONTO COMBI
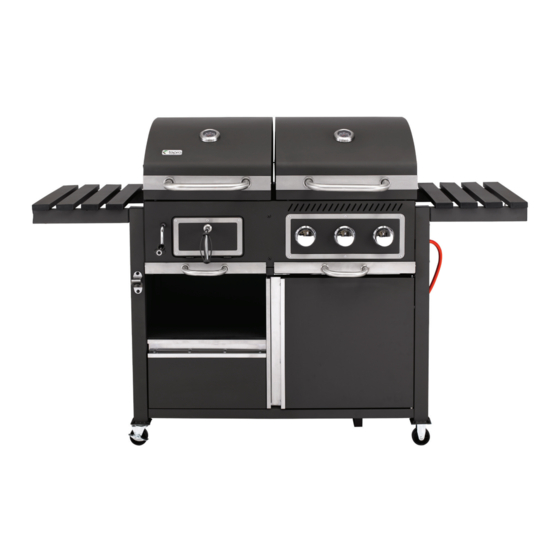
- Page 1 Instruction Manual CHARCOAL GAS COMBI GRILL “TORONTO COMBI” Version 2021 Art.-No. 3179UK P21108_TEPRO_TorontoKombi_3179_210907.indd 1 7/9/2021 2:15 PM...
- Page 2 HS1601- Assembly instruction steps P21108_TEPRO_TorontoKombi_3179_210907.indd 2 7/9/2021 2:15 PM...
-
Page 3: Table Of Contents
contents Before using the device ........................4 Delivery contents ..........................4 - 5 Intended use ............................5 For your safety ..........................5 - 6 Signal symbols ..........................6 General safety instructions ........................ 6 Safety instructions ........................6 - 8 Assembly ............................8 - 17 Preparation ............................ -
Page 4: Before Using The Device
Before using the product Part Qty. After unpacking and before use, check the product for damages. Should the product be damaged, do not use it and contact your Hood handle retailer. This user manual is based on the norms and regulations valid in the European Union. - Page 5 Part Qty. Part Qty. Middle panel of cabinet Door Left back panel of cabinet Support of gas bottle Charcoal door switch plate Right back panel of cabinet Right front leg Flame tamer Support of drawer right guide Holder for fat collection cup Fat collection cup Drawer...
-
Page 6: Intended Use
Please check that the delivery is complete and undamaged. – Never leave the BBQ unattended during use. Should a part be missing or defective, please contact your dealer. Danger Fire hazard! Claims relating to damages or missing parts made after assem- Never turn on/fire up the BBQ with the lid closed. - Page 7 SAFETy INSTRUcTIoNS FoR cHARcoAL GRILL – Always exercise extreme caution while grilling. If distracted, you can lose control of the device. – Always be attentive to and aware of what you are doing. Do not use this product if you are unfocussed or tired, or if you GENERAL SAFETy INSTRUcTIoNS - are under the influence of drugs, alcohol, or medications.
-
Page 8: Assembly
Assembly – Always wear oven or BBQ gloves when grilling. (Glove Cat- egory II with regard to heat protection, e.g. DIN-EN 407) Preparation – Use long-handled BBQ utensils with heat-resistant handles only. Danger Risk of injury! Failure to follow these instructions can lead to prob- –... -
Page 9: Assembling The Bbq
Assembling the BBQ Step 1 Step 2 Screw the castors without lock (19) to the legs (18) and (22) us- Fasten the bottom panel (23) with 4 screws (A) between the ing 4 nuts (I), washers (C), spring washers (D) and screws (B) legs (18) and (22), (26) and (31). - Page 10 Step 4 Fasten the left side panel of cabinet (16) and the right side panel of cabinet (30) with 6 screws (A) each between the left and right legs. Fasten the middle panel of cabinet (32) to the bottom panel (23) with 4 screws (A). Step 5 Fasten the left back panel of cabinet (35) with 8 screws (A) to the left rear leg, the bottom panel and the middle panel.
- Page 11 Step 6 Fasten the middle panel of cabinet (34) with 8 screws (A) to the left side panel (16), the left back panel (35) and the middle panel (32). P21108_TEPRO_TorontoKombi_3179_210907.indd 31 7/9/2021 2:17 PM...
- Page 12 Step 7 Fasten the cross beam (33) with 4 screws (A) between the middle panel (32) and the right side panel (30). Step 8 Fasten the two gas bottle supports (25) with 4 screws (A) to the bottom panel (23). P21108_TEPRO_TorontoKombi_3179_210907.indd 32 7/9/2021 2:17 PM...
- Page 13 Step 9 Attach the drawer handle (21) to the drawer (28) with the 2 countersunk screws (G). Step 10 Attach the bottle opener (17) to the left front leg with two screws (K). Slide in the drawer on the left under the shelf. Place the door (24), at the bottom right, on the bolt in the bottom panel.
- Page 14 Step 11 Fasten the handles for the hood (12) and handle seats (13) with the pre-assembled screws. Fasten the handles for the grease tray (9) and the handle seats (8) with the pre-assembled screws. Step 12 Schritt 12 Place the seat for the charcoal door handle (6) on the charcoal door handle (10).
- Page 15 Step 13 Insert the charcoal tray set (3) into the charcoal firebox and secure it with the R pin (J). Step 14 At least two strong and healthy people are required for this step. It is recommended that a third person be available to position the cart so that it is in the correct position.
- Page 16 Step 15 Fasten 4 hooks (15) each with screws (H) to the side tables (14). Attach the side tables (14) on the left and right. Step 16 Place the three flame tamers (38) in the gas grill. Place the charcoal cooking grill (4), the gas cooking grill (5) and the grill inserts (2) in the firebox. Attach the three burner control knobs (7) to the fittings on the gas BBQ side.
-
Page 17: Connecting The Gas Bottle
Model #HS1601 Step 17 nstallation of Grease cup (40) and Grease cup support (39) as shown n the figure Step 17 Storing the BBQ The gas BBQ must only be stored indoors, once the gas bottle has been removed. If the BBQ is not being used for an extended period of time, it should be covered with a protective hood and stored in a dry and dust-free environment. -
Page 18: Checking For Gas Leaks
operating the gas grill checking for Gas Leaks • Mix one part dishwashing liquid with 3 parts water. For test- Danger Risk of burning! ing, approx. 50 ml of soapy water is needed. The BBQ and the food become very hot during ope- •... -
Page 19: Operating The Charcoal Grill
cooking with the Lid closed Note: The charcoal grate is height adjustable. The charcoal grate can be positioned at four different heights. Set the desired Gas BBQs with lids enable gentle cooking of larger pieces of height with the lift handle. Always use BBQ gloves when the grill meat and entire fowls, similar to an oven. - Page 20 care of grill surfaces and lid • Food residues on the base of the BBQ can be removed with a brush, spatula, or cleaning sponge. Then wash again with IMPoRTANT INFoRMATIoN soapy water. Rinse with clean water and dry. care and protection of stainless steel surfaces •...
-
Page 21: Troubleshooting
Possible cause Suggested solution Charcoal Gas Combi Grill Burner won’t ignite. – LP gas bottle is empty – Replace with full LP „Toronto Combi“ gas bottle – Get the regulator tested approx. 62 kg – Defective regulator Weight: or replace it approx. - Page 22 P21108_TEPRO_TorontoKombi_3179_210907.indd 42 7/9/2021 2:17 PM...
Need help?
Do you have a question about the TORONTO COMBI and is the answer not in the manual?
Questions and answers