Table of Contents
Advertisement
Quick Links
Advertisement
Table of Contents

Related Manuals for TriBrer Lemon 5


Summary of Contents for TriBrer Lemon 5
- Page 1 Lemon 5...
- Page 3 Warning Any undefined change or modification of this manual will deprive you of the right to operate the equipment. To reduce the risk of fire or electric shock, do not expose the equipment to rain or humidity. To prevent electric shock, please do not open the shell, and it must be repaired by qualified personnel. This product is designed for splicing the glass fiber of optical communications and cannot be used to splice other materials.
- Page 4 Cautions Do not use and store the fusion splicer in a high temperature and humidity environment. Otherwise, it may cause damage to the equipment. Do not touch the heat-shrinkable tube during the heating or just ending, because the heat shrink is hot and may cause burns. Do not touch the fusion splicer, AC power cord and AC plug when wet hand, otherwise it may cause electric shock.
-
Page 5: Standard Package
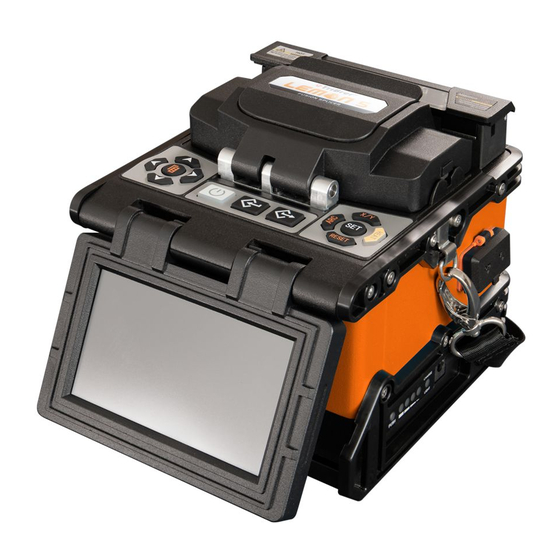
Standard Package AC/DC adapter Carrying case Fiber stripper Spare electrode Fiber cleaver Cooling tray Calibration certificate... - Page 6 Host Clamp slot V-groove Electrode Objective lens Windshield cover Optical fiber presser Electrode Cover Heater V-groove Heater cover Multi-function clamp Hand strap 4.3 inch TFT color LCD Removable battery USB port Charging port Anti-collision batten OPM/VFL port Screen Cover...
-
Page 7: How To Use Keyboard
How to Use Keyboard Discharge Start splicing Enter into main menu Power On/Off Switch X/Y images Start heating Motor reset Navigation buttons Enter Back to previous menu Move the cursor/fiber Save settings Modify settings Save splice image Note: Also can be operated by touch screen. -
Page 8: Splicing Operation
Splicing Operation Turn on Placing protection sleeve over fiber Stripping, Cleaning and Cleaving fiber Loading fiber onto splicer Confirming splicing mode, automatic splicing when windshield cover closed Note: Place fiber between electrodes tip and V-groove end. Visual inspection on LCD during splice Tension Test Press "... - Page 9 READY Press to turn on the device, then enter into the READY interface in default, and display the present " " " " splice and heat mode settings.
- Page 10 OPM VFL Function READY interface, press to enter OPM/VFL measurement interface, then tap corresponding icons " " " " to operate. And press to back to READY Interface. " " " " Wavelength 850/1300/1310/1490/1550/1625nm Ref setting Set reference value Unit Switch unit dBm/dB VFL ON /Blink/OFF...
- Page 11 Main Menu Press to enter the main menu, then using navigation buttons to choose the different sub-menus, " " and press to enter each interface, then press back to main menu. " " " "...
-
Page 12: Splice Mode
Splice Mode In " Splice Mode " , user can press " " / " " to choose , and " " to directly use the selected splice mode, then it turns red when selected. - Page 13 Splice Mode Press to edit splicing parameters in each fiber type option, then " " " " " " " " " " to modify the parameter. Note: Do not modify the parameters at will. Set the pre-discharge time before final splicing Set pre-discharge power before final splicing Set splicing time Set splicing power...
-
Page 14: Heat Mode
Heat Mode Mode Heat , user can select protection sleeve length based on requirement. Then press to enter " " " " parameter edition interface to set heat time, temperature and auto heat ON/OFF. Range: 0-240s Range: 130-200 Open/Close... -
Page 15: Function Settings
Function Settings In Function Settings, press to choose, and to edit ON/OFF for each function. " " " " " " If "Open" ,it will stop 1 or 2 times during the splicing, and press "SET" to continue If "Open", it will auto splicing when close the cover If "Open", it will auto-reset the motor after splicing Open/Close auto arc calibration after splicing... - Page 16 Setting In " Setting " interface, " Restore factory settings " & " Other settings " are protected with passwords. 2021...
-
Page 17: Maintenance
Maintenance... - Page 18 Maintenance- ARC Calibration Choose ARC Calibration , press to enter the interface. " " " " Put two prepared bare fiber to V-groove, close the cover, then arc calibrate starts automatically. If prompt Please continue , please do same operation as above until auto calibration finish. "...
- Page 19 Maintenance- Dust check Dust check is to check the optical channel clean or not, and indicate dust position. No need place fiber, choose " Dust check " , Press " " to enter the interface, press again to start checking. If prompts "...
- Page 20 Maintenance- Electrodes Aging Electrode is used for stability testing of new electrode. Users can check " ARC Times " and " Total ARC Times " , and can clear ARC Count. 0010...
- Page 21 Maintenance- Sensor Value/ Touch screen correction In " Sensor Value " , it will show the environmental condition, such as temperature, air pressure, power voltage... In " Touch screen correction " , follow the prompts to adjust the screen. 3 3 . 6 9 3 2 .
- Page 22 Maintenance- Debugging Debugging steps 1.Motor drive, tap the direction buttons to drive the optical fiber up/down/back/forth, and press" " to switch the left and right motors; 2.Image brightness, tap " " /" " to adjust the image brightness, and" " to switch the image to be adjusted;...
- Page 23 Information In "Information" interface, user can check spliced data and the device information.
- Page 24 Information- Splice Records Splice Records , press to choose the record, to check the detailed splice " " " " " " " " information, and to delete data or other options. " " The splice records will be saved automatically after splicing. Jump to the first record Jump to the last/recent record Clear selected record...
- Page 25 Information- Splice Image Splice Image , press to choose the image data, to view the splice image,and " " " " " " " " to delete data or other options. " " The splice image should be saved by pressing after splicing.
- Page 26 Information- Export records 1.Connect U-disk to the fusion splicer through the OTG cable 2.Choose Export records and press to enter and press again to connect " " " " " " 3.The records will be transmitted automatically, turn off the device and unplug the U-disk...
- Page 27 Information- Software Update 1.Create a software folder in the root directory of the U-disk, and put the upgrade file(e.g. 1.60P.bin format) " " in this folder; 2.Connect U disk to the fusion splicer through the OTG cable; 3.Turn on the device and choose Information , then Software Update...
-
Page 28: Electrode Replacement
Electrode Replacement Steps: 1. Loosen the screws and remove the electrode cover; 2. Remove the old electrode and install a new one; 3. Install the electrode cover and tighten the screws. Note: Keep the device off and ensure no fiber in the clamp slot. - Page 29 Fusion Splicer Cleaning V-groove Objective Lens Fiber Presser Heater When cleaning, keep the device off Do not touch the electrode tips Use cotton swab moistened with purity alcohol. Use dry swab to clean the excess alcohol.
-
Page 30: Troubleshooting
Troubleshooting Phenomenon Reason Solution Fiber Core axial misalignment V-groove or optical fiber presser is dusty Clean the V-groove and optical fiber presser V-groove or optical fiber presser is dusty Clean the V-groove and optical fiber presser Fiber Core angle error Check the fiber cleaver Poor quality of fiber end face V-groove or optical fiber presser is dusty... - Page 32 EMP_C07#0002 Rev.2100914...
Need help?
Do you have a question about the Lemon 5 and is the answer not in the manual?
Questions and answers
Hello, I want the factory reset code for the Fusion Lemon 5 device, please give me the code.
The factory reset code for the TriBrer Lemon 5 device is not provided in the context.
This answer is automatically generated