
Related Manuals for Magnadyne M4-LCD


Summary of Contents for Magnadyne M4-LCD
- Page 1 Operation and Installation Manual Models: M3-LCD and M4-LCD AM / FM / WB Stereo Receiver with Disc Player and Touch Screen Controls...
-
Page 2: Table Of Contents
Disc Warnings Music Disc Operation MP3 Operation (DISC, USB and SD CARD) Movie Disc Operation Movie Disc Setup Menu GPS Navigation GPS Navigation Operation (M4-LCD Only) Operation Bluetooth Operation Bluetooth Operation Satellite Radio Satellite Radio Setup Satellite Radio Operation IPOD Operation... - Page 3 Your first priority while driving should always be the safe operation of your vehicle. Magnadyne will not accept any responsibility whatsoever for accidents and/or injuries resulting from failure to observe these precautions or safety instructions.
- Page 4 Press and hold for 3 seconds to turn the unit Off. Press and release to switch to Navigation mode, press and release again to return to last source. Note: Navigation only available on M4-LCD. 3. LCD Display: Touch to interact with the display screen.
- Page 5 • Press the power button ( ) for 3 seconds will turn the unit off. Note (M4-LCD Only): Pressing and releasing the power button ( ) switches the unit to the Navigation mode, press and release again to return to last source.
-
Page 6: Language
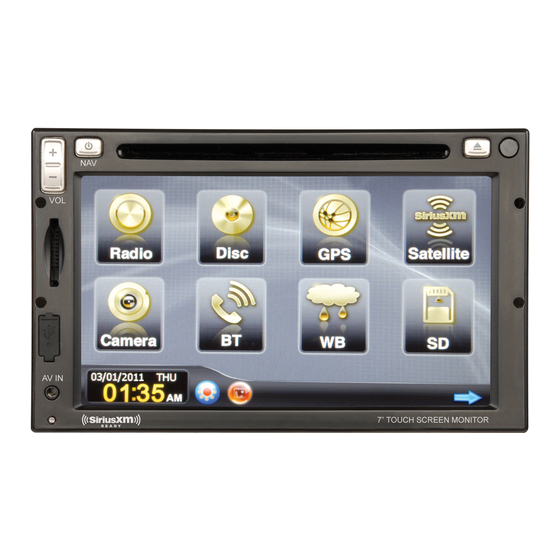
Homepage. The Homepage menu consists of 2 screens. Press the hand corner of the screen to reveal the second Homepage screen. • M4-LCD Only: In the Navigation (GPS) mode the Homepage can be accessed by pressing and releasing the power button ( power button ( ) again will switch the unit back to the Navigation (GPS) mode. -
Page 7: Setting The Clock
Press HOME to save and return to Homepage. GPS Setup (M4-LCD Only): The M4-LCD comes preloaded with the GPS soft- ware and is ready to use, no updating is necessary. Loading the GPS software: 1. Remove the SD card from the rear card reader. -
Page 8: System Setup
System Setup (Continued) System Setup (Continued): 2. A. The SYS (system) buttons deactivate and activate system features. B. The Effect buttons changes the way the unit transitions from one screen to another screen. 3. Once selections have been made press the button to exit the system setup menu. -
Page 9: Reset
System Setup (Continued) Reset: 1. Press the button to reveal more setup features. 2. Type “5365” as the password then press the button. 3. The unit will reset the radio area and wallpaper to factory default settings. Sound Controls Volume: Increase the volume by pressing the the button. - Page 10 Sound Controls (Continued) Equalizer Interface (continued): Balance and Fader: Press the button to activate the speaker adjustment screen. Use the the speaker’s balance and fader. Press the button to return to the factory settings. Center Speaker: To activate the center speaker press the button.
- Page 11 Radio Operation Power On/Off: Press the power button ( ) to turn the unit on. Selecting the Radio Source: Touch the HOME button to activate the Homepage screen. Touch the Radio button to enter the radio operation screen. Selecting the AM, FM or WB Band: Press the Band button repeatedly and select from FM1, FM2, FM3, AM1, AM2 or WB (weather band).
- Page 12 Radio Operation (continued) Automatically Store Radio Stations: 1. Press the BAND button to select from the FM1, FM2, FM3, AM1 or AM2 radio band. 2. Press and hold the AS/PS button until “AS/PS” appears in the display. The tuner will search for the strongest stations and store them into memory.
- Page 13 Radio Operation (continued) 4. To search for another station that broadcasts traffic announcements press either the button. 5. Press the TA button again to cancel this fea- ture. “TA” will disappear from the display. 6. Press the FUNC. button to return to main radio interface screen.
-
Page 14: Weather Band Operations
Weather Band Operation Power On/Off: Press the power button ( ) to turn the unit on. Selecting the Weather Band Radio Source: Touch the HOME button to activate the Homepage screen. Press the in the lower right hand corner of the screen to reveal the second Homepage screen. -
Page 15: Music Disc Operation
Music Disc Operation General Operations: Gently insert the disc into the slot with the label side up. The unit will automatically load the disc. Note: If a disc does not auto-load, DO NOT FORCE it into the slot, as you may already have a disc loaded. -
Page 16: Music Disc Operation
Music Disc Operation (continued) Stopping a Music Disc: Touch the screen to reveal the disc controls. Press the � button to stop the disc. To resume play, press the ll button. � Press the � button 2 times, then press the button and the disc will start playing from the beginning. -
Page 17: Mp3 Operation (Disc, Usb And Sd Card)
MP3 Operation (Disc, USB and SD Card) General Operations: Disc: Gently insert the disc into the slot with the label side up. Inserting the disc will automati- cally switch the unit to Disc source screen. Note: If a disc does not auto-load, DO NOT FORCE it into the slot, as you may already have a disc loaded. -
Page 18: File Selection
MP3 Operation (Disc, USB and SD Card) (continued) MP3 Interface Screen: The MP3 media (CD, SD card or USB flash drive) contains folder(s) with files inside the folders. These files can include music tracks, photos and/ or videos (compatible MPEG1, MPEG2 and DivX files). -
Page 19: Mp3 Operation (Disc, Usb And Sd Card)
MP3 Operation (Disc, USB and SD Card) (continued) Stop: Touch the button to reveal the file and folder controls. Press the � button to stop play. To resume play, press the ll button. � Press the � button 2 times, then press the button and the first track from the first folder will start playing. -
Page 20: Movie Disc Operation
Movie Disc Operation General Operations: Gently insert the disc into the slot with the label side up. The unit will automatically load the disc. Note: If a disc does not auto-load, DO NOT FORCE it into the slot, as you may already have a disc loaded. - Page 21 Movie Disc Operation (continued) Stopping a Movie Disc: Touch the screen to activate the control button panel. Press the � button to stop play. To resume play, press the ll button. � Press the � button 2 times, then press the button and the movie disc will start playing from the beginning.
- Page 22 Movie Disc Operation (continued) Subtitle Language Menu: 1. Touch the screen to reveal the disc controls. 2. Press the in lower right hand corner of the screen 2 times to reveal the secondary disc controls. 3. Press the button during playback. Each time the button is pressed, the subtitle lan- guage changes.
-
Page 23: Movie Disc Operation
Movie Disc Operation (continued) Direct Chapter Selection: 1. Touch the screen to reveal the disc controls. 2. Press the in lower right hand corner of the screen to reveal the secondary disc controls. 3. Press the button to show the number key- pad. -
Page 24: Movie Disc Setup Menu
Movie Disc Setup Menu Note: To access the Movie Disc Setup Menu, a movie disc has to be inserted. Movie Disc Setup Menu: 1. Touch the screen during movie playback to reveal the disc controls. 2. Press the in lower right hand corner of the screen to reveal the secondary disc controls. -
Page 25: Gps Navigation Operation (M4-Lcd Only)
GPS Navigation Operation (M4-LCD Only) Power On/Off: Press the power button ( ) to turn the unit on. Selecting the GPS Navigation System: Direct Selection: Press and release the button from any screens to enter the navigation screen. Note: Pressing the button again will return the unit to last non GPS screen. -
Page 26: Navigation Settings
GPS Navigation Operation (M4-LCD Only) (continued) Navigation Settings: You can configure the program settings, and modify the behavior of the navigation system. Touch the Settings icon in the Navigation Menu screen. Settings Menu (1 of 2): • Map Visuals: Fine-tune the appearance and con- tent of the Map screen. - Page 27 GPS Navigation Operation (M4-LCD Only) (continued) Map Features 1. Turn preview, that is the next route event. Press to open the Route Information screen. 2. Second upcoming route event. Press to open the trip itinerary. 3. Trip data. Press to open the Trip information screen.
-
Page 28: Selecting The Destination Of A Route
GPS Navigation Operation (M4-LCD Only) (continued) Selecting the Destination of a Route Selecting the Cursor as the Destination: 1. Locate your destination on the map. Move and scale the map as needed. 2. Touch the location on the map that you want to select as you destination. - Page 29 GPS Navigation Operation (M4-LCD Only) (continued) Entering an Address or part of an Address (Continued): 4. By default, the navigation system automati- cally selects the country, state and city. If you need to change any of the previous selection touch the screen next to item you want to change.
- Page 30 GPS Navigation Operation (M4-LCD Only) (continued) Entering a Zip Code (Continued): 3. Touch the Find Address button. 4. Select “All States” from the state menu. 5. Select “<enter city name filter>” menu. Using the keyboard enter the Zip Code. Automatically the city appears on the screen.
- Page 31 GPS Navigation Operation (M4-LCD Only) (continued) Making a Detour: Avoid Parts of the Route Detour: 1. Touch the Second Upcoming Route Event area. 2. Use the buttons at the bottom of the screen to find the part of the route to avoid.
- Page 32 GPS Navigation Operation (M4-LCD Only) (continued) Saved Search Criteria Detour (Continued): 3. Touch the Insert Via button and a yellow flag will appear on the map indicating the detour route has been calculated and you can start navigating. Note: To delete this detour touch the yellow detour flag until a flashing cursor shows up on the screen.
- Page 33 GPS Navigation Operation (M4-LCD Only) (continued) Route Menu: Touch the Route icon to save, load and edit your routes. 1. Route Information: Contains data (estimated arrival, route length, time left, distance left, method of travel and warning icons) and some of the functions you need while you navigate.
-
Page 34: Gps Navigation Operation (M4-Lcd Only)
GPS Navigation Operation (M4-LCD Only) (continued) Manage Menu: Touch the Manage icon to manage the content that the navigation system stores. 1. Saved Routed: Renaming or deleting saved routes. 2. Track Logs: Recording, simulating, renaming or deleting track logs, assigning color to them to be shown on the map. -
Page 35: Pairing Bluetooth Devices
7. When phone has been paired “Connected” will appear in the unit’s Bluetooth interface display. Note 1: If the mobile phone has been previously paired with the M4-LCD/M3-LCD, the unit will con- nect automatically to the Bluetooth mobile phone when the unit is turned on. - Page 36 Touch the red phone to end the call. Connecting an Already Used Phone: The M4-LCD/M3-LCD automatically connects itself to the last phone you used with it. If you want to connect the nit to another phone you already paired: 1. Make sure the Bluetooth is turned off of the last mobile phone that was connected to the unit.
- Page 37 Bluetooth Operation (continued) Phone Book: 1. Make sure the mobile phone is connected to the unit. 2. Press the button to enter the Bluetooth phone book interface. 3. Press the button to download the phone numbers from your mobile phone. 4.
-
Page 38: Satellite Radio Setup
Satellite Radio Setup Note: The vehicle must be equipped with an optional satellite tuner (SXV100) in order to receive a satellite sig- nal. If the tuner is not activated, call 1-866-635-2349 to activate. The Tuner ID Number (SID) is required during the activation process. -
Page 39: Satellite Radio Operation
Satellite Radio Operation Please note that satellite radio signal may be blocked by trees, buildings or other obstacles. Information display during reception: CHECK ANTENNA: When an antenna issue exists. ACQUIRING SIGNAL: When a channel is being tuned-in (no signal is yet received). CHANNEL NOT AVAILABLE: A channel without a broadcast has been selected or the receiver may not be activated. - Page 40 Satellite Radio Operation Channel Selection Modes (continued): Category Tuning: 1. Press the CATEGORY button. 2. Use the buttons to select the Category. � � The Category can also be selected by touching the desired category on the screen. To select the Channel, use the tons.
- Page 41 Satellite Radio Operation Programming Preset Satellite Channel: 1. Tune in the desired channel then press the PRESET button to access the preset channel menu. 2. To program the channel, press and hold any one of the six channel recall buttons until you see the “Preset Number”...
- Page 42 Satellite Radio Operation Recalling Preset Channel (continued): 2. To recall a preset channel, press and release the preset number displaying the desired channel number on the button. Note: Additional channels can also be recalled in the different preset bands (SIR1, SIR2 and SIR 3).
-
Page 43: Satellite Radio Operation
Satellite Radio Operation Skipping a Channel (continued): 4. Press the button and to the channel indicating that the channel is skipped. Reinstating a Skipped a Channel: Select the channel to be reinstated by highlight- ing the channel. Press the will appear next to the channel indicating that the channel is reinstated. -
Page 44: Ipod Operation
General Operations: 1. Press the power button ( ) to turn the unit on. 2. Connect an IPOD to the cable attached to the M4-LCD/M3-LCD. 3. The unit will automatically switch to the IPOD source screen and start playing. Note: The controls on the IPOD will become inop- erable and the unit will now control the IPOD. - Page 45 IPOD Operation (Continued) Navigation Controls: Touch the screen to activate the track controls. Press the in lower right hand corner to acti- vate the navigation controls. Navigation: Press the button to scroll up through the menu item. Same operation as the IPOD’s Click Wheel.
-
Page 46: Ipod Operation
IPOD Operation (Option) (Continued) Browse for a Song (continued) 3. Press the OK button. 4. Press the through the songs. 5. Press the OK button and the song will start playing. button to scroll... -
Page 47: Camera Operation
The video image from the camera will appear on the screen and the audio from the rear camera can be heard through the vehicle’s speakers. Note: This system only provides for one way audio, from the camera to the M4-LCD/M3-LCD. The M4-LCD/M3-LCD is unable to transmit audio to the camera. -
Page 48: Auxiliary Audio/Video Inputs Operation
Auxiliary Audio Video Inputs Operation Note: The M4-LCD/M3-LCD will not control the auxiliary source, but can adjust the audio output. Refer to the audio device’s owners manual for proper playback operation. Connecting an Auxiliary Audio/Video Device: Auxiliary Input 1 (AV-IN1): Connect an auxiliary audio/video device using a 3.5mm jack (not... -
Page 49: Removing The Unit
Installation Step 1 : The radio chassis is designed to be “Sleeve Mounted” through an opening in the dashboard panel. The required opening size is 182mm (7-3/16”) x 84mm (3-5/16”). Cut or engage an opening in the dashboard to accommodate the mounting sleeve. Step 2 : Insert the mounting sleeve into the opening in the dashboard. - Page 50 Speaker Connections White/Black Wire Left Front Speaker White Wire Brown/Black Wire Brown Wire Left Green/Black Wire Rear Speaker Green Wire Gray/Black Wire Gray Wire Center Channel Speaker Subwoofer (Optional) Violet/Black Wire Violet Wire Right Front Speaker Right Rear Speaker...
- Page 51 Input and Output Connections This unit for use only with a 12 Volt DC power source with a negative ground. Red Wire: (+) to 12 Volt Ignition 1A Fuse Yellow Wire: (+) to 12 Volt Constant Black Wire: Ground Orange Wire: Parking Brake Switch (-) Blue/Black Wire: Dimmer Control (+) Infrared Remote Sensor (Optional)
- Page 52 Input and Output Connections Audio Input Left (White) Audio Input Right (Red) Video Input (Yellow) (Optional) (Continued) SiriusXm Antenna Blue Wire: Power Antenna (12V Out) External TV Receiver (Optional) SiriusXm Vehicle Tuner SXV100 (Optional) External Automotive Type Antenna (Optional)
- Page 53 TV Monitor (Optional) Video Second Monitor (Optional) (Continued) Video Output (Red) Video Output (Green) Video Output (Blue) Sync (Brown) Audio Output Left (White) Audio Output Right (Red) Video Output (Yellow) Note: Audio Output is not controlled by the M4-LCD Video Output (Yellow)
- Page 54 Camera Connections C125: (Rearview) C-SDR: (Right Side) C-SDL: (Left Side) C125: (Front) White Wire: Left Trigger (+12V) Gray Wire: Right Trigger (+12V) Green Wire: Rear Trigger (+12V) (Green Connector) (Gray Connector) (White Connector) 13-Pin Camera Harness CAM3: CAM2: CAM1:...
- Page 55 Restart Button The LCD display may fail to function normally due to the vehicle’s battery condition, and could require restarting the radio’s microprocessor if: • The vehicle has been “jump started” from a dead battery condition. • The vehicle battery becomes very low and is quick-charged.
- Page 56 Warranty ONE (1) YEAR LIMITED WARRANTY Magnadyne Corporation or its authorized agents will within one year from the date of sale to you, repair, replace or refund the retail sales price of said product or any part thereof, at the option of the Magnadyne Corporation or its authorized agents, if said product or part is found defective in materials or workmanship, when properly connected and operating on the correct power requirements designated for the specific product.
Need help?
Do you have a question about the M4-LCD and is the answer not in the manual?
Questions and answers
No audio. Unable to get sound from speakers.