
Related Manuals for Optomed Polaris


Summary of Contents for Optomed Polaris
- Page 1 Polaris User Manual Reading through accompanying documents is a mandatory action before using this equipment 810-C1101-434 Ver. A...
-
Page 2: Table Of Contents
Non-Mydriatic Fundus Camera (Optomed Polaris) - User Manual Content Introduction Outline Intended use Indication for use Proper instrument use Safety Information Displays for safety use Symbols and labels Protective packing symbols Product labels Service life Cybersecurity information Cybersecurity functions Data back up... - Page 3 Non-Mydriatic Fundus Camera (Optomed Polaris) - User Manual Forehead adaptor installation Software update...
-
Page 4: Introduction
1.1 Outline The Automated non-mydriatic fundus camera Optomed Polaris is an auto 3D tracking, fast and easy to use retinal imaging system. Optomed Polaris is designed to provide images of the eye as an aid to clinicians in the diagnosis of diabetic retinopathy, AMD, glaucoma and other retinal diseases. -
Page 5: Proper Instrument Use
Non-Mydriatic Fundus Camera (Optomed Polaris) - User Manual 1.4 Proper instrument use Optomed Polaris is a medical device; it must be operated by properly trained and qualified person(s) only. The operation should be supervised by a physician. If abnormal behavior is observed due to EM disturbances, please relocate the device accordingly. -
Page 6: Safety Information
Non-Mydriatic Fundus Camera (Optomed Polaris) - User Manual 2 Safety Information Displays for safety use Display Meaning “WARNING” indicates the presence of a WARNING hazard that could result in severe personal injury. “CAUTION” indicates the presence of a hazard CAUTION that could result in minor injury. - Page 7 Non-Mydriatic Fundus Camera (Optomed Polaris) - User Manual TOOLS CONSIDERED TO BE THE STANDARD OF CARE FOR MEASUREMENT AND DIAGNOSIS OF THE EYE. The Optomed Polaris is a medical device. The WARNING software and hardware have been designed in accordance with U.S., European and other international medical device design and manufacturing standards.
- Page 8 Non-Mydriatic Fundus Camera (Optomed Polaris) - User Manual Do not obstruct the mains power switch or WARNING position the equipment where the connection to the mains line can be accidentally disconnected. Equipment is not suitable for use in the WARNING presence of a Flammable Anesthetic Mixture with Air, Oxygen, or Nitrous Oxide.
- Page 9 Non-Mydriatic Fundus Camera (Optomed Polaris) - User Manual Do not operate the LCD monitor with wet hands CAUTION or hard objects. The LCD monitor may be damaged. When adjusting chinrest, be careful not to pinch CAUTION the patient’s hand. The device needs to install on the stable table.
-
Page 10: Symbols And Labels
Non-Mydriatic Fundus Camera (Optomed Polaris) - User Manual 2.2 Symbols and labels Presence of electrical shock hazard. Note: Indicates risk of electrical shock due to the presence of uninsulated high voltage inside the instrument. Do not remove the instrument cover or parts. -
Page 11: Protective Packing Symbols
Non-Mydriatic Fundus Camera (Optomed Polaris) - User Manual 2.3 Protective packing symbols The protective packing symbols specify the handling requirements and the transport and storage conditions. Fragile, Handle with care Keep dry This end up Relative Humidity Temperature Do not stack... - Page 12 (none). Continuous Operation – Mode of operation Electromagnetic Compatibility (EMC): EN 60601-1-2 The Optomed Polaris device has been tested to comply with the emission and Immunity requirements of EN60601-1-2. The Optomed Polaris is intended for use in an...
- Page 13 Guidance and manufacturer’s declaration – electromagnetic emissions The Optomed Polaris is intended for use in the electromagnetic environment specified below. The customer or the user of the Optomed Polaris should assure that it is used in such an environment. Emissions test Compliance Electromagnetic environment –...
- Page 14 Guidance and manufacturer’s declaration – electromagnetic immunity The Optomed Polaris is intended for use in the electromagnetic environment specified below. The customer or the user of the Optomed Polaris should assure that it is used in such an environment. Immunity test...
- Page 15 Non-Mydriatic Fundus Camera (Optomed Polaris) - User Manual uninterruptible power supply or (30 % dip in UT) (30 % dip in UT) a battery. for 25 cycles for 25 cycles <5 % UT <5 % UT (>95 % dip in UT) (>95 % dip in UT)
- Page 16 Guidance and manufacturer’s declaration – electromagnetic immunity The Optomed Polaris is intended for use in the electromagnetic environment specified below. The customer or the user of the Optomed Polaris should assure that it is used in such an environment. Immunity...
- Page 17 To assess the electromagnetic environment due to fixed RF transmitters, an electromagnetic site survey should be considered. If the measured field strength in the location in which the Optomed Polaris is used exceeds the applicable RF compliance level above, the Optomed Polaris should be observed to verify normal operation.
- Page 18 Recommended separation distances between portable and mobile RF communications equipment and the Optomed Polaris The Optomed Polaris is intended for use in an electromagnetic environment in which radiated RF disturbances are controlled. The customer or the user of the Optomed...
-
Page 19: Product Labels
Otherwise, it may result in fire or electric shock. For details of purchasing accessories, please contact an Optomed representative or distributor. 2.5 Service life The service life of Optomed Polaris is five years if specified inspections and maintenance are done. 2.6 Cybersecurity information 2.6.1 Objective The purpose of this section is to summarize the cybersecurity controls of the Optomed Polaris system. -
Page 20: Cybersecurity Functions
• The laptop or PC is limited to install Windows 10 operation system and is dedicated for Optomed Polaris, for the risk of viruses and other malwares, users must install and enable... -
Page 21: Data Back Up
Non-Mydriatic Fundus Camera (Optomed Polaris) - User Manual confidentiality, integrity and availability. • Local supervisor must set the expiration time of screen saver to reduce casual viewing data. Data back up • To avoid the loss of patient data due to damage to the storage device of the user's PC, it is recommended that the user should regularly back up the data. -
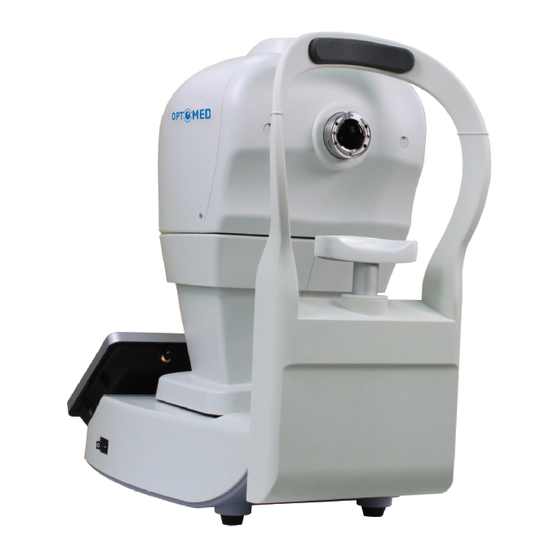
Page 22: Instrument Description
Non-Mydriatic Fundus Camera (Optomed Polaris) - User Manual 3 Instrument description Introduction Fundus Camera Head LCD Monitor/ Touch Panel Base Power Switch... - Page 23 Non-Mydriatic Fundus Camera (Optomed Polaris) - User Manual Forehead Rest Ocular Lens Chinrest (Motorized)
-
Page 24: Standard Accessories
Non-Mydriatic Fundus Camera (Optomed Polaris) - User Manual 3.2 Standard accessories Item Description Q’ty User manual 1 pc. AC power cord 1 pc. Dust cover 1 pc. Forehead adaptor 1 pc. Lens cover 1 pc. -
Page 25: Log In And Introduction Of User Interface
Non-Mydriatic Fundus Camera (Optomed Polaris) - User Manual Log in and introduction of user interface ◼ Log in Username Password ⚫ Username: Input the user name. Password: Input the password. ⚫ ◼ Default account: ⚫ Username: camera ⚫ Password: 00000000... - Page 26 Non-Mydriatic Fundus Camera (Optomed Polaris) - User Manual ◼ Modify account After logging in, go to the settings page to modify the username and password. Username Password Confirm Password Account ⚫ Username: Change username when needed. ⚫ Password: Change password when needed.
- Page 27 Non-Mydriatic Fundus Camera (Optomed Polaris) - User Manual If the password inputs are not same, please check them again. If the password inputs are same, below dialog is displayed.
- Page 28 Non-Mydriatic Fundus Camera (Optomed Polaris) - User Manual ◼ Change password every six months Password is requested to be changed every six months. ⚫ Old password: Input the old password. ⚫ New password: Input the new password. ⚫ Confirm new password: Input the password again.
- Page 29 Non-Mydriatic Fundus Camera (Optomed Polaris) - User Manual Below graph shows error occurs. Click Change button if no error occurs.
- Page 30 Non-Mydriatic Fundus Camera (Optomed Polaris) - User Manual Below error message means input password is incorrect. Below graph shows new password is changed successfully.
- Page 31 Non-Mydriatic Fundus Camera (Optomed Polaris) - User Manual Three tabs are displayed on screen after logging in and describe in below sections. Capture Image Patient Management Review captured image...
-
Page 32: Patient Management
Non-Mydriatic Fundus Camera (Optomed Polaris) - User Manual 4.1 Patient management Select patient, add patient and modify patient information Information Delete / Edit Settings Quick Search Search Patient List Recent Images • Patient List: Displays all the patients associated with the search result. - Page 33 Non-Mydriatic Fundus Camera (Optomed Polaris) - User Manual The columns with * mark are mandatory before adding new patient to database. By clicking , the new patient information is saved to the database. The main screen will then return to the main Patient Information window and the newly added patient is listed under the patient list window.
- Page 34 Enabling Auto Export, the captured image will be copied to specific path automatically where the user Archive: Creates a backup file of Optomed Polaris database. Step1. Choose the target folder for backup file Step2. Click “ARCHIVE” button to create backup file...
- Page 35 The target folder for backup file Process progress NOTE: The file system of target drive should be NTFS Restore: Restore the database of Optomed Polaris by backup file Step1. Choose the target folder where the backup file is saved Step2. Choose the backup file from the list and click the “RESTORE”...
- Page 36 Non-Mydriatic Fundus Camera (Optomed Polaris) - User Manual Backup file list Language: Multi-language selection About: Display software version of Optomed Polaris...
-
Page 37: Capture Image
Mode Selection: Auto alignment mode or manual alignment mode • Advanced: Display settings of Polaris program Semi Auto Mode: User needs to switch eye manually. Full Auto Mode: The Optomed Polaris will switch to another eye automatically. Enable manual mode helper: It can help to find suitable... - Page 38 Non-Mydriatic Fundus Camera (Optomed Polaris) - User Manual working distance and do capture processes automatically if enable it. • Capture Mode Control: Display capture mode setting panel and provide retina (default) and cornea mode. • Diopter Control: Display diopter setting panel and provide empty lens (default), - lens and + lens •...
- Page 39 Non-Mydriatic Fundus Camera (Optomed Polaris) - User Manual 4.2.1 Automatic alignment and focus operation • Adjust chinrest with and table to suitable position. • Click pupil position on screen to align the camera. • Click to start tracking and capture.
- Page 40 Non-Mydriatic Fundus Camera (Optomed Polaris) - User Manual • Click the SET button. • Click the OK to start montage capture • Click CONTINUE button for next shot. 4.2.3 Manual alignment and manual capture • Click Mode Selection button to manual mode •...
- Page 41 Non-Mydriatic Fundus Camera (Optomed Polaris) - User Manual align the camera. • Approach to the pupil by buttons until split bar is visible • Align split bar by ( Click on the button, the fixation mask plate will be removed. User can see the live retina video. )
- Page 42 Non-Mydriatic Fundus Camera (Optomed Polaris) - User Manual • Enter the pupil by buttons until two spots are appeared • buttons to align two spots and click button to capture...
- Page 43 Non-Mydriatic Fundus Camera (Optomed Polaris) - User Manual • Click on the button, the operation tips will be shown. 4.2.4 Cornea capture mode • Add forehead adaptor to forehead rest ( refer to item 7.1 forehead rest installation)
- Page 44 Non-Mydriatic Fundus Camera (Optomed Polaris) - User Manual • Click the button and then select the cornea capture mode. • Adjust chinrest with and table to suitable position. • Click pupil position on screen or press buttons to align the camera.
- Page 45 Non-Mydriatic Fundus Camera (Optomed Polaris) - User Manual • Click to capture 4.2.5 Send DICOM Image When the selected patient which is found from DICOM server, the DICOM sending window is displayed before user leaves the Capture Image page. User can choose images and send them to DICOM server.
- Page 46 Non-Mydriatic Fundus Camera (Optomed Polaris) - User Manual Select Patient Select Visit Date Click on Image to enter Photo Viewer • Multiple Selections Press and hold on image thumbnail can enter the multiple selection mode. Click image thumbnail to select image for batch delete or export.
- Page 47 Non-Mydriatic Fundus Camera (Optomed Polaris) - User Manual Click on button, warning dialog will show. Click yes to delete selected image. Be careful, Deleted image cannot restore! • Montage Click on button, montage dialog will show. Date List Switch Close...
- Page 48 Non-Mydriatic Fundus Camera (Optomed Polaris) - User Manual Visit Date List Click on image to assign it to candidate list Candidate List Start Montage ⚫ Click button and the montage result will be shown.
- Page 49 Non-Mydriatic Fundus Camera (Optomed Polaris) - User Manual • Image Export Click on button, warning dialog will be shown and then choose the destination folder, image compression format. The Export ID means the file name should be included patient ID.
- Page 50 Non-Mydriatic Fundus Camera (Optomed Polaris) - User Manual Date List Switch Close Reset Redfree Date List Switch: Click button, the visit date list of selected patient will be shown.
- Page 51 Non-Mydriatic Fundus Camera (Optomed Polaris) - User Manual Click on image to assign it to left or right frame Visit Date List Left frame Right frame Reset: Click button, all image settings are reset to default Redfree: Click button to show the redfree image •...
- Page 52 Non-Mydriatic Fundus Camera (Optomed Polaris) - User Manual Preview Selected printer Image Browse Copy count Selected paper Comment Close printer dialog Perform print Select two images and click on button, printer dialog will show. Click the PRINT to print selected images.
- Page 53 Non-Mydriatic Fundus Camera (Optomed Polaris) - User Manual 4.2.7 Photo Viewer • Click image of Image List, the Photo Viewer will show. The Photo Viewer includes below functions. Image Information Close Contrast Brightness Negative Red Free RGB Separation CD Ratio...
- Page 54 Non-Mydriatic Fundus Camera (Optomed Polaris) - User Manual Level up Level down Negative: To do negative process for selected image RedFree: Remove the red channel and convert to grayscale for selected image. RGB Separation: To do RGB channels separation and display in color or grayscale mode.
- Page 55 Non-Mydriatic Fundus Camera (Optomed Polaris) - User Manual • Step6. Click the CD Ratio button and click the button to save the measurement result. The measurement is displayed on the top-right side of Photo Viewer. Cup to disc horizontal ratio...
-
Page 56: Specifications
Non-Mydriatic Fundus Camera (Optomed Polaris) - User Manual 5 Specifications 5.1 Product specification Function Value/Type Remark Fundus image Non-mydriatic, color image Field of view 45 degrees Illumination for retina White LED Strobe mode with flashing image (Capture) illumination. Cornea Image (Capture) White LED... - Page 57 Non-Mydriatic Fundus Camera (Optomed Polaris) - User Manual General Function Value/Type Remark Alignment Fully automatic 3D tracking Alignment Mode Full Auto / Auto/ Manual Chinrest Motorized Interface USB 2.0 port, Lan, HDMI Input/ Output format Image format: JPEG, PNG , DICOM (optional) Display 10.1”...
-
Page 58: Environmental Conditions
Non-Mydriatic Fundus Camera (Optomed Polaris) - User Manual 5.2 Environmental conditions 1) Operating conditions: • Temperature: 10°C– 35°C • Humidity: 30%– 90%RH • Atmospheric pressure: 800–1060 hPa 2) Storage conditions: • Temperature: -10–55°C • Relative Humidity: 10–95%RH • Atmospheric pressure: 700–1060 hPa... -
Page 59: Electric Rating
Non-Mydriatic Fundus Camera (Optomed Polaris) - User Manual 5.3 Electric rating • Source voltage :AC100-240V • Frequency :50-60Hz • Power input : < 150VA 5.4 Fuse specification • Rating: 1.6A/250VAC • Package: 5 mm x20 mm • Type: Slow blow... -
Page 60: Maintenance
Non-Mydriatic Fundus Camera (Optomed Polaris) - User Manual 6 Maintenance Lens cleaning It is recommended to regularly clean the Ocular Lens of the Optomed Polaris on weekly basis or when needed. 6.1.1 Material required for ocular lens: a) Diluted acetone or lens cleaning solution b) Lens cleaning paper 6.1.2 Method:... -
Page 61: Installation
Non-Mydriatic Fundus Camera (Optomed Polaris) - User Manual 7 Installation 7.1 Forehead adaptor installation Step 1. Take the forehead adaptor Step 2. Put into forehead rest... - Page 62 Non-Mydriatic Fundus Camera (Optomed Polaris) - User Manual 8 Software update Step 1. Plug in the USB drive and copy the Polaris installation package file to Windows desktop. Step 2. Perform the Polaris installation package, below installation dialog will be shown.
- Page 63 Non-Mydriatic Fundus Camera (Optomed Polaris) - User Manual Step 3. Click the “Install” button and wait for installation Step 4. Perform the Polaris program.
Need help?
Do you have a question about the Polaris and is the answer not in the manual?
Questions and answers