Advertisement
Quick Links
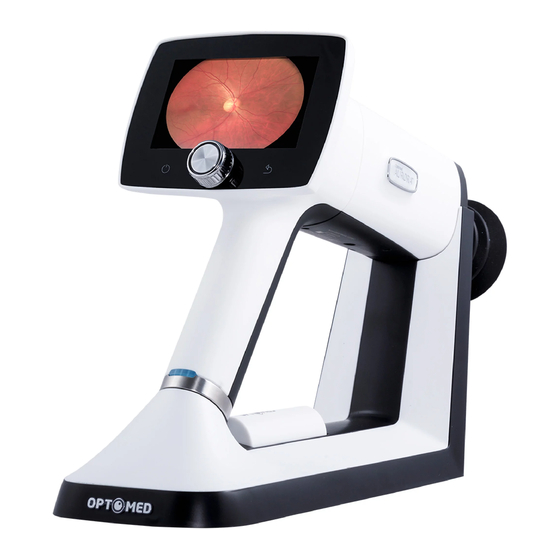
Optics eject button
Retinal module
Eye cup
Anterior module
Charging Station
Shutter button
Battery cover
QUICK GUIDE
Device overview
User interface
Patient
Fixation
target
Diopter
value
Brightness
Power button
• Short press, power on
• Long press, power off
Camera
Battery
Extra battery
Battery level
WLAN
Back button
Optoroller
• Access and
navigate in
menu
Advertisement

Related Manuals for Optomed AURORA IQ


Summary of Contents for Optomed AURORA IQ
- Page 1 QUICK GUIDE Device overview Optics eject button Retinal module Camera Eye cup Anterior module Battery Extra battery Charging Station User interface Patient Fixation Battery level target WLAN Diopter value Brightness Shutter button Back button Power button • Short press, power on Optoroller •...
- Page 2 Preparations and Settings Choose focus: Auto/manual* Power on Enter menu RIGHT EYE LEFT EYE RIGHT EYE Choose exposure: Choose fixation target: macula centric/optic disc centric Auto/manual* Create patient with ID Create new study Choose study: write patient name and ID. in patient menu •...
- Page 3 Imaging Approach pupil from 5-10 cm distance keeping Use both hands to support the device, stabilize it in the middle and press the eye cup firmly from the forehead around the eye Approach the GRAY oval reflection at the top of Red aim help;...
- Page 4 If the imaging target led or use autofocus decreasing (<5) the exposure level distance is too close, a reflection in the top of the image appears. R 2.0 Read the User Manual for more 2022 10 20 www.optomed.com information before use...
Need help?
Do you have a question about the AURORA IQ and is the answer not in the manual?
Questions and answers