DeFelsko PosiTector GLS Reference
Gloss meter
Hide thumbs
Also See for PosiTector GLS:
- Instruction manual (59 pages) ,
- Manual (26 pages) ,
- Instruction manual (56 pages)

Subscribe to Our Youtube Channel
Related Manuals for DeFelsko PosiTector GLS


Summary of Contents for DeFelsko PosiTector GLS
- Page 1 Gloss Meter On-Gage Help Reference Ayuda en el Medidor On-Gerät-Hilfe Aide sur l’instrumentation...
- Page 2 For an overview of the use and operation of your instrument, refer to its included Instruction Manual or download a digital PDF at www.defelsko.com/manuals. Update your gage to ensure your PosiTector includes these latest help references.
-
Page 3: Table Of Contents
Contents Memory ........................View ........................Off .......................... On .......................... Clear ........................Statistics ........................Statistics ........................ Clear ........................HiLo Alarm ......................Differential ......................Calibration Settings ...................... Edit ......................... Open ........................New Cal Standard ....................Delete ........................View ........................Power-On Cal ......................Cal Standard ...................... -
Page 4: Memory
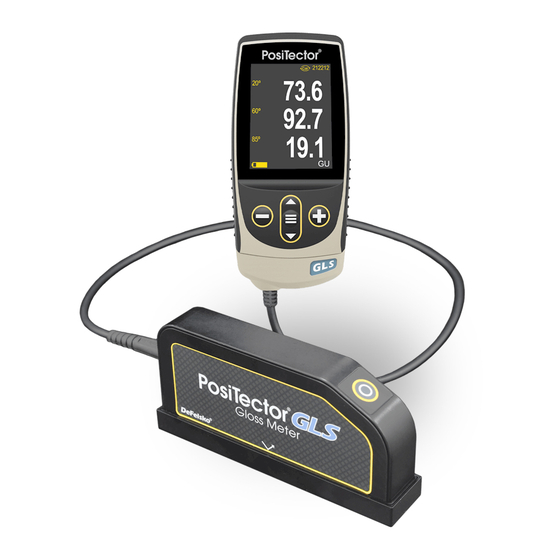
Memory The PosiTector GLS Standard has internal memory storage for recording measurement data. Stored measurements can be reviewed on-screen or downloaded to a computer. Measurements are date and time-stamped. Store up to 1000 readings (per probe) into a single batch. -
Page 5: Statistics
Statistics Menu option for configuring Statistics and HiLo Alarm modes. Statistics Statistics mode continually displays/updates average, standard deviation, min/max thickness and number of readings while measuring. When selected, the statistics icon and statistical summary will appear on the display. Ignore the last measurement by pressing the (-) button. Press (+) to clear statistics. Clear Clears all on-screen Statistics and HiLo tabulations. -
Page 6: Calibration Settings
Calibration Settings Calibrate the PosiTector GLS probe to known standards by using included gloss calibration standard (tile) or user supplied calibration standard. Place the probe on a known standard and select the Calibrate menu item. Alternatively, if Power-On Cal is selected in the Cal Settings menu the gage will perform a calibration every time the gage is powered on. -
Page 7: Power-On Cal
Cal Standard For some applications, it may be desirable to calibrate the PosiTector GLS probe to a different calibration standard than the one included with the probe. Add and manage up to 99 calibration standards from this menu. -
Page 8: Setup
Setup Set configuration options for the Gage. Set Clock All measurements are date and time stamped (24 hour format) when stored into memory. It is therefore important to keep both the date and time current using this menu option. Use the Up and Down buttons to scroll, and the (-) and (+) buttons to adjust value. -
Page 9: Units
Units = Gloss Touch = ON Flip Lock = OFF Auto Sync .net = ON Sound = Medium Language = English Battery Type = Alkaline Backlight = Normal Bluetooth Smart = OFF USB Drive = ON NOTE: Date, Time and WiFi are not affected by either Reset. Units Select between Gloss Units (GU) or % Reflectance. -
Page 10: Flip Lock
Flip Lock Disables the Auto Rotate feature by locking the display in its current orientation. Geometry (PosiTector GLS2060 and GLS206085 models only) Select the angles to display when taking measurements. Language Converts displayed and printed words to the selected language. Gage Info Displays the model number and serial number, probe type and serial number, PosiSoft.net registration key, the amount of remaining memory for storage of readings,... -
Page 11: Connect
Connect Configure communication and connection options for the Gage. Connect the Gage to a PC/Mac using the supplied USB-C cable. View and print readings and graphs with universal web browsers/file explorers or using PosiSoft Desktop. NOTE: While connected, power is supplied through the included USB-C cable. The batteries are not used and the body will not automatically power down. -
Page 12: Json Files
Determines if a software update is available for your Gage. To perform an update the Gage must be connected to an internet connected computer running PosiSoft Desktop. See www.defelsko.com/update WARNING: The Gage will perform a Hard Reset after an update. All stored measurements will be erased from memory. -
Page 13: Help
Press (+) or touch the (i) icon to display the help. Update your gage to ensure that you have the latest on-gage help information. A formatted PDF containing all on-gage help items is available at www.defelsko.com/help. Menu Operation To access the Menu, power-up the gage, then press the center navigation button. Either the keypad or touch screen can be used to navigate the menu. -
Page 14: Power Off
Power Off To conserve battery life, the gage will automatically go to sleep after 5 minutes of inactivity and enter Sleep Mode. While in Sleep Mode the gage powers up significantly faster— convenient when moving between parts or locations. The gage will completely power off after 4 hours of inactivity.
Need help?
Do you have a question about the PosiTector GLS and is the answer not in the manual?
Questions and answers