
Subscribe to Our Youtube Channel
Related Manuals for Eastey Perfomance EN Series


Summary of Contents for Eastey Perfomance EN Series
- Page 1 EM1622T, EM1622TK, EM1636T & EM1636TK Performance Series Semi-Automatic L-Sealers User Guide...
- Page 3 Semi-Automatic L-Sealers User Guide Revised 07/10/2017 P/N EM000900 Rev A Copyright and Trademarks Copyright ©2017 Eastey Enterprises, Inc. All rights reserved. All trademarks and brand names are the property of their respective owners. Eastey Enterprises 7041 Boone Ave. N. Brooklyn Park, MN 55428 Phone: (763) 428-4846;...
-
Page 5: Table Of Contents
Contents Safety ..........................6 General Safety Precautions ..................6 Introduction ........................8 General System Description ..................8 Specifications ........................ 9 Dimensions ......................... 11 Unpacking ........................12 Installation ........................13 Location Requirements ....................13 Operation ........................15 Control Panel ......................15 Film Unwinder ...................... -
Page 6: Safety
Read this manual carefully and make it available to everyone connected with the supervision, maintenance, or operation of this machine. Additional copies are available on request (Eastey.com/contact-us). The development of a good safety program that is rigidly enforced is absolutely imperative when involved in the operation of industrial equipment. - Page 7 • Do not make any modifications to either the electrical circuitry or the mechanical assemblies of this machinery. Such modifications may introduce hazards that would not otherwise be associated with this machinery. Eastey will not be responsible for any consequences resulting from such unauthorized modification. Do not operate a machine if any modification has been made •...
-
Page 8: Introduction
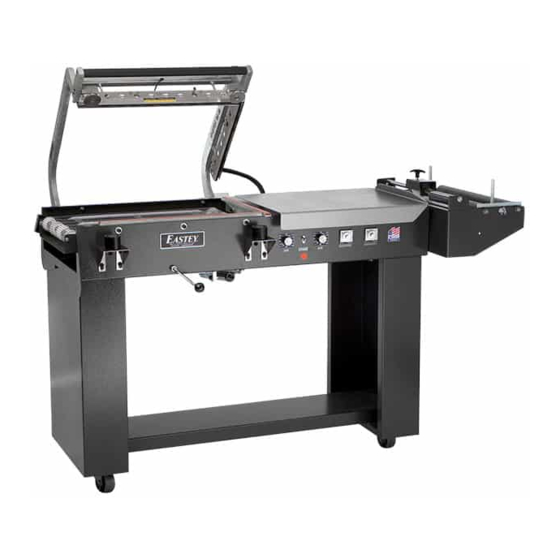
8 Introduction Introduction General System Description Seal Head Magnetic Disks Perforator Film Roll Hot Knife Support or Hot Rollers Wire Sealer On / Off Takeaway Toggle Product Conveyor Tray with Height Adjustment Front Seal and Side Seal Temperature Seal Dwell Electro Controls Timer and... -
Page 9: Specifications
227 kg 272 kg Explanation of Model Numbers • E = Manufactured by Eastey Enterprises Inc., division of Engage Technologies. • M = Manual (Semi-Automated) L-sealer operation. EM model Performance Series L-sealers incorporate an electromagnetic hold-down system that allows the operator to load the next package while the preceding package is being sealed, assuring uniform sealing pressure over the entire length of the seal bars to provide consistent sealing results. - Page 10 10 Introduction Standard Features • Designed to seal most polyolefin, polyethylene, and PVC* shrink films With hot knife systems only. • All-welded main frame from 12 gauge steel • Seal head casting equipped with head return cylinder • Stainless steel film clamps hold film in place while sealing •...
-
Page 11: Dimensions
Nominal Maximum Front Seal Length Width Height Length Side Seal Length Front Seal Length POWER OU T POWER OU T First in Quality. www.eastey.com Built to Last. sec. sec. MODE MODE POWER Height AT 11DN AT 11DN DWEL L CONVEYOR FRONT TEM SIDE TEM P. -
Page 12: Unpacking
We are willing to assist you in every reasonable manner to help you collect claims for loss or damage. However, this willingness on Eastey’s part does not make Eastey or its parent or related companies responsible for collections or claims or replacement of equipment damaged or lost in transit. -
Page 13: Installation
Installation 13 Installation Lift the machine up and off of the shipping pallet. CAUTION! The EM series L-sealer is heavy and will require a forklift, floor crane, or several people to move safely off the shipping pallet. Use proper equipment when lifting the L-sealer and ensure it is secure and will not shift while being moved off the shipping pallet. - Page 14 14 Installation For units equipped with a takeaway conveyor at the exit of the L-sealer, provision should be made for exiting packages. For example, a table or bin where packages that have been sealed will be placed until they can be picked up, or a conveyor that will move them to the tunnel.
-
Page 15: Operation
Operation 15 Operation Product Perforator Tray Film Roll Support Rollers Cast Seal Head Control Panel Control Panel ×100°F ×100°F POWER DWELL CONVEYOR Front Temperature Side Temperature CONTROL CONTROL Controls for the L-sealer are located along the front side of the frame under the product tray. -
Page 16: Film Unwinder
16 Operation Film Unwinder Product Tray The product tray is the adjustable metal platform used to separate the film and to facilitate insertion of the product between the bottom and top layers of film. The product tray is adjustable to achieve proper depth equal to the total width of the package, thereby allowing the product to be placed precisely at the center-fold of the film each time. -
Page 17: Sequence Of Operation
Operation 17 product and film into the sealing area. Do not place product in the first few bags formed by the sealer: they will not have any perforation holes in them (because the sealer and pin perforator work together). Perforation is required to allow air to vacate when the product passes through the shrink tunnel. - Page 18 18 Operation • While the magnets are holding the seal head down, it is not necessary to wait. Prepare the next item to be sealed, placing it on the product tray between upper and lower layers of film. 4. Once the seal is formed completely, the seal head automatically releases. The sealed product is removed by the takeaway conveyor, and the next item can be moved into position for sealing.
-
Page 19: Adjustments
Adjustments 19 Adjustments Element Pulse Switch Adjustment The sealing cycle should not begin until the seal head is within one-quarter-inch (¼”) or less of the film to be sealed. If the magnets energize before the head is within one- quarter-inch of the film, loosen the locknut and turn the screw (located at the rear of the side seal bar) up slightly (counter-clockwise as viewed from above). -
Page 20: Timers And Temperature Controls
20 Adjustments 5. Go to the rear of the L-sealer. Make sure the head cylinder is straight from front to back. Pull the air cylinder bracket the full length of the air cylinder. Tighten the -inch set screws. 6. Cycle the seal head up and down. Adjust set screws on head return cylinders for proper head speed and cushion. -
Page 21: Maintenance
Maintenance 21 Maintenance The Eastey EM Performance Series Semi-Automatic L-Sealer will provide many hours of maintenance-free operation. There are a few items that may require attention from time to time. Daily Clean the sealing areas: hot knives or cutting rules and silicone rubber or felt pads. -
Page 22: Changing Hot Knife Inserts And Cutting Rules
Instructions provided in this user guide are very general. If these generalized instructions do not address your specific conveyor issue, contact a certified representative of Eastey or contact Eastey Enterprises directly (Eastey.com/contact-us). -
Page 23: Wire Belt Repair Splicing
Maintenance 23 Replacing the Takeaway Conveyor Motor NOTE: This procedure requires an Allen or hex wrench, and a 7/16-inch box-end wrench. 1. Disconnect the L-sealer power plug from the electrical power source. 2. Disconnect wires # 14 and # 16 from inside the panel and pull them out. Note the color of wires and where they are connected. - Page 24 24 Maintenance Before you begin splicing • Release all belt tensioning mechanisms. • If installing a new belt, thread the belt onto the conveyor. - Check to be sure that the smooth side is “up.” - Check to be sure that the edge loops curve back in the direction opposite the direction of belt travel.
- Page 25 Maintenance 25 Far Edge Near Edge 5. Insert the strand ends into the center space of the opposite edge. (Space 3 in the illustration below.) 6. Pull the ends of the strand through until the center section “pops” or “locks” into place.
- Page 26 26 Maintenance Step 2 – Weave the strand to one side 1. Bend one end of the wire up and insert it around the z-bend in the next space on the edge of the wire closest to you. (Space 5 in the following illustration.) Always try to avoid bending the wire in the z-bend.
- Page 27 Maintenance 27 Step 3 – Weave the strand to the other side 1. Repeat the steps in Step 2, going in the opposite direction, weaving to the other side edge of the belt as shown in the following illustrations. 2. If you are installing a new belt, you are finished splicing. Step 4 –...
-
Page 28: Film Roll Support Rollers
28 Maintenance Step 5 – Check Entire Belt Circuit • Z-bends should not come into contact with any conveyor component (including end rolls, wear strips, transfer support rails, nose bars, etc.) • Adjust as needed. Step 6 – Adjust Tension •... -
Page 29: Troubleshooting
Troubleshooting 29 Troubleshooting Problem Solution • Check to be sure sealer is plugged in and No Element Heat electrical power is present at the outlet. • Is the temperature control dial for the heat element, Front or Side set greater than zero? If not, check main fuses - Heat element temperature control must be set to a number greater than zero (0). - Page 30 30 Troubleshooting Problem Solution • Improper setting of temperature film cutoff Weak or Poor Seals controller. (Heat set too low.) • Improper operating technique. (See Sequence of Operation on page 17.) • Check the sealing heating element to see if it needs cleaning.
-
Page 31: Parts List
Parts List 31 Parts List... -
Page 32: Appendix A: Electrical Schematics
32 Appendix A: Electrical Schematic Appendix A: Electrical Schematics Panel Layout... -
Page 33: Electrical Schematic
PIN 12 SIDE SSR-2 ON TT2 ON TT2 PIN 13 PIN 12 FRONT SSR-3 ON TT3 ON TT3 24V D.C. EASTEY Title ENTERPRISES HOT KNIFE EM16 "SEALERS" Tolerance Scale Material PIN-3 NONE NONE Drafter Part Numbers THERMOCOUPLE TO TTI, TT2, TT3... -
Page 34: Appendix B: Temperature Setting Specifications For Shrink-Wrap Plastics
34 Appendix B: Temperature Setting Specifications Appendix B: Temperature Setting Specifications for Shrink-Wrap Plastics Mushroom Insert PVC (Poly-Vinyl Chloride) Temperature settings: 325° F front bar; 325° F side bar Pad type: Felt Dwell Time: Approximately 1 second Polyolefin Temperature settings: 335°... -
Page 35: Appendix C: L-Sealer Size Estimating
L-Sealer Size Estimating 35 Appendix C: L-Sealer Size Estimating L-Sealer Center-Folded Film Size Estimating Table To calculate estimated per-package cost for manual and semi-automatic L-sealers, use the following formulas. 1) Center-Folded film – width of roll of film = 2) Cutoff Film length – film going across front seal bar = 3) Film usage –... -
Page 36: 16-Inch Side Seal Package Size Estimation
36 L-Sealer Size Estimating 16-inch Side Seal Package Size Estimation The following Eastey Enterprises side seal bar size dimensions are provided to make sure your product will fit under the side seal bar. You will need to know your product height and width to use these figures effectively. -
Page 37: Warranty Statement
EM Performance Series Semi-Automatic L-Sealers Warranty Statement Eastey Enterprises warrants that all of the products it ships will be in good working order and free from defects in material and workmanship for a period of two (2) years from the date of shipment by Eastey and will conform to the published specifications for that product. - Page 38 38 L-Sealer Size Estimating defective component to Eastey. If, after 30 days, Eastey hasn’t received the defective component, the customer will be invoiced for the replacement component. If the returned component is found to not be elegible for warranty, Easty will contact the customer and the customer will be invoiced for the replacement component.
-
Page 39: Customer Support
For help setting up or operating the EM Performance Series L-Sealer, please contact Eastey Technical Service at one of the numbers listed below. Toll-Free Phone 800-835-9344 Phone 763-428-4846 763-795-8867 E-mail info@eastey.com www.eastey.com Thank you again for your purchase of Eastey products. We are pleased to be a part of your packaging needs.
Need help?
Do you have a question about the Perfomance EN Series and is the answer not in the manual?
Questions and answers