
Related Manuals for Amplicomms BigTel 50 Alarm Plus


Summary of Contents for Amplicomms BigTel 50 Alarm Plus
- Page 1 BigTel 50 Alarm Plus Bedienungsanleitung User Guide Notice d’utilisation Istruzioni d’uso...
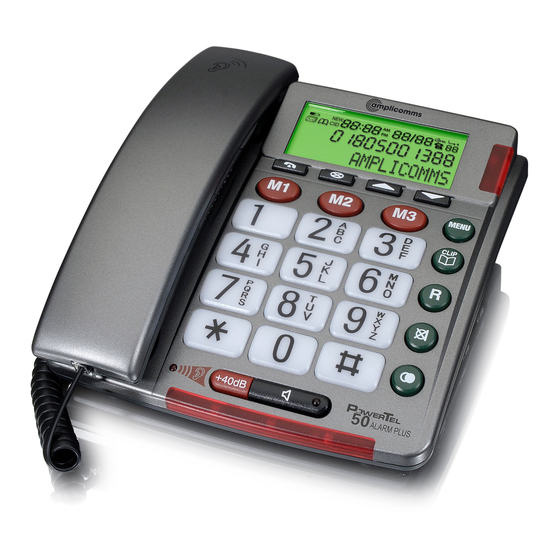
- Page 3 Telefon 1 Wähltaste 2 Direktwahltaste M1 (Notrufnummer 1) 3 Löschen 4 Direktwahltaste M2 (Notrufnummer 2) 5 Aufwärts blättern 6 Direktwahltaste M3 (Notrufnummer 3) 7 Abwärts blättern 8 LED Notrufgeber / Anzeige neuer Anruf (s. S. 17) 9 Menü-Taste 10 Anrufliste / Telefonbuch 11 R−Taste 12 Mikrofon stummschalten 13 Wahlwiederholung...
-
Page 4: Table Of Contents
INHALTSVERZEICHNIS Telefon in Betrieb nehmen..............6 Verpackungsinhalt prüfen.................6 Anschließen des Telefons................6 Wandmontage..................8 Displayanzeigen.................9 Datum/Uhrzeit einstellen................10 Sprache einstellen..................10 Telefonieren..................10 Eine Rufnummer von Hand eingeben und wählen.......10 Gesprach beenden.................10 Einen Anruf annehmen................11 Lauthören ein-/ausschalten..............11 Verstärkung der Hörerlautstärke einschalten.........11 Hörerlautstärke einstellen...............12 Klingellautstärke einstellen..............12 Klang des Hörers einstellen..............12 Freisprechlautstärke einstellen...............12... - Page 5 Anhang...................25 Sicherheitshinweise................25 Bestimmungsgemäße Verwendung............25 Aufstellungsort................26 Netzgerät....................26 Hörgeräte kompatibel................27 Entsorgung..................27 Fehlersuche und -behebung..............28 Pflegehinweise..................28 Garantie....................28 Konformitätserklärung................29...
-
Page 6: Telefon In Betrieb Nehmen
Telefon in Betrieb nehmen Wichtig: Lesen Sie bitte zuerst die Sicherheitshinweise auf der Seite 25, bevor Sie das Telefon in Betrieb nehmen. Achtung: Dieses Telefon kann sehr hohe Lautstärken wiederge- ben, wenn der Verstärker aktiviert ist und der Lautstärkeregler auf Maximum steht. - Page 7 1. Legen Sie die Batterien in das geöffnete Batteriefach ein. Verwenden Sie nur Batterien des Typs AA 1,5 V. Achten Sie auf die richtige Polung! Schließen Sie das Batteriefach. Achten Sie immer darauf, dass das Telefon nicht mit dem Telefonan- schluss und/oder Netzanschluss verbunden ist, wenn Sie die Batterien einlegen oder austauschen.
-
Page 8: Wandmontage
Wandmontage Ihr Telefon ist zur Wandmontage geeignet. Für die Befestigung des Tele- fons benötigen Sie zwei Schrauben. Führen Sie die Führungsnasen (1) der Wandmontagehalterung (2) in die Führungsnuten (3) auf der Rückseite des Telefons ein. Schieben Sie die Wandmontagehalterung (2) 10 mm nach oben, bis sie hörbar einrastet. Warnung: Im Bereich der zu bohrenden Löcher dürfen sich keine Leitungen (Kabel, Rohre usw.) befinden. -
Page 9: Displayanzeigen
Displayanzeigen Tauschen Sie die Batterien aus. Anzeige der Uhrzeit. Anzeige des Datum. Sie befinden sich im Telefonbuch. Sie befinden sich in der Anrufliste. CLIP Der aktuelle Eintrag in der Anrufliste ist neu. Der Anrufer hat mehrmals angerufen. REPEAT CALLS Anzeige der Positionsnummer in der Anrufliste. Sie haben XX Eintrage in der Anrufliste. -
Page 10: Datum/Uhrzeit Einstellen
Datum/Uhrzeit einstellen • Drücken Sie • Wählen Sie mit ZEIT/DATUM und drücken Sie • Geben Sie mit die Stunden ein und drücken Sie • Geben Sie mit die Minuten ein und drücken Sie • Geben Sie mit den Monat ein und drücken Sie •... -
Page 11: Einen Anruf Annehmen
oder - die Taste drücken, wenn Sie das Gespräch über den Lautspre- cher geführt haben (die rote Lampe in der Taste leuchtet). Einen Anruf annehmen Heben Sie den Hörer ab oder drücken Sie die Taste Lauthören ein-/ausschalten Während eines Telefongesprächs, das Sie mit dem Hörer führen, können Sie auf Lautsprecherbetrieb umschalten (Netzteil/Batterien erforderlich). -
Page 12: Hörerlautstärke Einstellen
Hörerlautstärke einstellen Sie können die Hörerlautstärke mit einem Drehregler (19) anpassen (siehe Ausklappseite vorn). Klingellautstärke einstellen Sie können die Klingellautstärke mit einem Schieberegler (20) anpassen (siehe Ausklappseite vorn). Klang des Hörers einstellen Sie können den Klang des Hörers mit einem Schieberegler (21) anpas- sen, wenn die Verstärkung auf +40 dB aktiviert ist (siehe Ausklappseite vorn). -
Page 13: Eine Rufnummer Aus Dem Telefonbuch Wählen
Weitere Information finden Sie im Abschnitt „Anrufliste“ auf der Seite 17. • Heben Sie zuerst den Hörer ab oder drücken Sie die Taste wählen Sie dann mit den Tasten den gewünschten Eintrag aus und drücken Sie oder • Wählen Sie zuerst mit den Tasten den gewünschten Eintrag aus und drücken Sie . -
Page 14: Nummern Verketten Und Übertragen
• Heben Sie zuerst den Hörer ab oder drücken Sie die Taste • Drücken Sie kurz die Notruftaste oder oder • Drücken Sie zuerst kurz die Notruftaste oder • Heben Sie dann den Hörer ab oder drücken Sie die Taste Hinweis: Die gespeicherten Rufnummern auf den Direktwahl- / Notruftasten können nicht gelöscht werden. - Page 15 • Die Telefonbucheinträge sind alphabetisch geordnet. Um direkt zum gewünschten Telefonbucheintrag zu gelangen, drücken Sie den entspre- chenden Anfangsbuchstaben. Namen eingeben Die Zifferntasten sind mit Buchstaben beschriftet. Durch mehrmaliges Drücken der entsprechenden Taste können Buchstaben, Ziffern und Sonderzeichen eingegeben werden. Leerzeichen geben Sie mit der Taste ein.
- Page 16 Telefonbucheinträge ändern • Drücken Sie zuerst , wählen Sie dann mit gewünschten Eintrag aus. • Drücken Sie für ca. 3 Sekunden und bestätigen Sie BEARBEITEN mit • Geben Sie ggf. die neue Rufnummer ein und drücken Sie • Geben Sie ggf. den neuen Namen ein und drücken Sie Gesprochenen Namen hinzufügen Sie können Sie zu jedem Telefonbucheintrag einen Namen aufnehmen.
-
Page 17: Anrufliste
• Wählen Sie dann mit den gewünschten Eintrag aus. • Drücken Sie während der Wiedergabe Einzelne Telefonbucheinträge löschen • Drücken Sie zuerst , wählen Sie dann mit gewünschten Eintrag aus. • Drücken Sie . Im Display erscheint LOSCHEN?. • Drücken Sie für ca. - Page 18 Die Rufnummer kann dann nicht angezeigt und somit auch nicht in der Anrufliste gespeichert werden. Im Ruhedisplay erkennen Sie, wieviele Anrufe in der Anrufliste sind und wieviele davon NEU (noch nicht angesehen) sind. Insgesamt werden 64 Rufnummern in einer Anrufliste gespeichert. Die blinkende rote LED zeigt an, dass neue Anrufe in der Anrufliste gespeichert wurden.
-
Page 19: Notrufgeber
Komplette Anrufliste löschen • Wählen Sie mit einen beliebigen Eintrag aus. • Drücken Sie für ca. 4 Sekunden. Im Display erscheint ALLE LOSCHEN?. • Drücken Sie erneut für ca. 4 Sekunden. Hinweis: Kontrollieren Sie vor dem Löschen der Rufnummern, ob die Einträge angesehen wurden. - Page 20 Notrufansage aufnehmen • Drücken Sie • Wählen Sie mit ANSAGE AUFNEHMEN und drücken • Drücken und halten Sie während Sie die Ansage sprechen. • Zum Beenden der Ansage lassen Sie wieder los. Notrufansage anhören • Drücken Sie • Wählen Sie mit ANSAGE PRUFEN und drücken Sie Notrufansage löschen •...
- Page 21 • Geben Sie die Rufnummer (max. 22 Ziffern) ein und drücken Sie • Wählen Sie eine Direktwahltaste oder aus und drücken Sie Hinweis: Die gespeicherten Rufnummern auf den Direktwahltasten können nicht gelöscht werden. Beim Speichern neuer Rufnummern werden die alten Einträge überschrieben. Automatischer Notruf Der automatische Notruf kann durch Drücken und Halten der Tasten M1, M2 oder M3 am Telefon oder den Notrufgeber gestartet werden.
- Page 22 Automatischer Notruf über den Notrufgeber 1. Halten Sie für 5 Sekunden die Taste (1) am Notrufgeber gedrückt, um den automatischen Notruf zu starten. 2. Halten Sie erneut die Taste am Notrufgeber für 5 Sekunden gedrückt, um den automatischen Notruf zu beenden. Ablauf des automatischen Notrufs Ihr Telefon verhält sich beim Starten des automatischen Notrufs folgen- dermaßen:...
- Page 23 Hinweis: Um einen Notruf zu beenden, halten Sie erneut die Taste am Notrufgeber oder M1, M2, M3 für 5 Sekunden gedrückt. Batterie Notrufgeber prüfen 1. Halten Sie die Taste (1) am Notrufgeber kurz gedrückt. Die LED (2) leuchtet. 2. Leuchtet die LED (2) beim Halten der Taste nicht mehr, tauschen Sie die Batterie aus.
-
Page 24: Einstellungen
Einstellungen Sie können verschiedene Einstellungen an Ihrem Telefon vornehmen. • Drücken Sie . Das Menü wird geöffnet. • Gehen Sie mit zum gewünschten Menüpunkt und drücken Sie , um das jeweilige Untermenü zu öffnen. LCD KONTRAST (1-5) Einstellung ändern mit oder , um die aktuelle Einstellung zu behalten. -
Page 25: Spezielle Verwendung
Spezielle Verwendung Betrieb an einer Telefonanlage Betreiben Sie Ihr Telefon an einer Telefonanlage (wenn Sie z. B. eine „0“ wählen müssen um eine Amtsleitung zu belegen) benutzen Sie für die Vermittlungsfunktionen, die Ihnen die Anlage bietet, die Taste Zur Länge des von Ihrer Anlage benötigten Flash-Signals sehen Sie bitte in der Dokumentation zu Ihrer Telefonanlage nach. -
Page 26: Aufstellungsort
Aufstellungsort Beachten Sie bitte: • Stellen Sie Ihr Telefon auf eine flache, ebene Oberfläche bzw. befesti- gen Sie es an der Wand. • Verlegen Sie die Anschlusskabel so, dass keine Stolperfallen entste- hen. • Stellen Sie sicher, dass die Steckdose mit dem Netzgerät jederzeit zugänglich ist, um das Gerät schnell vom Netz trennen zu können. -
Page 27: Entsorgung
Große Vorsicht ist geboten beim Wechsel zwischen Benutzern mit normalem Gehör und vermindertem Gehör. Entsorgung Sie sind gesetzlich zur sachgerechten Entsorgung von Gebrauchsgütern verpflichtet. Das nebenstehende Symbol auf Ihrem Telefon bedeutet, dass elektrische und elektronische Altgeräte und Batterien getrennt vom Hausmüll zu entsorgen sind. Elektrische oder elektronische Geräte entsorgen Sie bei einer Sammel- stelle eines geeigneten Entsorgungsträgers. -
Page 28: Fehlersuche Und -Behebung
Haben Sie Probleme mit Ihrem Telefon, kontrollieren Sie zuerst die folgenden Hinweise. Bei technischen Problemen können Sie sich an unsere Service-Hotline wenden. Die Rufnummer finden Sie auf unserer Website www.amplicomms.com Bei Garantieansprüchen wenden Sie sich an Ihren Fachhändler. Die Garantiezeit beträgt 2 Jahre. -
Page 29: Konformitätserklärung
Sollte Ihr Gerät dennoch einen Defekt innerhalb der Garantiezeit aufweisen, wenden Sie sich bitte unter Vorlage Ihrer Kaufquittung ausschließlich an das Geschäft, in dem Sie Ihr AMPLICOMMS - Gerät gekauft haben. Alle Gewährleistungsansprüche nach diesen Bestim- mungen sind ausschließlich gegenüber Ihrem Fachhändler geltend zu machen. - Page 30 Telephone 1 Call back button 2 One−touch dialling button M1 (emergency call number 1) 3 Delete 4 One−touch dialling button M2 (emergency call number 2) 5 Scroll upwards 6 One−touch dialling button M3 (emergency call number 3) 7 Scroll downwards 8 LED, emergency call unit / New call indication (see page 45) 9 Menu button 10 Calls list (CLIP) / Phone book...
- Page 31 TABLE OF CONTENTS Getting started..................34 Check box contents.................34 Connecting the telephone.................34 Wall mounting..................36 Display icons..................37 Setting date an time................38 Setting the language................38 Making and receiving calls..............38 Dialling a telephone number..............38 Ending a call..................38 Taking a call..................39 Activating/deactivating handsfree mode..........39 Boost the handset earpiece volume...........39 Setting the handset receiver volume.............39 Ringer...
- Page 32 Intended use..................52 Installation location.................53 Power supply..................53 Hearing aid compatibility................53 Disposal....................54 Help and support / Troubleshooting guide..........54 Maintenance..................55 Guarantee..................55 Declaration of conformity...............56...
-
Page 33: Getting Started
Getting started Important: please make sure you’ve read the safety information on page before you set up your phone system. Important: Your phone can produce very high sound when Boost is switched on. Please take care if the handset is used by others. Check box contents You should have: •... - Page 34 1. Insert the batteries in the open battery compartment. Only use batteries of the type AA 1.5 V. Pay attention to the correct polarity. Close the battery compartment cover. Pay attention that the telephone is not connected to the telephone line socket and/or mains power connection when the batteries are being inserted or replaced.
-
Page 35: Wall Mounting
Wall mounting The telephone can also be installed on a wall. You require two screws in order to fix the telephone on a wall. Feed the guide tabs (1) on the wall-mounting bracket (2) in the slots (3) on the rear side of the telephone. Slide the wall bracket (2) 10 mm upwards until it audibly snaps into place. -
Page 36: Display Icons
Display icons Replace the batteries. Display of the time. Display of the date. The phone book is open. The calls list is open. CLIP The entry in the calls list is new. Indicates a repeat call. REPEAT CALLS Position number in the call list. There are XX entries in the call list. -
Page 37: Setting Date An Time
Setting date an time • Press • Select TIME/DATE using and press • Adjust the hours using and press • Adjust the minutes using and press • Adjust the month using and press • Adjust the day using and press •... -
Page 38: Taking A Call
- press if the call was made in handsfree mode (the red LED within the handsfree button is on. Taking a call Lift the handset or press Activating/deactivating handsfree mode During a call you are making using the handset you can switch to handsfree mode to switch on the loudspeaker (power supply/batteries necessary). -
Page 39: Ringer Volume
Ringer volume You can adjust the ringer volume using the control (20) (refer to inlay page). Setting the handset receiver tone You can adjust the handset receiver tone using the control (21) if the Boost function (60 dB) is on (refer to inlay page). Setting the handsfree volume You can adjust the handsfree volume using the control (22) (refer to inlay page). -
Page 40: Dialling A Telephone Number From The Phone Book
Dialling a telephone number from the phone book For how to create and store phonebook entries please refer to the chap- ter “Phone book“ on page 42. • Lift the handset or press • Press , select the desired entry using and press •... -
Page 41: Chain Dialling
Chain dialling The function is used in more complex telephone services, e.g. for tele- phone banking, call-by-call or calling card procedures. Several numbers stored in the phone book can be dialled successively when a connec- tion has already been made. It is also possible to combine numbers for transfer from the phone book with numbers entered manually. - Page 42 Creating phone book entries • Press • Select STORE NUMBER using and press • Enter the telephone number and press • Enter the name and press • If you want to store a spoken name (which is spoken, when you call up the phonebook entry or a call from this person arrives) for the entry immediately, press and hold down •...
- Page 43 • Then select an entry using • Press and hold to start recording and release ending. Note: If the key is not released, recording is automatically stopped after 3 seconds. • Press to exit the menu. Deleting recordings • Press •...
-
Page 44: Calls List
Calls list Note: The caller number display function, essential for the calls list, is a supplementary service offered by telephone network providers. Contact your network provider for further information. If this function is available with your telephone line, the number of the caller and the name, if an entry in the telephone book exists, appears in the display or is spoken when the phone rings. -
Page 45: Emergency Call Unit
• Press . The display shows DELETE?. • Press and hold for approx. 4 s. The entry is deleted. Deleting all entries • Select an entry using • Press and hold for approx. 4 s. The display shows DELETE ALL?. •... - Page 46 Recording an outgoing alert message • Press • Select RECORD MESSAGE using and press • Press and hold down when you speak your message. • Release to end recording. Playing the outgoing alert message • Press • Select CHECK MESSAGE using and press Deleting the outgoing alert message •...
- Page 47 Automatic emergency call The automatic emergency call can be initiated by pressing and hold the buttons M1, M2 or M3 on the telephone or the button on the emergency call unit. If no phone number has been assigned to M1, M2 or M3 no phone num- ber is dialled but a loud warning signal is issued from the telephone.
- Page 48 Starting/Ending the automatic emergency call The phone behaves as follows on starting the automatic emergency call: 1. The emergency phone loudspeaker is switched on. An acoustic “emergency call active” signal is sounded for 15 sec. 2. You can then hear the dialling tone and the phone numbers assigned to the M1, M2 and M3 buttons are automatically dialled, in succession, at intervals of approx.
- Page 49 Testing the emergency call unit battery 1. Press and hold the button (1) on the emergency call unit briefly. The LED (2) lights up. 2. If the LED (2) no longer lights up when the button is pressed and held, replace the battery.
-
Page 50: Settings
Settings You can perform various settings on your phone. • Press to open the menu. • Scroll using to the desired entry and press to open the relevant sub-menu. LCD CONTRAST (1-5) Modify settings using or press ,to keep the current setting. -
Page 51: Special Use
Special use Use on a private branch exchange If your phone’s on an exchange (e.g. you need to dial 9 to get an outside line), you can transfer calls and use call back by using the button. You’ll need to check your private exchange manual to find out which timing to use for your exchange. -
Page 52: Installation Location
Installation location Make sure your phone: • is on a dry, flat and stable surface or mounted to a wall. • isn’t a trip hazard with its cables. • isn’t exposed to smoke, dust, vibration, chemicals, moisture, heat and direct sunlight. •... -
Page 53: Disposal
In the case of technical problems, please contact our service hotline. The number of our service hotline can be found on our website : www.amplicomms.com In the case of claims under the terms of guarantee, please contact your sales outlet. -
Page 54: Maintenance
• Please clean your equipment’s surfaces with a soft, fluff-free cloth. • Never use cleaning agents or solvents. Guarantee AMPLICOMMS equipment is produced and tested according to the latest production methods. The implementation of carefully chosen materials and highly developed technologies ensure trouble free functioning and a long service life. -
Page 55: Declaration Of Conformity
If your equipment shows signs of defect during the period of guarantee, please return to the sales outlet in which you purchased the AMPLICOMMS equipment together with the purchase receipt. All rights to claims under the terms of guarantee in accordance with this agree- ment must be asserted exclusively with regard to your sales outlet. - Page 56 Téléphone 1 Touche d‘appel 2 Touche de sélection directe M1 (numéro appel d’urgence 1) 3 Effacer 4 Touche de sélection directe M2 (numéro appel d’urgence 2) 5 Faire défiler vers le haut 6 Touche de sélection directe M3 (numéro appel d’urgence 3) 7 Faire défiler vers le bas 8 LED transmetteur d’appel de secours/Affichage des nouveaux appels (page 73)
- Page 57 TABLE DES MATIÈRES Mise en service du téléphone...............62 Vérification du contenu du coffret............62 Raccordement du téléphone..............63 Montage mural..................64 Affichage sur l‘écran................65 Régler la date/l’heure................66 Régler la langue..................66 Téléphoner..................66 Composer et choisir un numéro manuellement........66 Terminer l’appel..................67 Recevoir un appel..................67 Activer/Désactiver l’écoute amplifiée.............67 Activer l’amplification du volume sonore du combiné......67 Régler le volume sonore du combiné..........68...
- Page 58 Utilisation conforme aux prescriptions..........81 Lieu d‘installation..................82 Bloc secteur....................82 Compatibilité avec des appareils auditifs..........82 Élimination....................83 Recherche et correction d‘erreurs............84 Remarques d‘entretien................84 Garantie..................85 Déclaration de conformité...............86...
-
Page 59: Mise En Service Du Téléphone
Mise en service du téléphone Important : veuillez lire les consignes de sécurité de la page avant la mise en service du téléphone. Attention : Ce téléphone peut restituer des volumes sonores très élevés lorsque l’amplificateur est activé et que le volume est réglé au maximum. -
Page 60: Raccordement Du Téléphone
Raccordement du téléphone Une alimentation électrique est nécessaire afin de pouvoir utiliser toutes les fonctions du téléphone telles que « mains-libres » et amplification du volume du combiné. Celle-ci peut être réalisée à l’aide du bloc d’alimentation livré et par des piles. 1. -
Page 61: Montage Mural
Afin d’utiliser un appareil vibreur adapté, insérez la fiche d’alimen- tation de l’appareil vibreur dans la prise du téléphone. Aucune autre installation n’est nécessaire. L’appareil vibreur n’est pas fourni. Montage mural Votre téléphone est aussi conçu pour le montage mural. Vous avez besoin de deux vis pour fixer le téléphone. -
Page 62: Affichage Sur L'écran
Affichage sur l‘écran Changez les piles. Affichage de l‘heure. Affichage de la date. Vous vous trouvez dans le répertoire. Vous vous trouvez dans la liste d‘appels. CLIP Nouvelle entrée dans la liste d‘appels. Appel multiple de cette ligne téléphonique. REPEAT Affichage de la position du numéro dans la liste CALLS d‘appels. -
Page 63: Régler La Date/L'heure
Régler la date/l’heure • Appuyez sur • Selectionez à l’aide de HEURE/DATE et appuyez sur • Entrez l’heure à l’aide de et appuyez sur • Entrez les minutes à l’aide de et appuyez sur • Entrez le mois à l’aide de et appuyez sur •... -
Page 64: Terminer L'appel
Terminer l’appel Vous pouvez, pour terminer l’appel: - raccrocher le combiné. - appuyer sur la touche , si l’appel a eu lieu en utilisant le haut- parleur (la lumière rouge sous la touche s’allume). Recevoir un appel Décrochez le combiné ou appuyez sur la touche Activer/Désactiver l’écoute amplifiée Pendant une communication téléphonique réalisée à... -
Page 65: Régler Le Volume Sonore Du Combiné
Régler le volume sonore du combiné Vous pouvez adapter le volume sonore du combiné en tournant un bouton (19), (voir page d’insertion). Volume de la sonnerie Vous pouvez régler le volume de la sonnerie à l’aide d’un commutateur à glissière (20) (voir page d’insertion). Régler le son du combiné... -
Page 66: Composer Un Numéro À Partir Du Répertoire
• Décrochez le combiné d’abord ou appuyez sur la touche sélectionnez alors l’entrée souhaitée à l’aide des touches et appuyez sur • Sélectionnez d’abord l’entrée souhaitée à l’aide des touches et décrochez alors le combiné ou appuyez sur Le haut-parleur est activé. Si vous voulez poursuivre la conversation par le combiné, décrochez celui-ci. -
Page 67: Enchaînement Et Transmission De Numéros
• Appuyez d’abord sur les touches d’appel d’urgence • Décrochez alors le combiné ou appuyez sur la touche Note : Vous ne pouvez pas effacer les numéros enregistrés sur les touches d’appel direct ou les numéros d’urgence. Lorsque vous enregistrez de nouveaux numéros, les anciens enregistrements sont écrasés. - Page 68 • Les entrées du répertoire sont classées par ordre alphabétique. Pour afficher l’entrée désirée, appuyez sur la touche correspondant à la première lettre du nom. Introduction de noms Les touches numériques correspondent à des lettres. En appuyant plu- sieurs fois sur la touche appropriée, vous pouvez saisir des lettres, des chiffres et des caractères spéciaux.
- Page 69 Modifier les entrées du répertoire • Appuyez d’abord sur la touche , sélectionnez l’entrée souhaitée avec la touche • Appuyez sur pendant env. 3 secondes et confirmez en sélection- nant ADAPTER? avec • Saisissez éventuellement le nouveau numéro et appuyez sur •...
- Page 70 • Sélectionnez l’entrée souhaitée avec la touche • Appuyez sur pendant la lecture. Effacer une entrée du répertoire • Appuyez d’abord sur la touche , sélectionnez l’entrée souhaitée avec la touche • Appuyez sur . L’écran affiche EFFACER?. • Appuyez sur pendant env.
- Page 71 Vous distinguez sur l’écran de veille les appels qui sont sur la liste d’appels et les NOUVEAUX appels (pas encore vus). La liste d’appels peut enregistrer 64 numéros en tout. La LED clignotante indique que de nouveaux appels ont été enregistrés dans la liste d‘appels. Cette LED clignote tant que des entrées pas encore consultées existent.
-
Page 72: Transmetteur D'appel D'urgence
Note : Contrôlez, avant d’effacer les numéros d’appel que les enregistrements ont bien été regardés. Transmetteur d’appel d’urgence Le transmetteur d’appel d’urgence vous permet d’appeler à l’aide des services d’alarme ou des personnes. Note : Il existe de nombreux services d’alarme tels que p. ex. la “Croix Rouge”, les “Oeuvres de bienfaisance de la Croix de Malte”... - Page 73 Écouter l’annonce d’appel d’urgence • Appuyez sur • Sélectionnez CONTROLL. MESS avec la touche appuyez sur • Appuyez sur et maintenez la touche appuyée pendant que vous dites l’annonce. • Pour arrêter l’annonce, relâchez Écouter l’annonce d’appel d’urgence • Appuyez sur •...
- Page 74 Appel d’urgence automatique L’alarme automatique peut être activée en appuyant sur les touches M1, M2 ou M3 du téléphone ou sur le bouton d’alarme et en les mainte- nant enfoncés. Si vous n’avez pas enregistré de numéro sur l’une des touches M1, M2 ou M3, aucun numéro ne sera composé, mais votre téléphone reproduira un signal d’avertissement.
- Page 75 Démarrer / terminer l’appel d’urgence automatique The phone behaves as follows on starting the automatic emergency call: Au démarrage de l’appel d’urgence automatique, votre téléphone se comporte comme suit : 1. Le haut−parleur du téléphone de secours se branche. Un signal « appel d’urgence actif »...
- Page 76 Verifier la pile du transmetteur d’appel d’urgence 1. Maintenez brièvement appuyée la touche (1) du transmetteur d’appel d’urgence. La DEL (2) s’allume. 2. Si la DEL (2) ne s’allume plus pendant que la touche est appuyée, remplacez la pile. Remplacer la pile 1.
-
Page 77: Réglages
Réglages Vous pouvez effectuer différents réglages sur votre téléphone. • Appuyez sur . Le menu s’ouvre. • Allez au point de menu souhaité à l’aide de et appuyez pour ouvrir le sous-menu respectif. CONTRASTE LCD (1-5) Modifiez les paramètres avec ou appuyez sur pour conserver les paramètres actuels. -
Page 78: Fonctions Spéciales
Fonctions spéciales Utilisation dans une installation téléphonique Lorsque vous utilisez votre téléphone au sein d’une installation (lorsque, par exemple, vous devez composer le « 0 » pour accéder à une ligne extérieure) vous utilisez la touche pour accéder aux fonctions de commutation que vous offre l’installation. -
Page 79: Lieu D'installation
Lieu d‘installation Veuillez noter: • Posez votre téléphone sur une surface plate ou fixez-le au mur. • Posez le câble de raccordement de manière à éviter de trébucher avec. • Assurez-vous que le bloc et la prise sont toujours accessibles et qu’on peut rapidement débrancher le téléphone de la prise. -
Page 80: Compatibilité Avec Des Appareils Auditifs
Compatibilité avec des appareils auditifs Ce téléphone est compatible avec la plupart des appareils auditifs présents sur le marché. Étant donné le grand nombre de modèles proposés sur le marché, un fonctionnement sans défaut ne peut pas être garanti avec tous les appareils auditifs. -
Page 81: Recherche Et Correction D'erreurs
En cas de problème technique, vous pouvez vous adresser à notre service d’assistance téléphonique. Le numéro de télé- phone peut être trouvé sur notre site: www.amplicomms.com In the case of claims under the terms of guarantee, please contact your sales outlet. -
Page 82: Garantie
Garantie Les appareils AMPLICOMMS sont fabriqués et testés selon les procédés de production les plus modernes. Les matériaux choisis et la haute technologie assurent un fonctionnement parfait et une longue durée de vie. La garantie n’est pas valable si l’exploitant du réseau téléphonique ou éventuellement une installation à... -
Page 83: Déclaration De Conformité
CE. Pour obtenir la déclaration intégrale de conformité, veuillez la télécharg- er gratuitement sur notre site Internet www.amplicomms.com. © ATLINKS 2022 - Reproduction interdite. Le fabricant se réserve le droit de modifier les spécifications de ses produits afin de les améliorer techniquement ou de se... - Page 84 Telefono 1 Tasto di selezione 2 Tasto di selezione diretta M1 (numero d’emergenza 1) 3 Cancellare 4 Tasto di selezione diretta M2 (numero d’emergenza 2) 5 Sfogliare verso l’alto 6 Tasto di selezione diretta M3 (numero d’emergenza 3) 7 Sfogliare verso il basso 8 LED dispositivo di telesoccorso / Visualizzazione nuova chiamata (vedi pag.
- Page 85 INDICE Mettere in funzione il telefono...............92 Verificare il contenuto del pacchetto............92 Montaggio alla parete................94 Indicazioni sul display................95 Impostare data/ora.................96 Impostare lingua..................96 Telefonare...................96 Inserire un numero di chiamata e selezionare........96 Terminare la conversazione..............97 Accettare una chiamata................97 Accendere/spegnere l’altoparlante............97 Accendere l’amplificazione del volume della cornetta......97 Impostare il volume della cornetta............97 Volume del suono..................98...
- Page 86 Scopo d’uso del telefono..............111 Luogo di posizionamento..............112 Adattatore..................112 Compatibilità con apparecchiature acustiche........112 Smaltimento..................113 Ricerca ed eliminazione di errori............114 Manutenzione...................114 Garanzia....................115 Dichiarazione di conformità..............116...
-
Page 87: Mettere In Funzione Il Telefono
Mettere in funzione il telefono Importante: La preghiamo innanzitutto di leggere le istruzioni di sicurezza a pagina prima di mettere in funzione il telefono. Attenzione: Questo telefono può riprodurre volumi altissimi con l’amplificatore attivato e con il regolatore del volume al massimo. Molta attenzione nel cambio tra utenti con udito normale e udito ridotto. - Page 88 Collegamento del telefono Per poter utilizzare tutte le funzioni del telefono come ad es. il vivavoce e il volume amplificato del ricevitore, è necessaria un’alimentazione di corrente (adattore e batterie). 1. Inserisca le batterie nel comparto delle batterie aperto. Utilizzi esclusivamente batterie del tipo AA 1,5 V.
-
Page 89: Montaggio Alla Parete
Montaggio alla parete Il Suo telefono è adatto per essere montato alla parete. Per fissare il tele- fono servono due viti. Inserisca le chiavi (1) del supporto per il montaggio alla parete (2) nelle scanalature (3) sul retro del telefono. Spinga il supporto per il montaggio alla parete (2) 10 mm verso l’alto fino a che non entri in modo acustica- mente percepibile. -
Page 90: Indicazioni Sul Display
Indicazioni sul display Sostituisca le batterie. Visualizzazione dell’orario. Visualizzazione della data. Si trova nell’elenco telefonico. Si trova nell’elenco delle chiamate. CLIP L’inserimento attuale nell’elenco delle chiamate è nuovo. REPEAT Diverse chiamate da questo collegamento. Visualizzazione del numero della posizione CALLS nell’elenco delle chiamate. -
Page 91: Impostare Data/Ora
Impostare data/ora • Prema • Selezioni con ORA/DATA e prema • Con inserisca un’ora e prema • Con inserisca i minuti e prema • Con inserisca il mese e prema • Con inserisca il giorno e prema • Esca dal menu con Impostare lingua •... -
Page 92: Terminare La Conversazione
Terminare la conversazione Per terminare la conversazione può: - riattaccare la cornetta. - premere il tasto nel caso di una conversazione mediante alto- parlante (si illumina la lampadina rossa nel tasto). Accettare una chiamata Alzi la cornetta o prema il tasto Accendere/spegnere l’altoparlante Durante una conversazione telefonica condotta con la cornetta può... -
Page 93: Volume Del Suono
Impostare il volume della cornetta Può adattare il volume della cornetta con un regolatore girevole (19) (vedi pagina di inserimento). Volume del suono Può adattare il volume del suono con un regolatore a spingimento (20) (vedi pagina di inserimento). Impostare il suono della cornetta Può... -
Page 94: Scegliere Un Numero Di Chiamata Dall'elenco Telefonico
• Alzi innanzitutto la cornetta o prema il tasto , selezioni dunque l’inserimento desiderato con i tast e prema dunque • Selezioni innanzitutto l’inserimento desiderato con i tasti e alzi dunque la cornetta o prema il tasto Si attiva l’altoparlante. Se desidera proseguire la conversazione tramite il ricevitore, lo sollevi. -
Page 95: Concatenare E Trasmettere Numeri
• Prema prima il tasto di chiamata di emergenza • Alzi poi la cornetta e prema il tasto Avviso: I numeri di chiamata memorizzati sui tasti di selezione diretta / chiamata di emergenza non possono essere cancellati. Quando si salvano nuovi numeri di chiamata i vecchi inserimenti vengono sovrascritti. - Page 96 Inserire nomi Sui tasti numerici sono indicate delle lettere. Premendo diverse volte sul rispettivo tasto si possono inserire lettere, cifre e simboli. Può inserire spazi vuoti con il tasto Può cancellare caratteri con Per inserire due volte di seguito la stessa lettera, prema innanzitutto una volta la lettera rispettiva.
- Page 97 Aggiungere un nome parlato Per ogni voce della rubrica è possibile registrare un nome. Qualora poi riceva una chiamata da tale numero o selezioni la relativa voce nella rubrica, la registrazione verrà riprodotta e avrà così modo di sentire chi la chiama o quale voce abbia selezionato.
-
Page 98: Elenco Delle Chiamate
Cancellare tutte le voci dell’elenco telefonico • Prema innanzitutto , selezioni dunque l’inserimento desiderato con • Prema per ca. 4 secondi. Sul display appare CANCELL. TUTTI?. • Prema nuovamente per ca. 4 secondi. • Per interrompere il procedimento di cancellazione prema Elenco delle chiamate Avviso: Per poter usufruire di questa funzione, il Suo collegamento deve avere a disposizione il trasferimento del numero di chiamata. - Page 99 Visualizzare il numero di chiamata nell’elenco delle chiamate • Selezioni un inserimento con Salvare un numero di chiamata nell’elenco delle chiamate nell’elenco telefonico • Selezioni un inserimento con • Prema per ca. 3 secondi e confermi con COPIARE A MEM. •...
-
Page 100: Dispositivo Di Telesoccorso
Dispositivo di telesoccorso Il dispositivo di telesoccorso consente di lanciare una richiesta di telesoccorso a speciali servizi d’emergenza domestica o a determinate persone. Avviso: Sono numerosi i servizi d’emergenza domestica idonei, come ad es. Croce rossa, Croce rossa maltese, Soccorso dell’Or- dine di S. - Page 101 Riprodurre il messaggio d’emergenza • Prema • Selezioni con REGIS.MESSAGGIO e prema • Tenere premuto e avviare la registrazione. • Per terminare l’annuncio rilasci Cancellare il messaggio d’emergenza • Prema • Selezioni con CONTROLL.MESS.e prema • Durante la riproduzione prema .
- Page 102 Chiamata d’emergenza automatica Per lanciare una chiamata d’emergenza automatica, premere e tenere premuto i tasti M1, M2 o M3 del telefono o del dispositivo di telesoccor- so. Non avendo memorizzato alcun numero su uno dei tasti M1, M2 o M3, il telefono non seleziona alcun numero limitandosi invece al rilascio di un segnale d’emergenza ad alto volume.
- Page 103 Avviare / Concludere la chiamata d’emergenza automatica Al momento del lancio di una chiamata d’emergenza automatica, il tele- fono si comporta come segue: 1. L’altoparlante del dispositivo di telesoccorso si inserisce. Il dispositivo emette per una durata di 15 secondi il segnale “Chiamata d’emergenza attiva”.
- Page 104 Controllare la pila del dispositivo di telesoccorso 1. Tenere brevemente premuto il tasto (1) sul dispositivo di telesoccorso. Il LED (2) si accende. 2. Se il LED (2) non si accende più mentre si preme il tasto, sostituire la pila. Sostituire la pila 1.
-
Page 105: Impostazioni
Impostazioni Sul suo telefono può eseguire diverse impostazioni. • Prema . Il menù si apre. • Si sposti con sulla voce di menu desiderata e prema per aprire il rispettivo sottomenu. CONTRASTO LCD (1-5) Modifichi l’impostazione con prema , per mantenere l’impostazione attuale. -
Page 106: Impiego Speciale
Impiego speciale Funzionamento in combinazione con un impianto telefonico Se mette in funzione il Suo telefono in combinazione con un impianto telefonico (se ad esempio deve selezionare „0“ per prendere una linea ufficiale), per le funzioni d’intermediazione offerte dall’impianto, usi il tasto Per la lunghezza del Suo segnale flash richiesto dal Suo impianto La preghiamo di consultare la documentazione del Suo impianto telefonico. -
Page 107: Luogo Di Posizionamento
Luogo di posizionamento La preghiamo di attenersi a quanto segue: • Posizioni il Suo telefono su una superficie piana e diritta e/o lo fissi alla parete. • Monti i cavi di collegamento evitando la formazione di trappole su cui inciampare. •... -
Page 108: Smaltimento
Importante: Con l’”amplificazione” accesa, il livello del volume di questo telefono può essere molto alto. Per questo si deve fare at- tenzione quando questo telefono viene utilizzato anche da persone con udito normale. Smaltimento E’ obbligata/o a smaltire correttamente i prodotti d’uso. Il simbolo qui a lato riportato sul Suo telefono indica che gli apparecchi elettrici ed elettronici e le batterie usati devono essere smaltiti separatamente dai rifiuti domestici. -
Page 109: Ricerca Ed Eliminazione Di Errori
Ricerca ed eliminazione di errori Se ha problemi con il Suo telefono, controlli innanzitutto i seguenti avvisi. In caso di problemi tecnici e diritti di garanzia si rivolga al Suo rivenditore specializzato. La durata di garanzia ammonta a 2 anni. Conversazione telefonica impossibilitata - Linea telefonica collegata in modo scorretto o disturbata. -
Page 110: Garanzia
Garanzia Gli apparecchi di AMPLICOMMS vengono prodotti e controllati secondo le procedure di produzione più innovative. L’uso di materiali selezionati con attenzione e di tecnologie altamente sviluppate garantisce un funzionamento privo di disturbi e un ciclo di vita lungo. Le condizioni di garanzia non si applicano se la causa del disturbo nell’apparecchio... -
Page 111: Dichiarazione Di Conformità
La conformità con las direttivas sopra citata viene confermata con il simbolo CE sull’apparecchio. La dichiarazione di conformità completa la puo scaricare gratuitamente dal nostro sito web allo www.amplicomms.com. © ATLINKS 2022 - Riproduzione proibita. Il produttore si riserva il diritto di modificare le specifiche dei suoi prodotti al fine di apportare miglioramenti tecnici o osservare le normative. - Page 112 28 Boulevard Belle Rive 92500 RUEIL-MALMAISON France RCS Nanterre 508 823 747 Atlinks UK Ltd 3rd Floor, Waverley House 7-12 Noel Street, London, W1F 8GQ. UK Company registration: 13809295 BigTel 50 Alarm Plus A/W No.: 10002547 Rev.0 (DE/EN/FR/IT) Printed in China...
Need help?
Do you have a question about the BigTel 50 Alarm Plus and is the answer not in the manual?
Questions and answers