Table of Contents
Advertisement
Quick Links
E-M-HG2-S-XL-V3.3
Document code
HygroGen2: Humidity and Temperature Generator
with AutoCal, MBW External Reference, Remote Screen
Share, RemoteAPI and Range Extension options.
Instruction Manual
Document title
© 2020; Rotronic AG
Instruction Manual
HG2-S and HG2-XL
Rotronic AG
Bassersdorf, Switzerland
Unit
Instruction Manual for Software
Version 3.3
Document Type
E-M-HG2-S-XL-V3.3
Advertisement
Table of Contents

Related Manuals for Rotronic HygroGen2 HG2-S


Summary of Contents for Rotronic HygroGen2 HG2-S
- Page 1 Instruction Manual for Software HygroGen2: Humidity and Temperature Generator Version 3.3 with AutoCal, MBW External Reference, Remote Screen Share, RemoteAPI and Range Extension options. Document Type Instruction Manual Document title Instruction Manual HG2-S and HG2-XL © 2020; Rotronic AG E-M-HG2-S-XL-V3.3...
- Page 2 The calibration certificate included will vary according to the country of supply. In some countries, the chamber door is delivered with the HygroGen2. Due to the diversity of chamber doors and bungs, these are normally ordered separately and may be delivered in separate packaging. © 2020; Rotronic AG E-M-HG2-S-XL-V3.3...
-
Page 3: Table Of Contents
Updating HygroGen2 firmware from earlier version 3.x Updating HW4 version Configuration Mode Settings Network Settings Date and Time Settings International Keyboard External Monitor Touch Screen Calibration HygroGen2 Touchscreen Interface Controller Home Screen Navigation (items 1, 10 & 14) © 2020; Rotronic AG E-M-HG2-S-XL-V3.3... - Page 4 Advanced (Command Line interface) Best Practices and Precautions Dew/Frost control Mirror Cleaning iii. Decontamination of HygroGen2 chamber Super Cooled Water: Dew or Frost Films. Force Frost Threshold 55 Extremes of Temperature and Humidity Remote Control © 2020; Rotronic AG E-M-HG2-S-XL-V3.3...
- Page 5 Annual Servicing of HygroGen2 A1: Calibration Reference Options A1.1 Internal RH Probe Reference A1.2 External RH Probe Reference A1.3 Chilled Mirror Reference A2: Temperature Control A3: Validation – Requirements and Accessories B2: HygroGen2 / Screen Messages © 2020; Rotronic AG E-M-HG2-S-XL-V3.3...
- Page 6 C2: Manufacturer & Service Centre Contact Information D1: HygroGen2 Uncertainty Framework - Internal RH Probe D2: HygroGen2 Uncertainty Framework - External RH Probe D3: HygroGen2 Uncertainty Framework - Chilled Mirror Reference D4: Dew Point Uncertainty Analysis © 2020; Rotronic AG E-M-HG2-S-XL-V3.3...
-
Page 7: Scope Of Document
A Peltier element is used for heating and cooling the chamber. Measurement and control is provided by a combination of a ROTRONIC HC2-S probe, an embedded Platinum Resistance Thermometer (PRT) and a multi-loop controller. Set-points are entered using the touchscreen front panel display. -
Page 8: Optional Enhanced Features: Autocal, External Reference, Range Extensions And Remote Control
All Enhanced Features are activated by the application of a licence key, available via your ROTRONIC dealer, and can be added to any HygroGen2. Older units with serial numbers prior to HG2-VCT-1280 may require a service in order to enable network features required for Remote Control. - Page 9 PDF Calibration Certificate which is written to an external USB disk drive. Any values recorded on ROTRONIC HC2-S probes attached to the HygroGen2 via USB adaptors are recorded in the certificate. Probes can be set to automatically adjust to match the HygroGen2 reference probe at predetermined values.
-
Page 10: Setting Up The Hygrogen2
1:2001. This may affect mains power circuits protected by Residual Current Device (RCD) or Ground Fault Detector (GFD) type circuit breakers (particularly if used in multiples or with other equipment with an earth leakage current on the same supply circuit). © 2020; Rotronic AG E-M-HG2-S-XL-V3.3... -
Page 11: Overcurrent Protection
Conductive Pollution The unit is rated Pollution Degree 2 and must not be operated in environments where conductive pollutants (for example, carbon) may enter the unit. This includes excessive moisture ingress. © 2020; Rotronic AG E-M-HG2-S-XL-V3.3... -
Page 12: Hygrogen2 Assembly
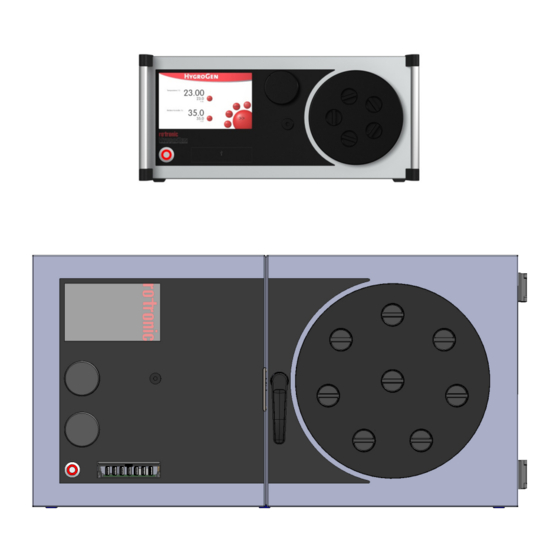
Probe aperture bung Handle Figure 1: Front of HygroGen2-S Sample loop return Sample loop outlet USB ports (2) DVI monitor interface Ethernet socket Type label Fan outlet Electrical mains connection Power switch Figure 2: Rear of HygroGen2-S © 2020; Rotronic AG E-M-HG2-S-XL-V3.3... -
Page 13: Hygrogen2-S Doors
(Figure 2(1) and (2) above) are firmly secured. iv. HC2-S Control Probe The HygroGen2 chamber conditions are monitored and controlled by a ROTRONIC HC2-S HC2-S-S RH and temperature probe. Depending on the circumstances and whether external references are being used (see Appendix A1.2 External RH Probe... -
Page 14: Hygrogen2-Xl
Figure 3: Front of HygroGen2-XL Sample loop return Sample loop outlet USB ports (2) DVI monitor interface Ethernet socket Type label Fan inlets and filter covers Electrical mains connection Power switch Figure 4: Rear of HygroGen2-XL © 2020; Rotronic AG E-M-HG2-S-XL-V3.3... -
Page 15: Hygrogen2-Xl Door
The HygroGen2-XL has three removable shelves, which secure into clips at the front and back of the chamber. Early serial number HygroGen2-XL do not have front clips. These can be retrofitted to improve shelf stability. Please email hygrogen@rotronic.co.uk to request front clips. © 2020; Rotronic AG E-M-HG2-S-XL-V3.3... -
Page 16: Hygrogen2-Xl Cable Management
The desiccant cell currently in use is displayed on the Settings screen on the desiccant level indicator. © 2020; Rotronic AG E-M-HG2-S-XL-V3.3... -
Page 17: External Sample Loop
A1.3), ensure the sample loop caps (Figure 2(1) and (2) above) are firmly secured. vi. HC2-S Control Probe The HygroGen2 chamber conditions are monitored and controlled by a ROTRONIC HC2-S HC2-S-S RH and temperature probe. Depending on the circumstances and whether external references are being used (see Appendix A1.2 External RH Probe... -
Page 18: Water Reservoir
If the HygroGen2 is overfilled, the humidifier should be fully emptied and then refilled with 50-80 ml of water (as described above). If there is water present in the chamber of the HygroGen2, this should be removed using an absorbent cloth. Ensure the © 2020; Rotronic AG E-M-HG2-S-XL-V3.3... -
Page 19: To Empty The Hygrogen2
Ultra Violet (UV) sterilisation lamp within the water reservoir. No user intervention is required - HygroGen2 auto-cycles the process. Under no circumstance should the water reservoir be opened by non-qualified personnel. Direct exposure to UV lamps can cause burns or blindness. © 2020; Rotronic AG E-M-HG2-S-XL-V3.3... -
Page 20: Hygrogen2 - Basic Operation
The temperature and humidity control defaults to the last set condition. If the “Low Water Level” alarm is displayed, then the unit should be filled as described in section 2.4. Humidification is disabled until water is filled. © 2020; Rotronic AG E-M-HG2-S-XL-V3.3... -
Page 21: Upgrading Hygrogen2 Firmware
On a PC, download the latest version 3.3.x.x of the HygroGen2 Controller Update firmware via the website link above. b. Unzip this file to the root of a USB stick. The file structure should look like this when completed successfully: © 2020; Rotronic AG E-M-HG2-S-XL-V3.3... - Page 22 Reboot the HygroGen2 into Configuration Mode, by going into the Settings, then select “Update Software” from the “Updates” drop-down menu. e. Click OK to reboot the HG2 into configuration mode. f. Insert the USB stick into any port in the HygroGen2. © 2020; Rotronic AG E-M-HG2-S-XL-V3.3...
-
Page 23: Updating Hw4 Version
Click OK to reboot into Operational Mode or continue below to update the built-in HW4 software. Updating HW4 version To determine the latest version available of the HygroGen2 built-in HW4 software, please consult the ROTRONIC website: https://support.vct-ltd.co.uk/support/hygrogen2/ https://support.vct-ltd.co.uk/support/hygrogen2-xl/ The HW4 software version your HygroGen2 is running can be determined via the Settings screen, selecting the “Support”... - Page 24 On the HygroGen2, if not already in Configuration Mode, go to the Settings Page and select “Update Software” from the “Updates” drop-down menu. Press OK and the HygroGen2 will reboot into Configuration Mode. f. Select Updates and then Update HW4. © 2020; Rotronic AG E-M-HG2-S-XL-V3.3...
- Page 25 Observe the on-screen progress h. When complete, the HG2 will report HW4 Update Succesful. Click OK to reboot. The HygroGen2 will return to standard mode. Start HW4 and re-enter the registration code recorded previously to enable full operation. © 2020; Rotronic AG E-M-HG2-S-XL-V3.3...
-
Page 26: Configuration Mode Settings
Control/Support Enhanced Feature. If you do not intend to use the Remote features, the Network functionality can still be enabled, to no disadvantage, but some organisations may stipulate it is turned off before the instrument can be used. © 2020; Rotronic AG E-M-HG2-S-XL-V3.3... - Page 27 PLEASE note: if your instrument has serial number VCT-HG2-1280 or earlier and has NOT been serviced since January 2013, your instrument requires a physical modification. Please contact your ROTRONIC distributor who will arrange for this operation to be performed. Without this modification, the Network Status will show as “unplugged” even if it is plugged in correctly.
-
Page 28: Date And Time Settings
NB Configuration mode is not required to alter this setting. External Monitor Please Section 7.2 for details about configuring external output peripherals. NB Configuration mode is not required to alter this setting. © 2020; Rotronic AG E-M-HG2-S-XL-V3.3... -
Page 29: Touch Screen Calibration
Select the “Touch Screen” option from the “Settings” drop-down menu on the “Settings and Updates” screen. Pressing the touch screen button will begin a four-point calibration. Press the cross in each corner of the screen as directed. © 2020; Rotronic AG E-M-HG2-S-XL-V3.3... -
Page 30: Hygrogen2 Touchscreen Interface
Figure 12: HygroGen2 Home Screen i. Navigation (items 1, 10 & 14) The user can navigate to different screens using the drop-down menu (item 1) or can scroll through the four main screens using items 10 & 11. © 2020; Rotronic AG E-M-HG2-S-XL-V3.3... -
Page 31: Temperature And Humidity Set-Points (Items 3 & 7)
0.01 °C of the set-point and the control temp is within 0.01 °C of the internal (HC2-S) reference temperature sensor. RH indicator is green when the RH reference is within 0.1%rh of the set point and the control RH is within 0.05 %rh of the internal (HC2-S) reference humidity sensor. © 2020; Rotronic AG E-M-HG2-S-XL-V3.3... -
Page 32: Trend Screen
The traces displayed can be selected using the buttons (item 4) ii. Trend Axes (items 2 & 3) The y-axis (item 2) is self-scaling; the x-axis (time) (item 3) can be adjusted by clicking anywhere along it and typing in the desired timescale. © 2020; Rotronic AG E-M-HG2-S-XL-V3.3... -
Page 33: Programmer Screen
Start the selected program running at the selected step using the “>” button. The total time the program has been running, and the time left on the current step are displayed. Use the Stop button to halt the program before it has completed. © 2020; Rotronic AG E-M-HG2-S-XL-V3.3... -
Page 34: Edit Program (Item 5)
Each program comprises at least one step. Each step can be edited. Enter the desired step set- points and duration (items 3, 4 & 5). A graphical representation of the step is shown to help visualise the sequence. © 2020; Rotronic AG E-M-HG2-S-XL-V3.3... -
Page 35: Insert Or Delete A Step (Items 6 & 7)
Temperature only Program (item 12) Humidity timing and control can be removed from a program using the ‘Temperature Only’ button. viii. Programmer Screen Click the ‘Prog’ button (item 13) to return to the Programmer screen. © 2020; Rotronic AG E-M-HG2-S-XL-V3.3... -
Page 36: Settings Screen
Enhanced Features can be activated via the “Upgrade Features” option on the “Updates” drop- down menu in Configuration Mode, or via the Settings screen in Standard Operation Mode. section 4 for more details about Enhanced Features. © 2020; Rotronic AG E-M-HG2-S-XL-V3.3... -
Page 37: Hygrogen Information
HygroGen Information screen. This can be found on the “Support” dropdown menu On the Configuration screen and the Settings screen (when in normal use). Figure 17: HygroGen Information iii. Remote Support Figure 18: Remote Support © 2020; Rotronic AG E-M-HG2-S-XL-V3.3... - Page 38 37 of 100 Document title Your HygroGen2 can be configured so that ROTRONIC support engineers can connect to your HygroGen2 and to its support network so that they can remotely control your HygroGen2. The feature requires the HygroGen2 to be connected to a network, and the instrument to be appropriately configured for network access.
-
Page 39: Connections To Network File Servers
‘Disconnect’ button and put in the new server details. Please note, for security reasons the network file server path and user credentials have to be re- entered every time the HygroGen2 is restarted. © 2020; Rotronic AG E-M-HG2-S-XL-V3.3... -
Page 40: Hygrogen2 Enhanced Features
PDF Calibration Certificate which is written to an external USB disk drive. Any values recorded on ROTRONIC HC2-S probes attached to the HygroGen2 via USB adaptors are recorded in the certificate. Probes can be set to automatically adjust to match the HygroGen2 reference probe at predetermined values. - Page 41 “Upgrade Features”. Type in the supplied code, ensuring there are no extra characters or spaces at the end of the string. The green lights will light up displaying the purchased Enhanced Features, which will be available immediately. © 2020; Rotronic AG E-M-HG2-S-XL-V3.3...
-
Page 42: Autocal
Control. AutoCal Screen As ROTRONIC probes are added via the USB ports, the individual probe slots are populated within the AutoCal Screen. During an AutoCal calibration run, probes can be adjusted, or not, as desired, for each probe. Select individual probes by selecting the “Adjust” button. -
Page 43: Autocal Program Edit
Take particular care to allow sufficient time to allow for stabilisation of probes with particular protection filters applied. It is not possible to select different adjustment points for different probes. If this is desired, please run a new program at a later time. © 2020; Rotronic AG E-M-HG2-S-XL-V3.3... -
Page 44: Tolerance And Sample Size
Included in each file is the program name, set- and adjustment-points, probe serial numbers and relevant calibration reference information. It is possible to upload a custom logo and add other user and reference information (see section © 2020; Rotronic AG E-M-HG2-S-XL-V3.3... - Page 45 40 °C. Adjustments made at temperatures other than 23 °C risk comprising the probe’s ability to meet its specification within the range of optimal performance: 18 to 28 °C. Please note that HW4 cannot be used at the same time as AutoCal. © 2020; Rotronic AG E-M-HG2-S-XL-V3.3...
-
Page 46: Customising The Pdf Calibration Certificate
USB into the HygroGen2. The HygroGen2 will detect the file and display your image. Select “Upload Logo”. The logo will be uploaded to the unit and will appear automatically sized and positioned on the PDF certificate below the “HygroGen” logo. Figure 24: Upload Logo © 2020; Rotronic AG E-M-HG2-S-XL-V3.3... -
Page 47: Reference Information
Chilled Mirror Hygrometer as a reference. Information about the devices can be entered by pressing “Configure Reference” in the AutoCal Screen (Figure 20) or selecting “Reference” from the “Settings” drop-down menu on the Settings screen, Figure 26: Edit AutoCal Reference © 2020; Rotronic AG E-M-HG2-S-XL-V3.3... - Page 48 If a reference that has previously been used and has reference information stored on the HygroGen2 is restored to the instrument, the information will automatically be reapplied. © 2020; Rotronic AG E-M-HG2-S-XL-V3.3...
-
Page 49: External Chilled Mirror (Dew Point) Reference (Autocal+)
4.2 Chilled Mirror Reference Systems To reduce further measurement uncertainties that can be achieved with the HygroGen2, ROTRONIC has worked with MBW and Michell to integrate their products into the HygroGen2. Particularly well suited are the MBW473 and Michell S8000 Dew Point Mirrors. -
Page 50: Connecting And Configuring A Chilled Mirror External Reference
Connection to an MBW Chilled Mirror requires a USB – RS232 adapter and a male-female RS-232 extension cable. Please consult with your Rotronic Supplier to determine the best adapter to use. Earlier units can utilise an Aten UC-232A USB-RS232 later units will work with most Prolific based adapters. - Page 51 S8000 serial number each time the S8000 or HygroGen2 is restarted to ensure the reference instrument has not been changed. It is the operator’s responsibility to ensure that the serial number of the S8000 matches the serial number entered on the “External Reference Connection” screen. © 2020; Rotronic AG E-M-HG2-S-XL-V3.3...
-
Page 52: Measurement Type And Corrections
MBW gives you the choice between using the RH value as determined by the external reference directly or by using the Dew/Frost Point from the external reference. If Dew/Frost Point is selected the HygroGen2 will calculate the RH. © 2020; Rotronic AG E-M-HG2-S-XL-V3.3... -
Page 53: Corrections
Section 6. Enter the correction values from the instrument’s calibration certificate via the two tables found via the “Corrections” option in the “External” drop-down menu and press the toggle button so that it displays “Applied”. © 2020; Rotronic AG E-M-HG2-S-XL-V3.3... - Page 54 If the corrections are applied the Dew Point and Temperature values used by the HygroGen2 are the corrected values. If the uncorrected valuers are required, toggle the “Applied” button off and the HygroGen 2 will used the raw values read from the external reference. © 2020; Rotronic AG E-M-HG2-S-XL-V3.3...
-
Page 55: Calibration Info
(or frost) film forms. This dew (or frost) point is a temperature independent measurement of the humidity level in a gas at a particular pressure. A chilled mirror measures humidity only if mirror control is switched on. The HygroGen2 will report if © 2020; Rotronic AG E-M-HG2-S-XL-V3.3... -
Page 56: Mirror Cleaning
6) to calculate dew points. E.g. at 23 °C, 15 %rh dew point is -5 °C, at 23 °C, 21.5 %rh dew point is -0.15 °C. So at 23 °C, avoid 15-22 %rh as a set point. © 2020; Rotronic AG E-M-HG2-S-XL-V3.3... -
Page 57: Extremes Of Temperature And Humidity
Figure 36: Probe mounted on inside door surface An HG2-B8-9 bung which has a 9-17 mm cable gland can be used to secure the head cable from the outside of the door and provides further insulation. © 2020; Rotronic AG E-M-HG2-S-XL-V3.3... -
Page 58: Remote Control
The feature requires the HygroGen2 to be connected to a network, and the instrument to be appropriately configured for network access. See section Section 3.3.1 Network Settings. Any VNC viewer/client can be used. ROTRONIC recommends RealVNC. iOS: https://apps.apple.com/gb/app/vnc-viewer/id352019548 Android: https://play.google.com/store/apps/details?id=com.realvnc.viewer.android Windows: https://www.realvnc.com/en/connect/download/viewer/... - Page 59 To connect your VNC client to the HygroGen2, enter the Local Area Network IP address as the server name in your VNC client, and the password as set in the previous section. You may receive a warning that the connection is not encrypted. © 2020; Rotronic AG E-M-HG2-S-XL-V3.3...
-
Page 60: Remoteapi
HygroGen2. Off-site connections are possible from other networks using firewall traversal/port forwarding (port 6341) but configuration is required on your firewall and is beyond the scope of this document. Contact your IT support department if you wish to set this up. © 2020; Rotronic AG E-M-HG2-S-XL-V3.3... - Page 61 Share, RemoteAPI and Range Extension options. Document Type Instruction Manual Page 60 of 100 Document title Using the reported LAN IP address, establish a connection in RAW format on port 6341. Figure 40: Putty – Example Command Line Interface © 2020; Rotronic AG E-M-HG2-S-XL-V3.3...
- Page 62 Reports serial number of desiccant HC2-S-S Sserial? Continued *note: these values will be with corrections applied if the MBW Reference is used, a correction table has been entered, and applied and RH calculations are based on dew point (not RH). © 2020; Rotronic AG E-M-HG2-S-XL-V3.3...
- Page 63 (see MBW manual for list) Warning? <text> Reports any HG2 onscreen notifications, e.g. low water level ProgramRun? Reports whether if any programs running on HG2 (1 if yes, 0 if no) Shutdown none Shuts down the HygroGen2 © 2020; Rotronic AG E-M-HG2-S-XL-V3.3...
-
Page 64: Range Extensions
Expert adjustment of the control PID parameters may also be required. PID access is via the Service Menu, which is locked down for standard operation. For further information please contact hygrogen@rotronic.co.uk. © 2020; Rotronic AG... -
Page 65: General Operational Considerations
It is recommended that the chamber door is not opened when the chamber temperature is below the ambient temperature as water vapour from the atmospheric air introduced will condense out into the chamber. The dehumidification of the chamber takes longer at lower chamber temperatures. © 2020; Rotronic AG E-M-HG2-S-XL-V3.3... -
Page 66: Above Ambient Temperature Operation
The immersion depth of any probe inserted in the HygroGen2 should be within the limits of 100-150 mm (4-6”), measured from the inner side of the door. This will reduce the effect of room temperature via stem conduction on the probe. © 2020; Rotronic AG E-M-HG2-S-XL-V3.3... -
Page 67: Protective Filters
The water level sensor may behave differently for different qualities of water. To ensure accuracy of the water level indicator, periodic calibration is advised. To access this feature, go to the Settings Screen and select “Water Level” from the “Settings” drop-down menu. Follow the on-screen instructions. © 2020; Rotronic AG E-M-HG2-S-XL-V3.3... -
Page 68: Switching Off The Hygrogen2
There are two Shutdown procedures; these are presented after you press the on- screen power button. It is important that these are observed; instrument faults attributable to incorrect Shutdown are not covered by the warranty. Figure 43: Shutdown Screen © 2020; Rotronic AG E-M-HG2-S-XL-V3.3... -
Page 69: Shut Down
HygroGen2 will not switch off if the water is not emptied as requested! DO NOT switch off at the wall before the HygroGen2 has shut down. Failure to do this may cause software corruption if running firmware version 1.x. © 2020; Rotronic AG E-M-HG2-S-XL-V3.3... -
Page 70: Preparing The Unit For Transit Or Storage
Even having completely emptied the water reservoir, after transportation there may be a small amount of residual water that has drained into the chamber from the pipework. This is normal and can be simply wiped out with a lint-free cloth. © 2020; Rotronic AG E-M-HG2-S-XL-V3.3... -
Page 71: Hw4 Embedded
7). To start HW4, touch the HW4 icon. Drag the HW4 window onto a second monitor if available. Any ROTRONIC HC2-S probes that are connected to the HygroGen2’s USB ports using a ROTRONIC service cable, can be connected to HW4 using the “Search for USB Masters”... -
Page 72: Hw4 Installation And Registration
To register your HW4 software and to assign your full contact details, visit www.rotronic.com and go to the “Software” Section. Software registration will ensure that you receive full support and notification of upgrades available. Do not try to register online via the HygroGen2 interface as this will not work. -
Page 73: Data Logging In Hw4
Choose either a local path to a USB stick, or configure a network file share, as described in Section 3.4.9, and enter the required server path in the ‘Path’ field in HW4. For further details on HW4, please see ROTRONIC HW4 documentation. © 2020; Rotronic AG E-M-HG2-S-XL-V3.3... -
Page 74: Control Hc2-S
As of firmware version 3.9, HW4 can see and log the HygroGen2 control HC2-S. HW4 automatically detects the HygroGen2 and adds it to the device tree. Should you not wish for it to be listed, delete it in the proscribed fashion as detailed in HW4 documentation. © 2020; Rotronic AG E-M-HG2-S-XL-V3.3... -
Page 75: External Pc Peripherals
All standard user functions may be accessed using the HygroGen2 touch screen. However, if desired, any standard USB keyboard and mouse may be plugged in via front or rear USB ports to facilitate operation. This is particularly useful for operating the embedded HW4 ROTRONIC device control software. International Keyboard Layouts Different international keyboards can be configured for the HygroGen2 via the Settings Page, “Settings”... -
Page 76: External Monitor
11. HW4 will open on the HygroGen2 screen. 12. Using the mouse, drag the HW4 window so that it displays on the monitor. 13. You can now size the HW4 window to suit the connected monitor. © 2020; Rotronic AG E-M-HG2-S-XL-V3.3... -
Page 77: Servicing And Maintenance
Fast PT100 sensor, by gently pulling on the Lemo connector sleeve. Then do the same for the HC2-S control HC2-S. Unscrew the HC2-S from its housing. Figure 45: HG2-XL Control HC2 and PT100 Sensor, and with latter removed © 2020; Rotronic AG E-M-HG2-S-XL-V3.3... -
Page 78: Desiccant
To update the value, run the HygroGen2 on the lowest RH set-point (5 %rh) for at least 5 minutes. © 2020; Rotronic AG E-M-HG2-S-XL-V3.3... -
Page 79: Changing Desiccant
Other desiccants including self- indicating silica gel and drierite can be used if desired; for further information, please contact hygrogen@rotronic.co.uk. Dusty desiccants should be avoided as particles may be passed into the HygroGen2 chamber. Replace or regenerate the desiccant whenever the drying performance of the HygroGen2 is deteriorating. -
Page 80: Hygrogen2 Cleaning
Page 79 of 100 Document title Material Safety Sheets for the desiccants supplied by ROTRONIC are available on request. Regeneration of Molecular Sieve Desiccant It is possible to regenerate molecular sieve desiccant by heating it in a ventilated oven at about 175°C for 5 hours and then allowing it to cool in a sealed container. - Page 81 HygroGen2: Humidity and Temperature Generator Version 3.0 with AutoCal, MBW External Reference, Remote Screen Share, RemoteAPI and Range Extension options. Document Type Instruction Manual Page 80 of 100 Document title Figure 48: HG2-XL Air inlet filter removal © 2020; Rotronic AG E-M-HG2-S-XL-V3.3...
-
Page 82: Chamber
The unit does not require routine user maintenance beyond that described in this Section. For optimum performance, ROTRONIC recommends that the HygroGen2 is serviced every 12 months at an approved HygroGen2 service centre, details of which can be found in Appendix C2 of this manual. -
Page 83: A1: Calibration Reference Options
Testing and Calibration Laboratories”. Appendix D1 provides examples of uncertainty budgets for the HygroGen2 when using different calibration references. These are for guidance only and ROTRONIC accepts no liability in relation to their use. A1.1 Internal RH Probe Reference The display values on the HygroGen2 (which are derived from the control probe - as... -
Page 84: A1.2 External Rh Probe Reference
HygroGen2 external sample loop is employed (see section below). Advantages of chilled mirror references: • Best measurement capability. • Instruments do not drift significantly. • Operates over a broad range of humidity conditions. © 2020; Rotronic AG E-M-HG2-S-XL-V3.3... - Page 85 Chilled mirror probes of diameters up to 30 mm can be directly fitted through the standard HygroGen2/XL door. Depending on the diameter of the probe, a special adaptor or custom HygroGen2 or HygroGen2-XL door may be required, please contact your ROTRONIC dealer for guidance.
- Page 86 (after the mirror) to confirm the air flow rate required by the chilled mirror instrument (typically 0.5 l/min). © 2020; Rotronic AG E-M-HG2-S-XL-V3.3...
-
Page 87: A2: Temperature Control
If a replacement HC2-S reference is put into the HygroGen2, and it gives a significantly different temperature reading, it may take a while - roughly 20 minutes for every 0.1°C discrepancy - the first time stability control is engaged, as the self-adjustment algorithm runs. © 2020; Rotronic AG E-M-HG2-S-XL-V3.3... -
Page 88: A3: Validation - Requirements And Accessories
For an ISO 17025 calibration system, you will need to show evidence of qualifying your own system, and permanently logging temperature gradients within the chamber. For this purpose, ROTRONIC has developed a special door with detachable mapping rig for the HG2-S:... -
Page 89: B2: Hygrogen2 / Screen Messages
Operation can continue at dew points below ambient temperature. Water Sensor error Fault with level sensor. Manual supervision of water level allows use to continue until next service. UV error UV Lamp failure. Contact service centre. © 2020; Rotronic AG E-M-HG2-S-XL-V3.3... - Page 90 Powder coated aluminium, IP20, 450 x 406 x 205 mm (Max) Operating Conditions 5-40°C <2000m Altitude or less. Optimal performance occurs within 18-28°C. Non condensing, indoor use only. Weight 13 kg Safety: EN 61010-1:2001 EMC: EN 61326-1:2006 EN 61326-1:2006 & EN 61000-6- 1:2007 © 2020; Rotronic AG E-M-HG2-S-XL-V3.3...
- Page 91 Powder coated aluminium, and steel, IP20, 80x62x41cm (Max) Operating Conditions 5-40°C <2000m Altitude or less. Optimal performance occurs within 18-28°C. Non condensing, indoor use only. Weight 37 kg Safety: EN 61010-1:2001 EMC: EN 61326-1:2006 EN 61326-1:2006 & EN 61000-6- 1:2007 © 2020; Rotronic AG E-M-HG2-S-XL-V3.3...
- Page 92 Additional desiccant cell, pre-filled with molecular sieve HG2-FILL Fill tube and syringe HC2-S-S Standard control or reference probe. Order UKAS temperature and RH calibration separately Accessories HG2-TB HygroGen2-S transit bag, lightweight HG2-TC HygroGen2-S heavy-duty transit case HG2-MON DVI monitor and lead © 2020; Rotronic AG E-M-HG2-S-XL-V3.3...
- Page 93 3 mm not used 13.5 mm 26 mm 34 mm 14 mm 20 mm cable gland 5 -12 mm probes 32 mm cable gland 11-21mm probes not used 15 mm angled Vaisala HMDW40/W50 not used © 2020; Rotronic AG E-M-HG2-S-XL-V3.3...
- Page 94 50 mm Optidew Cable gland to accept 32…38mm diameter probes General Eastern Chilled Mirror head (32 mm thread) 47 mm Michell Optidew Chilled Mirror head (threaded) 80 mm 8 mm M24 x 1 M20 x 1.5 © 2020; Rotronic AG E-M-HG2-S-XL-V3.3...
- Page 95 Document title C1: HygroGen2 Warranty Statement ROTRONIC will grant a warranty for the HygroGen2 for a period of 12 months from the date of delivery in respect of any evidenced faulty workmanship and materials. The warranty period is extended by a further 12 months when the unit is serviced at a ROTRONIC approved service centre 12 months after the date of supply.
- Page 96 C2: Manufacturer & Service Centre Contact Information Manufacturer/UK Service Switzerland Service Centre: USA Service Centre: Centre: Rotronic Instrument Corp. Rotronic AG Suite 150 Rotronic Instruments (UK) Ltd Grindelstrasse 6 135 Engineers Road Crompton Fields CH-8303 Hauppauge, NY 11788, Crompton Way Bassersdorf...
- Page 97 Resolution from manufacturer’s specification Measured temperature gradients from the ROTRONIC HygroGen2 Service Measured stability from the ROTRONIC HygroGen2 Service From Standard Deviation of 10 repeated calibration runs Resolution of ROTRONIC HygroGen2 Control Clip Resolution of ROTRONIC HygroGen2 Control Clip Resolution from manufacturer’s specification...
- Page 98 Expanded uncertainty (95 % confidence) 1.69 Drift between two successive calibrations of the reference instrument Resolution from manufacturer‘s specification Measured temperature gradients from the ROTRONIC HygroGen2 Service Stem conduction Measured stability from the ROTRONIC HygroGen2 Service From Standard Deviation of 10 repeated calibration runs...
- Page 99 From Standard Deviation of 10 repeated calibration runs Expanded uncertainty (95% confidence) 0.77 Measured temperature gradients from the ROTRONIC HygroGen2 Service Measured stability from the ROTRONIC HygroGen2 Service From Standard Deviation of 10 repeated calibration runs Resolution of ROTRONIC HygroGen2 Control Clip Resolution of ROTRONIC HygroGen2 Control Clip Resolution from manufacturer’s specification...
- Page 100 D4: Dew Point Uncertainty Analysis Dew Point Temperature -5 to +35 °Cdp Equiv Reference Uncertainty source Distribution Value Units Sensitivity °Cdp Divisor One SD Squares Calibration of Standard normal °Cdp 0.10 2.00 0.050 0.00250 Drift of Standard rectangular °Cdp 0.10 1.73 0.058 0.00333...
Need help?
Do you have a question about the HygroGen2 HG2-S and is the answer not in the manual?
Questions and answers