Wavetronix Click 400 Instructions For Use Manual
Hide thumbs
Also See for Click 400:
- Quick start manual (4 pages) ,
- Installation & quick start manual (2 pages) ,
- User manual (260 pages)
Advertisement
Quick Links
Using the Click 400
The Click 400 is a 900 MHz spread spectrum radio with two RS-485 ports and one RS-232 port which are active
at all times. The unit also auto-detects the serial settings of a SmartSensor network for quick and easy installation.
Supporting baud rates of 9600 bps to 115.2 Kbps, all Click 400 units can have different serial baud rates and still
communicate perfectly.
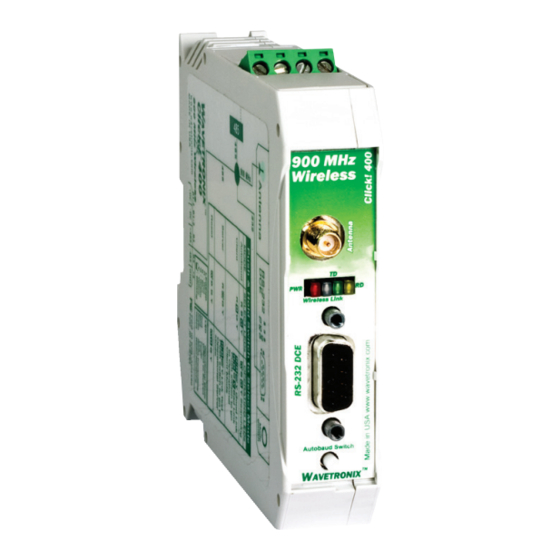
Physical Features
The Click 400 has several communication ports, as well as features for configuration.
T-Bus
TOP
Connector
Communication Ports
The back of the Click 400 features a 5-position connector that plugs into a T-bus connector and provides power
and RS-485 communication to the device. It also passes RS-485 communication from the Click 400 to all other
devices on the T-bus.
The top of the device has a pluggable screw terminal block that features four terminals—one -485, one +485
WX-501-0534 • 01.22
RS-485
Connector
FRONT
Antenna
Connector
LED Indicators
RS-232
Connector
Mode
Switch
0534
1 of 11
Advertisement

Related Manuals for Wavetronix Click 400


Summary of Contents for Wavetronix Click 400
- Page 1 0534 The Click 400 is a 900 MHz spread spectrum radio with two RS-485 ports and one RS-232 port which are active at all times. The unit also auto-detects the serial settings of a SmartSensor network for quick and easy installation.
-
Page 2: Configuration Features
This will be discussed in the On-device Configuration section of this document. On-device Configuration The Click 400 can be configured using the push-button on the lower part of the faceplate. Press and hold the push-button to cycle through the different operation modes; release the button when the desired mode is reached. -
Page 3: Computer Configuration
LED means no data is being received. 5. If the Click 400 is receiving invalid link test data, verify that the server is in link test mode. If this does not fix the problem, then check the line of sight and the antenna for possible problems. - Page 4 ■ SmartSensor Server driver. To see advanced settings, use the Expert driver. This driver, which exposes every available field for the Click 400, should only be used under the direction of Wavetronix Support. After you have made configuration changes on a driver and saved it to the Click device, the word “current” will appear after that driver to indicate the driver that is currently loaded onto the device.
- Page 5 Tx Power (1W Max) Allows you to modify the power level in increments of 10%. The Click 400 transmit power can be reduced to decrease interference caused by multiple radios. Baud Rate Allows you to change the baud rate at which the device connects to the sensor.
- Page 6 Save to Device to save your settings to your Click 400. Note. If you do not save your settings to your Click 400, they will be lost the next time you power the device down. The Tools menu contains five options for working with your device. Reset > System power cycles your device, ■...
- Page 7 The System > General tab combines elements of the Setup and About tabs from the other drivers (see the figure and table below). Setting Description Module Allows you to enter a name for the device. Driver Names the driver you are currently working with. Description Shows a description of the device being configured.
- Page 8 Command Allows you to set the command sent from the device during the autobaud process. Don’t change these values unless instructed to by Wavetronix Technical Services. Response Shows the response the device is expecting from the above command. Don’t change these values unless instructed to by Wavetronix Technical Services.
- Page 9 Allows you to choose the destination for the data packets. If Destination ID is selected, the Dest. ID will need to be entered for the Click 400 you are communicating with; if Server ID is selected, the Click 400 will automatically communicate with the Server.
- Page 10 Sync to channel Allows you to synchronize channels with other servers. Sync Channel Allows you to choose the channel number to synch to. This number must be lower than the RF channel. DES Encryption Allows you to encrypt data going across radios. DES Key Must be the same on all radios you are using.
- Page 11 © 2022 Wavetronix LLC. All rights reserved. Protected in the US by patents viewable at www.wavetronix.com/en/legal. Protected by Canadian Patent Nos. 2461411; 2434756; 2512689; and European Patent Nos. 1435036; 1438702; 1611458. Other US and international patents pending. Wavetronix, SmartSensor, Click, Command and all associated logos are trademarks of Wavetronix LLC. All other product or brand names as they appear are trademarks or registered trademarks of their respective holders.
Need help?
Do you have a question about the Click 400 and is the answer not in the manual?
Questions and answers