Table of Contents
Advertisement
MR36H Installation Guide
The Cisco Meraki MR36H is a dual-band 802.11ax cloud-managed access point with integrated Ethernet ports. Designed for room wireless and wired
connectivity, the MR36H is easy to install on the wall on a single gang box, and is the first cloud managed hospitality AP.
About this Guide
This guide provides instructions on how to install and configure your MR36H access points. This guide also provides mounting instructions and limited
troubleshooting procedures. For more wireless installation guides, refer to the
Product Overview
Physical Specifications
MR36H
Interfaces
•
1x Gigabit Ethernet (RJ45) with 802.3af Power over Ethernet output *
•
2x Gigabit Ethernet (RJ45) outputs
•
1 to 1 Passthrough port
*it can work with 802.3af with lower capabilities
Power
•
Power over Ethernet: 37 - 57 (802.3at compatible)
•
Power consumption: 25W max (802.3at)
•
Power over Ethernet injector sold separately
Environment
wireless installation guides section
on our documentation website.
1
Advertisement
Table of Contents

Subscribe to Our Youtube Channel
Related Manuals for Cisco MERAKI MR36H


Summary of Contents for Cisco MERAKI MR36H
- Page 1 The Cisco Meraki MR36H is a dual-band 802.11ax cloud-managed access point with integrated Ethernet ports. Designed for room wireless and wired connectivity, the MR36H is easy to install on the wall on a single gang box, and is the first cloud managed hospitality AP.
-
Page 2: Package Contents
Storage and Transportation Temperature: -4 °F to 158 °F (-20 °C to 70 °C) • Humidity: 5 to 95% non-condensing Physical Security • Two security screw options (included) • Concealed mount plate Package Contents The MR36H package contains the following: MR36H Cloud-Managed Access Point Mount cradle... -
Page 3: Mount Kit
Mount Kit... -
Page 4: Mounting Compatibility
MR36H needs both ports on the back to be used. The same mounting plate that fits MR30H could be used If the use of the MR36H's passthrough port is not needed, as that is the part that will be covered by the old bracket. -
Page 5: Ethernet Ports
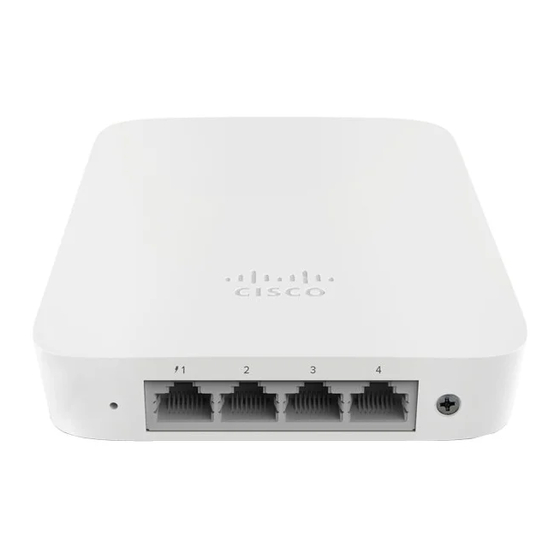
LAN Access Ports The MR36H features 3x LAN ports labeled 1 through 3. Port 1 may provide 802.3af out to an end device if the MR36H is powered via a 802.3at power source. Configuration details can be found in the AP port profiles article. -
Page 6: Power Source Options
Connecting another MR to the LAN ports of the MR36H is not a supported topology. Through MR-4072 we learnt that if another MR is connected to the LAN port of an MR36H, DHCP requests from that MR will not be forwarded from the LAN ports, this is designed as such to prevent erroneous mesh topologies from forming. -
Page 7: Factory Reset Button
Factory Reset Button If the button is pressed and held for at least five seconds and then released, the MR36H will reboot and be restored to its original factory settings by deleting all configuration information stored on the unit. The factory reset button is located on the rear of the unit and must be ejected from the mount plate in order to be activated. - Page 8 System Status The MR36H is equipped with a multi-color LED light on the front of the unit on the top right to convey information about system functionality and performance. The LED shines through the faceplate of the AP and is not visible when either disabled via Run Dark mode or powered off.
-
Page 9: Pre-Install Preparation
Run Dark mode is not enabled. Run Dark Mode The MR36H may be operated in “Run Dark” mode for additional security and to reduce the visibility of the access point. In this mode, the LED will not be illuminated. This mode may be configured through the Meraki dashboard. - Page 10 Attach your MR36H to power and a wired Internet connection. See the "Power the MR36H" section for details. The MR36H will turn on and the LED will glow solid orange. If the unit does not require a firmware upgrade, the LED will turn either green (no clients associated) or blue (clients associated) within thirty seconds.
-
Page 11: Collect Tools
Configure the static IP address, net mask, gateway IP address and DNS servers that this AP will use on its wired connection. If necessary, reconnect the AP to the LAN. Static IP via DHCP Reservations Instead of associating to each Meraki AP individually to configure static IP addresses, an administrator can assign static IP addresses on the upstream DHCP server. -
Page 12: Installation Instructions
Install the MR36H For most mounting scenarios, the MR36H mount cradle provides a quick, simple, and flexible means of mounting your device. The installation should be done in two steps. First, install the mount cradle to your selected location. Then, attach the MR36H to the mount cradle. - Page 13 Attach the MR36H to the Mount Cradle To attach the MR36H to the mount cradle properly, line up the top edge of the AP with the top tab of the mount cradle. Since the cradle is already mounted to the wall, guide the MR36H towards the top tab and insert the top tabs into the MR36H’s slot.
- Page 14 Then adjust the MR36H to guide the MR36H’s bottom slot into the cradle’s bottom tab until it clicks into place. Once in place, the MR36H should be secured to the cradle by using one of the included screws in the cradle’s bottom tab.
- Page 15 Secure the MR36H Depending on your mounting environment, you may want to secure the MR36H to its mount location. Your MR36H can be secured via security screw (Torx security screws are included).
- Page 16 Ejecting MR36H from mount plate To release the MR36H from the mount cradle, first remove the security screw that secures the MR36H to the cradle’s bottom tab. While holding the MR36H with one hand, use the eject tool to trigger the release mechanism. Then remove the MR36H from the cradle’s top tab.
-
Page 17: Verify Device Functionality And Test Network Coverage
Note: Your MR36H must have an active route to the Internet to check and upgrade its firmware. Verify access point connectivity Use any 802.11 client device to connect to the MR36H and verify proper connectivity using the client’s web browser. Check network coverage Confirm that you have good signal strength throughout your coverage area. -
Page 18: Basic Troubleshooting
Basic Troubleshooting The following steps can be used for troubleshooting basic connectivity issues with your access point. • Reset the access point • Factory reset the access point by holding the factory reset button for 5 seconds • Try switching cables, or testing your cable on another device If your access point still does not connect, the following instructions may be useful, depending on your issue. -
Page 19: Warranty
The original hardware packaging includes device serial number and order information, and may be required for return shipping. Meraki MR36H devices have been tested and found to comply with the limits for a Class B digital device, pursuant to part 15 of the FCC rules. These limits are designed to provide reasonable protection against harmful interference in a residential installation. - Page 20 • The equipment is intended for industrial or other commercial activities. • The equipment is used in areas without exposure to harmful and dangerous production factors, unless otherwise specified in the operational documentation and/or on the equipment labeling. • The equipment is not for domestic use. The equipment is intended for operation without the constant presence of maintenance personnel. •...
Need help?
Do you have a question about the MR36H and is the answer not in the manual?
Questions and answers