Table of Contents
Advertisement
Quick Links
Advertisement
Table of Contents

Related Manuals for OBSIDIAN CONTROL SYSTEMS NETRON EP2


Summary of Contents for OBSIDIAN CONTROL SYSTEMS NETRON EP2
- Page 2 ©2021 OBSIDIAN CONTROL SYSTEMS all rights reserved. Information, specifications, diagrams, images, and instructions herein are subject to change without notice. Obsidian Control Systems logo and identifying product names and numbers herein are trademarks of ADJ PRODUCTS LLC. Copyright protection claimed includes all forms and matters of copyrightable materials and information now allowed by statutory or judicial law or hereinafter granted.
-
Page 3: Table Of Contents
C O N T E N T S GENERAL INFORMATION OVERVIEW CONNECTIONS MENU: NAVIGATION HOME SCREEN PRESETS NETRON PRESETS DMX PORTS VIEW AND TEST IP ADDRESS SYSTEM INFORMATION WEB REMOTE CONFIGURATION WEB REMOTE MENU FIRMWARE UPDATES... -
Page 4: General Information
G E N E R A L I N F O R M AT I O N INTRODUCTION Please read and understand the instructions in this manual carefully and thoroughly before attempting to operate this device. These instructions contain important safety and use information. CUSTOMER SUPPORT Contact your local Obsidian Controls Systems dealer or distributor for any product related service and support needs. -
Page 5: Overview
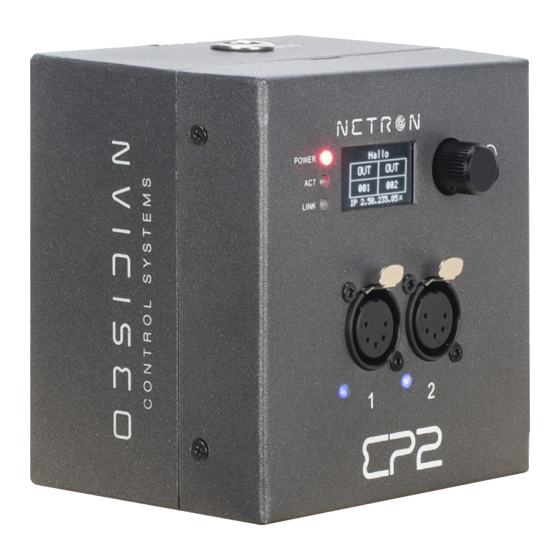
O V E R V I E W The NETRON EP2 is a compact Ethernet to DMX gateway with two RDM compatible ports designed for wall mount, truss mount and standalone installations. It is configurable via its internal web remote and powered over Ethernet or via the convenient USB-C connection. -
Page 6: Connections
C O N N E C T I O N S DMX CONNECTIONS: All DMX Output connections are 5pin female XLR; the pin-out on all sockets is pin 1 to shield, pin 2 to cold (-), and pin 3 to hot (+). Pins 4 and 5 are not used. Carefully connect DMX cables to the respective ports. - Page 7 C O N N E C T I O N S : F R O N T & S I D E PA N E L S F R O N T C O N N E C T I O N S Turn to scroll, push-to-select Status Indicators...
-
Page 8: Menu
M E N U : N A V I G AT I O N The Netron devices use a small OLED display for feedback and setup. The encoder dials up and down through the menu, a push of the encoder selects an item or saves an entry. Revert to a previous menu or cancel an entry with a single push of the back arrow. -
Page 9: Presets
M E N U : P R E S E T S Several simple presets are preprogrammed into the device for fast setup. Some presets require additional input like a start Universe. SUB MENU OPTION / VALUES DESCRIPTION 1. ArtNet 2.x Universe 1-32767 2. -
Page 10: Netron Presets
M E N U : N E T R O N P R E S E T S These simple presets are preprogrammed into the device for fast setup. Some presets require additional input like a start Universe. Label Ethernet DMX Ports IP Address Subnet... -
Page 11: Dmx Ports
M E N U : D M X P O R T S Select a port number to adjust its settings. Depending on the Mode, certain options are not relevant and hidden from the display or web interface. SUB MENU OPTION / VALUES DESCRIPTION Disable... -
Page 12: View And Test
M E N U : V I E W A N D T E S T Select a View and Test mode to test . Depending on the Mode, certain options are not relevant and hidden from the display or web interface. -
Page 13: Ip Address
M E N U : I P A D D R E S S Set the desired device IP address in this menu. Every Netron device is set to a unique 2.x.x.x address at the factory, and after every reset to this default. For Art-Net systems, it should never be necessary to adjust this IP. -
Page 14: System
M E N U : S Y S T E M This menu contains all the settings to configure and manage the device SUB MENU OPTION / VALUES DESCRIPTION 12 Character Label Set a device name 0-999 Set an optional device ID Disable Display stays on indefinitely Display Timeout... -
Page 15: Information
M E N U : I N F O R M AT I O N This menu provides information about the device. SUB MENU OPTION / VALUES DESCRIPTION Boot SW V# Display the current software version Firmware: V# Time: XXXXX(H) Total time the device has been powered on. -
Page 16: Web Remote Configuration
W E B R E M O T E C O N F I G U R AT I O N Ensure the device and a computer do not share IP address, but are in the same IP address range, and are connected. -
Page 17: Web Remote Menu
W E B R E M O T E M E N U : H O M E PA G E Please note that Netron devices are not compatible with Microsoft Internet Explorer. Also, the antivirus software AVAST is known to block important communication with NETRON, and must be disabled for the web interface and firmware updates to function. - Page 18 W E B R E M O T E M E N U : P R E S E T S - N E T R O N P R E S E T S W E B R E M O T E M E N U : P R E S E T S - U S E R P R E S E T S...
- Page 19 W E B R E M O T E M E N U : D M X P O R T S - O U T P U T...
- Page 20 W E B R E M O T E M E N U : D M X P O R T S - D I S A B L E W E B R E M O T E M E N U : D M X P O R T S - I N P U T...
- Page 21 W E B R E M O T E M E N U : D M X P O R T S - S E N D V A L U E...
- Page 22 W E B R E M O T E M E N U : D M X P O R T S - S E N D V A L U E...
- Page 23 WEB REMOT E M ENU : DMX PO RT S - D E VI C E S ET T I N G S...
- Page 24 W E B R E M O T E M E N U : DMX PO RT S - M AI NT EN AN C E...
- Page 25 F IRMWAR E UP D ATE S Updates for improved performance or to add additional features may be available on www.obsidiancontrol.com. To install a firmware upgrade, connect to the device through a web browser and open the System – Maintenance menu. Always back up the configuration first.
Need help?
Do you have a question about the NETRON EP2 and is the answer not in the manual?
Questions and answers