Table of Contents
Advertisement
Quick Links
Advertisement
Table of Contents

Related Manuals for Electrolux EHH957BE


Summary of Contents for Electrolux EHH957BE
- Page 1 EHH957BE Cooking User manual...
-
Page 2: Table Of Contents
Serial number: _____________________________________ affect your ability to make a claim under the Electrolux manufacturer’s warranty provided with your product. Products must be used, installed and operated in accordance with this manual. -
Page 3: Safety Information
SAFETY INFORMATION Please read the user manual carefully and store in a handy • The bottom of the appliance can get hot. We place for later reference. Pass the user manual on to recommend to install a non-combustible separation possible new owners of the appliance. panel under the appliance to prevent access to the bottom. - Page 4 SAFETY INFORMATION • This appliance is not intended for use by persons WARNING! (including children) with reduced physical, sensory Risk of damage to the appliance. or mental capabilities, or lack of experience and knowledge, unless they have been given supervision or •...
-
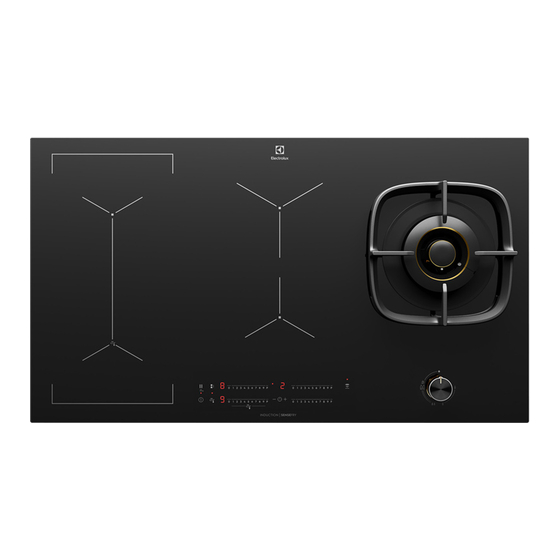
Page 5: Product Description
PRODUCT DESCRIPTION Figure 1a Figure 1b Burner Injector Burner flame ports Skirt Ignition spark plug Flame safeguard sensor Figure 2a Dual wok burner Removable cast iron trivet Enamelled burner skirt Induction cooking zone Ceramic Glass hob – the glass hob is resistant to Induction cooking zone heat, cold and rapid temperature changes, but is Induction cooking zone... - Page 6 PRODUCT DESCRIPTION (CONTINUED) Sensor field Function To activate and deactivate the appliance To lock / unlock the control panel Sets all operating zones to a keep warm setting To activate the Bridge function To activate and deactivate the manual mode of the Hob2Hood function.
- Page 7 Heat setting displays Display Description The cooking zone is deactivated The cooking zone operates Sets all operating zones to a keep warm setting The automatic heat up function operates Power function operates There is a malfunction + digit OptiHeat Control (3 step Residual heat indicator) : continue cook / stay warm / residual heat Lock / The child safety function operates Not correct cookware or too small or no cookware on the cooking zone The automatic switch off function operates...
-
Page 8: Operating Instructions
OPERATING INSTRUCTIONS Before first use CAUTION! Installation Do not place burners or trivets in a dishwasher. • An authorised person must install this appliance and MUST provide a Certificate of Compliance. Controls This certificate should be retained along with Each burner is controlled by a control knob. - Page 9 Figure 2a Note! When the wok burner is turned to low only the smal inner ring stays lit. This is a normal function of the dual wok burner to provide a very low power flame option. In the absence of electrical power, carry out the ignition directly to the burner with a hand held ignition source.
- Page 10 OPERATING INSTRUCTIONS Bridge function On and off IMPORTANT! Touch for 1 second to activate or deactivate the Use the Bridge Function with the appliance. Infinite Plancha accessory Automatic switch off The Bridge Function connects the two left side cooking zones under the accessory and they operate as one.
- Page 11 Automatic heat up Count down timer Use the Count Down Timer to set how long the cooking zone operates for one cooking session. Set the Count Down Timer after the selection of the cooking zone. You can set the heat setting before or after you set the timer.
- Page 12 OPERATING INSTRUCTIONS (CONTINUED) Keep warm Operating the function automatically function sets all cooking zones that operate to the The default automatic mode from the factory is H5. You can lowest heat setting ( ). When operates, you cannot change the automatic mode by following the instructions change the heat setting.
- Page 13 SenseFry function This function lets you set a heat setting level to fry your food. The hob keeps the selected temperature automatically while frying. Once the heat setting level is set, no manual temperature adjustment is necessary. You can set the function for the left front cooking zone of the hob. CAUTION! Use laminated pans only with low heat setting level to prevent overheating and damage of the cookware.
-
Page 14: Helpful Hints And Tips
HELPFUL HINTS AND TIPS Operating the fan speed manually Cookware is correct for an induction hob if: You can also operate the function manually. To do Find the right cookware that touch when the hob is active. This deactivates Only magnetic pots and pans work with induction. - Page 15 To find the full range of rangehoods which work with this the cookware. The cookware with a smaller diameter than function refer to our consumer website. The Electrolux the minimum receives only a part of the power generated rangehoods that work with this function must have the by the cooking zone.
- Page 16 HELPFUL HINTS AND TIPS (CONTINUED) Hints and Tips for Sensefry function Examples of cooking applications for the function The data in the tables shows examples of food for To achieve the best results with the function: each heat setting level. The amount, thickness, quality •...
- Page 17 Examples of cooking applications The relation between the heat setting and the cooking zone consumption of power is not linear. When you increase the heat setting it is not proportional to the increase of the cooking zone consumption of power. It means that the cooking zone with the medium heat setting uses less than a half of its power.
-
Page 18: Care And Cleaning
CARE AND CLEANING CAUTION! CAUTION! Ensure the appliance is off and cool before Use the scraper supplied to remove spillages cleaning. immediately, while the hob is still hot! Especially sugar and foods with a high sugar content (eg. jam), melted plastics and foil, all of which can Enamel (on burner skirts and trivets) damage the hob if left. - Page 19 scratching this surface during cleaning. In instances of heavy soiling, it may be necessary to apply a non-abrasive cleaning compound and rub with a cloth until the soiling is removed and then finish with a soft, dry cloth. NOTE! DO NOT place trivets or burners in the dishwasher. Ignition spark plug and flame safeguard sensor GENTLY clean the ignition spark plug and flame safeguard sensor with a damp cloth to avoid lighting...
- Page 20 CARE AND CLEANING (CONTINUED) Clean the appliance after each use. 2. Remove after the appliance is sufficiently cool: Always use cookware with clean bottom. limescale rings, water rings, fat, stains, shiny metallic discolourations. Use a special cleaning agent for glass ceramic or stainless steel.
-
Page 21: Troubleshooting
TROUBLESHOOTING TROUBLESHOOTING If you have a problem with the cooktop, check the table below. You may be able to solve the problem and this will save you from paying for a service call. You will have to pay for a service call even in the warranty period if the problem is one listed below. - Page 22 TROUBLESHOOTING (CONTINUED) TROUBLESHOOTING Problem Possible cause Remedy Red rings, limescale or water Cooktop surface has not been cleaned Use a ceramic glass cleaner such rings, shiny metallic or other correctly. Cleaning/ maintenance of the as Cerapol. discolouration, scratches/ cooktop surface is not covered under shadows, bubbles or other warranty.
- Page 23 The sensor fields The cookware is too large or you put it Put large cookware on the rear cooking zones if become hot. too near to the controls. necessary. There is no signal The signals are deactivated. Activate the signals when you touch the (refer to “OffSound control”).
-
Page 24: Technical Information
TECHNICAL INFORMATION Model. Voltage (volts) 220-240 Ser.Nr. Cycles (Hz) 50/60 ELECTROLUX Cooking Nominal Power Power Function Power function maximum Minimum zone (Max heat setting) (W) activated (W) duration (min) cookware diameter (mm) Middle front 1400 W 2500 W 125-145... -
Page 25: Installation
INSTALLATION INSTRUCTIONS This appliance must be installed by an authorised person CAUTION! and in compliance with: Cooktops are supplied set up for natural gas (NG). AS/NZS 5601.1 Gas Installations Part 1: General To use on LPG, the injectors must be changed using Installations, and AS/NZS 5601.2 Gas Installations the conversion kit supplied. - Page 26 INSTALLATION PROCEDURE The bench cutout should be made as per cutout dimensions . A djacent walls, cupboards and protection for combustible materials: Ensure that the appliance is installed in accordance with AS/NZS 5601.1, or AS/NZS 5601.2 with regard to clearances to combustible surfaces and materials, and clearances to rangehoods and exhaust fans.
- Page 27 min. 25mm min. min.8mm 50mm min. 25mm min. 60mm *Note: The clearance must meet or exceed the minimum recommended for both the rangehood and cooktop. Refer to the rangehood installation manual.
-
Page 28: Gas Connection
GAS CONNECTION Operation on N.G./S.N.G Elbow positioning This appliance is supplied for use with Natural Gas. It is possible to reposition the elbow if required by However, it can be converted for use with LPG. Refer to loosening the locking nut and elbow by using two LP conversion on page 28. - Page 29 OPERATION ON N.G./S.N.G. CHECKING THE GAS SUPPLY 1. Check the manometer zero point is correct. Assembly of the regulator 2. Connect the manometer to the cooktop pressure The assembly of the regulator to the cooktop manifold point. This is located on the regulator. is achieved via the elbow union and sealing washer 3.
- Page 30 LPG CONVERSION - CHANT REGULATOR Once these checks have been completed, if the IMPORTANT! regulator still fails to perform in a satisfactory manner it Refer to page 28 if you have been supplied with a should be replaced. DONG YANG regulator.
-
Page 31: Electrical Connection
ELECTRICAL CONNECTION (220-240 VOLTS) The appliance is supplied with a standard 7.5 Amp service cord terminated by a 3-pin plug for connection to a standard household socket. The electrical supply is required to power the electronic ignition system. NOTE! It will be necessary for servicing purposes to disconnect the electrical power supply. -
Page 32: Testing Appliance Operation
TESTING APPLIANCE OPERATION After installation, test the appliance and ensure that CAUTION! it operates correctly before handing it over to the Servicing must only be carried out by an authorised customer. The following procedure is recommended: service person. 1. Turn on the gas and electricity supply and attempt... -
Page 33: Notes
NOTES... - Page 34 NOTES...
-
Page 35: Warranty
Guarantee Act does not apply. warranty. 11. C onfidentiality: You accept that if you make a warranty claim, Electrolux 7. Exclusions: You may not make a claim under this warranty unless and its agents including ASC may exchange information in relation to you the defect claimed is due to faulty or defective parts or workmanship. - Page 36 0800 436 245 fax: 0800 225 088 email: customercare@electrolux.co.nz web: electrolux.co.nz To add a touch of professional inspiration to your home, visit electrolux.com.au or electrolux.co.nz electrolux.com.au or electrolux.co.nz P/No. ANC A22211203 Rev.A © 2021 Electrolux Home Products Pty Ltd. EMAN_Induction_Hobs_Jul21...
Need help?
Do you have a question about the EHH957BE and is the answer not in the manual?
Questions and answers