Table of Contents
Advertisement
Quick Links
Advertisement
Table of Contents

Related Manuals for dji RONIN 4D


Summary of Contents for dji RONIN 4D
- Page 1 User Manual 2022.02 v1.2...
- Page 2 Navigating to a Topic View a complete list of topics in the table of contents. Click on a topic to navigate to that section. Printing this Document This document supports high resolution printing. © 2022 DJI All Rights Reserved.
-
Page 3: Using This Manual
DJI official website (http:www.dji.com/ronin-4d). Read the safety guidelines to understand your legal rights and responsibilities. Contact DJI or a DJI authorized dealer if you have any questions or issues during installation, maintenance, or use of this product. Watching the Tutorial Videos... -
Page 4: Table Of Contents
Contents Using this Manual Legend Before You Begin Watching the Tutorial Videos Downloading DJI Assistant 2 (Ronin Series) Product Profile Getting Started Mounting the Lens (Using DL Lens as an example) Mounting the LiDAR Range Finder Balancing Attaching the Hand Grips... - Page 5 Recording Video Display User Settings Storage System Lens Stabilizer Transmission Intelligent Battery Intelligent Features ActiveTrack Pro Focus Control Firmware Maintenance Specifications Appendix Using DJI Force Pro and DJI Master Wheels with Ronin 4D Dimensions © 2022 DJI All Rights Reserved.
-
Page 6: Product Profile
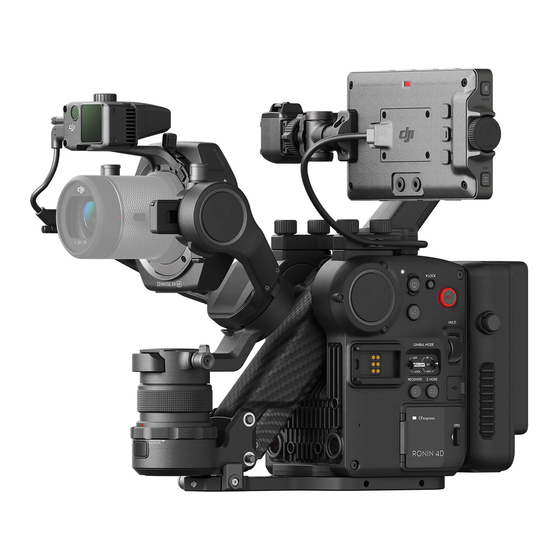
DL mount, it can also be interchanged with other lens mounts such as the DJI M mount and the third-party E mount. The camera can control the aperture and focus of the DL lens** as well as both manual and auto focus on a manual lens when used with the X9 Focus Motor and LiDAR range finder. - Page 7 DJI Ronin 4D User Manual Ronin 4D Diagram 1. Gimbal and Camera 7. High-Bright Main Monitor 2. Z-Axis 8. TB50 Intelligent Battery and Battery 3. Base Plate Compartment 4. Left Hand Grip 9. Main Body 5. Top Handle 10. Right Hand Grip 6.
-
Page 8: Getting Started
Follow the steps below to prepare Ronin 4D for shooting. Mounting the Lens (Using DL Lens as an example) The X9 gimbal and camera supports various lenses. Visit the official DJI website at http://www.dji.com/ ronin-4d/lens to check compatible lenses. 1. The gimbal is folded by default. Unfold the roll and tilt axes before mounting the lens. Toggle the roll axis lock to the unlocked position, adjust the roll axis as shown, and lock the roll axis. - Page 9 An M mount is required when attaching an M mount lens. Follow the steps below to attach an M mount. Refer to the DJI Zenmuse X9 M Mount Unit User Guide for more information. 1. Press and hold the release button on the camera lever, rotate the lever counter-clockwise until it is positioned left of the white mark, and remove the DL mount.
-
Page 10: Mounting The Lidar Range Finder
Use the LiDAR range finder with DJI Zenmuse X9 Focus Motor to control the focus of manual lens. Refer to the DJI Zenmuse X9 Focus Motor Product Information for more information. It is recommended to mount the counterweight (106g) for optimal balancing if the X9 Focus Motor is not being used. -
Page 11: Balancing
Remove any lens cap from the camera before balancing. 2. Make sure to select the focal length before balancing if using a varifocal lens. Make sure Ronin 4D is powered off or in sleep mode before balancing. -
Page 12: Attaching The Hand Grips
Tilt Ronin 4D towards you while holding the top handle. Check the movement of the pan axis. If the camera lens rotates to the left, push the pan axis to the right. If the camera lens rotates to the right, push the pan axis to the left. -
Page 13: Attaching The Intelligent Battery
Click Inserting the Storage Media Ronin 4D supports the DJI PROSSD 1TB when used with the DJI PROSSD Mount, CFexpress2.0 Type-B cards, and USB 3.1 Type-C SSDs*. The DJI PROSSD 1TB supports internal recording of the highest format and the footage can be read in the computer directly through the provided USB-C to USB-C cable. - Page 14 , press the clip inside, and remove the cover. 2. Locate the arrow on the CFexpress card plug and insert it into the card slot of Ronin 4D based on the direction of the arrow. 3. Remove the two M2×5 screws on Ronin 4D, align the PROSSD mount with the screw holes, and attach using the two M2×22 screws...
-
Page 15: Activating Dji Ronin 4D
Ronin 4D: 1. Before powering on Ronin 4D, make sure the LOCK switch is in the unlocked position and the three axes of the gimbal are unlocked. Otherwise, Ronin 4D cannot work properly. Press and hold the power button for 1 second to power on Ronin 4D. -
Page 16: Auto Tune
Make sure the three axes of the gimbal are unlocked and the GIMBAL MODE is toggled to FOLLOW or LOCK before auto tune. Make sure Ronin 4D is placed on a flat and steady surface before autotuning. It is normal for the gimbal to vibrate and emit sounds during autotune. -
Page 17: Balancing The Z-Axis
Make sure the total payload of the Z-axis is less than 2 kg including the X9 Gimbal and Camera, X9 Focus Motor, counter weight, and LiDAR range finder. Power on Ronin 4D and enable the Z-axis before balancing the Z-axis. 1. Loosen the Z-axis lock and press the Z-axis switch to enable the Z-axis. - Page 18 4. The Z-axis is balanced if there are no red bars or arrows displayed on the screen. Keep Ronin 4D horizontal and steady during balancing. The Z-axis cannot be balanced when Ronin 4D is upside down. © 2022 DJI All Rights Reserved.
-
Page 19: Dji Zenmuse X9 Gimbal And Camera
3. X9 Focus Motor Port 9. Gimbal Release Button For connecting the X9 Focus Motor and Ronin Press the release button to remove the gimbal. 4D using the DJI LiDAR range finder/X9 focus 10. Pan Lock motor cable. For locking the pan axis. - Page 20 DJI Ronin 4D User Manual Gimbal Gimbal Mode The gimbal modes include Lock, Pan Follow, Pan and Tilt Follow, FPV, and Custom modes. Lock Mode: The gimbal will not follow the movement of the main body. Pan Follow: Only the pan axis follows the movement of the main body.
- Page 21 DJI Ronin 4D User Manual Controlling the Gimbal Push the left hand grip joystick or the top handle tilt slider up or down to control the tilt axis by default. Push the left hand grip joystick up or down to control the pan axis by default.
- Page 22 Do not detach the gimbal and camera unless necessary. The X9 gimbal and camera do not support hot-swapping. Make sure to power off the Ronin 4D before attaching or detaching the gimbal and camera. Make sure the gimbal and camera is mounted firmly.
- Page 23 DJI Ronin 4D User Manual X9-6K Recording Specifications DCI 17:9 DCI 2.39:1 Codec Resolution Image Area Sensor FPS (MB/s) 23.976 29.97 59.94 Full Frame ProRes RAW Super 35 Full Frame Full Frame ProRes 422HQ Super 35 Full Frame Super 35...
- Page 24 DJI Ronin 4D User Manual Apple ProRes 422 HQ Super 35 4K 17:9 - 4096×2160 Apple ProRes 422 HQ Super 35 4K 2.39:1 - 4096×1712 Apple ProRes 422 HQ Super 35 2K 17:9 - 2048×1080 H.264 Full Frame 4K 17:9 - 4096×2160 H.264 Full Frame 4K 2.39:1 - 4096×1712...
- Page 25 DJI Ronin 4D User Manual X9-8K Recording Specifications DCI 17:9 DCI 2.39:1 Codec Resolution Image Area Sensor FPS (MB/s) 23.976 29.97 59.94 Full Frame ProRes RAW 5.5K Super 35 Full Frame ProRes 422HQ Full Frame Super 35 Full Frame H.264...
- Page 26 DJI Ronin 4D User Manual Apple ProRes 422 HQ Full Frame 8K 17:9 - 36×19 mm Apple ProRes 422 HQ Full Frame 4K 17:9 - 36×19 mm Apple ProRes 422 HQ Super 35 4K 17:9 - 24.5×12.98 mm H.264 Full Frame 4K 17:9 - 36×19 mm H.264 Super 35 4K 17:9 - 24.5×12.98 mm...
-
Page 27: Z-Axis
Make sure the payload of the Z-axis is within 2 kg, including the gimbal and camera, lens, counter weight, LiDAR range finder, and X9 Focus Motor. The Z-Axis is disabled by default. Power on Ronin 4D before enabling the Z-axis. Loosen the lock knob, press the Z-axis switch on the main body or press the right hand grip trigger twice to enable the Z-axis. -
Page 28: Main Body
13 12 1. Power Indicator Glows solid white when Ronin 4D is powered on and blinks for three seconds before powering off. If the Lock button is in the locked position, Ronin 4D cannot be powered on when pressing the power button and the power indicator will blink three times before turning off. - Page 29 DJI Ronin 4D User Manual Blinks fast when installing an CFexpress card, blinks slowly when recording, and remains off when not recording. 12. C1 & C2 Buttons Press the C1 button to recenter the gimbal. Press the C2 button to switch between Follow and Lock mode of the Z-axis when the Z-Axis mode is set to Follow or Lock in the high-bright main monitor menu.
-
Page 30: Hand Grips
Press and hold to enter Sport mode and release to exit Sport mode. Alternatively, press twice to enter or exit Sport mode. 9. Safety Lock Release the safety lock before detaching the hand grip. © 2022 DJI All Rights Reserved. - Page 31 DJI Ronin 4D User Manual Right Hand Grip 1. Dial Turn to adjust focus, ND, EI, or aperture and to scroll through options on the high-bright main monitor. Turn the dial to control focus by default and press the mode button to scroll through the options.
-
Page 32: Top Handle
Attaching and Detaching the Top Handle Loosen the four screws to detach the top handle. Align with the positioning hole and the pins before tightening the four screws when attaching the top handle. © 2022 DJI All Rights Reserved. -
Page 33: High-Bright Main Monitor
Press once to access playback and play the last recorded video. Press and hold to enter or exit full screen. 10. Dial Rotate the dial to scroll through the options and press once to confirm. © 2022 DJI All Rights Reserved. - Page 34 DJI Ronin 4D User Manual 11. Home Button Press once to enter or exit menu screen. 12. Tally Light Glows solid red during recording and is off when not recording. 13. Focus Peak Button Press once to enable or disable the focus assist display.
-
Page 35: Camera View
5600K 08:02:16:06 1. Battery Level Displays the battery level (displays the voltage when using a DC power supply for Ronin 4D). The icon becomes red when the battery level is lower than 10% . An exclamation mark will appear in the icon when the battery level is critically low. - Page 36 The minimum focus distance of Ronin 4D is 1 foot (approx. 0.3 m). Select Lens, Focus, and Unit in the high-bright ©...
- Page 37 Preset can be selected in both run modes. In Preset mode, tap TC settings or Reset TC to customize the initial value. Jam Synced can only be selected in Free Run mode and requires an SN external timecode synchronizer and the DJI Ronin 4D Expansion Plate (SDI/XLR/TC).
- Page 38 Description Icon Indicates Ronin 4D requires auto tune such as when using for the first time or after reseting gimbal parameters. Tap the icon to enter auto tune. The icon is white when the gimbal is properly balanced and can work normally.
- Page 39 DJI Ronin 4D User Manual The icon is orange if the gimbal is not balanced properly. It is recommended to rebalance the gimbal. The icon is red when the gimbal is severely unbalanced and cannot work normally. The gimbal must be rebalanced.
- Page 40 DJI Ronin 4D User Manual 21. Frame Guide The frame guide ratio can be set in the menu. Select Display, Monitor, and Frame Guide. The frame guide can be customized and the frame guide transparency can be adjusted. The frame guide will only be displayed in the liveview of the monitor and will not appear in the actual recording.
-
Page 41: Menu And Functions
DJI Ronin 4D User Manual Menu and Functions Press the HOME button to enter the menu. Recording The recording menu consists of the three sub menus of Video, Audio, and Settings. Video Image Area The image area can be set to Full Frame or Super 35. The sensor size is shown below. - Page 42 0000 to 9999 and cannot be set. The folder name of the footage consists of the reel index, clip number, and the suffix of Ronin 4D serial number. The filename of the footage consists of the camera index, reel index, clip number, date, and the suffix of Ronin 4D serial number.
- Page 43 DJI Ronin 4D User Manual Audio Tap Audio to set the CH1/CH2 Source, Gain, and check the real-time volume. CH1/CH2 Source: Supports Main Mic L/R (main body left and right microphone), 3.5 Mic L/R (main body 3.5mm microphone port input), and 3.5 Line L/R (main body 3.5 microphone port line level input).
-
Page 44: Display
DJI Ronin 4D User Manual Image Sharpness and Noise Reduction can be set when recording at Full Frame/Super 35 Apple ProRes 422 HQ and H. 264 and cannot be set when recording at Apple ProRes RAW. Image Sharpness: The default setting is 0 and can be set from -2 to 2. Image Sharpness will affect the definition of the footage. - Page 45 DJI Ronin 4D User Manual Zebra Stripes: The area will be displayed in zebra stripes if the exposure exceeds the set level. The zebra level can be set from 50% to 100% with a default setting of 50%. Zebra Stripes Effect Image Waveform: Indicates the luminance relation of the image using waveform.
- Page 46 DJI Ronin 4D User Manual False Color: False color will overlap the image to indicate the exposure value. For example, magenta indicates the best exposure for light skin color and green indicates the best exposure of dark skin color. Check the pink or green to obtain consistent skin color when recording people. The color changes from yellow to red to indicate the image is overexposed.
- Page 47 DJI Ronin 4D User Manual Focus Assistant The function of the PEAK button is set to Focus Peaking by default and can be switched to LiDAR Waveform and Focus Magnify (2x and 4x). After enabling focus peaking, the focus area will be shown in sharp focus but will not affect the recording footage.
- Page 48 DJI Ronin 4D User Manual Frame Guide: The Frame Guide can be enabled or disabled in the liveview and the settings will not affect the recorded footage. The Frame Guide is only used to monitor the liveview and adjust the frame. The Frame Guide consists of different aspect ratios which can be adapted to film and television standards.
- Page 49 LUT file. Ronin 4D supports up to 16 LUT files for read and display. Tap Exit to exit LUT file settings. The LUT file has been imported to LOOK list. View the LUT file by tapping Display, Monitor, and then Monitor LUT.
-
Page 50: User Settings
After setting up the camera parameters and gimbal parameters, tap User Profile Settings to manage the user profile. Import: Tap import and Ronin 4D will read the user profile in the storage. Select the profile and tap import to add to list. - Page 51 DJI Ronin 4D User Manual Export: Tap Export. Ronin 4D will export the camera parameters, gimbal parameters, and lens calibration information to a user profile and store to the storage device. Exit: Tap to exit user profile settings. Overwrite: Tap to overwrite the user profile using the current camera parameters, gimbal parameters, and lens information.
-
Page 52: Storage
DJI PROSSD 1TB can only be formatted when connected to Ronin 4D. Do not disconnect the DJI PROSSD 1TB from Ronin 4D or power off Ronin 4D during formatting. Without the DJI PROSSD Mount, the DJI PROSSD 1TB can only be used as a low speed storage card. Do not disconnect the storage media during recording. - Page 53 DJI Ronin 4D User Manual Recording Format of the Storage Media DJI PROSSD 1TB Recording Format No restriction on recording format ProRes 422 HQ: 6K: 23.976/24/25/29.97/30fps C4K: 23.976/24/25/29.97/30/48/50/59.94/60/72/96/100/120fps CFexpress 2.0 Type-B Recording 2K: 23.976/24/25/29.97/30/48/50/59.94/60/72/96/100/120fps Format H.264: C4K: 23.976/24/25/29.97/30/48/50/59.94/60/72/96/100/120fps 2K: 23.976/24/25/29.97/30/48/50/59.94/60/72/96/100/120fps ProRes 422 HQ: C4K: 23.976/24/25/29.97/30/48/50/59.94/60fps...
-
Page 54: System
The three fan modes of Ronin 4D are Rec Low, Normal, and Low Noise. Rec Low: Rec Low mode is available when the Z-axis is disabled. The fan of Ronin 4D will be turned off during recording and Fan mode will switch to Normal when the temperature of Ronin 4D reaches the threshold. -
Page 55: Lens
AMF mode, the camera will auto focus according to the ROI mode, the dial of right hand grip will rotate automatically according to the focal position, and the focus can be controlled by turning the dial at any time. The DJI LiDAR Range Finder is required in order to use AF. ROI Mode Includes Spot, Wide, and Smart. - Page 56 DJI Ronin 4D User Manual Calibration When using a non-DJI lens, the lens needs to be calibrated in order to use autofocus. Lens Calibration Information: Displays the saved lens calibration information. Tap to select a lens and the focus motor will start calibrating the lens. NA appears if there is no lens calibration information. Ronin 4D cannot autofocus and calibrate the lens within 1 foot of the subject currently due to the limitation of the LiDAR range finder minimum focusing distance.
- Page 57 DJI Ronin 4D User Manual 2. Input the lens focal length. 3. Motor initialization will start automatically when using a manual lens with the X9 Focus Motor mounted. 4. Turn the dial of the right hand grip to adjust the focus to infinity after motor initialization is completed.
- Page 58 The calibration information is saved automatically. It is not necessary to calibrate the lens again after restarting Ronin 4D if the position of the X9 Focus Motor, LiDAR range finder, and the lens remain the same and Ronin 4D was powered off.
-
Page 59: Stabilizer
The gimbal mode settings in the main monitor and the settings of gimbal mode toggle of main body have priority. Ronin 4D will follow the settings that were last set. Ronin 4D will follow the settings of the gimbal mode toggle after restarting. - Page 60 If smoothing is set to 0, the movement will be translated to an abrupt stop. This setting applies to all the remote devices of Ronin 4D. For a larger roll rotational angle, set the gimbal mode to Lock or PF, tilt the main body forward, and tilt the pan axis 80°...
- Page 61 Horizontal Calibration: It is recommended to perform horizontal calibration if the camera view is not level when the gimbal is steady. Make sure the gimbal axes are unlocked, the gimbal mode is not off, and the gimbal is upright and placed on a steady flat surface. Do not move Ronin 4D during horizontal calibration.
-
Page 62: Transmission
Broadcast mode. Ronin 4D will enter Control mode by default if Broadcast mode is disabled. Mirror Control mode can be enabled when the Ronin 4D is in Broadcast mode or Control mode. In Mirror Control mode, the high-bright remote monitor can view the liveview of the high-bright main monitor. - Page 63 Settings. Tap Broadcast mode and the remote monitor will search for Ronin 4D automatically. The camera name will display on the screen with the initials representing the camera index of Ronin 4D. Tap to select a camera and the liveview will display on the remote monitor. Tap the camera index shown on the right side of the remote monitor to switch between cameras.
-
Page 64: Intelligent Battery
8. Short Circuit Protection: the power supply is automatically cut if a short circuit is detected. 9. Battery Cell Damage Protection: a warning prompt will appear in DJI Assistant 2 when a damaged battery cell is detected. 10. Sleep Mode: the battery enters sleep mode when not in use to save power. - Page 65 DJI does not take any responsibility for damage caused by third-party chargers. ©...
- Page 66 Checking the Battery Level Press the battery level button once to check battery level. The battery level indicator glows and Ronin 4D cannot be powered on during this time. Wait for the indicators to turn off before powering on Ronin 4D.
-
Page 67: Intelligent Features
Smart mode. The Track button on the screen will display in white. 2. Ronin 4D recognizes the face and limbs of people in the center area of camera view. A yellow box will appear on the recognized subject, which indicates Ronin 4D is ready to track the subject. Tap the subject in the yellow box or press the ActiveTrack button on the left hand grip to confirm the subject. -
Page 68: Focus Control
5600K 08:02:16:06 Automated Manual Focus Go to the menu, select Lens, and AMF. During AMF, Ronin 4D will focus automatically and user can use the dial or DJI 3-Channel Follow Focus to manually adjust focus at anytime. © 2022 DJI All Rights Reserved. -
Page 69: Firmware
How to update firmware: 1. Launch DJI Assistant 2 (Ronin Series) and log in with a DJI account. 2. Power on Ronin 4D and connect the USB-C port to the computer using a USB-C cable. 3. Click Ronin 4D and Update. -
Page 70: Maintenance
Focus Motor, DJI PROSSD 1TB, main monitor, hand grips, lens, lens mount, and top handle support hot swapping. Keep the sensor or lens clean, clean Ronin 4D with a soft dry cloth, and do not spray Ronin 4D with any cleaning liquids. -
Page 71: Specifications
Approx. 150 min (Measured with a fully charged TB50 Battery and Ronin 4D in a still state with the gimbal balanced, the Z-Axis off, and Max Operating Time continuously recording in ProRes RAW. Gimbal movements or use of the Z-axis will reduce operating time.) - Page 72 Z-axis modes and usage scenarios and may be smaller than the mechanical range) Pan: ±285° Controllable Range Tilt: -55° to +155° Roll: ±35° DJI Master Wheels or DJI Force Pro: Tilt: 360°/s Roll: 360°/s Pan: 360°/s Max Control Speed (°/s) Ronin 4D Hand Grip: Tilt: 120°/s...
- Page 73 DJI Ronin 4D User Manual Single Pulse Width Two kinds of pulses emit in circulation: 5 ns and 33.4 ns. Max Laser Power Main Monitor Screen Size 5.5 in (diagonal) Resolution 1920×1080 Refresh Rate 60 Hz Max Brightness 1000 cd/m²...
- Page 74 Max Brightness 1500 cd/m² Screen Resolution 1920×1200 Refresh Rate 60 Hz Approx. 2 hours (Measured at 50% screen brightness with DJI WB37 Max Battery Life battery) Operating Temperature 0° to 40° C (32° to 104° F) Storage Temperature -20° to 60° C (-4° to 140° F)
-
Page 75: Appendix
Monitor Expansion Plate (SDI/HDMI/DC-IN) to the back of the DJI High-Bright Remote Monitor and tighten the four screws. 2. Connect the DC-OUT port of the DJI Master Wheels or DJI Force Pro and the DC-IN port of the DJI Remote Monitor Expansion Plate mounted on the DJI High-Bright Remote Monitor using the DJI High-Bright Remote Monitor Controller Cable. - Page 76 DJI Ronin 4D User Manual Main Body 115.00 235.00 Unit: mm High-Bright Main Monitor Mounting Hole 18.00 2-M4 Depth7 Unit: mm Base Plate 90 99 108 117 126 3/8" -16 1/4" -20 Unit: mm © 2022 DJI All Rights Reserved.
- Page 77 DJI Ronin 4D User Manual Counter Weight and Focus Motor Mounting Hole 40.00 4-M3 Depth 5 Diameter 2 Depth 3 2-M3 Depth 5 26.00 36.00 Unit: mm Top Handle Mounting Hole 68.56 6.09 5.98 4-M4 Depth 7 9.42 27.00 Cutaway View 1.50...
- Page 78 DJI Ronin 4D User Manual 4.60 ± 0.05 31.54 ± 0.05 Dovetail Slot of Main Body 4.60 ± 0.05 31.54 ± 0.05 4.60 ± 0.05 31.54 ± 0.05 135.00° 135.00° 135.00° 3.88 ± 0.05 3.88 ± 0.05 3.88 ± 0.05 4.60 ±...
- Page 79 This content is subject to change. Download the latest version from https://www.dji.com/ronin-4d/downloads If you have any questions about this document, please contact DJI by sending a message to DocSupport@dji.com. DJI is a trademark of DJI. Copyright © 2022 DJI All Rights Reserved.
Need help?
Do you have a question about the RONIN 4D and is the answer not in the manual?
Questions and answers