
Related Manuals for Hart InterCivic Verity Scan


Summary of Contents for Hart InterCivic Verity Scan
- Page 1 Polling Place Field Guide Humboldt County Office of Elections Revised February 2020...
- Page 2 Austin, TX 78728 Document Number 6651-017 A © 2019 Hart InterCivic, Inc. All Rights Reserved about this guide This Verity Polling Place Field Guide is a portable guide to polling place tasks using the Verity Scan and Verity Touch Writer devices.
-
Page 3: Table Of Contents
Verity Scan Verity Scan help and features troubleshooting spoiling printed paper ballots undervotes, overvotes, and blank ballots on Verity Scan provisional ballots the unread ballot slot multi-sheet ballots and Verity Scan closing polls... -
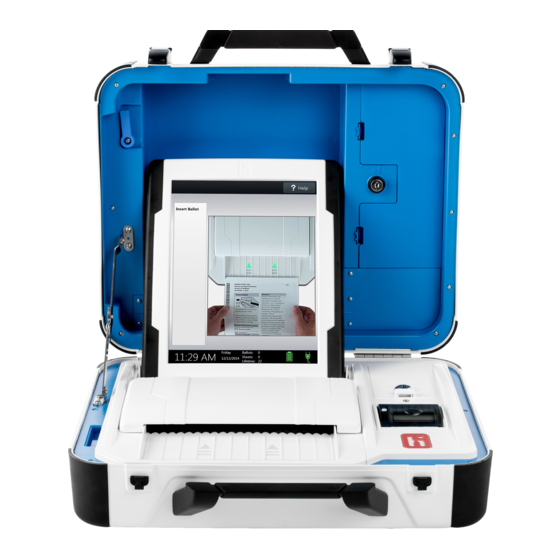
Page 4: Verity Scan
Verity Scan Verity Scan is a polling place-based digital scanner for scanning and casting ballots. Verity Scan can be used with hand-marked ballots or with ballots marked and printed using Verity Touch Writer. Verity Scan deposits scanned ballots into its ballot box for secure storage. -
Page 5: Setting Up Verity Scan
Verity Scan setting up the ballot box Position the folded ballot box as shown. Unlatch the four clips (two on each side). Pull open the ballot box. Press the side panels outward until they are flat, being careful not to pinch your hands or fingers. - Page 6 Lower the bottom panel put do not press down. Release the lid by unhooking the 3 straps. Pull the string on the underside of the lid upward to unlock the lid latch. Lift the lid while gently pulling upward and outward, ensuring that the double hinge is fully extended.
- Page 7 Remove the white key from the voting equipment manuals and supplies bag. Using the white key, unlock the front door of the ballot box. Press firmly on bottom panel to lock it in place. ...
-
Page 8: Setting Up The Verity Scan
Verity Scan Assemble the ballot box, if this has not been done already. Place the Verity Scan on the ballot box, aligning footpads with the indentations. The handle on the Verity Scan must face the front of the ballot box. ... - Page 9 IMPORTANT: Do not plug the power cord into the wall yet. Log the yellow beaded seal number on your Security Log - AM. Open the Verity Scan case and lock the lid brace in place. IMPORTANT: Never tilt a device up by the handle while cords are connected –...
- Page 10 AC power is present. Press the button on the back of the Verity Scan to power it on. Note: During the power on process, a Power-On Self Test report will print on Verity Scan’s built-in printer. This report will indicate any hardware or connection issues;...
-
Page 11: Verity Scan Orientation
Sheets: The number of ballot sheets scanned on the Verity Scan for the current election; at the start of a voting event, this number should be zero. • Lifetime: The number of ballots cast on the Verity Scan for the lifetime of the device (for all elections). •... -
Page 12: Report Printer Operation
The thermal report printer is located on the righthand side of Verity Scan. To open the paper compartment: While standing in front of the device, pull the lever on the top of the printer cover towards you, and then lift up to open the paper compartment. -
Page 13: Opening Polls
Set up and power on the Verity Scan. Confirm that you are running on AC power. Select Print Zero Report. NOTE: If you are reopening polls during subsequent days of a multiple- day voting event, then you will not print a Zero report. - Page 14 Select Open the Polls. IMPORTANT: Once you open polls, you can no longer print a Zero report. Enter the Open Polls Code, and then select Accept. The Open Polls report will print. Wait while the Open Polls report prints. File the Zero and Open Polls reports according to local guidelines.
-
Page 15: Voting With Verity Scan
The voter fills in the selection box to the left of their choices completely using blue or black ink. When the voter has finished marking their ballot, they take the ballot to Verity Scan to cast their ballot. -
Page 16: Verity Scan Help And Features
Verity Scan help and features The Help button is located at the top right of the Verity Scan screen. This button provides the voter with help text for the voting step currently underway. Select Exit Help on the bottom right of the Help screen to return to scanning ballots. -
Page 17: Troubleshooting
If there is a problem with the Verity Scan, follow the error instructions on the screen (if applicable), and/or contact your elections office for assistance. spoiling printed paper ballots To spoil a printed paper ballot, follow your local procedures (for example, filling out a spoiled ballot log and envelope). -
Page 18: Provisional Ballots
Voters should be instructed to scan all sheets of their ballot, even if they have made no choices on a particular sheet. The Verity Scan ballot counter will increment when a sheet 1 is scanned but not when a sheet 2 (or •... -
Page 19: Closing Polls
IMPORTANT: Wait until the close polls time to close polls. Once polls are closed they cannot be reopened on that Scan device. poll worker button BLUE poll worker button is located on the back of Verity Scan. This button is used when closing polls. Press the BLUE poll worker button on the back of the Verity Scan. - Page 20 Select Yes, close the polls. IMPORTANT: Once polls have been closed, they cannot be reopened on that Scan device. closing polls Enter the Close Polls Code and select Accept. The Close Polls report will print automatically. The polls are now closed. Print two scan reports. File one scan report in your precinct board team binder zipper pouch.
- Page 21 When you have finished printing reports, press the power button on the back of the Verity Scan to power it off. IMPORTANT: Wait for the Verity Scan to be completely powered down and showing a black screen if you will be unlocking and removing the tablet.
Need help?
Do you have a question about the Verity Scan and is the answer not in the manual?
Questions and answers