Table of Contents
Advertisement
Advertisement
Table of Contents

Subscribe to Our Youtube Channel
Related Manuals for FrontRow CB6000

Summary of Contents for FrontRow CB6000
- Page 1 CB6000 Installer Guide...
- Page 2 If you follow the steps set out in this Installer Guide and organize everything you need beforehand, you’ll find setting up your FrontRow CB6000 touch control panel to be quite simple. Of course, if you run into any obstacles, you can always find contact information for our technical support representatives at www.gofrontrow.com/contact-us.
-
Page 3: Table Of Contents
Step 6..................15-16 Install Your CB6000 Appendix A . -
Page 4: Before You Begin
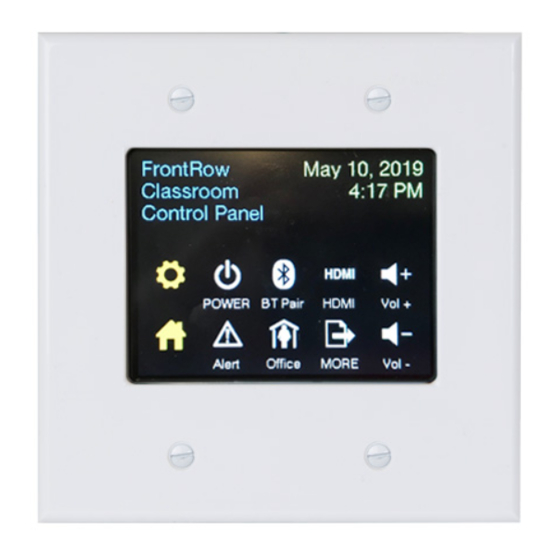
Step 1: Before you begin Make sure you’ve got everything you need to install your FrontRow CB6000. By taking the time to prepare, you’ll help ensure the actual set-up is as quick and problem-free as possible. 1. Visualize your goal... - Page 5 Information about this unit Calibrate screen** *Password required. Use either installer password (1538) or touch panel password (default is 1357; see Appendix C.7) **Password required. Use installer password (1538) Back of CB6000 Network jack Auxiliary jack (standalone power and other user functions)
- Page 6 3. What do you want to control? How do you want to control it? Your CB6000 can let teachers control or communicate with practically any device or person. Now is the time to plan what you want to do. Example 1: Typical ezRoom setup with projector In this example, the CB6000 works with other ezRoom components to turn a projector on and off, switch inputs, handle the transport controls for a DVD player, and control audio volume from the teacher’s com-...
- Page 7 Example 2: Using CB6000 as a stand-alone controller You can also use the CB6000 as a stand-alone serial controller. In this configuration, the FrontRow TB14 adapter included with your CB6000 standalone kit supplies power, routes commands, and feeds data back (in the case of bidirectional serial devices).
- Page 8 Make a list of all rooms to be outfitted and the equipment to be controlled in each • Set aside IP addresses for each CB6000, ICR-01 Smart Receiver or CM3000, and any other FrontRow components or servers To help organize this important information, we have an ezRoom Installer Planning Template available for you to download at www.gofrontrow.com/ezroom under the Downloads section.
-
Page 9: Step 3
If your configuration — the collection of commands you want to issue from the CB6000 and the devices you want to control — is the same in each room in your installation, then you will need only one configuration base file which you will modify with specific IP addresses unique to each room. -
Page 10: Configuring Your Cb6000S
Masking tape or labels and a marker 2. Connect your configuration setup Take your first CB6000 and connect it to your configuration equipment in either of the ways shown here: a. With ICR-01 Smart Receiver as power source WARNING: CONNECT THE ICR-01 TO THE CB6000’S ‘NETWORK ONLY’ JACK! YOU CAN DAMAGE YOUR DEVICES IF YOU CONNECT TO THE ‘AUX‘... - Page 11 With TB14 as power source WARNING: CONNECT THE TB14 TO THE CB6000’S ‘AUX’ JACK! YOU CAN DAMAGE YOUR DEVICES IF YOU CONNECT TO THE ‘NETWORK ONLY‘ JACK. Power...
- Page 12 3. Give your computer a static IP address For the duration of the configuration, your computer needs to have a specific IP address. Here’s how to change your computer’s wired network adapter from automatic (DHCP) to fixed (static): a. Windows XP Open Windows Start menu.
- Page 13 In the General tab, click Use the following IP address, and enter: • IP address: 192.168.1.100 • Subnet mask: 255.255.255.0 • Default gateway: Leave blank NOTE: We recommend 192.168.1.100 as the standard IP address; however, you may need to use a different address if you are using a local switch already using this address Leave the Use the following DNS server addresses fields blank Click OK.
- Page 14 IP address for this unit). This will allow you to skip points 12 through 14 below. Click Load. Note that if you checked the box in point 5 above, the address of the CB6000 may change and you will no longer be connected to it. You’ll need to enter the new address in your browser before continuing to point 7.
- Page 15 Teacher Edition. 15. Disconnect the CB6000 from the Cat 5 cable, replace it in its anti-static bag, and apply a label with the room number written on it so you are sure to install it in the right place on the job site.
-
Page 16: Physical Installation Prep
Step 4: Physical Installation Prep Nearly everything you need to install your FrontRow CB6000s is included in the boxes we shipped. You will need some basic tools and materials, depending on how your classroom is built: 1. Materials you will need •... -
Page 17: Plan Your Installation
1. Decide where to put the CB6000 We recommend locating the CB6000 where the instructor is likely to spend most of her or his time. In the example below, we’ve placed the CB6000 conveniently near both the whiteboard and the teacher’s desk. -
Page 18: Install Your Cb6000
Step 1 as you connect components. Install a double-gang electrical box, surface box, or mud ring according to the manufacturer’s instructions If using the CB6000 with a FrontRow ICR-01 Smart Receiver or CM3000 amplifier/switch (as in a full ezRoom system): •... - Page 19 If using the CB6000 as a standalone controller with the TB14 adapter: • Mount the TB14 adapter securely near the projector or other device to be controlled. • Thread Cat 5 cable from the electrical box to the location of the TB14 adapter. Ensure the cable is installed in compliance with your national and local electrical codes.
- Page 20 7. Connect to the CB6000 through A Web Browser On a computer connected to the LAN, type in the IP address of your CB6000 — the default is 192.168.1.104 If you have not already reassigned it (see Step 3 for guidance).
- Page 21 NET Command — For commands to be sent to IP-addressable devices over your network • HTP Command — To initiate an intercom call via a FrontRow Conductor™ server to a FrontRow CM3000 elsewhere on the network (e.g., the office or another classroom). For schools using the Conductor™...
- Page 22 @{MacroName} A.2) or the IP address and port of device to be controlled. For explicit device references: IAddress, PPort Default port for CB6000 is 7267 Command Required Variant Specific to device. For ICR-01 A string expression that contains Smart Receiver or CM3000 the command.
- Page 23 Actions to be executed. In most cases, a user pressing a button on the touch screen is what tells the CB6000 that an Event has occurred; however, you are also free to specify any general purpose input or NOP signal you wish as a Trigger. Alternatively,...
- Page 24 If you want to have the Event initiated by a general purpose input signal, make a selection in the Trigger Quicklist and define the specific Trigger in the Event Trigger field. The CB6000 constantly scans all inputs, searching for an event that matches any Triggers you have defined. When a matching event is recognized, the corresponding output actions are executed in rapid succession.
- Page 25 • One per call: the CB6000 will treat the actions as a loop, executing the next Action in the series each time the Event is initiated (e.g., Action 1 on the first button press, Action 2 on the second button press, Action 1 on the third button press, etc.).
- Page 26 BYTE 4: Repeat Mode - three selections: 00h = repeat the entire IR command, 01 = repeat the IR header only once, 02h = repeat the IR command with an offset. Default is 00h. BYTE 5: Offset – displays which section of the IR burst was learned. 01 = Learn Universal code 02 = Learn Universal code w/1 skip 03 = Learn Universal code w/2 skips...
- Page 27 1. Connect to the CB6000 through A Web Browser On a computer connected to the LAN, type in the IP address of your CB6000 — the default is 192.168.1.104 If you have not already reassigned it (see Step 3 for guidance).
- Page 28 To create or edit a button: • Click a button slot. Details for the selected button will appear in the right-hand section of the definition interface. • Select an icon for the button. Click the graphic at the top of the button detail section, then click on an appro- priate icon from the library that appears at the bottom of the screen •...
- Page 29 • Test your changes on the CB6000 user interface to be sure the results are as expected • When you are satisfied that you have completely finished programming your Base Configuration File, see Save/...
- Page 30 1. Connect to the CB6000 through A Web Browser On a computer connected to the LAN, type in the IP address of your CB6000 — the default is 192.168.1.104 If you have not already reassigned it (see Step 3 for guidance).
- Page 31 Idle Timeout field’s default setting is Disabled. When active, it sets the duration (in minutes) before the controller releases the remote communication port after a period of inactive controller communication. If a special case arises where your system does require configuration, contact FrontRow Technical Services at customercare@gofrontrow. com for assistance.
- Page 32 Table. A message below the check box indicates whether DST is currently OFF or ON. A three- column table at the bottom of the view displays the current defined year and the next three years. No actual DST data can be changed with this interface. Contact FrontRow Technical Service at customercare@gofrontrow.com for DST modifications.
- Page 33 Enter the delay in minutes between a screen touch and entering dim mode under Timeout Period • Click Save Settings in the top section Select the conditions upon which the CB6000 will ‘fall back’ to a default screen under Fallback Mode: • None (i.e. the screen will never change from the last screen used) •...
- Page 34 8. Save/Restore Use this window to either load an existing configuration file onto your CB6000 or save the current configuration to a file on your computer for re-use as a template for other CB6000 units To load an existing configuration file onto your CB6000: •...
- Page 35 Appendix D: ICR-01 Smart Receiver/ Juno Connect Commands The following commands can be used in Actions to control how a FrontRow ICR-01 Smart Receiver amplifier/switch handles audio: ICR-01 Smart Receiver / Juno Connect Master Volume Commands* Syntax: #AUDn[Mute,Volume]; Name Required/Optional...
- Page 36 ICR-01 Smart Receiver / Juno Connect Input Volume Commands* Syntax: #AINn[Input, Volume]; Name Required/Optional Data Type Format Description Required Constant Denotes the sub-device. Since the ICR-01 has only one sub device, this is always 1 Input Required Variant ICommand Denotes which input volume will be adjusted where Command is 1-9 Volume...
- Page 37 Conductor Server IP Address X.X.X.X Conductor Admin Touch Computer IP Address X.X.X.X Conductor Admin CM3000 IP Address X.X.X.X Conductor Admin CMP500 IP Address X.X.X.X Room Component IP Addresses Room FrontRow CB6000 Room # X.X.X.X Room # X.X.X.X Room # X.X.X.X Room # X.X.X.X Room # X.X.X.X...
- Page 38 Appendix E: CM3000 Commands The following commands can be used in Actions to control how a FrontRow CM3000 amplifier/switch handles audio: CM3000 Audio Commands* Syntax: #AUDn[Input,Mute,Volume]; Name Required/Optional Data Type Format Description Required Constant Denotes the sub-device. Since CM3000 has only one sub-device, this is always 1.
- Page 39 Appendix F: CA1000 Commands The following commands can be used in Actions to control how a FrontRow CA1000 amplifier handles audio: CA1000 Audio Commands* Syntax: #Command\r Name Required/Optional Data Type Format Description Command Required Variant ACHn Switches the audio input to the...
- Page 40 Create an Event and assign the Event to a button on the CB6000 (see Appendix A and Appendix B) Alerts can also be sent directly from the CB6000 if used in a hallway or other location that does not have an ezRoom installed.
- Page 41 CMBT is part of an ezRoom ceiling installation, that button is not easily accessible. Here’s how to control the CMBT remotely from your CB6000 touch panel via the CNAP port of the CM3000, CM800Si, or ICR-01 Smart Receiver. Defined Actions...
- Page 42 #XRO1[F2, “3801F0000008002732073207320732070027”]; CB-6000 Example Let’s look at an example where a CB6000 is programmed to allow remote control of a CMBT Bluetooth audio receiver attached to a CM800Si via relay 1. We could simply create two actions, two events which use those actions, and assign the events to two buttons. Here are the steps: 1.
- Page 43 31. Now click on Save Buttons to update the device with the newly defined buttons At this point, assuming the devices can reach each other on the network, the CB6000 can be used to control the CMBT Bluetooth audio receiver remotely. Pressing the Pairing button will put it in pairing mode, and pressing that same but- ton twice (while in pairing mode) will exit that mode.
- Page 44 I can’t remember what IP address I changed the CB6000 to, and now I can’t communicate with it • Reset the CB6000 to its default IP address (192.168.1.104). On the screen (see Step 1.2) go to Menu > Reset > Enter Code 1538 and follow the instructions.
- Page 45 © 2018 FrontRow Calypso LLC Phonic Ear, FrontRow, Calypso and the names of Phonic Ear, Calypso, and FrontRow products are trademarks or registered trademarks of FrontRow Calypso LLC in the U.S. and other countries. Bluetooth is a registered trademark of Bluetooth SIG, Inc.
Need help?
Do you have a question about the CB6000 and is the answer not in the manual?
Questions and answers