Table of Contents
Advertisement
Quick Links
Advertisement
Table of Contents

Related Manuals for FrontRow CB200

Summary of Contents for FrontRow CB200
- Page 1 CB2000 INSTALLER GUIDE...
- Page 2 If you follow the steps set out in this Installer Guide and organize everything you need beforehand, you’ll find setting up your FrontRow CB2000 touch control panel to be quite simple. Of course, if you run into any obstacles, you can always find contact information for our technical support representatives at www.gofrontrow.com.
-
Page 3: Table Of Contents
CONTENTS Step 1................Pages 1-6 Before You Begin Step 2. -
Page 4: Before You Begin
Step 1: Before you begin Make sure you’ve got everything you need to install your F CB2000s. By taking the time to prepare, ront you’ll help ensure the actual set-up is as quick and problem-free as possible. 1. Visualize your goal When your F system CB2000 is installed, it may look something like this: ront... - Page 5 2. Get familiar with the button panel Back of CB2000 Network jack AUX jack Jumper for switching between IR out or GPI (on TB14 or TB6+TB8) CB50 Volume Control Connector...
- Page 6 DVD player, and control audio volume from the teacher’s computer, an MP3 player, and two FrontRow wireless microphones. If FrontRow Conductor™ is being used in the school, the CB2000 could also initiate intercom calls and trigger alerts.
- Page 7 Example 2: Using CB2000 as a stand-alone controller with TB14 You can also use the CB2000 as a stand-alone serial controller. In this configuration, the FrontRow TB14 adapter included with your CB2000 standalone kit supplies power, routes commands, and feeds data back (in the case of bidirectional serial devices).
- Page 8 FrontRow TB6 and TB8 adapters included with your CB2000 standalone kit supply power, routes commands, and feeds data back (in the case of bidirectional serial devices). In combination with powerful tools like FrontRow Maestro™, this can allow you to ‘network’ and manage projectors that are otherwise not online. Below are the basic connections for controlling a projector and amplifier serially, and a DVD player via infrared remote.
- Page 9 • Make a list of all rooms to be outfitted and the equipment to be controlled in each • Set aside IP addresses for each CB2000, CM3000, and any other FrontRow components or servers To help organize this important information, we have an ezRoom Installer Planning Template available for you to download at www.gofrontrow.com/products/ezroom under the Resources tab.
-
Page 10: Step 3
Step 2: Getting Your Configuration Files Your CB2000s need a script to tell them what the buttons should do, what other devices they need to communi- cate with, and how. If your configuration — the collection of commands you want to issue from the CB2000 and the devices you want to control —... -
Page 11: Set-Up
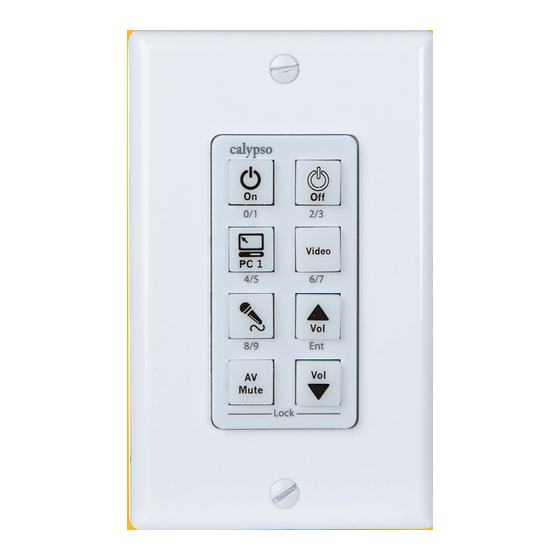
Step 3: Set-Up Assembling the Button Pad • The CB2000 comes with a set of 24 tactile, pre-labeled button “caps”. Choose eight buttons for assembling the button pad. • Carefully tear away the perforated edge from the button sheet for each button. Arrange them in the array desired. -
Page 12: Configuring Your Cb2000S
• Your CB2000s • Any of the following power sources: • 1 FrontRow CM3000 amplifier/switch with power supply (included in most full ezRoom systems); or • 1 FrontRow TB14 adapter with power supply; or • 1 FrontRow TB6 and 1 FrontRow TB8 adapter with power supply •... - Page 13 b. With TB14 as power source WARNING: TO AVOID DAMAGE TO THE DEVICE, IN THIS CONFIGURATION CONNECT THE TB14 TO THE CB2000’S ‘AUX’ JACK! Power NETWORK NETWORK CB2000 TB14 Control Adapter Computer Panel Cat 5 cable Other cable NOTE: This is a schematic illustration intended to clarify the relationship of components to each other.
- Page 14 3. Give your computer a static IP address For the duration of the configuration, your computer needs to have a specific IP address. Here’s how to change your computer’s wired network adapter from automatic (DHCP) to fixed (static): a. Windows XP Open Windows Start menu.
- Page 15 In the General tab, click Use the following IP address, and enter: • IP address: 192.168.1.100 • Subnet mask: 255.255.255.0 • Default gateway: Leave blank NOTE: We recommend 192.168.1.100 as the standard IP address; however, you may need to use a different address if you are using a local switch already using this address Leave the Use the following DNS server addresses fields blank Click OK.
- Page 16 To save time on future configuration jobs, create a shortcut on your desktop to 192.168.1.104 and name it CB2000 Configuration Screen. If using the Apple Safari browser, do not use password protection during reload. For best results, FrontRow recommends using the Google Chrome browser.
-
Page 17: Step
Select Time from the left-hand menu Click Load Computer Time 10. Click Save Settings 11. Now define the IP address of this CB2000. Select Ethernet from the left-hand menu 12. Change the IP address, subnet mask, and router IP address to the appropriate values for this CB2000 (Reference your Installer Planning Template;... -
Page 18: Physical Installation Prep
Step 5: Physical Installation Prep Nearly everything you need to install your FrontRow CB2000s is included in the boxes we shipped. You will need some basic tools and materials, depending on how your classroom is built: 1. Materials you will need •... -
Page 19: Plan Your Installation
Step 6: Plan your installation Estimated time for this step: 5-10 minutes Now it’s time to decide where you’ll place the CB2000 (note that if your installation is part of an ezRoom, be sure to refer to the Installer guides for the various ezRoom components for best results). To help you decide, we’ll use the following layout of a typical classroom as an example: Student desks Windows... -
Page 20: Install Your Cb2000
If using the CB2000 with a FrontRow CM3000 amplifier/switch (if not, skip to #3): • Install Cat 5 cable from the electrical box to the location of the FrontRow CM3000. Ensure the cable is installed in compliance with your national and local electrical codes. - Page 21 If your configuration includes the TB14: • If you are controlling a serial device (e.g., projector), connect the provided serial cable(s) to the TB14 adapter’s RS232 captive screw connector. You can have up to two separate serial cables. Wiring is as follows: •...
-
Page 22: Step
TB8 wires: Use the below table as a reference for wiring your to your system: Pin # Wire Color Function Orange Brown White Black GND 1 (IR or GPI) Yellow GND 2 (Power) Blue IR Out+ or GPI Green 12V or 9V If controlling a device using IR, connect the Blue and Black wires from the TB8 to the TB6, then your 3.5mm IR cable to the TB6 IR connector. -
Page 23: Appendix A
Appendix A: Control Logic Programming You can use the CB2000 to its full potential by learning to program your own configuration files. Each CB2000 includes a utility for creating, modifying, loading, and/or saving the configuration file. We strongly recommend that you use the following workflow for any custom programming: Create Macros (covered in Appendix A.2) —... - Page 24 3. Define Events With your collection of discrete Actions defined, you can now specify what Events will cause one or more of those Actions to be executed. In most cases, a user pressing a button on the touch screen is what tells the CB2000 that an Event has occurred.
-
Page 25: Appendix A
• Give the Event a useful description (e.g., “Mute”) • If you want to have the Event initiated by a button press, be sure the event number corresponds to the correct button (see Appendix B.2). • If you want to have the Event initiated by a general purpose input signal, select Event 9 or higher (and be sure the CB2000 jumper (see page 2) connects pins 1 and 2). - Page 26 • NET Command — For commands to be sent to IP-addressable devices over your network • HTP Command — To initiate an intercom call via a FrontRow Conductor™ server to a FrontRow CM3000 elsewhere on the network (e.g., the office or another classroom). For schools using the Conductor™ IP paging and bell system only.
- Page 27 Network (NET) Commands* Syntax: #NET[Connection, StringType, Device, ‘Command’]; Name Required/Optional Data Type Format Description Connection Required Variant Defines the connection type: • TCP/IP (1) where n is 1 or 2 • UDP (2) StringType Optional Variant Defines the string type: •...
- Page 28 Example (turns on the beep with a 200ms duration): #ALM[“ON”,D50]; *For complete programming guidance, refer to the Calypso Action Control Language (CACL) manual under the Resources tab of the ezRoom web page: www.gofrontrow.com/products/frontrow-ezroom • If the CB2000 has been physically installed, you can test the action you created by clicking the Test Action button.
- Page 29 5. IR Learning If you are controlling devices that lack serial control ports (the recommended method for controlling non-networked devices) but have an infrared remote control, you can place your CB2000 into an IR learning mode. • Choose Enter Command •...
- Page 30 6. Enter Command The Enter Command interface lets you test proper connection and function by entering and executing command strings. You can use this to verify the correctness of a command before you enter it into an Action. For serial commands, it can also be used to see any data returned from the remote device.
-
Page 31: Appendix B
Appendix B: Setting Preferences You can use the CB2000 to its full potential by learning to program your own configuration files. Each CB2000 includes a utility for creating, modifying, loading, and/or saving the configuration file. We strongly recommend that you use the following workflow for any custom programming: Create Macros (covered in Appendix A.2) —... - Page 32 3. Web Access Password To set a password to deter configuration changes by network hacks: • Choose User ID/Password • Type in the old password (the default is ‘calypso’) • Enter/re-enter the new password • Click Save Settings in the top section •...
- Page 33 The Remote Port Idle Timeout field’s default setting is Disabled. When active, it sets the duration (in minutes) before the controller releases the remote communication port after a period of inactive controller communication. If a special case arises where your system does require configuration, contact FrontRow Technical Services at customercare@gofrontrow.com for assistance.
- Page 34 Table. A message below the check box indicates whether DST is currently OFF or ON. A three- column table at the bottom of the view displays the current defined year and the next three years. No actual DST data can be changed with this interface. Contact FrontRow Technical Service at customercare@gofrontrow.com for DST modi- fications.
- Page 35 7. Save/Restore Use this window to either load an existing configuration file onto your CB2000 or save the current configuration to a file on your computer for re-use as a template for other CB2000 units To load an existing configuration file onto your CB2000: •...
-
Page 36: Appendix C
Appendix C: CM3000 Commands The following commands can be used in Actions to control how a FrontRow CM3000 amplifier/switch handles audio: CM3000 Audio Commands* Syntax: #AUDn[Input,Mute,Volume]; Name Required/Optional Data Type Format Description Required Constant Denotes the sub-device. Since CM3000 has only one sub-device, this is always 1. -
Page 37: Appendix D
Appendix D: CA1000 Commands The following commands can be used in Actions to control how a FrontRow CA1000 amplifier handles audio: CA1000 Audio Commands* Syntax: #Command\r Name Required/Optional Data Type Format Description Command Required Variant ACHn Switches the audio input to the... -
Page 38: Appendix E
Appendix E: Pin-Out Guide I/O Port Pin Out Pin # Wire Color Function Orange Brown White Black GND 1 (IR or GPI) Yellow GND 2 (Power) Blue IR Out+ or GPI Green 12V or 9V LAN RJ-45 Pin Out Pin # Function GND_Ethernet power GND_Ethernet power... -
Page 39: Appendix F
ARP cache. From the command prompt, ® enter: ARP -D IPADDRESS (e.g., ARP -D 192.168.1.104) I’ve already programmed a CB2000 but can’t find the IP address • Download the SpyGlass app from http://gofrontrow.com/en/products/frontrow-ezroom, under the Resouces tab. - Page 40 © 2014 FrontRow Calypso LLC Phonic Ear, FrontRow, Calypso and the names of Phonic Ear, Calypso, and FrontRow products are trademarks or registered trademarks of FrontRow Calypso LLC in the U.S. and other countries. 821-2000-011/Rev. B 0114...
Need help?
Do you have a question about the CB200 and is the answer not in the manual?
Questions and answers