Table of Contents
Advertisement
Quick Links
Advertisement
Table of Contents

Subscribe to Our Youtube Channel
Related Manuals for Shindaiwa DGA37CM


Summary of Contents for Shindaiwa DGA37CM
- Page 1 S AND OPERATOR S MANUAL Vertical, Water-Cooled 4-Cycle Diesel Engine CAUTION Do not operate the Generator, or any other appliance, before you have read and understood the instructions for use and keep near for ready use. DGA37CM X753-008 47 0 X753801-550 0...
- Page 3 Introduction Thank you for purchasing this Shindaiwa soundproof diesel engine generator. This manual has been created to ensure safe usage of this generator. Be sure to read this manual before operation. Improper operation/handling of this generator will result in an accident or malfunction.
-
Page 4: Table Of Contents
Table of Contents 1. Safety Guidelines ························································································· 1 2. Specifications ······························································································ 5 2-1. Data ······································································································ 5 2-2. Ambient Condition ····················································································· 6 3. Use ············································································································· 6 4. Parts ··········································································································· 6 4-1. Outer and Main Components ······································································· 6 4-2. Operation Panel ······················································································· 7 4-3. -
Page 5: Safety Guidelines
1 Safety Guidelines WARNING : EXHAUST GAS POISONING Do not operate the generator in poorly ventilated areas such as indoors or tunnels, as the exhaust gas of the engine contains substances that are harmful to human health. Do not direct exhaust fumes at bystanders or buildings. WARNING : ELECTRIC SHOCK ... - Page 6 CAUTION : FIRE Do not carry flammable items (such as fuel, gas and paint) or items that are highly combustible near the generator as the muffler, exhaust gas and other parts become extremely hot. Position this generator 3 ft. (1 m) or more from walls or other hindrances, and on a level surface.
- Page 7 CAUTION : INJURY Always be sure to use Lifting Hook when lifting up the generator, and slowly lift it straight up. Personnel performing lifting work must wear protective gear such as helmets, safety shoes and gloves. Position the generator on a level stable surface so that it cannot slide or move in any manner.
- Page 8 Warning / Caution Label Locations When warning / caution labels become unreadable or damaged, place new labels at the appropriate locations as specified in the following figure. When ordering the labels, use the following part numbers. 1. Injuries ····································· (Part no.: X505-004630) 2.
-
Page 9: Specifications
2 Specifications 2-1. Data Unit DGA37CM Generating Method Rotating Filed, Brushless 3-Phase Synchronous Generator Rated Output 29.6 Rated Voltage Rated Current 51.5 Rated Frequency Rated Speed 1500 Phase & Wiring 3-Phase 4-Wire Power Factor Insulation Class Alternator: F Exciter: B... -
Page 10: Ambient Condition
2-2. Ambient Condition Be sure to use the equipment under the following ambient condition range. Otherwise the condition may cause damage, insufficient output or durability shortage to the equipment. ■ Ambient: Temperature: from -15 to 40 degree Celsius ■ Relative: Humidity: less than 80% ■... -
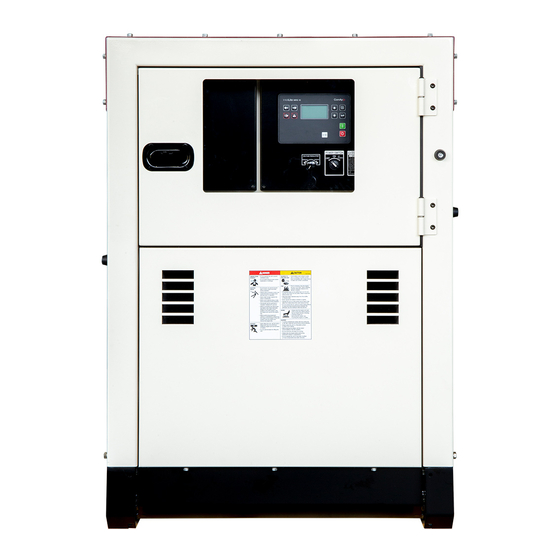
Page 11: Operation Panel
Accessories Owner’s Manual 4-2. Operation Panel Battery Isolator Controller Main Circuit Breaker Frequency Adjusting Screw Throttle Lever Voltage Regulator Power Switch / Air Bleeding Emergency Stop Button... -
Page 12: Output Panel
4-3. Output Panel 3-Phase Breaker (32A) 3-Phase Breaker (20A) 1-Phase Breaker (15A) 3-Phase RCCB 1-Phase RCCB 1-Phase Receptacle (15A) 3-Phase Receptacle 3-Phase Receptacle (32A) (20A) -
Page 13: Equipment
5 Equipment 5-1. Controller This generator has a Controller which is used for starting or stopping the power generator or the engine, for monitoring. If you turn the Power Switch to ON position, the status Screen appears. (1) Front panel elements ①... - Page 14 ⑤ HORN RESET button Use this button deactivate the horn output without acknowledging the alarms. ⑥ FAULT RESET button Use this button to acknowledge alarms and deactivate the horn output. Inactive alarm will disappear immediately and status of active alarms will be changed to “confirmed” so they will disappear as soon as their reasons dismiss.
-
Page 15: Switches
5-2. Switches Power Switch / Air Bleeding This is the main Power Switch of the generator. When the Power Switch turned to OFF position, the Controller is OFF. When the Power Switch turned to AIR BLEEDING position, automatically starts air-bleeding device. (2) Emergency Stop Button This button is used to stop the engine in emergency. - Page 16 (5) 3-Phase Residual Current Circuit Breaker (3P RCCB) 1-Phase Residual Current Circuit Breaker (1P RCCB) Each receptacle, 3-Phase and 1-Phase is incorporated with RCCB respectively. When current leak occurs, it trips to stop power transmission to load. 1P RCCB 3P RCCB <...
-
Page 17: Voltage Regulator And Throttle Lever
5-3. Voltage Regulator and Throttle Lever (1) Voltage Regulator The dial adjusts generator output voltage. By turning the dial clockwise, you can increase the voltage. By turning the dial counter-clockwise, you can decrease the voltage. (2) Throttle Lever 1. Throttle Lever The lever is to adjust the engine speed. -
Page 18: Fuel Line Changeover Valve (3-Way Valve)
5-4. Fuel Line Changeover Valve (3-way valve) CAUTION : Fire Always stop the engine when performing any work on the fuel line. Always wipe any drip of Diesel fuel or engine oil. Do not use this equipment, when a leak is found. Repair the equipment before use. ... -
Page 19: Transportation & Installation
6 Transportation and installation 6-1. How to transport WARNING : Injuries When lifting the equipment, always use a lift hook. Never use roping lug for lifting the unit, for it may cause equipment to drop. (1) Lifting the equipment Always use a Lift lug, when lifting the equipment for transportation. -
Page 20: Installation
6-2. Installation WARNING : Suffocation from exhaust gas Exhaust fumes from the engine contains many elements harmful to humans. Do not operate this equipment in poorly ventilated area, such as inside a room or in a tunnel CAUTION : Suffocation from exhaust gas ... -
Page 21: Connecting Load
7 Connecting Load 7-1. Select Load Cable Select the cable with proper gauge, based on its allowable amperage and the distance between the generator and the machinery to be connected. CAUTION : Damage to properties If the load exceeds the allowable amperage, the damage to the cable may be damaged in overheating. -
Page 22: Connecting Load Cable
7-2. Connecting Load Cable WARNING : Electric Shock Before connecting or disconnecting a load cable from output receptacles, always turn a circuit breaker to OFF position, stop the engine, and turn the Power Switch to the OFF position. CAUTION : Fire ... -
Page 23: Rccb And Grounding
7-3. Residual Current Circuit Breaker (RCCB) and Grounding WARNING : Electric Shock Ground the every grounding terminal to the earth as set in the manual. If even one of all is unconnected by mistake or accident, it will be much more dangerous for human than the NO-RELAY case, because leaking current inevitably goes through the body. - Page 24 (2) Operation Check WARNING : Electric Shock / Injuries Before turning RCCB to ON position, ensure that the breakers or the switches of loads are positioned to OFF. You should communicate well with the electrician by the load side when operating RCCB.
- Page 25 (3) RCCB has activated. When the RCCB has activated, repair the leakage point and restore it by the following procedure. (Overload happens when the breaker activates but the Residual Current Circuit Breaker does not activate.) Turn the 3-Phase RCCB to ON to restore. Turn the 1-Phase RCCB to RESET to restore.
-
Page 26: Initialization And Pre-Check
8 Initialization and Pre-check WARNING : Electric Shock / Injuries Before performing any equipment check or maintenance, stop the engine, and turn the Power Switch to the OFF position. CAUTION : Fire / Burns When checking engine, always stop the engine, and keep away from fire. Wait until the engine cools down, before performing any checks. -
Page 27: Coolant / Water
Viscosity and temperature SAE20/20W SAE40 SAE10W SAE30 SAE10W-30 SAE15W-40/20W-40 (2) Replacing Engine Oil Volume (Unit: Liter) Lubrication Oil (including the oil in filter) 10.2 (0.6) Value in ( ) shows the oil in filter 8-2. Checking Coolant / Water ※... - Page 28 (2) Checking coolant in Sub Tank / Adding coolant Check to see if the water/coolant level is between FULLand LOW line in the Sub Tank. Fill up to the FULL line, if the water/coolant level is low. < Note > ...
-
Page 29: Fan Belt
8-3. Checking Fan Belt ※ Refer to the user’s manual for Engine separately also. WARNING : Injuries Before performing any equipment check or maintenance, stop the engine, and turn the Power Switch to the OFF position. Close and lock all doors during operating this equipment, to avoid injuries by unintentionally touching cooling fan and fan belt. -
Page 30: Fuel, Engine Oil And Coolant Leakage
This blended fuel is usually called also No.2-D. It can be used in colder temperature than N0.2-D fuel, which has not been winterized. Check with service station operator to be sure you can get the proper blend fuel. Fuel requirements: NOTICE: The fuel injection pump, injector or other parts of the fuel system and engine can be damaged if you use any fuel or fuel additive other than those specifically recommended by Isuzu. - Page 31 ■Replacing the Battery Remove the clamp and cable from negative (-) post from the battery (always remove negative -Post side first). +Post Remove the battery fixing clamp. Remove the cable from positive (+). Fixing Clamp Remove the battery from the seat. ※Reinstall a new Battery in the reverse order (always install the cable to the positive (+) post of the new Battery first).
-
Page 32: Operation
9 Operation 9-1. Initialization and Preparation WARNING : Suffocation from exhaust gas Exhaust fumes from the engine contains many elements harmful To humans. Do not operate this equipment in poorly ventilated area, such as inside a room or in a tunnel. CAUTION : Suffocation from exhaust gas ... - Page 33 Let engine idles for approximately 5 minutes. Turn the Throttle Lever to <RUN POSITION>. Ensure that the controller shows the following frequency at no load. No Load Frequency (Revolving Speed) 50Hz RUN 52.5Hz (about) (1575min < Note > In either case of incorrect frequency, adjust the frequency by FREQUENCY ADJUSTING SCREW.
-
Page 34: Procedures During Operation
9-2. Procedures during Operation (1) Checks after Startup Make sure that the controller is in normal status. Check that there is no abnormal vibration or noise. Check that the exhaust gas color is normal. When operation is normal, the exhaust gas should be colorless or slightly bluish. -
Page 35: Stopping
< Note > Ensure that all the air is completely extracted from fuel line, by setting the throttle lever to START and start the engine. In the case air is in the fuel line, the engine speeds is unstable. In the case, extract the air again by using the priming pump as per the following process. -
Page 36: Protection Functions
9-4. Protection Functions WARNING : INJURY Do not open the check door when the Power Switch is in the ON position. It will cause injury by rotating parts such as cooling fans and fan belt. Always turn the Power Switch to the OFF position and stop the engine, then close and lock OPERATION PANEL DOOR before checking or maintaining the engine or any equipment. -
Page 37: Connecting With External Fuel Tank
9-5. Connecting to External Fuel Tank CAUTION Always stop the engine, when working on the fuel line. Always wipe any drip of Diesel fuel or oil. Do not use this equipment when a leak is found. Repair the equipment before use. ... -
Page 38: Check And Maintenance
10 Check / Maintenance WARNING : Electric Shock/Injuries Before performing any equipment check or maintenance, stop the engine, and turn the Power Switch to the OFF position. CAUTION : Fire/Burns When checking engine, always stop the engine, and keep away from fire. Wait until the engine cools down, before performing any checks. - Page 39 Startup Every Every Every Every Description 1000hrs check 200hrs 400hrs 500hrs Engine Side ◯ Clean each parts / tightening ◯ Engine oil checks / add oil ◯ Engine oil change (1 time at 50 hr mark) ◯ Oil Filter change (1 time at 50 hr mark) ◯...
- Page 40 (1) Change engine oil Initial 50 hours and after Every 200 hours Remove the Oil Gauge. Oil Gauge Remove the Oil Drain Plug to drain engine oil. Tighten the Oil Drain Plug. Oil Filler Add oil through Oil Filler to fill it up to the . MAX level while checking the oil level Oil Drain Plug on the oil level gauge.
- Page 41 < Note > If an oil filter wrench is not at hand, contact our authorized distributor or our engineering section to replace. Oil Filter Part No. Isuzu Part No. 8970497080 (3) Cleaning / Changing Air Filter Element Air Cleaner Clean Every 200 hours Change...
- Page 42 (4) Drain water in the Water Sedimentor Check Startup Clean Every 200 hours When The Float (red) in the cup is floating at drain level, drain water. Loosen the Cock. COCK After draining finishes, tighten the Cock. < Note > ...
- Page 43 (6) Change fuel filter Gasket Change Every 500 hours Loosen and remove the fuel filter, using an oil filter wrench. Loosen the filter faucet and remove it. Screw to set a new filter to the filter faucet and smear a little fuel on the rubber gasket of the new fuel filter.
- Page 44 Put a tray under the lever in order to catch spilled fuel when loosing the lever. Extract the air in fuel line after gauze filter washing finishes. (Refer to 『9-2. Procedures during Operation』.) Ensure that there is no fuel leakage after reinstallation. (8) Clean gauze filter in engine feed pump Clean Every 500 hours...
- Page 45 (9) Change filter in the magnet pump for automatic fuel extraction Change Every 1000 hours Turn the cover, located at the bottom of pump, counter-clockwise and remove filter. MAGNET PUMP Reinstall a replacing filter in the reverse order. FILTER < Note > COVER ...
- Page 46 (11) Change Coolant Radiator Cap Cover Radiator Cap Change 2 years or 1000 hours Remove the radiator plate first and open the radiator cap cover. Water Inlet Remove the radiator cap. Radiator Plate Loosen the radiator drain cock and the drain plug on the engine side. After draining finishes, tighten the radiator drain cock and the drain plug...
-
Page 47: Long Term Storage
11 Long-term storage WARNING : Electric Shock/Injuries Before performing any equipment check or maintenance, stop the engine, and turn the Power Switch to the OFF position. CAUTION : Fire/Injuries Temperature around muffler and exhaust can get extremely high levels. Keep any inflammable items (such as fuel, gas, paint, etc.) away from the equipment. -
Page 48: Troubleshooting
(2) Stacking WARNING : Injuries If you have to stack two generators at warehouse, always proceed with the following steps. Ensure that there is no dent on bonnet, loose bolt or no bolt in the equipment. Always place the equipment horizontal on a flat and stable surface to be endurable for the total weight, and to keep the equipment from sliding. - Page 49 Symptom Presumable Cause Action Starter motor does not Battery Isolator is OFF Turn Battery Isolator to ON drive or speed is low. Battery output is weak Check / battery liquid/ or Battery is deteriorated Charge Battery terminal is OFF or loose Change battery Battery terminal is corroded Fix / Tighten terminal...
- Page 50 Black smoke comes out from 1. Air filter element is clogged 1. Check / Change air filter Muffler 2. Fuel injection nozzle is element defective 2. Ask our distributor to repair 3. Improper fuel is used 3. Change to clean fuel White smoke comes out from 1.
-
Page 51: Generator Circuit Diagram
13 Generator Circuit Diagram... -
Page 52: Engine Circuit Diagram
14 Engine Circuit Diagram... - Page 56 ©2021...
Need help?
Do you have a question about the DGA37CM and is the answer not in the manual?
Questions and answers